Ansible in Action
- Introduction
- How Does Ansible Work?
- Prerequisites
- Step 1 — Installing Ansible
- Step 2 — Setting Up the Inventory File
- Step 3 — Testing Connection
- Step 4 — Running Ad-Hoc Commands (Optional)
- Conclusion
- Tips
- Refer
Introduction
Configuration management systems are designed to streamline the process of controlling large numbers of servers, for administrators and operations teams. They allow you to control many different systems in an automated way from one central location.
While there are many popular configuration management tools available for Linux systems, such as Chef and Puppet, these are often more complex than many people want or need. Ansible is a great alternative to these options because it offers a simple architecture that doesn’t require special software to be installed on nodes, using SSH to execute the automation tasks and YAML files to define provisioning details.
In this guide, we will discuss how to install Ansible on an Ubuntu 18.04 server and go over some basics of how to use this software.
How Does Ansible Work?
Ansible works by configuring client machines, referred to as managed nodes, from a computer that has the Ansible components installed and configured, which is then called the Ansible control node.
It communicates over normal SSH channels to retrieve information from remote systems, issue commands, and copy files. Because of this, an Ansible system does not require any additional software to be installed on the client computers.
This is one way that Ansible simplifies the administration of servers. Any server that has an SSH port exposed can be brought under Ansible’s configuration umbrella, regardless of what stage it is at in its life cycle. This means that any computer that you can administer through SSH, you can also administer through Ansible.
Ansible takes on a modular approach, enabling you to extend the functionalities of the main system to deal with specific scenarios. Modules can be written in any language and communicate in standard JSON.
Configuration files are mainly written in the YAML data serialization format due to its expressive nature and its similarity to popular markup languages. Ansible can interact with hosts either through command line tools or its configuration scripts, which are known as Playbooks.
Prerequisites
To follow this tutorial, you will need:
-
One Ansible Control Node: The Ansible control node is the machine we will use to connect to and control the Ansible hosts over SSH. Your Ansible control node can either be your local machine or a server dedicated to running Ansible, though this guide assumes your control node is an Ubuntu 18.04 system. Make sure the control node has:
- A non-root user with sudo privileges. To set this up, you can follow Steps 2 and 3 of our Initial Server Setup Guide for Ubuntu 18.04. However, please note that if you’re using a remote server as your Ansible Control node, you should follow every step of this guide. Doing so will configure a firewall on the server with
ufwand enable external access to your non-root user profile, both of which will help keep the remote server secure. - An SSH keypair associated with this user. To set this up, you can follow Step 1 of our guide on How to Set Up SSH Keys on Ubuntu 18.04.
- A non-root user with sudo privileges. To set this up, you can follow Steps 2 and 3 of our Initial Server Setup Guide for Ubuntu 18.04. However, please note that if you’re using a remote server as your Ansible Control node, you should follow every step of this guide. Doing so will configure a firewall on the server with
-
One or more Ansible Hosts: An Ansible host is any machine that your Ansible control node is configured to automate. This guide assumes your Ansible hosts are remote Ubuntu 18.04 servers. Make sure each Ansible host has:
- The Ansible control node’s SSH public key added to the authorized_keys of a system user. This user can be either root or a regular user with sudo privileges. To set this up, you can follow Step 2 of How to Set Up SSH Keys on Ubuntu 18.04.
Step 1 — Installing Ansible
Ubuntu
To begin using Ansible as a means of managing your server infrastructure, you need to install the Ansible software on the machine that will serve as the Ansible control node.
From your control node, run the following command to include the official project’s PPA (personal package archive) in your system’s list of sources:
sudo apt-add-repository ppa:ansible/ansible
Press ENTER when prompted to accept the PPA addition.
Next, refresh your system’s package index so that it is aware of the packages available in the newly included PPA:
sudo apt update
Following this update, you can install the Ansible software with:
sudo apt install ansible
Your Ansible control node now has all of the software required to administer your hosts. Next, we will go over how to add your hosts to the control node’s inventory file so that it can control them.
CentOS
CentOS utilizes the YUM package manager as well, and you can install Ansible directly from the EPEL repository:
sudo yum update -y
sudo yum install epel-release
sudo yum install ansible

# Validate Ansible:
ansible ---version
$ which ansible
/usr/bin/ansible

$ ansible --version
ansible [core 2.16.3]
  config file = /etc/ansible/ansible.cfg
  configured module search path = ['/root/.ansible/plugins/modules', '/usr/share/ansible/plugins/modules']
  ansible python module location = /usr/lib/python3.12/site-packages/ansible
  ansible collection location = /root/.ansible/collections:/usr/share/ansible/collections
  executable location = /usr/bin/ansible
  python version = 3.12.8 (main, Dec 16 2024, 17:09:32) [GCC 8.5.0 20210514 (Tencent 8.5.0-23)] (/usr/bin/python3.12)
  jinja version = 3.1.2
  libyaml = True
Step 2 — Setting Up the Inventory File
The inventory file contains information about the hosts you’ll manage with Ansible. You can include anywhere from one to several hundred servers in your inventory file, and hosts can be organized into groups and subgroups. The inventory file is also often used to set variables that will be valid only for specific hosts or groups, in order to be used within playbooks and templates. Some variables can also affect the way a playbook is run, like the ansible_python_interpreter variable that we’ll see in a moment.
To edit the contents of your default Ansible inventory, open the /etc/ansible/hosts file using your text editor of choice, on your Ansible Control Node:
sudo nano /etc/ansible/hosts
Note: some Ansible installations won’t create a default inventory file. If the file doesn’t exist in your system, you can create a new file at
/etc/ansible/hostsor provide a custom inventory path using the-iparameter when running commands and playbooks.
$ cat /etc/ansible/hosts
# This is the default ansible 'hosts' file.
#
# It should live in /etc/ansible/hosts
#
#   - Comments begin with the '#' character
#   - Blank lines are ignored
#   - Groups of hosts are delimited by [header] elements
#   - You can enter hostnames or ip addresses
#   - A hostname/ip can be a member of multiple groups

# Ex 1: Ungrouped hosts, specify before any group headers:

## green.example.com
## blue.example.com
## 192.168.100.1
## 192.168.100.10

# Ex 2: A collection of hosts belonging to the 'webservers' group:

## [webservers]
## alpha.example.org
## beta.example.org
## 192.168.1.100
## 192.168.1.110

# If you have multiple hosts following a pattern, you can specify
# them like this:

## www[001:006].example.com

# You can also use ranges for multiple hosts:

## db-[99:101]-node.example.com

# Ex 3: A collection of database servers in the 'dbservers' group:

## [dbservers]
##
## db01.intranet.mydomain.net
## db02.intranet.mydomain.net
## 10.25.1.56
## 10.25.1.57


# Ex4: Multiple hosts arranged into groups such as 'Debian' and 'openSUSE':

## [Debian]
## alpha.example.org
## beta.example.org

## [openSUSE]
## green.example.com
## blue.example.com
The default inventory file provided by the Ansible installation contains a number of examples that you can use as references for setting up your inventory. The following example defines a group named [servers] with three different servers in it, each identified by a custom alias: server1, server2, and server3. Be sure to replace the highlighted IPs with the IP addresses of your Ansible hosts.
# /etc/ansible/hosts
[servers]
server1 ansible_host=203.0.113.111
server2 ansible_host=203.0.113.112
server3 ansible_host=203.0.113.113

[all:vars]
ansible_python_interpreter=/usr/bin/python3
The all:vars subgroup sets the ansible_python_interpreter host parameter that will be valid for all hosts included in this inventory. This parameter makes sure the remote server uses the /usr/bin/python3 Python 3 executable instead of /usr/bin/python (Python 2.7), which is not present on recent Ubuntu versions.
When you’re finished, save and close the file by pressing CTRL+X then Y and ENTER to confirm your changes.
Whenever you want to check your inventory, you can run:
ansible-inventory --list -y
You’ll see output similar to this, but containing your own server infrastructure as defined in your inventory file:
all:
  children:
    servers:
      hosts:
        server1:
          ansible_host: 203.0.113.111
          ansible_python_interpreter: /usr/bin/python3
        server2:
          ansible_host: 203.0.113.112
          ansible_python_interpreter: /usr/bin/python3
        server3:
          ansible_host: 203.0.113.113
          ansible_python_interpreter: /usr/bin/python3
    ungrouped: {}
Now that you’ve configured your inventory file, you have everything you need to test the connection to your Ansible hosts.
Step 3 — Testing Connection
After setting up the inventory file to include your servers, it’s time to check if Ansible is able to connect to these servers and run commands via SSH.
For this guide, we will be using the Ubuntu root account because that’s typically the only account available by default on newly created servers. If your Ansible hosts already have a regular sudo user created, you are encouraged to use that account instead.
You can use the -u argument to specify the remote system user. When not provided, Ansible will try to connect as your current system user on the control node.
From your local machine or Ansible control node, run:
ansible all -m ping -u root
This command will use Ansible’s built-in ping module to run a connectivity test on all nodes from your default inventory, connecting as root. The ping module will test:
- if hosts are accessible;
- if you have valid SSH credentials;
- if hosts are able to run Ansible modules using Python.
You should get output similar to this:
server1 | SUCCESS => {
    "changed": false,
    "ping": "pong"
}
server2 | SUCCESS => {
    "changed": false,
    "ping": "pong"
}
server3 | SUCCESS => {
    "changed": false,
    "ping": "pong"
}
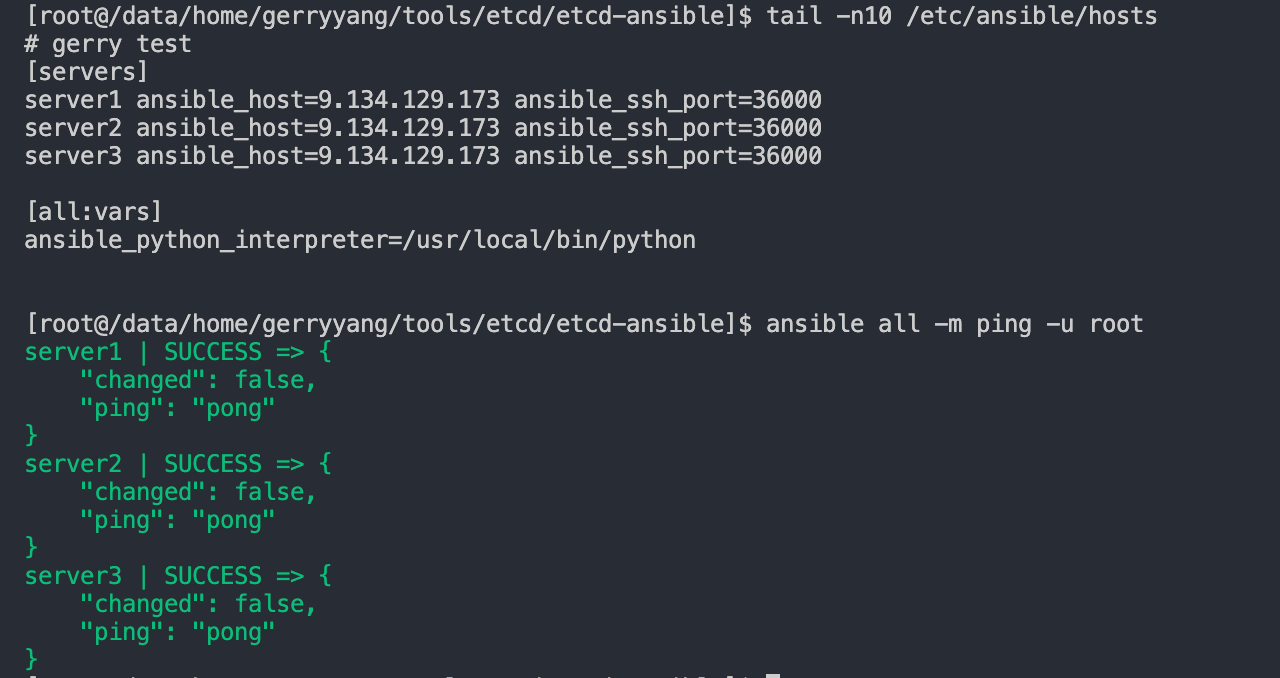
要指定一个不同的SSH端口,可以使用
-e选项来设置 ansible_ssh_port 变量。或者在 inventory 文件中设置 ansible_ssh_port 变量。
例如:
server1 ansible_host=9.134.129.173 ansible_ssh_port=36000 ansible_user=root
server2 ansible_host=9.134.129.173 ansible_ssh_port=36000 ansible_user=root
server3 ansible_host=9.134.129.173 ansible_ssh_port=36000 ansible_user=root

[all:vars]
ansible_python_interpreter=/usr/local/bin/python
If this is the first time you’re connecting to these servers via SSH, you’ll be asked to confirm the authenticity of the hosts you’re connecting to via Ansible. When prompted, type yes and then hit ENTER to confirm.
Once you get a “pong” reply back from a host, it means you’re ready to run Ansible commands and playbooks on that server.
Note: If you are unable to get a successful response back from your servers, check our Ansible Cheat Sheet Guide for more information on how to run Ansible commands with different connection options.
Step 4 — Running Ad-Hoc Commands (Optional)
After confirming that your Ansible control node is able to communicate with your hosts, you can start running ad-hoc commands and playbooks on your servers.
Any command that you would normally execute on a remote server over SSH can be run with Ansible on the servers specified in your inventory file. As an example, you can check disk usage on all servers with:
ansible all -a "df -h" -u root
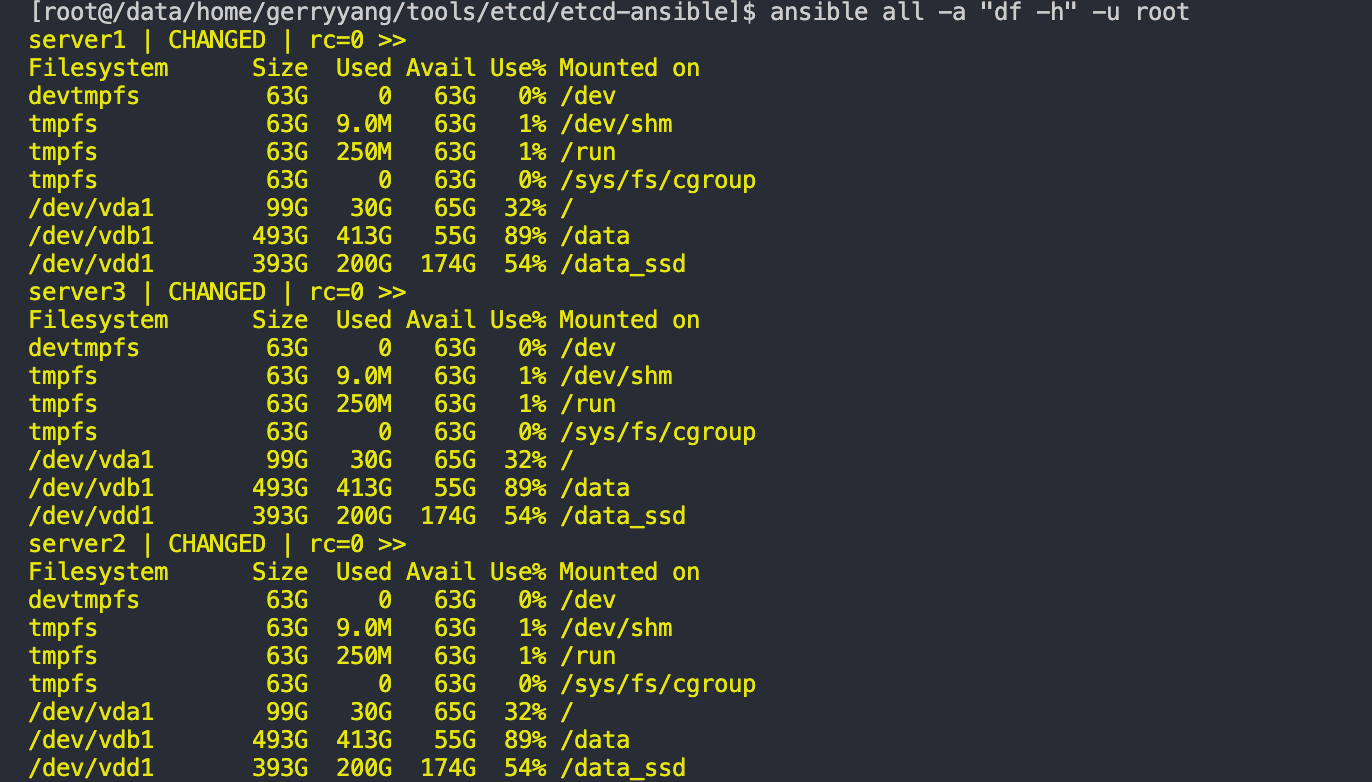
The highlighted command df -h can be replaced by any command you’d like.
You can also execute Ansible modules via ad-hoc commands, similarly to what we’ve done before with the ping module for testing connection. For example, here’s how we can use the apt module to install the latest version of vim on all the servers in your inventory:
ansible all -m apt -a "name=vim state=latest" -u root
You can also target individual hosts, as well as groups and subgroups, when running Ansible commands. For instance, this is how you would check the uptime of every host in the servers group:
ansible servers -a "uptime" -u root
We can specify multiple hosts by separating them with colons:
ansible server1:server2 -m ping -u root
For more information on how to use Ansible, including how to execute playbooks to automate server setup, you can check our Ansible Reference Guide.
Conclusion
In this guide, you’ve installed Ansible and set up an inventory file to execute ad-hoc commands from an Ansible Control Node.
Once you’ve confirmed you’re able to connect and control your infrastructure from a central Ansible controller machine, you can execute any command or playbook you desire on those hosts. For fresh servers, the Initial Server Setup community playbook is a good starting point. You can also learn how to write your own playbooks with our guide Configuration Management 101: Writing Ansible Playbooks.
For more information on how to use Ansible, check out our Ansible Cheat Sheet Guide.
Tips
Interpreter Discovery
Most Ansible modules that execute under a POSIX environment require a Python interpreter on the target host. Unless configured otherwise, Ansible will attempt to discover a suitable Python interpreter on each target host the first time a Python module is executed for that host.
To control the discovery behavior:
- for individual hosts and groups, use the
ansible_python_interpreterinventory variable - globally, use the
interpreter_pythonkey in the[defaults]section ofansible.cfg
You can still set ansible_python_interpreter to a specific path at any variable level (for example, in host_vars, in vars files, in playbooks, and so on). Setting a specific path completely disables automatic interpreter discovery; Ansible always uses the path specified.
[root /etc/ansible 15:02:12]$ ls
ansible.cfg  hosts  roles
setup 模块用于收集远程主机的信息
例如,想查看主机的操作系统信息,filter=ansible_os_family 表示只显示 ansible_os_family 这个字段的信息。
$ ansible server1 -m setup -a 'filter=ansible_os_family' -i hosts
输出:
server1 | SUCCESS => {
    "ansible_facts": {
        "ansible_os_family": "RedHat",
        "discovered_interpreter_python": "/usr/bin/python3.12"
    },
    "changed": false
}
也可以使用通配符来匹配多个字段。例如,想查看所有以 ansible_eth 开头的网络接口信息,filter=ansible_eth* 表示显示所有以 ansible_eth 开头的字段的信息。
$ ansible server2 -m setup -a 'filter=ansible_eth*' -i hosts
输出:
server2 | SUCCESS => {
    "ansible_facts": {
        "ansible_eth0": {
            "active": true,
            "device": "eth0",
            "features": {
                "fcoe_mtu": "off [fixed]",
                "generic_receive_offload": "on",
                "generic_segmentation_offload": "on",
                "highdma": "on",
                "large_receive_offload": "off [fixed]",
                "loopback": "off [fixed]",
                "netns_local": "off [fixed]",
                "ntuple_filters": "off [fixed]",
                "receive_hashing": "off [fixed]",
                "rx_all": "off [fixed]",
                "rx_checksumming": "on",
                "rx_fcs": "off [fixed]",
                "rx_vlan_filter": "off [fixed]",
                "rx_vlan_offload": "on",
                "rx_vlan_stag_filter": "off [fixed]",
                "rx_vlan_stag_hw_parse": "on",
                "scatter_gather": "on",
                "tcp_segmentation_offload": "on",
                "tx_checksum_fcoe_crc": "off [fixed]",
                "tx_checksum_ip_generic": "on",
                "tx_checksum_ipv4": "off [fixed]",
                "tx_checksum_ipv6": "off [fixed]",
                "tx_checksum_sctp": "off [fixed]",
                "tx_checksumming": "on",
                "tx_fcoe_segmentation": "off [fixed]",
                "tx_gre_segmentation": "off [fixed]",
                "tx_gso_robust": "off [fixed]",
                "tx_lockless": "on [fixed]",
                "tx_nocache_copy": "on",
                "tx_scatter_gather": "on",
                "tx_scatter_gather_fraglist": "on",
                "tx_tcp6_segmentation": "on",
                "tx_tcp_ecn_segmentation": "on",
                "tx_tcp_segmentation": "on",
                "tx_udp_tnl_segmentation": "off [fixed]",
                "tx_vlan_offload": "on",
                "tx_vlan_stag_hw_insert": "on",
                "udp_fragmentation_offload": "off [fixed]",
                "vlan_challenged": "off [fixed]"
            },
            "hw_timestamp_filters": [],
            "ipv4": {
                "address": "9.135.18.186",
                "broadcast": "9.135.18.186",
                "netmask": "255.255.255.255",
                "network": "9.135.18.186",
                "prefix": "32"
            },
            "macaddress": "92:79:2c:6e:36:6b",
            "mtu": 1500,
            "promisc": false,
            "speed": 10000,
            "timestamping": [
                "rx_software",
                "software"
            ],
            "type": "ether"
        },
        "discovered_interpreter_python": "/usr/bin/python"
    },
    "changed": false
}
Refer
- How to Install and Configure Ansible on Ubuntu 18.04
- How to Use Ansible: A Reference Guide
- How to Install Ansible on Ubuntu, RHEL, macOS & CentOS
- Installing Ansible
- How to Set Up SSH Keys on Ubuntu 18.04
- How To Set Up and Secure an etcd Cluster with Ansible on Ubuntu 18.04
- Configuration Management 101: Writing Ansible Playbooks
- Ansible’s official Intro to Playbooks