Git in Action
- Git的设计思想
- Git的安装和配置
- 特殊文件
- Git的协作模式
- Git的常用命令
- 查看和设置Git配置
- 创建代码仓库
- 远程仓库操作 - git clone
- 远程仓库操作 - git remote
- 远程仓库操作 - git checkout
- 远程仓库操作 - git fetch
- 远程仓库操作 - git pull
- 远程仓库操作 - git push
- 添加变更文件 - git add
- 提交变更信息 - git commit
- 查看某次提交信息 - git show
- 查看文件最后一次修改信息 - git blame
- 查看历史提交信息 - git log
- 对比差异 - git diff
- 分支操作 - git branch
- 变基操作 - git rebase
- 暂存操作 - git stash
- 子模块 - git submodule
- 取消某次提交 git revert
- 将指定的提交应用于其他分支 git cherry-pick
- 稀疏检出 git sparse-checkout
- 导出补丁 git format-patch
- 应用补丁 git am
- 应用补丁 git apply
- 大文件管理 git lfs
- git bisect
- git ls-tree
- git reflog
- git rev-list (列出 commitid 记录)
- git gc
- git filter-branch
- git rev-parse
- git tag
- git describe
- Git hooks
- Git LFS的原理
- Git与GitHub
- 免密提交
- GitHub 常用缩写
- Issue 规范
- Commit 规范
- Merge Request流程
- Tips
- Git相关工具
- Q&A
- Manual
- Refer
Linux的创始人Linus Torvalds在2005年开发了Git的原型程序,主要用于对Linux内核开发的版本管理。作为开发者日常离不开对代码的管理,Git采用了分布式版本库的方式,使得开发者更加自由,随时随地在本地可以管理自己的代码,而不像集中式的版本控制工具(VCSs),例如CVS,Subversion,代码管理需要依赖网络。使用Git让源代码的管理,以及团队间的协作更为高效,这也是为什么越来越多的科技公司都使用Git进行代码管理。
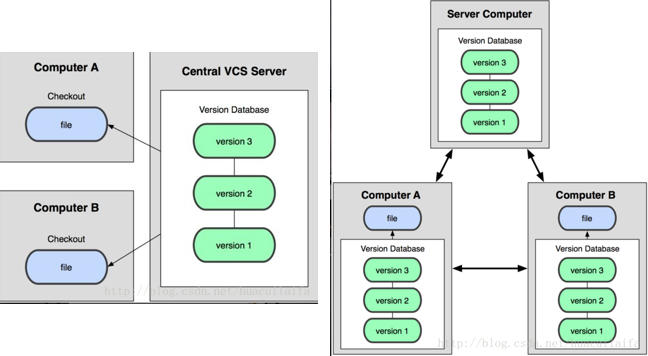
版本控制演变:
- CVS:始祖,集中式(每次提交都需要联网,效率低),1985
- SVN:集大成者,集中式(每次提交都需要联网,效率低),2000
- Git:Linux之父Linus开发的,geek主流,分布式(不需要联网,可以在本地提交),2005
- GitHub:geek社区,托管网站,2008
Git的操作流程:
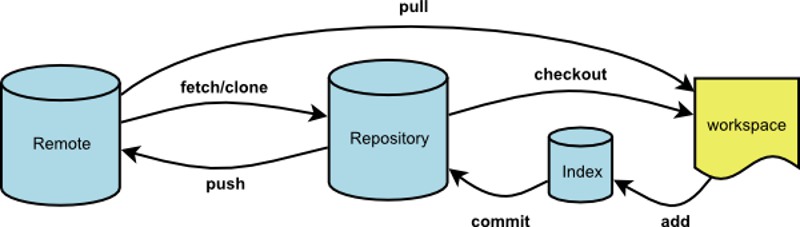
工作目录 ------------> 暂存区 ------------> 版本历史
        git add files        git commit
Git的设计思想
如果要学习Git,请先忘记之前你知道的关于其他VCSs的用法(例如,SVN),这样可以帮助你更好地理解和使用Git,因为Git的设计理念和其他的VCSs完全不同,下图非常形象地解释了二者的不同。
关于Git的一些基本概念:
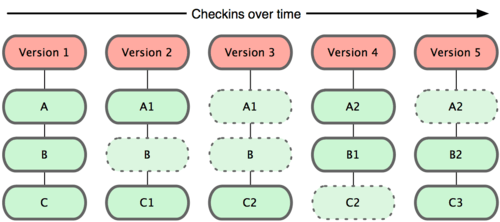
Snapshots, Not Differences
Git通过快照的方式来记录每次变更,如果文件没有变更,新的分支不会重复复制此文件,而是通过索引的方式访问历史的快照文件。
- Other systems tend to store data as changes to a base version of each file.
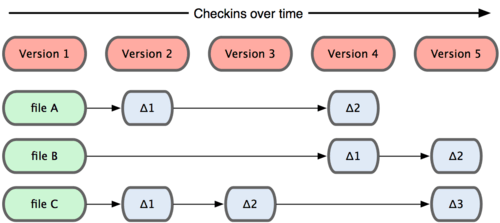
- Git stores data as snapshots of the project over time.
Nearly Every Operation Is Local
使用Git的时候,如果要浏览历史版本,是不需要进行网络交互的,因为历史版本的信息都保存在本地,因此可以在任何时间任何地点(即离线状态)进行工作,到可以使用网络的时候,再对之前的所有工作提交到远端版本仓库(git push origin master)。而对比其他VCSs,在离线的状态下这些工作都是不可能完成的。
Git Has Integrity
Git对所有存储的文件通过SHA-1计算散列值来索引文件,以保证文件的完整性。类似区块链的Merkel Tree链式结构,来防止数据丢失。Git的很多命令需要依赖这个hash值(只指定前4位即可)进行操作,比如,git reset --hard $hashid
Everything in Git is check-summed before it is stored and is then referred to by that checksum. This means it’s impossible to change the contents of any file or directory without Git knowing about it. This functionality is built into Git at the lowest levels and is integral to its philosophy. You can’t lose information in transit or get file corruption without Git being able to detect it.
The mechanism that Git uses for this checksumming is called a SHA-1 hash. This is a 40-character string composed of hexadecimal characters (0–9 and a–f) and calculated based on the contents of a file or directory structure in Git. A SHA-1 hash looks something like this:
24b9da6552252987aa493b52f8696cd6d3b00373
You will see these hash values all over the place in Git because it uses them so much. In fact, Git stores everything not by file name but in the Git database addressable by the hash value of its contents.
Git Generally Only Adds Data
在操作Git时只有添加文件的概念,而没有删除的概念。类似区块链,只要数据上链就没有办法删除,从而达到防抵赖的特性。
When you do actions in Git, nearly all of them only add data to the Git database. It is very difficult to get the system to do anything that is not undoable or to make it erase data in any way. As in any VCS, you can lose or mess up changes you haven’t committed yet; but after you commit a snapshot into Git, it is very difficult to lose, especially if you regularly push your database to another repository.
This makes using Git a joy because we know we can experiment without the danger of severely screwing things up. For a more in-depth look at how Git stores its data and how you can recover data that seems lost, see Chapter 9.
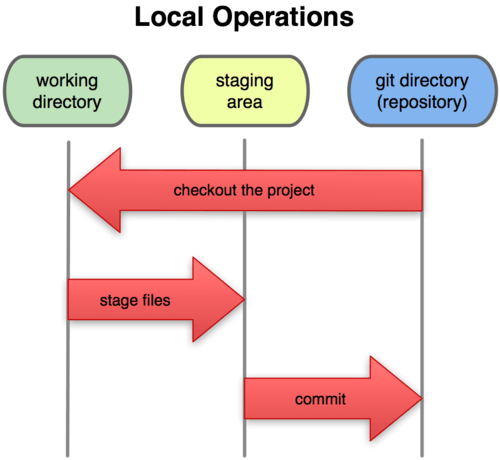
The Three States
请记住Git中的三种状态,通过命令行操作时,在命令行的提示信息中也可以看到当前执行到了哪个状态。
- committed (已提交到
本地数据库) - modified (已修改但未提交)
- staged (对修改进行了标记以待提交)
Now, pay attention. This is the main thing to remember about Git if you want the rest of your learning process to go smoothly. Git has three main states that your files can reside in: committed, modified, and staged.
Committed means that the data is safely stored in your local database.
Modified means that you have changed the file but have not committed it to your database yet.
Staged means that you have marked a modified file in its current version to go into your next commit snapshot.
This leads us to the three main sections of a Git project: the Git directory, the working directory, and the staging area.
The Git directory is where Git stores the metadata and object database for your project. This is the most important part of Git, and it is what is copied when you clone a repository from another computer.
The working directory is a single checkout of one version of the project. These files are pulled out of the compressed database in the Git directory and placed on disk for you to use or modify.
The staging area is a simple file, generally contained in your Git directory, that stores information about what will go into your next commit. It’s sometimes referred to as the index, but it’s becoming standard to refer to it as the staging area.
The basic Git workflow goes something like this:
- You modify files in your working directory.
- You stage the files, adding snapshots of them to your staging area.
- You do a commit, which takes the files as they are in the staging area and stores that snapshot permanently to your Git directory.
If a particular version of a file is in the git directory, it’s considered committed. If it’s modified but has been added to the staging area, it is staged. And if it was changed since it was checked out but has not been staged, it is modified. In Chapter 2, you’ll learn more about these states and how you can either take advantage of them or skip the staged part entirely.
Git的安装和配置
下载安装
Git下载地址,Git有两种使用方式,一种是命令行,一种是集成了git命令的GUI客户端。本文主要使用命令行的方式。
升级版本
使用源码编译安装:
安装依赖:
sudo yum -y install epel-release
sudo yum -y groupinstall "Development Tools"
sudo yum -y install wget perl-CPAN gettext-devel perl-devel  openssl-devel  zlib-devel curl-devel expat-devel  getopt asciidoc xmlto docbook2X
sudo ln -s /usr/bin/db2x_docbook2texi /usr/bin/docbook2x-texi
下载git源码,并编译:
sudo yum -y install wget
export VER="2.32.0"
wget https://github.com/git/git/archive/v${VER}.tar.gz
tar -xvf v${VER}.tar.gz
rm -f v${VER}.tar.gz
cd git-*
make configure
sudo ./configure --prefix=/usr
sudo make
sudo make install
Install Latest Git ( Git 2.x ) on CentOS 7
基础配置
安装后,对Git进行配置,通过命令行的方式。首先需要配置用户名和邮箱,如果没有配置在执行Git命令时会提示如下错误:
*** Please tell me who you are.

Run

  git config --global user.email "you@example.com"
  git config --global user.name "Your Name"

to set your account's default identity.
Omit --global to set the identity only in this repository.
# Sets the some repo name for git to use when you commit
git config --local user.name "your_name"

# Sets the some repo email for git to use when you commit
git config --local user.email "your_email@example.com"

# Sets the default name for git to use when you commit
git config --global user.name "your_name"

# Sets the default email for git to use when you commit
git config --global user.email "your_email@example.com"
注意上面的设置是对全局生效的,若想对某个repo使用不同的username或email可以通过下面方法进行设置:
# Changes the working directory to the repository you need to switch info for
cd my_other_repo

# Sets the user's name for this specific repository
git config --local user.name "Different Name"

# Sets the user's email for this specific repository
git config --local user.email "differentemail@email.com"
查看配置:
git config --list [--local | --global | --system]
区别:
- local:只对某一个仓库生效
- global:对当前用户的所有仓库生效 (常用)
- system:对本系统的所有用户生效 (少用)
更多:Customizing-Git-Git-Configuration
创建Git仓库
两种场景:
- 把已有的项目代码纳入Git管理
$ cd your_project
$ git init
- 新建的项目直接使用Git管理
$ cd 某个文件夹
$ git init your_project   # 会在当前路径下创建your_project目录
$ cd your_project
特殊文件
.gitkeep
What is .gitkeep? How to Track and Push Empty Folders in Git
git can’t push empty directories. It can only track files.
If you try to push a folder with nothing in it, although it will exist on your local machine, nothing will go into your branch. So if someone tries to clone your code, they won’t have the same folder structure as you do on your local machine. So if it doesn’t work, what do you need to do?
Now we know that Git only tracks files, so we know we need to add something to the folder. You can add anything. You just need to add a really simple dummy file to make sure that the folder is tracked, and will be pushed. You could copy and paste a text file file.txt with nothing in it, and that would work. You could put a PNG image of a cat.
A common, standardised practice to solve this exact issue, however, is to push a file called .gitkeep into your empty folders.
This isn’t a feature of Git! So you could name it anything. There’s nothing special about the name .gitkeep – some developers add .gitignore instead, for example. .gitignore is a little confusing, though, as you are trying to make git not ignore your file, and actually push it into your branch. Either way, by adding this simple file to your folders, they’ll get pushed when the time comes.
.gitkeep is a common thing you will see in codebases, where an empty folder needs to be tracked via Git. The name of the dummy file may not always be .gitkeep but you’ll see the actual practice over and over again as a developer.
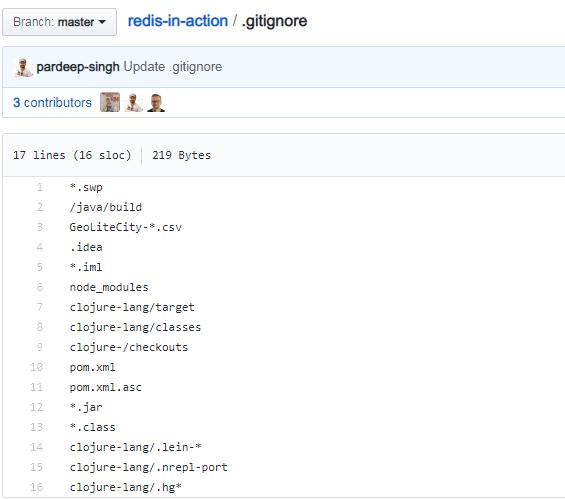
.gitignore
A gitignore file specifies intentionally untracked files that Git should ignore. Files already tracked by Git are not affected.
在实际的项目中,比如,临时文件,编译过程文件(例如C/C++编译过程中的.o文件)等,是不需要进行代码管理的(即不用提交)。可以在仓库的根目录下创建一个名为.gitignore的文件,并配置当前项目需要忽略的文件列表。
*.[oa]
*~
- 忽略所有以
.o或.a结尾的文件 - 忽略所有以波浪符结尾的文件
如果忘记添加.gitignore文件,不小心将一些不需要的日志文件添加到了暂存区(staging area),可以这么撤销:
git rm --cached *.log
此命令会把暂存区域的文件移除,同时文件仍然保留在磁盘。
Note The purpose of gitignore files is to ensure that certain files not tracked by Git remain untracked.
To stop tracking a file that is currently tracked, use git rm –cached.
# remove specific file from git cache
git rm --cached filename

# remove all files from git cache
git rm -r --cached .
git add .
git commit -m ".gitignore is now working"
如果要忽略某个文件,但是又需要此文件在 git 工程中存在,可以:
# 先从工程中删除
git rm --cached filename
git commit -m "chore: rm filename"
git push origin master

# 修改 .gitignore 添加 filename

# 再生成 filename 文件并强制添加提交
git add -f filename
git commit -m "chore: add filename"
git push origin master
- https://git-scm.com/docs/gitignore
- Why is .gitignore not ignoring my files?
其他示例:
Make .gitignore ignore everything except a few files
An optional prefix
!which negates the pattern; any matching file excluded by a previous pattern will become included again. If a negated pattern matches, this will override lower precedence patterns sources.
# Ignore everything
*

# But not these files...
!.gitignore
!script.pl
!template.latex
# etc...

# ...even if they are in subdirectories
!*/

# if the files to be tracked are in subdirectories
!*/a/b/file1.txt
!*/a/b/c/*
Git的协作模式
使用Git的最大好处,是提高团队的协作效率,以下是两种常见的方式。
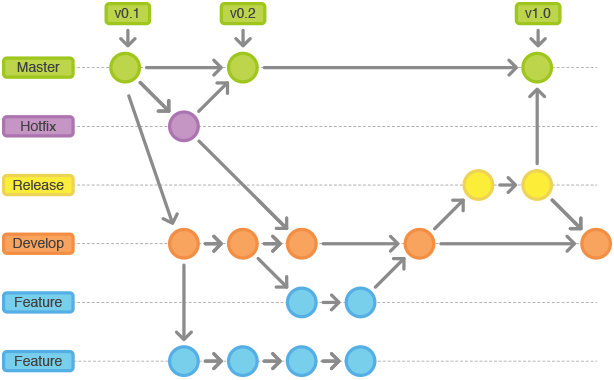
Gitflow工作流
主要是适合复杂的大型项目。
- Master分支:用于存放线上版本代码,可以方便的给代码打版本号。
- Develop分支:用于整合 Feature 分支。
- Hotfix分支:紧急修复的分支,一旦修复了可以合并到 Master 分支和 Develop 分支。
- Feature分支:某个功能的分支,从 Develop 分支切出,并且功能完成时又合并回 Develop 分支,不直接和Master 分支交互。
- Release分支:通常对应一个迭代。将一个版本的功能全部合并到 Develop 分支之后,从 Develop 切出一个Release 分支。这个分支不再追加新需求,可以完成 bug 修复、完善文档等工作。务必记住,代码发布后,需要将其合并到 Master 分支,同时也要合并到 Develop 分支。
功能分支模式
主要适合日常不太复杂的项目开发,此模式下有三种类型的分支:
master分支,只能有一个,相当于svn中的trunk,只允许merge requests,不允许直接push。可以通过分支保护设置。feature分支,可以有多个,用来做新功能开发,可以随意commit和pushbugfix分支,可以有多个,用来做bugfix,可以随意commit和push
新功能开发流程
- 从远端master拉取最新的代码到本地
- 创建一个新的分支,可以在新的分支中随时commit和push
- 新分支功能开发完成后
- 先把主干merge到分支,解决可能的冲突,再发起merge requests到master
- 先把分支rebase到master,解决可能存在的冲突,再发起merge requests到master
- 项目的maintainer接收到merge requests,负责code review,没有问题后再accept并merge到master
PS:使用rebase,提交记录线性的,会比较清晰。
bugfix流程
与新功能开发流程基本一致,注意建立分支时请以bugfix_开头
撤销流程
在未进行git push前的所有操作,都是在本地仓库中执行的。将本地仓库的代码还原操作叫做撤销。
- 生成了新的local untracked files
git clean -fd - 还原为上一次提交的状态
git restore <file> - 文件被修改了,但未执行git add操作(working tree内撤销)
git checkout <fileName> git checkout . - 撤销
typechange状态的文件 refer: Git reset files with typechange status
git status --porcelain | awk '{if ($1=="T") print $2}' | xargs git checkout
- 同时对多个文件执行了
git add操作,但本次只想提交其中一部分文件(这种情况是把一个文件修改了add到暂存区了但又想重新放回工作区)git add * git status # 取消暂存 git reset HEAD <fileName> git reset HEAD - 文件执行了
git add操作,但想撤销对其的修改(index内回滚)# 1. 取消暂存 git reset HEAD <fileName> # 2. 撤销修改 git checkout <fileName> - 修改的文件已被
git commit,但想再次修改不再产生新的commit# 修改最后一次提交 git add sample.txt git commit --amend -m"说明" - 版本已经commit,但是需要回退,会将提交记录和代码全部回滚
git reset --hard <commit-id> - 将
HEAD理解为当前分支的别名,HEAD表示当前版本,上一个版本就HEAD^,上上一个版本就是HEAD^^,当然往上100个版本写100个^比较容易数不过来,所以写成HEAD~100git reset --hard HEAD^
问题:如果使用
git reset --hard <commit-id>回退到某个版本,之后想撤回,使用git log已经找不到之前的提交记录,怎么办? 解决方法:Git提供了一个git reflog命令用来记录你的每一次命令,可以找到之前的commit-id,然后再执行git reset --hard <commit-id>。
总结:
- 场景1:当你改乱了工作区某个文件的内容,想直接丢弃工作区的修改时,用命令
git checkout -- file - 场景2:当你不但改乱了工作区某个文件的内容,还添加到了暂存区时,想丢弃修改,分两步,第一步用命令
git reset HEAD file,就回到了场景1,第二步按场景1操作。 - 场景3:已经提交了不合适的修改到版本库时,想要撤销本次提交,则按照版本回退的办法,不过前提是没有推送到远程库。
refer: Git撤销&回滚操作
回滚流程
已进行git push,即已推送到远程仓库中。将已被提交到远程仓库的代码还原操作叫做回滚。注意:对远程仓库做回滚操作是有风险的,需提前做好备份和通知其他团队成员。
若不小心把错误的代码merge到主干了怎么办?到项目根目录,执行如下操作:
git checkout master          # 切换到master
git pull                     # 拉取最新代码
git log -l 5                 # 查看想退回到版本号并copy下来,后面到数字可以自己设置。或者使用git reflog
git reset --hard `版本号`     # 强制将指针回退到指定版本
git push -f                  # 强制push到远端master
重写历史
全局修改邮箱地址
另一个常见的情形是在你开始工作时忘记运行 git config 来设置你的名字与邮箱地址, 或者你想要开源一个项目并且修改所有你的工作邮箱地址为你的个人邮箱地址。 任何情形下,你也可以通过 filter-branch 来一次性修改多个提交中的邮箱地址。 需要小心的是只修改你自己的邮箱地址,所以你使用 --commit-filter:
$ git filter-branch --commit-filter '
        if [ "$GIT_AUTHOR_EMAIL" = "schacon@localhost" ];
        then
                GIT_AUTHOR_NAME="Scott Chacon";
                GIT_AUTHOR_EMAIL="schacon@example.com";
                git commit-tree "$@";
        else
                git commit-tree "$@";
        fi' HEAD
这会遍历并重写每一个提交来包含你的新邮箱地址。 因为提交包含了它们父提交的 SHA-1 校验和,这个命令会修改你的历史中的每一个提交的 SHA-1 校验和, 而不仅仅只是那些匹配邮箱地址的提交。
Working with Remotes
To be able to collaborate on any Git project, you need to know how to manage your remote repositories. Remote repositories are versions of your project that are hosted on the Internet or network somewhere. You can have several of them, each of which generally is either read-only or read/write for you. Collaborating with others involves managing these remote repositories and pushing and pulling data to and from them when you need to share work. Managing remote repositories includes knowing how to add remote repositories, remove remotes that are no longer valid, manage various remote branches and define them as being tracked or not, and more.
Showing Your Remotes
To see which remote servers you have configured, you can run the git remote command. It lists the shortnames of each remote handle you’ve specified. If you’ve cloned your repository, you should at least see origin — that is the default name Git gives to the server you cloned from:
$ git clone https://github.com/schacon/ticgit
Cloning into 'ticgit'...
remote: Reusing existing pack: 1857, done.
remote: Total 1857 (delta 0), reused 0 (delta 0)
Receiving objects: 100% (1857/1857), 374.35 KiB | 268.00 KiB/s, done.
Resolving deltas: 100% (772/772), done.
Checking connectivity... done.
$ cd ticgit
$ git remote
origin
You can also specify -v, which shows you the URLs that Git has stored for the shortname to be used when reading and writing to that remote:
$ git remote -v
origin	https://github.com/schacon/ticgit (fetch)
origin	https://github.com/schacon/ticgit (push)
If you have more than one remote, the command lists them all. For example, a repository with multiple remotes for working with several collaborators might look something like this.
$ cd grit
$ git remote -v
bakkdoor  https://github.com/bakkdoor/grit (fetch)
bakkdoor  https://github.com/bakkdoor/grit (push)
cho45     https://github.com/cho45/grit (fetch)
cho45     https://github.com/cho45/grit (push)
defunkt   https://github.com/defunkt/grit (fetch)
defunkt   https://github.com/defunkt/grit (push)
koke      git://github.com/koke/grit.git (fetch)
koke      git://github.com/koke/grit.git (push)
origin    git@github.com:mojombo/grit.git (fetch)
origin    git@github.com:mojombo/grit.git (push)
This means we can pull contributions from any of these users pretty easily. We may additionally have permission to push to one or more of these, though we can’t tell that here.
Adding Remote Repositories
We’ve mentioned and given some demonstrations of how the git clone command implicitly adds the origin remote for you. Here’s how to add a new remote explicitly. To add a new remote Git repository as a shortname you can reference easily, run git remote add <shortname> <url>:
$ git remote
origin
$ git remote add pb https://github.com/paulboone/ticgit
$ git remote -v
origin	https://github.com/schacon/ticgit (fetch)
origin	https://github.com/schacon/ticgit (push)
pb	https://github.com/paulboone/ticgit (fetch)
pb	https://github.com/paulboone/ticgit (push)
Now you can use the string pb on the command line instead of the whole URL. For example, if you want to fetch all the information that Paul has but that you don’t yet have in your repository, you can run git fetch pb:
$ git fetch pb
remote: Counting objects: 43, done.
remote: Compressing objects: 100% (36/36), done.
remote: Total 43 (delta 10), reused 31 (delta 5)
Unpacking objects: 100% (43/43), done.
From https://github.com/paulboone/ticgit
 * [new branch]      master     -> pb/master
 * [new branch]      ticgit     -> pb/ticgit
Paul’s master branch is now accessible locally as pb/master — you can merge it into one of your branches, or you can check out a local branch at that point if you want to inspect it. We’ll go over what branches are and how to use them in much more detail in Git Branching.
Fetching and Pulling from Your Remotes
As you just saw, to get data from your remote projects, you can run:
$ git fetch <remote>
The command goes out to that remote project and pulls down all the data from that remote project that you don’t have yet. After you do this, you should have references to all the branches from that remote, which you can merge in or inspect at any time.
If you clone a repository, the command automatically adds that remote repository under the name “origin”. So, git fetch origin fetches any new work that has been pushed to that server since you cloned (or last fetched from) it. It’s important to note that the git fetch command only downloads the data to your local repository — it doesn’t automatically merge it with any of your work or modify what you’re currently working on. You have to merge it manually into your work when you’re ready.
If your current branch is set up to track a remote branch (see the next section and Git Branching for more information), you can use the git pull command to automatically fetch and then merge that remote branch into your current branch. This may be an easier or more comfortable workflow for you; and by default, the git clone command automatically sets up your local master branch to track the remote master branch (or whatever the default branch is called) on the server you cloned from. Running git pull generally fetches data from the server you originally cloned from and automatically tries to merge it into the code you’re currently working on.
From Git version 2.27 onward, git pull will give a warning if the pull.rebase variable is not set. Git will keep warning you until you set the variable.
If you want the default behavior of Git (fast-forward if possible, else create a merge commit): git config –global pull.rebase “false”
If you want to rebase when pulling: git config –global pull.rebase “true”
Pushing to Your Remotes
When you have your project at a point that you want to share, you have to push it upstream. The command for this is simple: git push <remote> <branch>. If you want to push your master branch to your origin server (again, cloning generally sets up both of those names for you automatically), then you can run this to push any commits you’ve done back up to the server:
$ git push origin master
This command works only if you cloned from a server to which you have write access and if nobody has pushed in the meantime. If you and someone else clone at the same time and they push upstream and then you push upstream, your push will rightly be rejected. You’ll have to fetch their work first and incorporate it into yours before you’ll be allowed to push. See Git Branching for more detailed information on how to push to remote servers.
Inspecting a Remote
If you want to see more information about a particular remote, you can use the git remote show <remote> command. If you run this command with a particular shortname, such as origin, you get something like this:
$ git remote show origin
* remote origin
  Fetch URL: https://github.com/schacon/ticgit
  Push  URL: https://github.com/schacon/ticgit
  HEAD branch: master
  Remote branches:
    master                               tracked
    dev-branch                           tracked
  Local branch configured for 'git pull':
    master merges with remote master
  Local ref configured for 'git push':
    master pushes to master (up to date)
It lists the URL for the remote repository as well as the tracking branch information. The command helpfully tells you that if you’re on the master branch and you run git pull, it will automatically merge the remote’s master branch into the local one after it has been fetched. It also lists all the remote references it has pulled down.
That is a simple example you’re likely to encounter. When you’re using Git more heavily, however, you may see much more information from git remote show:
$ git remote show origin
* remote origin
  URL: https://github.com/my-org/complex-project
  Fetch URL: https://github.com/my-org/complex-project
  Push  URL: https://github.com/my-org/complex-project
  HEAD branch: master
  Remote branches:
    master                           tracked
    dev-branch                       tracked
    markdown-strip                   tracked
    issue-43                         new (next fetch will store in remotes/origin)
    issue-45                         new (next fetch will store in remotes/origin)
    refs/remotes/origin/issue-11     stale (use 'git remote prune' to remove)
  Local branches configured for 'git pull':
    dev-branch merges with remote dev-branch
    master     merges with remote master
  Local refs configured for 'git push':
    dev-branch                     pushes to dev-branch                     (up to date)
    markdown-strip                 pushes to markdown-strip                 (up to date)
    master                         pushes to master                         (up to date)
This command shows which branch is automatically pushed to when you run git push while on certain branches. It also shows you which remote branches on the server you don’t yet have, which remote branches you have that have been removed from the server, and multiple local branches that are able to merge automatically with their remote-tracking branch when you run git pull.
Renaming and Removing Remotes
You can run git remote rename to change a remote’s shortname. For instance, if you want to rename pb to paul, you can do so with git remote rename:
$ git remote rename pb paul
$ git remote
origin
paul
It’s worth mentioning that this changes all your remote-tracking branch names, too. What used to be referenced at pb/master is now at paul/master.
If you want to remove a remote for some reason — you’ve moved the server or are no longer using a particular mirror, or perhaps a contributor isn’t contributing anymore — you can either use git remote remove or git remote rm:
$ git remote remove paul
$ git remote
origin
Once you delete the reference to a remote this way, all remote-tracking branches and configuration settings associated with that remote are also deleted.
Git Branching - Branches in a Nutshell
Nearly every VCS has some form of branching support. Branching means you diverge from the main line of development and continue to do work without messing with that main line. In many VCS tools, this is a somewhat expensive process, often requiring you to create a new copy of your source code directory, which can take a long time for large projects.
Some people refer to Git’s branching model as its “killer feature,” and it certainly sets Git apart in the VCS community. Why is it so special? The way Git branches is incredibly lightweight, making branching operations nearly instantaneous, and switching back and forth between branches generally just as fast. Unlike many other VCSs, Git encourages workflows that branch and merge often, even multiple times in a day. Understanding and mastering this feature gives you a powerful and unique tool and can entirely change the way that you develop.
Git的常用命令
| 操作 | Git | Subversion |
|---|---|---|
| 复制数据库 | git clone | svn checkout |
| 提交 | git commit | svn commit |
| 查看提交的详细记录 | git show | svn cat |
| 确认状态 | git status | svn status |
| 确认差异 | git diff | svn diff |
| 确认记录 | git log / git reflog | svn log |
| 添加 | git add | svn add |
| 移动 | git mv | svn mv |
| 删除 | git rm | svn rm |
| 取消修改 | git checkout / git reset | svn revert |
| 创建分支 | git branch | svn copy |
| 切换分支 | git checkout | svn switch |
| 合并 | git merge | svn merge |
| 创建标签 | git tag | svn copy |
| 更新 | git pull / git fetch | svn update |
| 反映到远端 | git push | svn commit |
| 忽略档案目录 | .gitignore | .svnignore |
查看和设置Git配置
# 查看当前Git配置
git config --list

# 设置用户名和邮箱
git config --local user.name "your_name"
git config --local user.email "your_email@example.com"
创建代码仓库
# 初始化并生成.git子目录存放Git仓库的配置文件
git init

# 添加指定的文件到暂存区
git add README.md
# 把所有修改过文件都加入暂存区
git add .

# 先提交到本地
git commit -m "first commit"

# 或者将以上两步合并为一步

git commit -am "first commit"

# 添加remote仓库
git remote add origin git@github.com:gerryyang/your_repo.git

# 将本地修改的代码推送到remote仓库
git push -u origin master
远程仓库操作 - git clone
从远程主机克隆一个版本库,使用git clone命令。该命令会在本地主机生成一个目录,与远程主机的版本库同名。如果要指定不同的目录名,可以将目录名作为git clone命令的第二个参数。git clone支持多种协议,除了HTTP(s)以外,还支持SSH、Git、本地文件协议等。通常来说,Git协议下载速度最快,SSH协议用于需要用户认证的场合。各种协议优劣的详细讨论请参考官方文档。
# 克隆一个版本库
git clone <版本库的网址>

# 指定不同的目录名
git clone <版本库的网址> <本地目录名>

# 获取master分支
git clone https://github.com/gerryyang/mac-utils.git

# 获取指定分支
git clone -b $branch https://github.com/gerryyang/mac-utils.git

# 不同协议
git clone http[s]://example.com/path/to/repo.git/
git clone ssh://example.com/path/to/repo.git/    # ssh协议
git clone [user@]example.com:path/to/repo.git/   # ssh协议另一种表示方法
git clone git://example.com/path/to/repo.git/
git clone /opt/git/project.git
git clone file:///opt/git/project.git
git clone ftp[s]://example.com/path/to/repo.git/
git clone rsync://example.com/path/to/repo.git/
使用 git clone --mirror 完整克隆原仓库的镜像(包含所有分支、标签和提交历史),然后修改远程地址并推送到新仓库。
# 1. 克隆原仓库的镜像
git clone --mirror https://git.woa.com/gerryyang/abc.git
cd abc.git  # 进入克隆生成的目录

# 2. 修改远程地址为新仓库
git remote set-url origin https://git.woa.com/jlib/jlib_mesh.git

# 3. 推送所有内容到新仓库
git push --mirror

# 4. 验证迁移
# 访问新仓库页面 https://git.woa.com/jlib/jlib_mesh.git,检查提交历史、分支和标签是否完整

# 5. 删除本地镜像副本:迁移完成后可清理本地文件

# 6. 克隆新仓库进行开发
git clone https://git.woa.com/jlib/jlib_mesh.git

# 7. 注意事项
# 确保新仓库为空:若 jlib/jlib_mesh 已存在内容,需先清空或联系管理员处理
# 权限检查:确认你有权限推送到目标仓库
# 处理特殊内容:如原仓库使用 Git LFS,需额外迁移 LFS 对象
  git lfs fetch --all
  git lfs push --all origin
远程仓库操作 - git remote
为了便于管理,Git要求每个远程主机都必须指定一个主机名。git remote命令就用于管理主机名。不带选项的时候,git remote命令列出所有远程主机。使用-v选项,可以参看远程主机的网址。克隆版本库的时候,所使用的远程主机自动被Git命名为origin。如果想用其他的主机名,需要用git clone命令的-o选项指定。git remote show命令加上主机名,可以查看该主机的详细信息。
# 命令列出所有远程主机
$ git remote
origin

# 参看远程主机的网址
$ git remote -v
origin  git@github.com:jquery/jquery.git (fetch)
origin  git@github.com:jquery/jquery.git (push)

# 用其他的主机名
$ git clone -o jQuery https://github.com/jquery/jquery.git
$ git remote
jQuery

# 查看该远程主机的详细信息
$ git remote show <主机名>
$ git remote show origin
* remote origin
  Fetch URL: git@github.com:gerryyang/mac-utils.git
  Push  URL: git@github.com:gerryyang/mac-utils.git
  HEAD branch: master
  Remote branch:
    master tracked
  Local branch configured for 'git pull':
    master merges with remote master
  Local ref configured for 'git push':
    master pushes to master (up to date)

# 添加远程主机
$ git remote add <主机名> <网址>

# 删除远程主机
$ git remote rm <主机名>

# 远程主机的改名
$ git remote rename <原主机名> <新主机名>

# 更新
git remote -v
git remote set-url origin <新地址>

# 或者在 ~/.gitconfig 里配置
[url "新地址:"]
    insteadOf = 老地址:
远程仓库操作 - git checkout
部分 checkout
一些构建部署场景下为提升速度,只需要检出部分业务相关的目录,可以使用 git 的稀疏检出 (git version >= 2.27)。
例如,部署更新只需要lay1/lay2目录即可
git clone git@git.woa.com:gerryyang/proj.git --sparse

cd proj
git sparse-checkout init --cone
git sparse-checkout add lay1/lay2
远程仓库操作 - git fetch
一旦远程主机的版本库有了更新(Git术语叫做commit),需要将这些更新取回本地,这时就要用到git fetch命令。git fetch命令通常用来查看其他人的进程,因为它取回的代码对你本地的开发代码没有影响。取回远程主机的更新以后,可以在它的基础上,使用git checkout命令创建一个新的分支。
# 将某个远程主机的更新,全部取回本地
$ git fetch <远程主机名>

# 默认情况下,git fetch取回所有分支(branch)的更新。如果只想取回特定分支的更新,可以指定分支名
$ git fetch <远程主机名> <分支名>

# 取回origin主机的master分支
# 所取回的更新,在本地主机上要用"远程主机名/分支名"的形式读取。比如origin主机的master,就要用origin/master读取
$ git fetch origin master
$ git branch -a
* master
  remotes/origin/master

# 在origin/master的基础上,创建一个新分支
$ git checkout -b newBrach origin/master

# 也可以使用git merge命令或者git rebase命令,在本地分支上合并远程分支
# 在当前分支上,合并origin/master
$ git merge origin/master
$ git rebase origin/master
远程仓库操作 - git pull
git pull命令的作用是,取回远程主机某个分支的更新,再与本地的指定分支合并。它的完整格式稍稍有点复杂。
$ git pull <远程主机名> <远程分支名>:<本地分支名>

# 取回origin主机的next分支,与本地的master分支合并
$ git pull origin next:master

# 如果远程分支是与当前分支合并,则冒号后面的部分可以省略
$ git pull origin next

# 上面命令表示,取回origin/next分支,再与当前分支合并。实质上,这等同于先做git fetch,再做git merge
$ git fetch origin
$ git merge origin/next
远程仓库操作 - git push
git push命令用于将本地分支的更新,推送到远程主机。它的格式与git pull命令相仿。注意,分支推送顺序的写法是<来源地>:<目的地>,所以git pull是<远程分支>:<本地分支>,而git push是<本地分支>:<远程分支>。如果省略远程分支名,则表示将本地分支推送与之存在”追踪关系”的远程分支(通常两者同名),如果该远程分支不存在,则会被新建。
$ git push <远程主机名> <本地分支名>:<远程分支名>

# 将本地的master分支推送到origin主机的master分支。如果后者不存在,则会被新建
$ git push origin master

# 如果省略本地分支名,则表示删除指定的远程分支,因为这等同于推送一个空的本地分支到远程分支。即表示删除origin主机的master分支
$ git push origin :master
# 等同于
$ git push origin --delete master
添加变更文件 - git add
git add -Astages all changesgit add .stages new files and modifications, without deletions (on the current directory and its subdirectories).git add -ustages modifications and deletions, without new files
# 设置 git add 别名,以忽略部分目录的变更
git config alias.adds 'add -- ":!protocol" ":!resources"'
git add .
refer:
- git-add - Add file contents to the index
- https://stackoverflow.com/questions/572549/difference-between-git-add-a-and-git-add
- Force add despite the .gitignore file
提交变更信息 - git commit
git commit --amend追加或修改当前提交的记录信息
refer:
查看某次提交信息 - git show
git show <commit-id>
查看文件最后一次修改信息 - git blame
The blame command is a Git feature, designed to help you determine who made changes to a file.
Despite its negative-sounding name, git blame is actually pretty innocuous; its primary function is to point out who changed which lines in a file, and why. It can be a useful tool to identify changes in your code.
Basically, git-blame is used to show what revision and author last modified each line of a file. It’s like checking the history of the development of a file.
git blame -L 1,3 README.md 显示 1-3 行最后一次修改信息
refer:
- http://git-scm.com/docs/git-blame
- What does ‘git blame’ do?
Ignoring Refactoring Commits (Git 2.23 to the rescue)
git 2.23 版本中 git blame 新增了 -ignore-rev 参数,可用于忽略不重要的提交记录,因此可用于忽略代码 format 的提交记录以保留重要的提交信息。
测试:–ignore-rev 选项
$git blame -L 626,626 libs/common/Framework/IThread.cpp
5cbab33d0 (user00 2021-08-04 12:53:00 +0800 626)     m_stLibEventMgr.SetupSingleton();
$git blame -L 626,626 --ignore-rev 5cbab33d0 libs/common/Framework/IThread.cpp
1595edd84 (user01 2020-12-31 01:46:35 +0000 626)     m_stLibEventMgr.SetupSingleton();
$git blame --ignore-revs-file .git-blame-ignore-revs -L 626,626 JLib/libs/common/Framework/IThread.cpp
1595edd84 (user01 2020-12-31 01:46:35 +0000 626)     m_stLibEventMgr.SetupSingleton();
参考 Flink 文档的一段描述:
We keep a list of big refactoring commits in .git-blame-ignore-revs. When looking at change annotations using git blame it’s helpful to ignore these. You can configure git and your IDE to do so using:
git config blame.ignoreRevsFile .git-blame-ignore-revs
参考 Ignoring bulk change commits with git blame
To limit the impact of such ‘unimportant’ bulk commits, git 2.23 adds a new option to git blame. Using --ignore-rev, one can specify a commit to be ignored by git blame. Lines changed by the ignored commit will be attributed to the previous commit touching that line instead. This means that even after our bulk style change, we can get back a meaningful context for the ‘real’ changes to our function.
When multiple bulk commits were added over time, it takes quite some effort to add a --ignore-rev for each of them in order to get a ‘clean’ output for git blame. Luckily, git also provides a way to make this easier on us. In your repository, create a file to hold commit hashes of commits to be ignored by git blame. Naming this file .git-blame-ignore-revs seems to be a common convention.
$ cat .git-blame-ignore-revs
# Conversion to PSR-2 code style
237de8a6367a88649a3f161112492d0d70d83707

# Fix line endings
df0ee6b006ee0f90cccc18b71ced290f6cae18d9
The file should contain the full (40 char) commit hashes. Lines starting with a # are considered comments and can be used to explain what makes the given commit(s) unimportant. Now we can call git blame with the --ignore-revs-file option to ignore all these commits at once.
git blame --ignore-revs-file .git-blame-ignore-revs describeBottles.php
The .git-blame-ignore-revs can be versioned inside the repository, so that all developers can use (and maintain) the same list of ignored commits. To avoid typing the extra option with every command, we can set the blame.ignoreRevsFile configuration variable:
git config blame.ignoreRevsFile .git-blame-ignore-revs
通过时间搜索需要忽略的 commit 提交记录。
git log --pretty=format:"%H %ad - %an: %s" --after="2021-08-04 00:00:00" --until="2021-08-04 23:59:59"
关于 git log –pretty=format 用法可参考:https://git-scm.com/docs/git-log
%H
commit hash

%an
author name

%ad
author date (format respects --date= option)

%s
subject
在项目根目录执行git config --local blame.ignoreRevsFile .git-blame-ignore-revs,验证可以生效。但是需要每个项目都执行这个命令,所以考虑在公用的.vscode/settings.json里进行配置,可以使用git blame参数来实现这个命令。
{
    "gitlens.advanced.blame.customArguments": [
        "--ignore-revs-file=.git-blame-ignore-revs",
    ],
}
$cat .git-blame-ignore-revs
#
# @refer https://www.moxio.com/blog/43/ignoring-bulk-change-commits-with-git-blame
# @usage You can use following command to search which commit should be ignored and then add to this file
# git log --pretty=format:"%H %ad - %an: %s" --after="2021-08-04 00:00:00" --until="2021-08-04 23:59:59"
#

# The following is ignore commit lists for git blame

# Wed Aug 4 12:53:00 2021 +0800 - user00: fix(format): xxx
5cbab33d098e411bfe7cd3ca6871f1ddab8970a9
查看历史提交信息 - git log
# 查看当前仓库代码状态
git status

# 对比修改的内容
git diff

# 查看最近2次的提交统计信息
git log --stat -2

# 按格式化显示提交信息
git log --pretty=format:"%h - %an, %ar : %s"
git log --pretty=format:"%h %s" --graph
git log --since=2.weeks

# 将每个提交版本信息缩减为一行
git log --pretty=oneline
git log --oneline -n3
git log --oneline -n3 --graph

# 指定用户
git log --oneline -n3 --author=gerryyang
更多: Git-基础-查看提交历史
对比差异 - git diff
# 只显示当前一行的差异,而不是三行
git diff -U0 HEAD^

-U<n>, --unified=<n>
           Generate diffs with <n> lines of context instead of the usual three. Implies --patch. Implies -p.
分支操作 - git branch
Git最核心的特性就是,创建新分支操作几乎能在瞬间完成,并且在不同分支之间的切换操作也是一样高效。在切换分支时,会发现当前工作目录里的文件会改变成切换后的分支代码。
由于Git的分支实质上仅是包含所指对象校验和(长度为40的SHA-1值字符串)的文件,所以它的创建和销毁都异常高效。创建一个新分支就相当于往一个文件中写入41 个字节(40个字符和 1个换行符),如此的简单能不快吗?
这与过去大多数版本控制系统形成了鲜明的对比,它们在创建分支时,将所有的项目文件都复制一遍,并保存到一个特定的目录。完成这样繁琐的过程通常需要好几秒钟,有时甚至需要好几分钟。所需时间的长短,完全取决于项目的规模。而在Git中,任何规模的项目都能在瞬间创建新分支。
# 更新远程分支信息
git remote update origin --prune

# 查看分支详细信息 (可以看出代码是否已经push)
git branch -av

# 删除本地分支
git branch -d

# 强制删除本地分支
git branch -D

# 删除远端分支
git push origin -d <branch-name>

# 通过查看远程分支信息,也可以看出每个分支的进度
git remote show origin

# 切换到某个分支
# 确保您已经获取了远程仓库的最新信息。运行以下命令来获取远程仓库的所有分支信息
git fetch
# 如果您知道具体的远程分支名称,可以只获取该分支的信息
git fetch origin branch_name
# 确认远程分支是否存在。运行以下命令查看所有远程分支
git branch -r
git checkout <branch-name>

# 切换到上一个分支
git checkout -

# 新建并切换到该分支
git checkout -b <branch-name>
# 等价于
git branch <branch-name>
git checkout <branch-name>

# 分支合并,例如修复了一个bug然后合并到master
git checkout master
git checkout -b hotfix
# 在hotfix分支修改bug代码
git commit -a -m 'fix the bug'
git checkout master
git merge hotfix
# 最新的修改已经合到 master分支,hotfix分支可以退出历史舞台了,可以删掉(建议,除非分支确实太多了)
git branch -d hotfix

# 如何撤销一个合并
git merge --abort
# 如果合并后发现有问题需要撤销
git reset --hard

# 删除无效的远程追踪分支
$ git remote show origin
Warning: Permanently added the RSA host key for IP address '140.82.113.4' to the list of known hosts.
* remote origin
  Fetch URL: git@github.com:gerryyang/mac-utils.git
  Push  URL: git@github.com:gerryyang/mac-utils.git
  HEAD branch: master
  Remote branches:
    master                  tracked
    refs/remotes/origin/tmp stale (use 'git remote prune' to remove)        # 此分支为无效分支,在远程仓库已经不存在,可以使用 git remote prune orign 命令来同步删除本地此仓库
  Local branch configured for 'git pull':
    master merges with remote master
  Local ref configured for 'git push':
    master pushes to master (up to date)

$ git remote prune origin
Pruning origin
URL: git@github.com:gerryyang/mac-utils.git
 * [pruned] origin/tmp
注意:若在执行git merge时遇到代码冲突,需要先解决冲突。解决完冲突后,执行git status可以查看,任何因包含合并冲突而有待解决的文件,都会以未合并状态标识出来。而如果没有,说明所有的冲突都修复了,并且提醒你去提交一下。再执行git commit -am <comment>,至此冲突解决完毕并已提交代码。
修改分支的名字:
# Rename the local branch to the new name
git branch -m <old_name> <new_name>

# Delete the old branch on remote - where <remote> is, for example, origin
git push <remote> --delete <old_name>

# Or shorter way to delete remote branch [:]
git push <remote> :<old_name>

# Push the new branch to remote
git push <remote> <new_name>

# Reset the upstream branch for the new_name local branch
git push <remote> -u <new_name>
更多:
变基操作 - git rebase
Do not rebase commits that you have pushed to a public repository. See The Perils of Rebasing
在Git中整合来自不同分支的修改主要有两种方法:merge 和 rebase
这两种整合方法的最终结果没有任何区别,但是变基使得提交历史更加整洁。 你在查看一个经过变基的分支的历史记录时会发现,尽管实际的开发工作是并行的,但它们看上去就像是串行的一样,提交历史是一条直线没有分叉。
一般我们这样做的目的是为了确保在向远程分支推送时能保持提交历史的整洁——例如向某个其他人维护的项目贡献代码时。 在这种情况下,你首先在自己的分支里进行开发,当开发完成时你需要先将你的代码变基到 origin/master 上,然后再向主项目提交修改。 这样的话,该项目的维护者就不再需要进行整合工作,只需要快进合并便可。
请注意,无论是通过变基,还是通过三方合并,整合的最终结果所指向的快照始终是一样的,只不过提交历史不同罢了。 变基是将一系列提交按照原有次序依次应用到另一分支上,而合并是把最终结果合在一起。
例子:你可以检出 experiment 分支,然后将它变基到 master 分支上:
$ git checkout experiment
$ git rebase master
First, rewinding head to replay your work on top of it...
Applying: added staged command
现在回到 master 分支,进行一次快进合并。
$ git checkout master
$ git merge experiment
更多:
- Git 分支 - 变基
- Git合并那些事——Rebase的烦恼
- Git commits are duplicated in the same branch after doing a rebase
- The Perils of Rebasing
暂存操作 - git stash
当前你在开发feature1分支,开发了一半,还要2天才能开发完成,这时候又不想提交。这时突然来了个bug,你必须今天就得修复bug,修复完了后才继续开发需求,怎么办?这里就使用到了暂存的功能。
# 先把所有的修改暂存起来,这时候你的所有改动都好像消失了一样,但其实是被暂存起来了
git stash
# 新建bugfix分支去修复bug
git checkout -b bugfix/分支名
# 修复bug
# 回到原来的开发分支
git checkout feature1
# 恢复暂存的内容
git stash pop
# 继续开发需求

git stash list
git stash show 0
git stash pop 0
git stash drop 0
# git stash a specific file
git stash push -m welcome_cart app/views/cart/welcome.thtml
- https://stackoverflow.com/questions/5506339/how-can-i-git-stash-a-specific-file
子模块 - git submodule
克隆一个含有子模块的项目。当你在克隆这样的项目时,默认会包含该子模块目录,但其中还没有任何文件。你必须运行两个命令:git submodule init 用来初始化本地配置文件,而 git submodule update 则从该项目中抓取所有数据并检出父项目中列出的合适的提交。现在子目录是处在和之前提交时相同的状态了。不过还有更简单一点的方式。 如果给 git clone 命令传递 --recurse-submodules 选项,它就会自动初始化并更新仓库中的每一个子模块, 包括可能存在的嵌套子模块。如果你已经克隆了项目但忘记了 --recurse-submodules,那么可以运行 git submodule update --init 将 git submodule init 和 git submodule update 合并成一步。如果还要初始化、抓取并检出任何嵌套的子模块, 请使用简明的 git submodule update --init --recursive。
# 含有子模块项目的clone
git clone --recurse-submodule --remote-submodules git@github.com:gerryyang/mac-utils.git mac-utils

# 如果忘记了 --recurse-submodules
git submodule update --init --recursive # 等价于 git submodule init 和 git submodule update

# 添加子模块 (在需要添加此模块的目录下执行)
git submodule add https://github.com/chaconinc/DbConnector

# https://git-scm.com/docs/git-submodule#Documentation/git-submodule.txt-sync--recursive--ltpathgt82308203
git submodule sync
在 Git 中,删除子模块可以分为两个步骤:
- 删除子模块的引用:在父仓库中删除子模块的引用,即删除
.gitmodules文件中对应子模块的配置信息和子模块目录下的.git目录。
git submodule deinit -f <submodule-path>
git rm -f <submodule-path>
rm -rf .git/modules/<submodule-path>
- 删除子模块的代码:在子模块目录中删除代码,并提交删除操作。
rm -rf <submodule-path>
git commit -m "Remove submodule <submodule-path>"
需要注意的是,删除子模块会删除子模块的所有历史记录,因此在删除子模块之前需要备份子模块的代码和历史记录。另外,删除子模块后,如果需要重新添加子模块,需要重新执行 git submodule add 命令来添加子模块。
- Git 工具 - 子模块
- How to “git clone” including submodules
- How do git submodules work?
- Git - How to change url/path of a submodule
- git submodule 游离分支(detached)产生原因及解决办法
取消某次提交 git revert
git revert [--[no-]edit] [-n] [-m parent-number] [-s] [-S[<keyid>]] <commit>…
git revert (--continue | --skip | --abort | --quit)
Given one or more existing commits, revert the changes that the related patches introduce, and record some new commits that record them. This requires your working tree to be clean (no modifications from the HEAD commit).
Examples:
git revert HEAD~3

Revert the changes specified by the fourth last commit in HEAD and create a new commit with the reverted changes.

git revert -n master~5..master~2

Revert the changes done by commits from the fifth last commit in master (included) to the third last commit in master (included), but do not create any commit with the reverted changes. The revert only modifies the working tree and the index.
- https://git-scm.com/docs/git-revert
将指定的提交应用于其他分支 git cherry-pick
git cherry-pick [--edit] [-n] [-m <parent-number>] [-s] [-x] [--ff] [-S[<keyid>]] <commit>…
git cherry-pick (--continue | --skip | --abort | --quit)
git cherry-pick <commitHash>
git cherry-pick <HashA> <HashB>
git cherry-pick --continue
git cherry-pick A^..B -x # merge 从 A 到 B 的所有 commit,加不加 ^ 就代表包不包括 A 这个 commit,加了就是包含 A,不加就是从 A 后面那个开始
-n,--no-commit: 只更新工作区和暂存区,不产生新的提交。-x: 在提交信息的末尾追加一行 (cherry picked from commit …),方便以后查到这个提交是如何产生的。-s,--signoff: 在提交信息的末尾追加一行操作者的签名,表示是谁进行了这个操作。
如果操作过程中发生代码冲突,Cherry pick 会停下来,让用户决定如何继续操作
--continue: 用户解决代码冲突后,第一步将修改的文件重新加入暂存区(git add .),第二步使用命令git cherry-pick --continue,让 Cherry pick 过程继续执行。--abort: 发生代码冲突后,放弃合并,回到操作前的样子。--quit: 发生代码冲突后,退出 Cherry pick,但是不回到操作前的样子。
转移到另一个代码库
Cherry pick 也支持转移另一个代码库的提交,方法是先将该库加为远程仓库。
# 添加了一个远程仓库target
git remote add target git://gitUrl
然后,将远程代码抓取到本地:
git fetch target
接着,检查一下要从远程仓库转移的提交,获取它的哈希值:
git log target/master
最后,使用git cherry-pick命令转移提交:
git cherry-pick <commitHash>
refer:
- https://git-scm.com/docs/git-cherry-pick
- https://www.ruanyifeng.com/blog/2020/04/git-cherry-pick.html
- Stop cherry-picking, start merging
稀疏检出 git sparse-checkout
git-sparse-checkout - Reduce your working tree to a subset of tracked files
Using sparse-checkout with an existing repository
To restrict your working directory to a set of directories, run the following commands:
git sparse-checkout init --cone
git sparse-checkout set <dir1> <dir2> ...
If you get stuck, run git sparse-checkout disable to return to a full working directory.
使用示例:
git clone $repo --sparse
cd $repo
git sparse-checkout init --cone
git sparse-checkout add $repo_sub_path
- https://git-scm.com/docs/git-sparse-checkout
- https://github.blog/2020-01-17-bring-your-monorepo-down-to-size-with-sparse-checkout/
导出补丁 git format-patch
Prepare each non-merge commit with its “patch” in one “message” per commit, formatted to resemble a UNIX mailbox. The output of this command is convenient for e-mail submission or for use with git am.
- https://git-scm.com/docs/git-format-patch
应用补丁 git am
Splits mail messages in a mailbox into commit log message, authorship information and patches, and applies them to the current branch.
- https://git-scm.com/docs/git-am
应用补丁 git apply
Apply a patch to files and/or to the index
- https://git-scm.com/docs/git-apply
大文件管理 git lfs
Git LFS 全名 Git Large File Storage,是 Github 带头在 2015 年推出的解决方案。
- 下载安装:https://github.com/git-lfs/git-lfs/releases
#!/bin/bash

# Download Git LFS v3.4.0
if ! wget https://github.com/git-lfs/git-lfs/releases/download/v3.4.0/git-lfs-linux-amd64-v3.4.0.tar.gz; then
        echo "Error: Failed to download Git LFS"
        exit 1
fi

# Extract the archive
if ! tar xvf git-lfs-linux-amd64-v3.4.0.tar.gz; then
        echo "Error: Failed to extract the tarball"
        exit 1
fi

# Enter the extracted directory
cd git-lfs-3.4.0 || { echo "Error: Failed to enter the extracted directory"; exit 1; }

# Check if the user has root privileges before installing
if [ "$(id -u)" != "0" ]; then
        echo "Error: Installation requires root privileges" 1>&2
        exit 1
fi

# Install Git LFS
./install.sh

echo "Git LFS installation successful"
- 初始化仓库
git lfs install
- 配置想要加入 lfs 托管的文件规则
例如,添加目录下所有的.psd 和.a 文件,使其被 LFS 托管
git lfs track "*.psd"
git lfs track "*.a"
或者直接编辑.gitattributes文件
注意:.gitattributes需要加入到 git 库中,LFS 文件才能被其他人识别。
- 只获取仓库本身而不获取任何 LFS 对象
如果自己的相关工作不涉及到被 Git LFS 所管理的文件的话,可以选择只获取 Git 仓库自身的内容,而完全跳过 LFS 对象的获取。
GIT_LFS_SKIP_SMUDGE=1 git clone https://github.com/gerryyang/mac-utils.git

# 或
git -c filter.lfs.smudge= -c filter.lfs.required=false clone https://github.com/gerryyang/mac-utils.git
注意:GIT_LFS_SKIP_SMUDGE=1 及 git -c filter.lfs.smudge= -c filter.lfs.required=false 同样使用于其他 git 命令,如 checkout, reset 等
- 获取当前 commit 下包含的 LFS 对象的当前版本
如果起初获取代码时,没有一并获取 LFS 对象,而随后又需要这些被 LFS 管理的文件时,可以单独执行 LFS 命令来获取并签出 LFS 对象:
git lfs fetch
git lfs checkout

# 或
git lfs pull
经过以上几步,psd 和 a 类型的大文件就会在 push 时自动向 LFS 服务器提交了。
- 查看已跟踪的 lfs 对象
git lfs ls-files
refer: https://git-lfs.github.com/
git bisect
git bisect 是一个很有用的命令,用来查找哪一次代码提交引入了错误。它的原理很简单,就是将代码提交的历史,按照两分法不断缩小定位。所谓”两分法”,就是将代码历史一分为二,确定问题出在前半部分,还是后半部分,不断执行这个过程,直到范围缩小到某一次代码提交。
- https://www.ruanyifeng.com/blog/2018/12/git-bisect.html
git ls-tree
Lists the contents of a given tree object, like what “/bin/ls -a” does in the current working directory.
# 列出 Git 仓库中所有文件的大小,并按照文件大小排序
git ls-tree -r -t -l HEAD | sort -k 4 -n

# 列出 Git 仓库中大小超过指定大小的文件
git ls-tree -r -t -l HEAD | awk '$4 >= <file-size> {print $0}'
- https://git-scm.com/docs/git-ls-tree
git reflog
This command manages the information recorded in the reflogs.
git reflog show accepts any of the options accepted by git log.
git reflog show --oneline -n5
- https://git-scm.com/docs/git-reflog
git rev-list (列出 commitid 记录)
Lists commit objects in reverse chronological order
git rev-list --all --abbrev-commit | head -n5
- https://git-scm.com/docs/git-rev-list
git gc
Cleanup unnecessary files and optimize the local repository.
git gc --aggressive --prune=now
- https://git-scm.com/docs/git-gc
git filter-branch
Rewrite branches
- https://git-scm.com/docs/git-filter-branch
git rev-parse
# 获取当前 HEAD 提交的哈希值
git rev-parse HEAD

# 获取当前分支名
git rev-parse --abbrev-ref=strict HEAD
- https://git-scm.com/docs/git-rev-parse
- https://stackoverflow.com/questions/15798862/what-does-git-rev-parse-do
git tag
# 切换到要打 tag 的分支
git checkout <branch-name>

# 创建一个 tag
git tag <tag_name>
git tag -a <tag_name> -m "<tag_message>"

# 推送单个标签
git push origin <tag_name>

# 推送所有本地标签
git push --tags

# 列出所有 tag
git tag

# 查看远程仓库中的 tag
git ls-remote --tags origin <tag_name>

# 切换到指定的 tag
git checkout <tag_name>

# 删除本地 tag
git tag -d <tag-name>

# 删除远程仓库中的 tag
git push <remote-name> :<tag-name>

# 更新远程仓库的 tag 信息
git fetch --tags
- https://git-scm.com/book/zh/v2/Git-%E5%9F%BA%E7%A1%80-%E6%89%93%E6%A0%87%E7%AD%BE
git describe
git-describe - Give an object a human readable name based on an available ref
The command finds the most recent tag that is reachable from a commit. If the tag points to the commit, then only the tag is shown. Otherwise, it suffixes the tag name with the number of additional commits on top of the tagged object and the abbreviated object name of the most recent commit. The result is a “human-readable” object name which can also be used to identify the commit to other git commands.
How to find the current git branch in detached HEAD state?
I can find the current git branch name by doing either of these:
$ git describe --contains --all HEAD
feature/apollo

$ git branch | awk '/^\*/ { print $2 }'
feature/apollo
But when in a detached HEAD state, these commands doesn’t work.
Answers:
A more porcelain way:
$ git describe
v0.15.1

$ git log -n 1 --pretty=%d HEAD
 (HEAD, tag: v0.15.1)

$ git log -n 1 --pretty=%D HEAD
HEAD, tag: v0.15.1

$ git show -s --pretty=%d HEAD
 (HEAD, tag: v0.15.1)
The refs will be listed in the format (HEAD, master) - you’ll have to parse it a little bit if you intend to use this in scripts rather than for human consumption.
More: Make Git show the correct tag on branches with git describe
Git hooks
$ .git/hooks$ls
applypatch-msg.sample  fsmonitor-watchman.sample  pre-applypatch.sample  pre-merge-commit.sample    pre-push.sample    pre-receive.sample       update.sample
commit-msg.sample      post-update.sample         pre-commit.sample      prepare-commit-msg.sample  pre-rebase.sample  push-to-checkout.sample
pre-commit
通过.git/hooks/pre-commit可以在commit前执行自定义操作。通过ln -s pre-commit ${PROJECT_ROOT}/.git/hooks/pre-commit指定自定义 pre-commit 的脚本,之后 commit 时自动触发 pre-commit 脚本执行,如存在错误则会报错终止 commit,修复完毕后重新发起 commit 即可。以下是pre-commit.sample示例:
#!/bin/sh
#
# An example hook script to verify what is about to be committed.
# Called by "git commit" with no arguments.  The hook should
# exit with non-zero status after issuing an appropriate message if
# it wants to stop the commit.
#
# To enable this hook, rename this file to "pre-commit".

if git rev-parse --verify HEAD >/dev/null 2>&1
then
        against=HEAD
else
        # Initial commit: diff against an empty tree object
        against=$(git hash-object -t tree /dev/null)
fi

# If you want to allow non-ASCII filenames set this variable to true.
allownonascii=$(git config --type=bool hooks.allownonascii)

# Redirect output to stderr.
exec 1>&2

# Cross platform projects tend to avoid non-ASCII filenames; prevent
# them from being added to the repository. We exploit the fact that the
# printable range starts at the space character and ends with tilde.
if [ "$allownonascii" != "true" ] &&
        # Note that the use of brackets around a tr range is ok here, (it's
        # even required, for portability to Solaris 10's /usr/bin/tr), since
        # the square bracket bytes happen to fall in the designated range.
        test $(git diff --cached --name-only --diff-filter=A -z $against |
          LC_ALL=C tr -d '[ -~]\0' | wc -c) != 0
then
        cat <<\EOF
Error: Attempt to add a non-ASCII file name.

This can cause problems if you want to work with people on other platforms.

To be portable it is advisable to rename the file.

If you know what you are doing you can disable this check using:

  git config hooks.allownonascii true
EOF
        exit 1
fi

# If there are whitespace errors, print the offending file names and fail.
exec git diff-index --check --cached $against --
实际使用的例子:
#!/bin/bash

<< COMMENT
the scropt for git pre-commit
Usage: $0 $FILE
COMMENT

CUR_DIR=$(dirname $(readlink -f $0))
echo $CUR_DIR

RESULT=0
NEEDCHECK=0

CPPLINT="$CUR_DIR/cpplint.sh"

function CHECK_LOG()
{
    if [ $? -ne 0 ]; then
        echo -e "\033[031;1m[FAILED]\033[0m $1"
    else
        echo -e "\033[032;1m[PASS]\033[0m $1"
    fi
}

echo "pre-commit begin"

if [ ${CODE_CHECK_IGNORE:-0} -eq 1 ]; then
    echo "Ignore code check"
    exit 0
fi

GIT_DIFF=$(git diff --cached --name-status)
while read STATUS FILE; do

    if [ "$STATUS" == "D" ]; then
        continue;
    fi

    if [ -z $(expr "$f" : ".*\.\(h\|hpp\|cc\|cpp\)$") ]; then
        continue
    fi

    NEEDCHECK=1

    echo "Check cpp style: $FILE"
    $CPPLINT $FILE
    if [ $? -ne 0 ]; then
        CHECK_LOG "$CPPLINT $FILE failed"
        RESULT=1
    else
        CHECK_LOG "$CPPLINT $FILE"
    fi

done <<< "$GIT_DIFF"

if [ $NEEDCHECK -eq 0 ]; then
    CHECK_LOG "No file needs to check"

elif [ $RESULT -gt 0 ]; then
    CHECK_LOG "pre-commit failed, need to check before next commit"
    exit 1
fi

echo "pre-commit end"
Git LFS的原理
存储和管理大型文件的版本,是一个由来已久的难题。 由于需要记录全部历史版本,在托管比较大的文件时,以往的代码仓库往往不太给力。
-
SVN。SVN 会把每次提交的文件差异存储下来,当用户新拉取一个文件时,需要取得所有的差异集,并把他们拼装相加,再返回一个完整的文件给用户。如果仅是满足代码文件(文本)的需要,这种机制是十分顺畅的。但当图片、音视频、数据集、程序包、二进制文件时,状况就会开始恶化。如果版本数量较少,计算机凭借优异的性能,可以做到用户无感知。但当版本较多,文件很大时,CPU的计算资源会逐渐成为瓶颈,其体现就是 SVN CO 速度越来越慢。慢并非是网络传输造成的,而是版本数、碎片、文件大小共同作用,使CPU和IO到达瓶颈带来的。
-
Git。Git 虽然没有 SVN 合并差异计算的问题,相比 SVN 利用空间替换了 CPU 的计算时间。但由于分布式要求,客户端往往会克隆整个仓库来本地,也包含了文件历史。如果历史版本较多,用户就要等每个版本从网络传输到本地。因此,用户克隆的时间包含了下载所有历史版本到本地的时间。如果文件比较大,会变成所有人的梦魇。
向服务器提交时,Git LFS把文件上传到一个专用的存储区域,同时保存一份指针(文本文件)在原有的版本库中。 当另外一个人拉取,他将首先拉取到指针,此时Git LFS解析这个指针,并把实际文件内容取回到本地。 文件每有一个新版本时,就会创建一个新指针,并向服务器上传,这样服务器上就有了多个历史版本,从而实现了基本的版本管理。
Git与GitHub
GitHub主要为开发者提供Git仓库的托管服务,拥有一只octocat的吉祥物。截止2013年12月,GitHub托管的仓库数已超过1000万。GitHub这一服务为开源世界带来了社会化编程的概念。在GitHub上进行交流时用到的Issue, Wiki等都可以用FGM(Git Flavored Markdown)语法表述。
在GitHub上公开源代码时可以指定相关的许可协议。实际使用时,只需将LICENSE文件加入仓库,并在README.md文件中声明使用了何种许可协议即可。
- 修正的BSD许可协议
- Apache许可协议
- MIT许可协议 (https://opensource.org/licenses/mit-license.php)
Copyright <YEAR> <COPYRIGHT HOLDER>

Permission is hereby granted, free of charge, to any person obtaining a copy of this software and associated documentation files (the "Software"), to deal in the Software without restriction, including without limitation the rights to use, copy, modify, merge, publish, distribute, sublicense, and/or sell copies of the Software, and to permit persons to whom the Software is furnished to do so, subject to the following conditions:

The above copyright notice and this permission notice shall be included in all copies or substantial portions of the Software.

THE SOFTWARE IS PROVIDED "AS IS", WITHOUT WARRANTY OF ANY KIND, EXPRESS OR IMPLIED, INCLUDING BUT NOT LIMITED TO THE WARRANTIES OF MERCHANTABILITY, FITNESS FOR A PARTICULAR PURPOSE AND NONINFRINGEMENT. IN NO EVENT SHALL THE AUTHORS OR COPYRIGHT HOLDERS BE LIABLE FOR ANY CLAIM, DAMAGES OR OTHER LIABILITY, WHETHER IN AN ACTION OF CONTRACT, TORT OR OTHERWISE, ARISING FROM, OUT OF OR IN CONNECTION WITH THE SOFTWARE OR THE USE OR OTHER DEALINGS IN THE SOFTWARE.
关于GitHub的更多功能:
- https://github.com/features
- https://github.com/trending
免密提交
如果你使用的是 SSH 方式连接远端,并且设置了一个没有口令的密钥,这样就可以在不输入用户名和密码的情况下安全地传输数据。 然而,这对 HTTP 协议来说是不可能的 —— 每一个连接都是需要用户名和密码的。
参考:
- 将远程 URL 从 HTTPS 切换到 SSH
- How can I save username and password in Git?
- Git push requires username and password
$git remote -v
origin  git@git.woa.com:gerryyang/jlib_proj.git (fetch)
origin  git@git.woa.com:gerryyang/jlib_proj.git (push)
upstream        https://git.woa.com/jlib/jlib_proj.git (fetch)
upstream        https://git.woa.com/jlib/jlib_proj.git (push)
http 方式在本地保存密钥 (凭证存储)
Git 拥有一个凭证系统来处理这个事情。下面有一些 Git 的选项:
-
默认所有都不缓存。每一次连接都会询问你的用户名和密码。
-
“cache” 模式会将凭证存放在内存中一段时间。密码永远不会被存储在磁盘中,并且在15分钟后从内存中清除。
-
“store” 模式会将凭证用明文的形式存放在磁盘中,并且永不过期。这意味着除非你修改了你在 Git 服务器上的密码,否则你永远不需要再次输入你的凭证信息。这种方式的缺点是你的密码是用明文的方式存放在你的 home 目录下。
-
如果你使用的是 Mac,Git 还有一种 “osxkeychain” 模式,它会将凭证缓存到你系统用户的钥匙串中。这种方式将凭证存放在磁盘中,并且永不过期,但是是被加密的,这种加密方式与存放 HTTPS 凭证以及 Safari 的自动填写是相同的。
-
如果你使用的是 Windows,你可以安装一个叫做 “Git Credential Manager for Windows” 的辅助工具。这和上面说的 “osxkeychain” 十分类似。
部分辅助工具有一些选项。 “store” 模式可以接受一个 --file <path> 参数,可以自定义存放密码的文件路径(默认是 ~/.git-credentials )。 “cache” 模式有 --timeout <seconds> 参数,可以设置后台进程的存活时间(默认是 “900”,也就是 15 分钟)。 下面是一个配置 “store” 模式自定义路径的例子:
$ git config --global credential.helper 'store --file ~/.my-credentials'
使用 http 的下载方式,并设置缓存(注意:每次修改密码后需要清理缓存重新设置),但是用户名和密码是以明文的形式存储的,存在安全风险。
执行
git config --global credential.helper store
然后再 pull 或者 clone,正常输入一次密码
后续就缓存了账号密码,http 也无需再输入密码了
之后在 home 目录会生成如下文件:
~$ls -la .git*
-rw-r--r-- 1 gerryyang users 85 10月 12 12:17 .gitconfig
-rw------- 1 gerryyang users 44 10月 12 12:17 .git-credentials
~$cat .gitconfig
[user]
        email = gerryyang@tencent.com
        name = gerryyang
[credential]
        helper = store
~$cat .git-credentials
https://gerryyang:$password@git.woa.com  // $password 密码明文存储
也可以配置使用 oauth2 的凭证:
https://oauth2:$access_toekn@git.woa.com
Attention: This method saves the credentials in plaintext on your PC’s disk. Everyone on your computer can access it, e.g. malicious NPM modules.
Run
git config --global credential.helper store
then
git pull
provide a username and password and those details will then be remembered later. The credentials are stored in a file on the disk, with the disk permissions of “just user readable/writable” but still in plaintext.
If you want to change the password later
git pull
Will fail, because the password is incorrect, git then removes the offending user+password from the ~/.git-credentials file, so now re-run
git pull
to provide a new password so it works as earlier.
refer: Git 工具 - 凭证存储
SSH 方式
使用ssh认证方式可以实现免密提交,通过ssh-keygen可以生成ssh认证所需的公钥和私钥。执行ssh-keygen后直接回车,不用填写东西,之后会让你输入密码(根据安全性选择是否需要此密码,可以直接回车),然后就生成一个.ssh目录,目录里会生成两个(默认)文件:id_rsa和id_rsa.pub。
cd $HOME/.ssh
ssh-keygen -t rsa -C <email>               # 默认生成 id_rsa 私钥文件和 id_rsa.pub 公钥文件
ssh-keygen -t rsa -C <email> -f <id_rsa>   # -C "公钥文件中的备注"  -f 指定生成的私钥文件名
生成公私钥后,复制公钥信息配置在Github上。并注意本地.git/config配置中的url为ssh要求的格式:
[core]
        repositoryformatversion = 0
        filemode = false
        bare = false
        logallrefupdates = true
        symlinks = false
        ignorecase = true
[remote "origin"]
        #url = http://git.code.oa.com/gerryyang/portal.git
        url = git@git.code.oa.com:gerryyang/portal.git
        fetch = +refs/heads/*:refs/remotes/origin/*
        puttykeyfile =
[branch "master"]
        remote = origin
        merge = refs/heads/master
[user]
        name = gerryyang
        email = gerryyang@tencent.com
测试是否生效,如果ok以后执行git push时就不用再输入用户名和密码验证了。
ssh -vT git@github.com
有时需要配置多个ssh key,例如,一个用于Github,一个用于公司内部的git。此时要为不同的域名指定不同的私钥配置。在$HOME/.ssh目录下,创建一个config配置文件,根据不同域名指定不同的私钥。这样就可以实现多个不同的ssh key免密提交了。
# oa
Host git.code.oa.com
   HostName git.code.oa.com
   PreferredAuthentications publickey
   IdentityFile ~/.ssh/oa_id_rsa

# github
Host github.com
   HostName github.com
   PreferredAuthentications publickey
   IdentityFile ~/.ssh/id_rsa
refer:
GitHub 常用缩写
| 缩写 | 全称 | 含义 |
|---|---|---|
| PR | Pull Request | 拉取请求,给其他项目提交代码 |
| MR | Merge Request | 合并请求 |
| LGTM | Looks Good To Me | 可以合并,没有问题 |
| SGTM | Sounds Good to Me | 可以合并 |
| WIP | Work In Progress | 开发中 |
| PTAL | Please Take A Look | 请求维护者review |
| TBR | To Be Reviewed | 请求维护者review |
| TL;DR | Too Long; Didn’t Read | 太长懒得看 |
| TBD | To Be Done/Defined/Discussed/Decided/Determined | 待定 |
| AFAIK | As far as I know | 据我所知 |
| IIRC | If I recall correctly | 如果我没记错的话 |
| CC | Carbon Copy | 抄送 |
| ACK | Acknowledgement | 同意 |
| NACK/NAK | Negative Acknowledgement | 不同意 |
| TYPO | 拼写错误 | |
| WFM | Works For Me | 测试结果对我有效 |
| MUST | 必须修改 | |
| Duplicate of #123 | 关闭重复的issue | |
| close/closes/closed #issue | 关闭issue | |
| fix/fixes/fixed #issue | 修复issue | |
| resolve/resolves/resolved | 解决issue |
Issue 规范
- Duplication Issue
关闭重复的Issue,在重复Issue中通过Duplicate of #123关联到当前Open的Issue,并把重复Issue中有价值的信息合并到open的Issue中。
- One issue per issue
每个Issue的信息尽量独立,过多的问题可以分在不同的Issue中。
- Titles are important
Issue的标题尽量精简易懂。
- Formatting
良好的Issue格式可以帮助他人快速理解问题,比如,合理地使用Markdown,可参考:Basic writing and formatting syntax
- Issue as user story
提供额外的user stroy可以更好的理解问题
- Objectivity
问题的描述尽量客观真实,比如,可以提供一些测试数据。
- Reproduction steps
针对bug的Issue,提供问题可复现的步骤
Commit 规范
commit消息结构:
<type>[optional scope]: <description>

[optional body]

[optional footer(s)]
允许的提交类型type:
feat -> feature
fix -> bug fix
docs -> documentation
style -> formatting, lint stuff
refactor -> code restructure without changing exterrnal behavior
test -> adding missing tests
chore -> maintenance
init -> initial commit
rearrange -> files moved, added, deleted etc
update -> update code (versions, library compatibility)
refer:
Merge Request流程
MR场景:MR发起者,对原始项目A进行fork,生成自己的项目B。随后在B项目上完成开发,然后创建MR请求,即,向项目A的Owner申请将项目B修改的代码合入项目A中。
过程描述:
- MR发起者,先fork要开发的原始项目
A,生成自己的项目B- MR发起者,在fork的项目
B上创建自己的分支进行开发,比如dev分支- 当需要将项目
B中改动的代码合入项目A时,需要发起Merge Request流程 3.1 MR发起者,更新原始项目A的代码到本地环境,例如,git fetch upstream master3.2 MR发起者,将项目B的dev分支rebase到upstream/master分支,并解决可能的代码冲突,例如,git rebase upstream/master。其中,3.1和3.2可以合并成一步,git pull --rebase upstream dev(此步操作会保证MR发起者commit的记录在原始项目commit记录的上面) 3.3 MR发起者,提交MR请求等待Owner审核- MR审批者,执行Comment和Approve,完成代码合入。
MR发起者处理流程
- Before you can sync your fork with an upstream repository, you must configure a remote that points to the upstream repository in Git.
# List the current configured remote repository for your fork
$ git remote -v
> origin  https://github.com/YOUR_USERNAME/YOUR_FORK.git (fetch)
> origin  https://github.com/YOUR_USERNAME/YOUR_FORK.git (push)

# Specify a new remote upstream repository that will be synced with the fork
$ git remote add upstream https://github.com/ORIGINAL_OWNER/ORIGINAL_REPOSITORY.git

# Verify the new upstream repository you've specified for your fork
$ git remote -v
> origin    https://github.com/YOUR_USERNAME/YOUR_FORK.git (fetch)
> origin    https://github.com/YOUR_USERNAME/YOUR_FORK.git (push)
> upstream  https://github.com/ORIGINAL_OWNER/ORIGINAL_REPOSITORY.git (fetch)
> upstream  https://github.com/ORIGINAL_OWNER/ORIGINAL_REPOSITORY.git (push)
- 完成本地项目代码与原始项目代码的同步,更新本地项目master代码为最新的代码。Merge an upstream repo
# 切换到本地项目 YOUR_BRANCH 分支
git checkout YOUR_BRANCH

# 同步 upstream/master 最新代码
git fetch upstream master

# 合并upstream的修改到master分支
git rebase upstream/master

# 上述两步也可以简化为git pull命令
git pull --rebase upstream master

# 如果有代码冲突,则需要先解决,使用vscode会自动提示冲突解决
git add <解决冲突的文件>

# 完成rebase
git rebase --continue

# 将本地master分支的多次commit提交记录合并,比如,合并前7条提交记录,通过`-i`交互操作中将不需要的commit记录从`pick`改为`squash`,保留第一条commit为pick
git rebase -i HEAD~7

# 提交master修改到远端
git push origin master

# 最后提交MR请求
-
创建
Merge Request -
Source branch为自己fork项目的master分支,Target branch为实际项目master分支 -
填写
Title,Description信息,最后提交。
MR审批者处理流程
- 收到
Merge Request处理请求。 - 选择
Create a merge commit。通常选择,Squash and merge或Rebase and merge。 - 进行
Code Review,若发现问题则通过comment反馈给发起者进行修改,开发者修改后Close MR,再Reopen MR。 - 没有问题,确认完成MR。
- 若MR过程出现代码冲突,则MR审批者选择
Close Merge request。由MR发起者解决冲突后再重新提交MR。
refer:
- Writing a proper GitHub issue
- About issue and pull request templates
- Configuring issue templates for your repository
- About issue and pull request templates
- Setting guidelines for repository contributors
- Creating a pull request
- Linking a pull request to an issue
- Autolinked references and URLs
Tips
More: https://github.com/git-tips/tips
添加常用的 alias
git config --global alias.st status
git config --global alias.co checkout
git config --global alias.ci commit
git config --global alias.br branch
Reset author, after author has been changed in the global config
git commit --amend --reset-author --no-edit
Git相关工具
Sourcetree
A free Git client for Windows and Mac. Sourcetree simplifies how you interact with your Git repositories so you can focus on coding. Visualize and manage your repositories through Sourcetree’s simple Git GUI.
https://www.sourcetreeapp.com/
TortoiseGit
TortoiseGit is a Windows Shell Interface to Git and based on TortoiseSVN. It’s open source and can fully be build with freely available software.
https://tortoisegit.org/
Git Tools
Assorted git-related scripts and tools.
https://github.com/MestreLion/git-tools
Q&A
fatal: in unpopulated submodule
The root cause of this error in my case was that I have a subdirectory with its own .git folder inside. When I issued the git add --all command, I got this same error.
Here’s how I resolved the issue:
- Remove all
.gitfolder inside the sub directory causing the error cdto the main directorygit rm --cached sub_directory_name -fgit add --allto add the subdirectory and contents, recursivelygit statusto verify that the items are added
I almost got a headache with this error but thanks for the previous answers, a combination of those worked for me.
How do I make Git ignore file mode (chmod) changes?
git config core.fileMode false
Automatically closing issue from pull request
Maintain a Git repository (对 Git 仓库瘦身)
Maintenance of your Git repository typically involves reducing a repository’s size.
Understanding file removal from Git history
Recall that cloning a repository clones the entire history — including every version of every source code file. If a user commits a huge file, such as a JAR, every clone thereafter includes this file. Even if a user ends up removing the file from the project with a subsequent commit, the file still exists in the repository history. To remove this file from your repository you must:
- remove the file from your project’s current file-tree
- remove the file from repository history - rewriting Git history, deleting the file from all commits containing it
- remove all reflog history that refers to the old commit history
- repack the repository, garbage-collecting the now-unused data using git gc
Git ‘gc’ (garbage collection) will remove all data from the repository that is not actually used, or in some way referenced, by any of your branches or tags. In order for that to be useful, we need to rewrite all Git repository history that contained the unwanted file, so that it no longer references it - git gc will then be able to discard the now-unused data.
Rewriting repository history is a tricky business, because every commit depends on it’s parents, so any small change will change the commit id of every subsequent commit. There are two automated tools for doing this:
- the BFG Repo Cleaner - fast, simple, easy to use. Require Java 6 or above.
- git filter-branch - powerful, tricky to configure, slow on big repositories. Part of the core Git suite.
Remember, after you rewrite the history, whether you use the BFG or filter-branch, you will need to remove reflog entries that point to old history, and finally run the garbage collector to purge the old data.
下面是关于使用 git filter-branch 的方法介绍:
Antony Stubbs 提供了一个可以查找 git 大文件的 bash 脚本 git_find_big.sh
#!/bin/bash
#set -x

# Shows you the largest objects in your repo's pack file.
# Written for osx.
#
# @see http://stubbisms.wordpress.com/2009/07/10/git-script-to-show-largest-pack-objects-and-trim-your-waist-line/
# @author Antony Stubbs

# set the internal field spereator to line break, so that we can iterate easily over the verify-pack output
IFS=$'\n';

# list all objects including their size, sort by size, take top 10
objects=`git verify-pack -v .git/objects/pack/pack-*.idx | grep -v chain | sort -k3nr | head -n10`

echo "All sizes are in kB's. The pack column is the size of the object, compressed, inside the pack file."

output="size,pack,SHA,location"
for y in $objects
do
	# extract the size in bytes
	size=$((`echo $y | cut -f 5 -d ' '`/1024))
	# extract the compressed size in bytes
	compressedSize=$((`echo $y | cut -f 6 -d ' '`/1024))
	# extract the SHA
	sha=`echo $y | cut -f 1 -d ' '`
	# find the objects location in the repository tree
	other=`git rev-list --all --objects | grep $sha`
	#lineBreak=`echo -e "\n"`
	output="${output}\n${size},${compressedSize},${other}"
done

echo -e $output | column -t -s ', '
输出:
All sizes are in kB's. The pack column is the size of the object, compressed, inside the pack file.
size    pack   SHA                                       location
132011  24488  c26f3ca0ad465e93a98aea7d6c9c697dcba05dac  JLib/libs/lib/protobuf/libprotoc.a
128799  24669  422bd00a3ce77aaf9623d4643bdd138d19867e89  JLib/libs/lib/irpc/lib64/libtsf4g2.a
102317  28626  f1700e3d6ed6faa2857ffb2718ebe6b081d20f83  JLib/tools/cmd/cmdtool
101967  20128  8f2dd4caf83888e79f3eab6f03ff091c8ce0592c  JLib/libs/lib/irpc/lib64/libbase_agent_client_api.a
86066   14985  ca911a78a4dcb60b6a53b7298e16987d11c4c8b8  JLib/libs/lib/protobuf/libprotoc.a
82541   13534  57bfd8bd1274c5b76820ecba4ad0d3d181361837  JLib/libs/lib/tsf4g/libapolloservice.a
80786   15872  af7db1120203eb1afb31f6090125f8e5e1c452fe  JLib/libs/lib/protobuf/libprotobuf.a
80495   15869  93995fcad84daef208561c34b2f8a3ac32ce9872  JLib/libs/lib/irpc/lib64/thirdparty/libprotobuf.a
77920   14125  a607eb72817c4e58494ad5b895d8f8e5e17b1425  JLib/libs/lib/irpc/lib64/submod/libmicro_service_sdk.a
63532   19468  afb521929d9f4c38fb0a07b644b9eefa36f05874  JLib/bin/tconnd/tconnd
获得大文件信息后,通过 git filter-branch 删除大文件:
git filter-branch --force --prune-empty --index-filter 'git rm -rf --cached --ignore-unmatch $file' --tag-name-filter cat -- --all
--index-filter选项可以修改仓库的索引--cached选项从索引中而不是磁盘来删除文件,这样会更快,因为你不需要在运行这个过滤器前检查每个修订版本--ignore-unmatch选项可以防止在尝试移走不存在的文件 pathname 的时候命令失败
结合上面 git_find_big.sh 的输出 file.txt,将删除逻辑封装成 git_strip.sh 脚本
#!/bin/bash

while read -r path; do
  git filter-branch --force --prune-empty --index-filter "git rm -rf --cached --ignore-unmatch $path" --tag-name-filter cat -- --all
done < <(sed '1,2d' file.txt | awk '{print $NF}')

echo "done"
- 使用
sed和awk命令来删除文件的前两行,并提取每一行的最后一个字段 < <()语法用于将命令的输出作为输入传递给while循环
再通过 git_gc_data.sh 进行数据回收:
#!/bin/bash

# Prune all of the reflog references from now on back (unless you're explicitly only operating on one branch).
git reflog expire --expire=now --all

# Repack the repository by running the garbage collector and pruning old objects.
git gc --prune=now

echo "done"
最后推送到远端仓库:
# Push all your changes back to the Bitbucket repository.
git push --all --force

# Make sure all your tags are current too
git push --tags --force
另外一种完全清除历史记录的方案:git-clearHistory
Steps to clear out the history of a git/github repository
# Remove the history from
rm -rf .git

# recreate the repos from the current content only
git init
git add .
git commit -m "Initial commit"

# push to the github remote repos ensuring you overwrite history
git remote add origin git@github.com:<YOUR ACCOUNT>/<YOUR REPOS>.git
git push -u --force origin master
refer: