Assembly Language in Action
- 进程虚拟地址空间
- 函数调用栈
- 函数调用栈示例
- 函数调用约定
- Common Knowledge
- Memory
- Stack
- CPU Registers (CPU 寄存器)
- x86 Assembly/X86 Architecture
- Intel vs AT&T
- Installing an assembler
- Assembling a program
- Variables
- Printing a string
- Instructions
- Addressing modes
- Objdump Disassemble
- Debugging assembly with GDB
- GCC Inline Assembly
- Q&A
- More
- Refer
- TODO
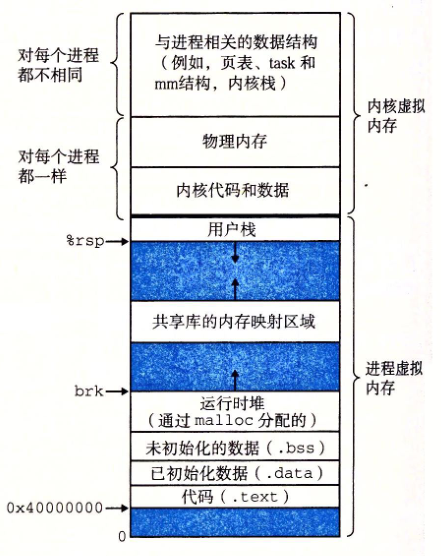
进程虚拟地址空间
由低地址到高地址分别为:(图中,从下往上)
- 只读段/代码段:只能读,不可写;可执行代码、字符串字面值、只读变量
- 数据段:已初始化且初值非0全局变量、静态变量的空间
- BSS段:未初始化或初值为0的全局变量和静态局部变量,block starting symbol (abbreviated to .bss or bss) (More: https://en.wikipedia.org/wiki/.bss)
- 堆 :就是平时所说的动态内存,
malloc或new大部分都来源于此 - 文件映射区域 :如动态库、共享内存等映射物理空间的内存,一般是
mmap函数所分配的虚拟地址空间 - 栈:用于维护函数调用的上下文空间;局部变量、函数参数、返回地址等
- 内核虚拟空间:用户代码不可见的内存区域,由内核管理(页表就存放在内核虚拟空间)
objdump -dj .data your_binary | grep "g_"
objdump -dj .bss your_binary | grep "g_"
函数调用栈
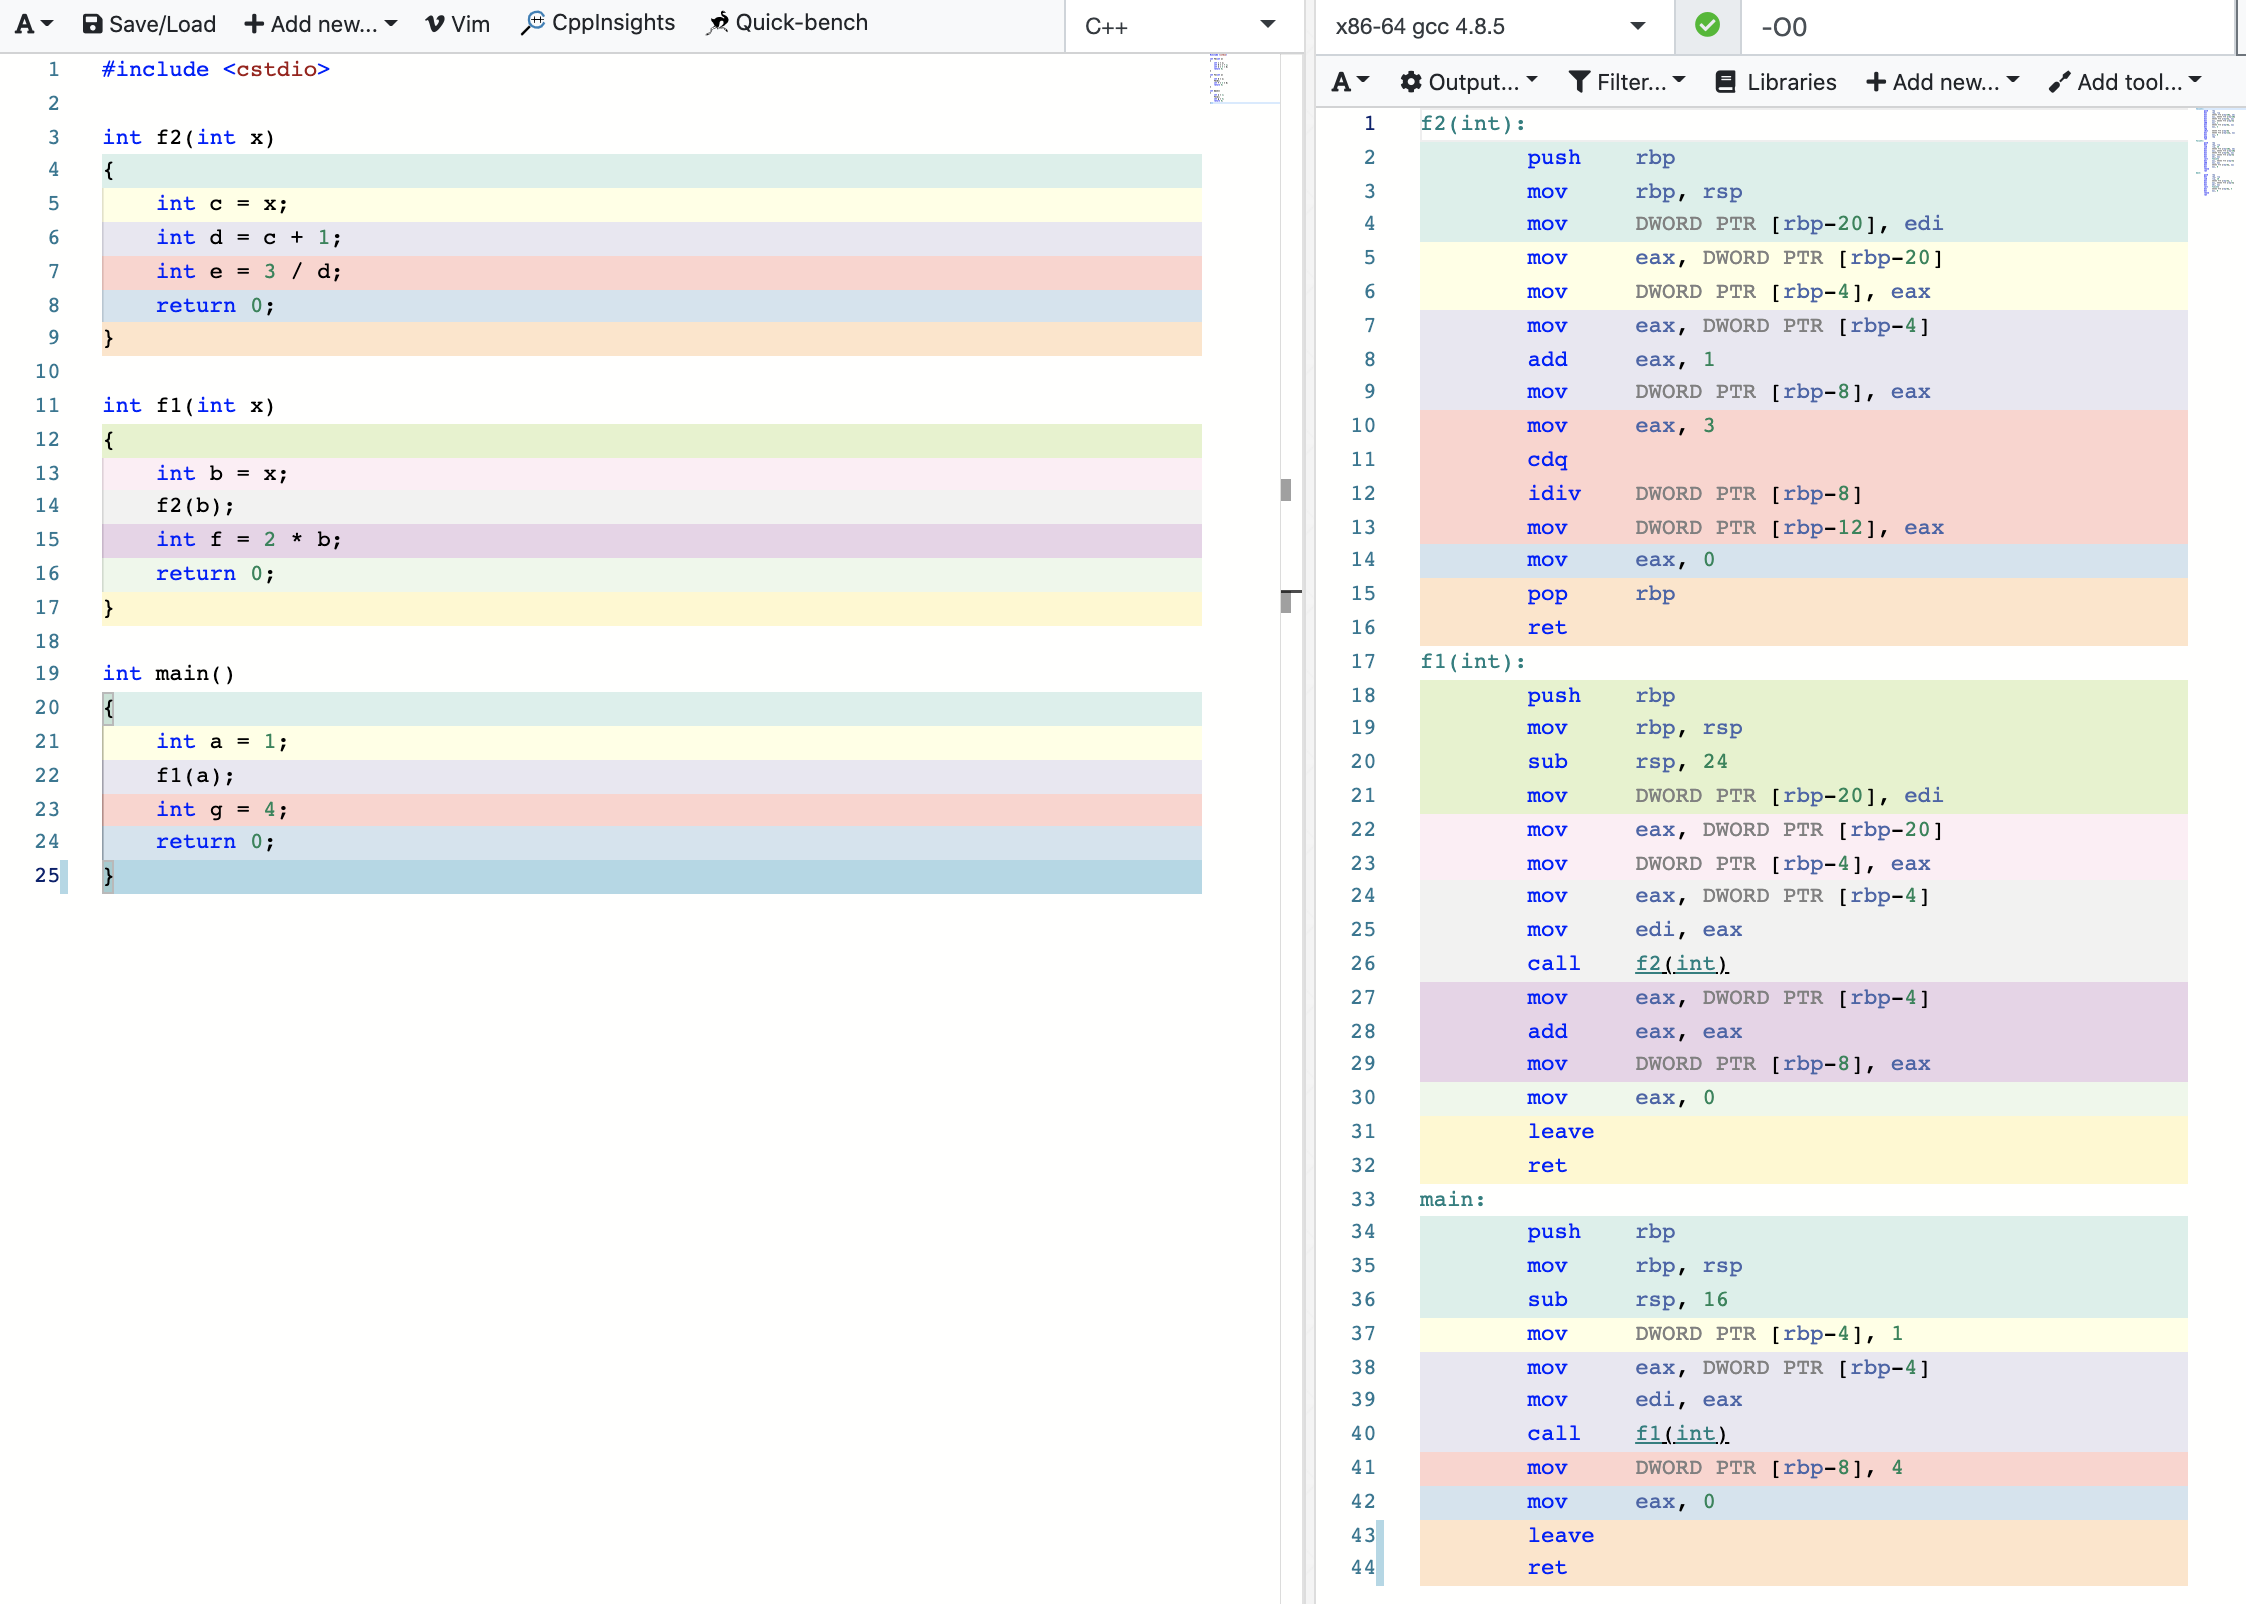
汇编代码生成:https://gcc.godbolt.org/
- 栈帧,是指为一个函数调用单独分配的那部分栈空间。比如,当运行中的程序调用另一个函数时,就要进入一个新的栈帧,原来函数的栈帧称为调用者函数的帧,新的栈帧称为被调用函数的帧(当前帧)。被调用的函数运行结束后当前帧全部回收,回到调用者的帧。
- 当进行函数调用的时候,除了将函数参数挨个入栈,将返回地址入栈以外,接下来就是移动
esp和ebp指针。 - 将调用者函数的
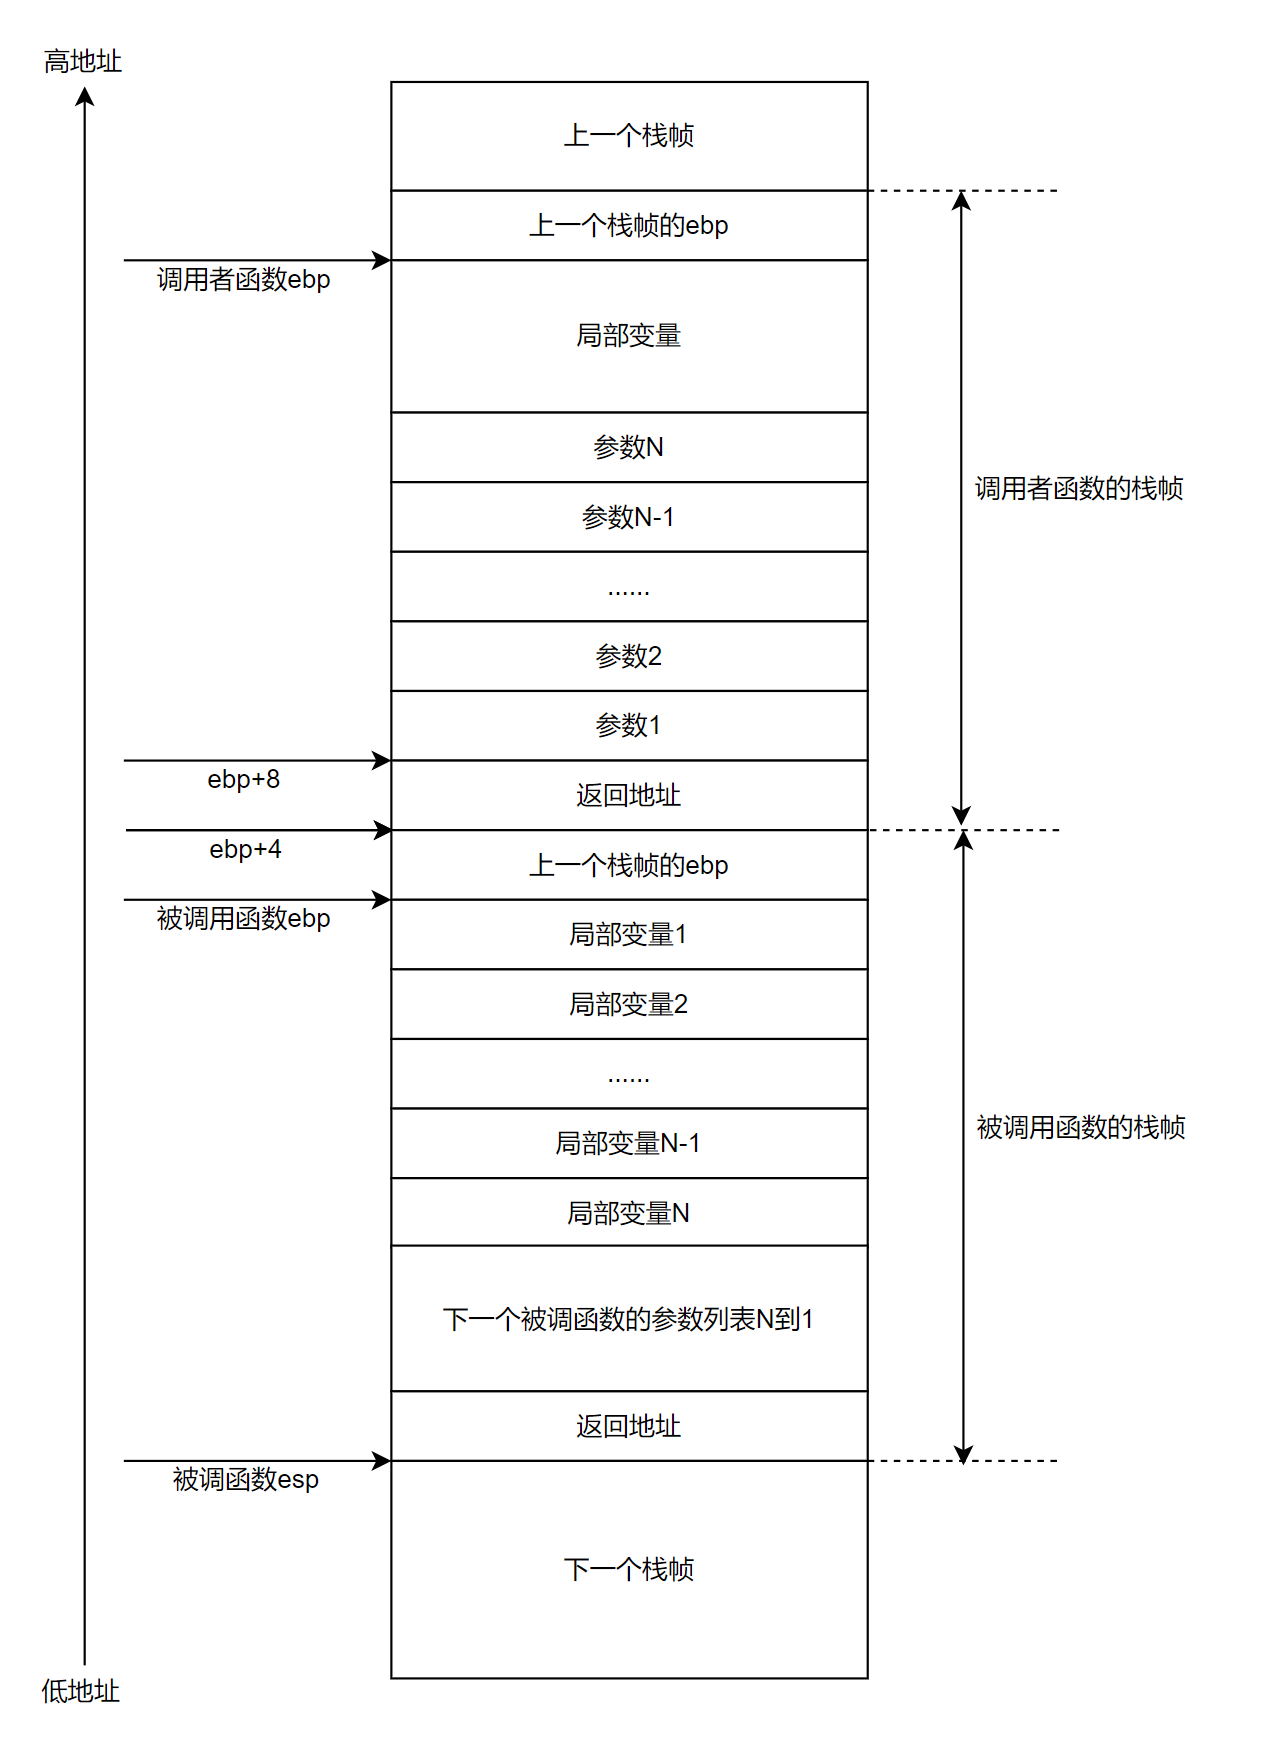
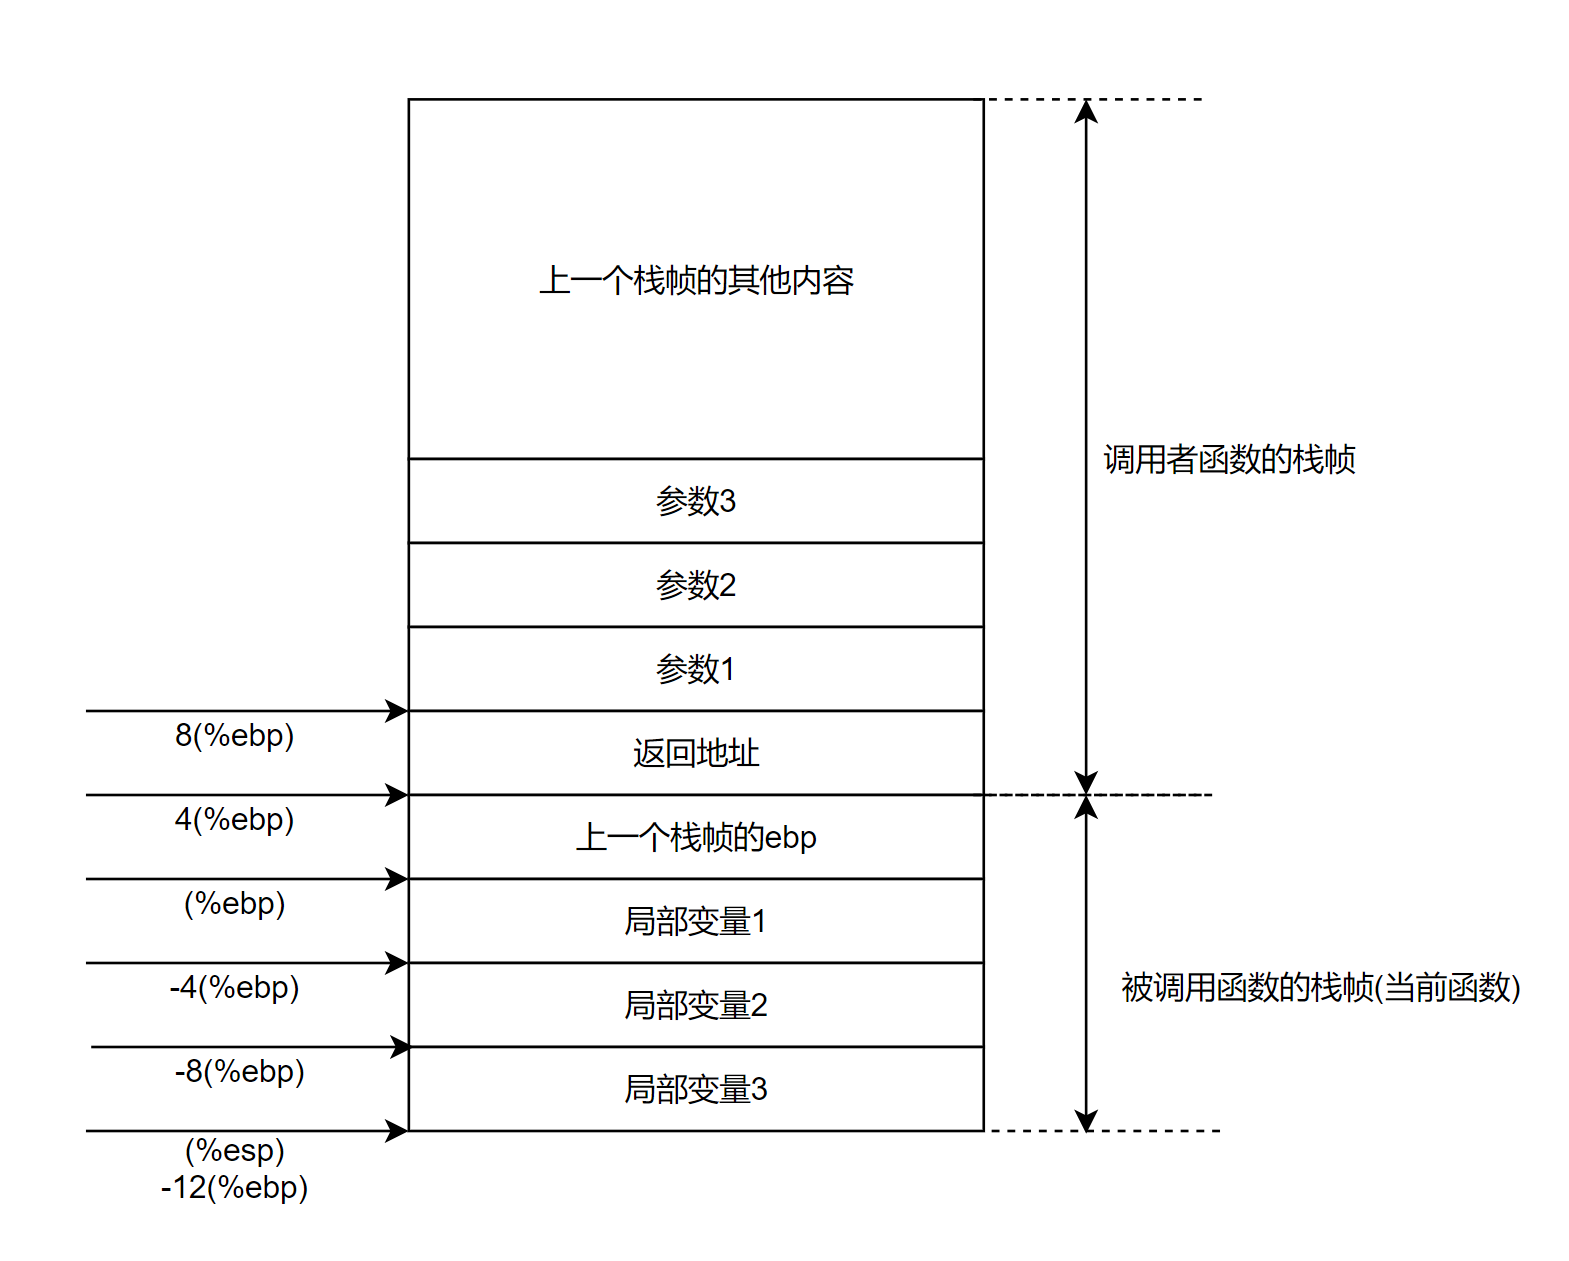
ebp入栈(pushl指令),然后将调用者函数的栈顶指针esp赋值给被调函数的ebp(作为被调函数的栈底),之后便可以将局部变量以pushl的方式入栈了。此时,ebp存储了一个重要的地址,向上(栈底方向,+n)能获取返回地址、参数值,向下(栈顶方向,-n)能获取函数的局部变量值,而该ebp地址处又存放着上一层函数调用时的ebp值(即,上一个栈帧的ebp)。 - 一般规律:
SS:[ebp + 4]处为被调函数的返回地址,SS:[ebp + 8]处为传递给被调函数的第一个参数(最后一个入栈的参数此处假设其占用4字节内存)的值,SS:[ebp-4]处为被调函数中的第一个局部变量,SS:[ebp]处为上一层ebp值。由于ebp中的地址处总是”上一层函数调用时的ebp值“,而在每一层函数调用中,都能通过当时的ebp值,向上(栈底方向)能获取返回地址、参数值,向下(栈顶方向)能获取被调函数的局部变量值,如此递归,就形成了函数调用栈。 - 不管是较早的帧,还是调用者的帧,还是当前帧,它们的结构是完全一样的,因为每个帧都是基于一个函数,帧随着函数的生命周期产生、发展和消亡。这里用到了两个寄存器,
ebp是帧指针,它总是指向当前帧的底部;esp是栈指针,它总是指向当前帧的顶部。这两个寄存器用来定位当前帧中的所有空间。编译器需要根据IA32指令集的规则小心翼翼地调整这两个寄存器的值,一旦出错,参数传递、函数返回都可能出现问题。
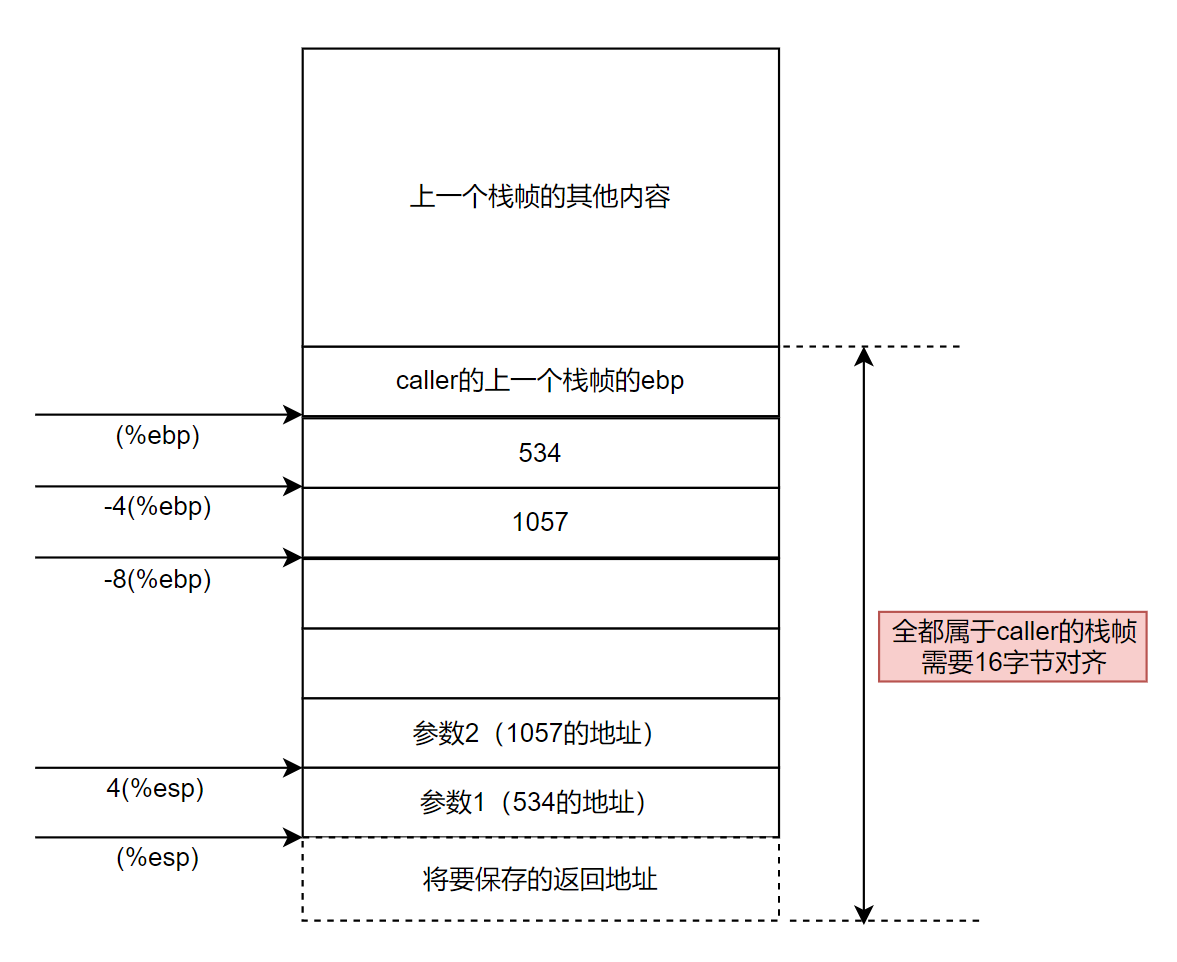
栈帧结构如下:
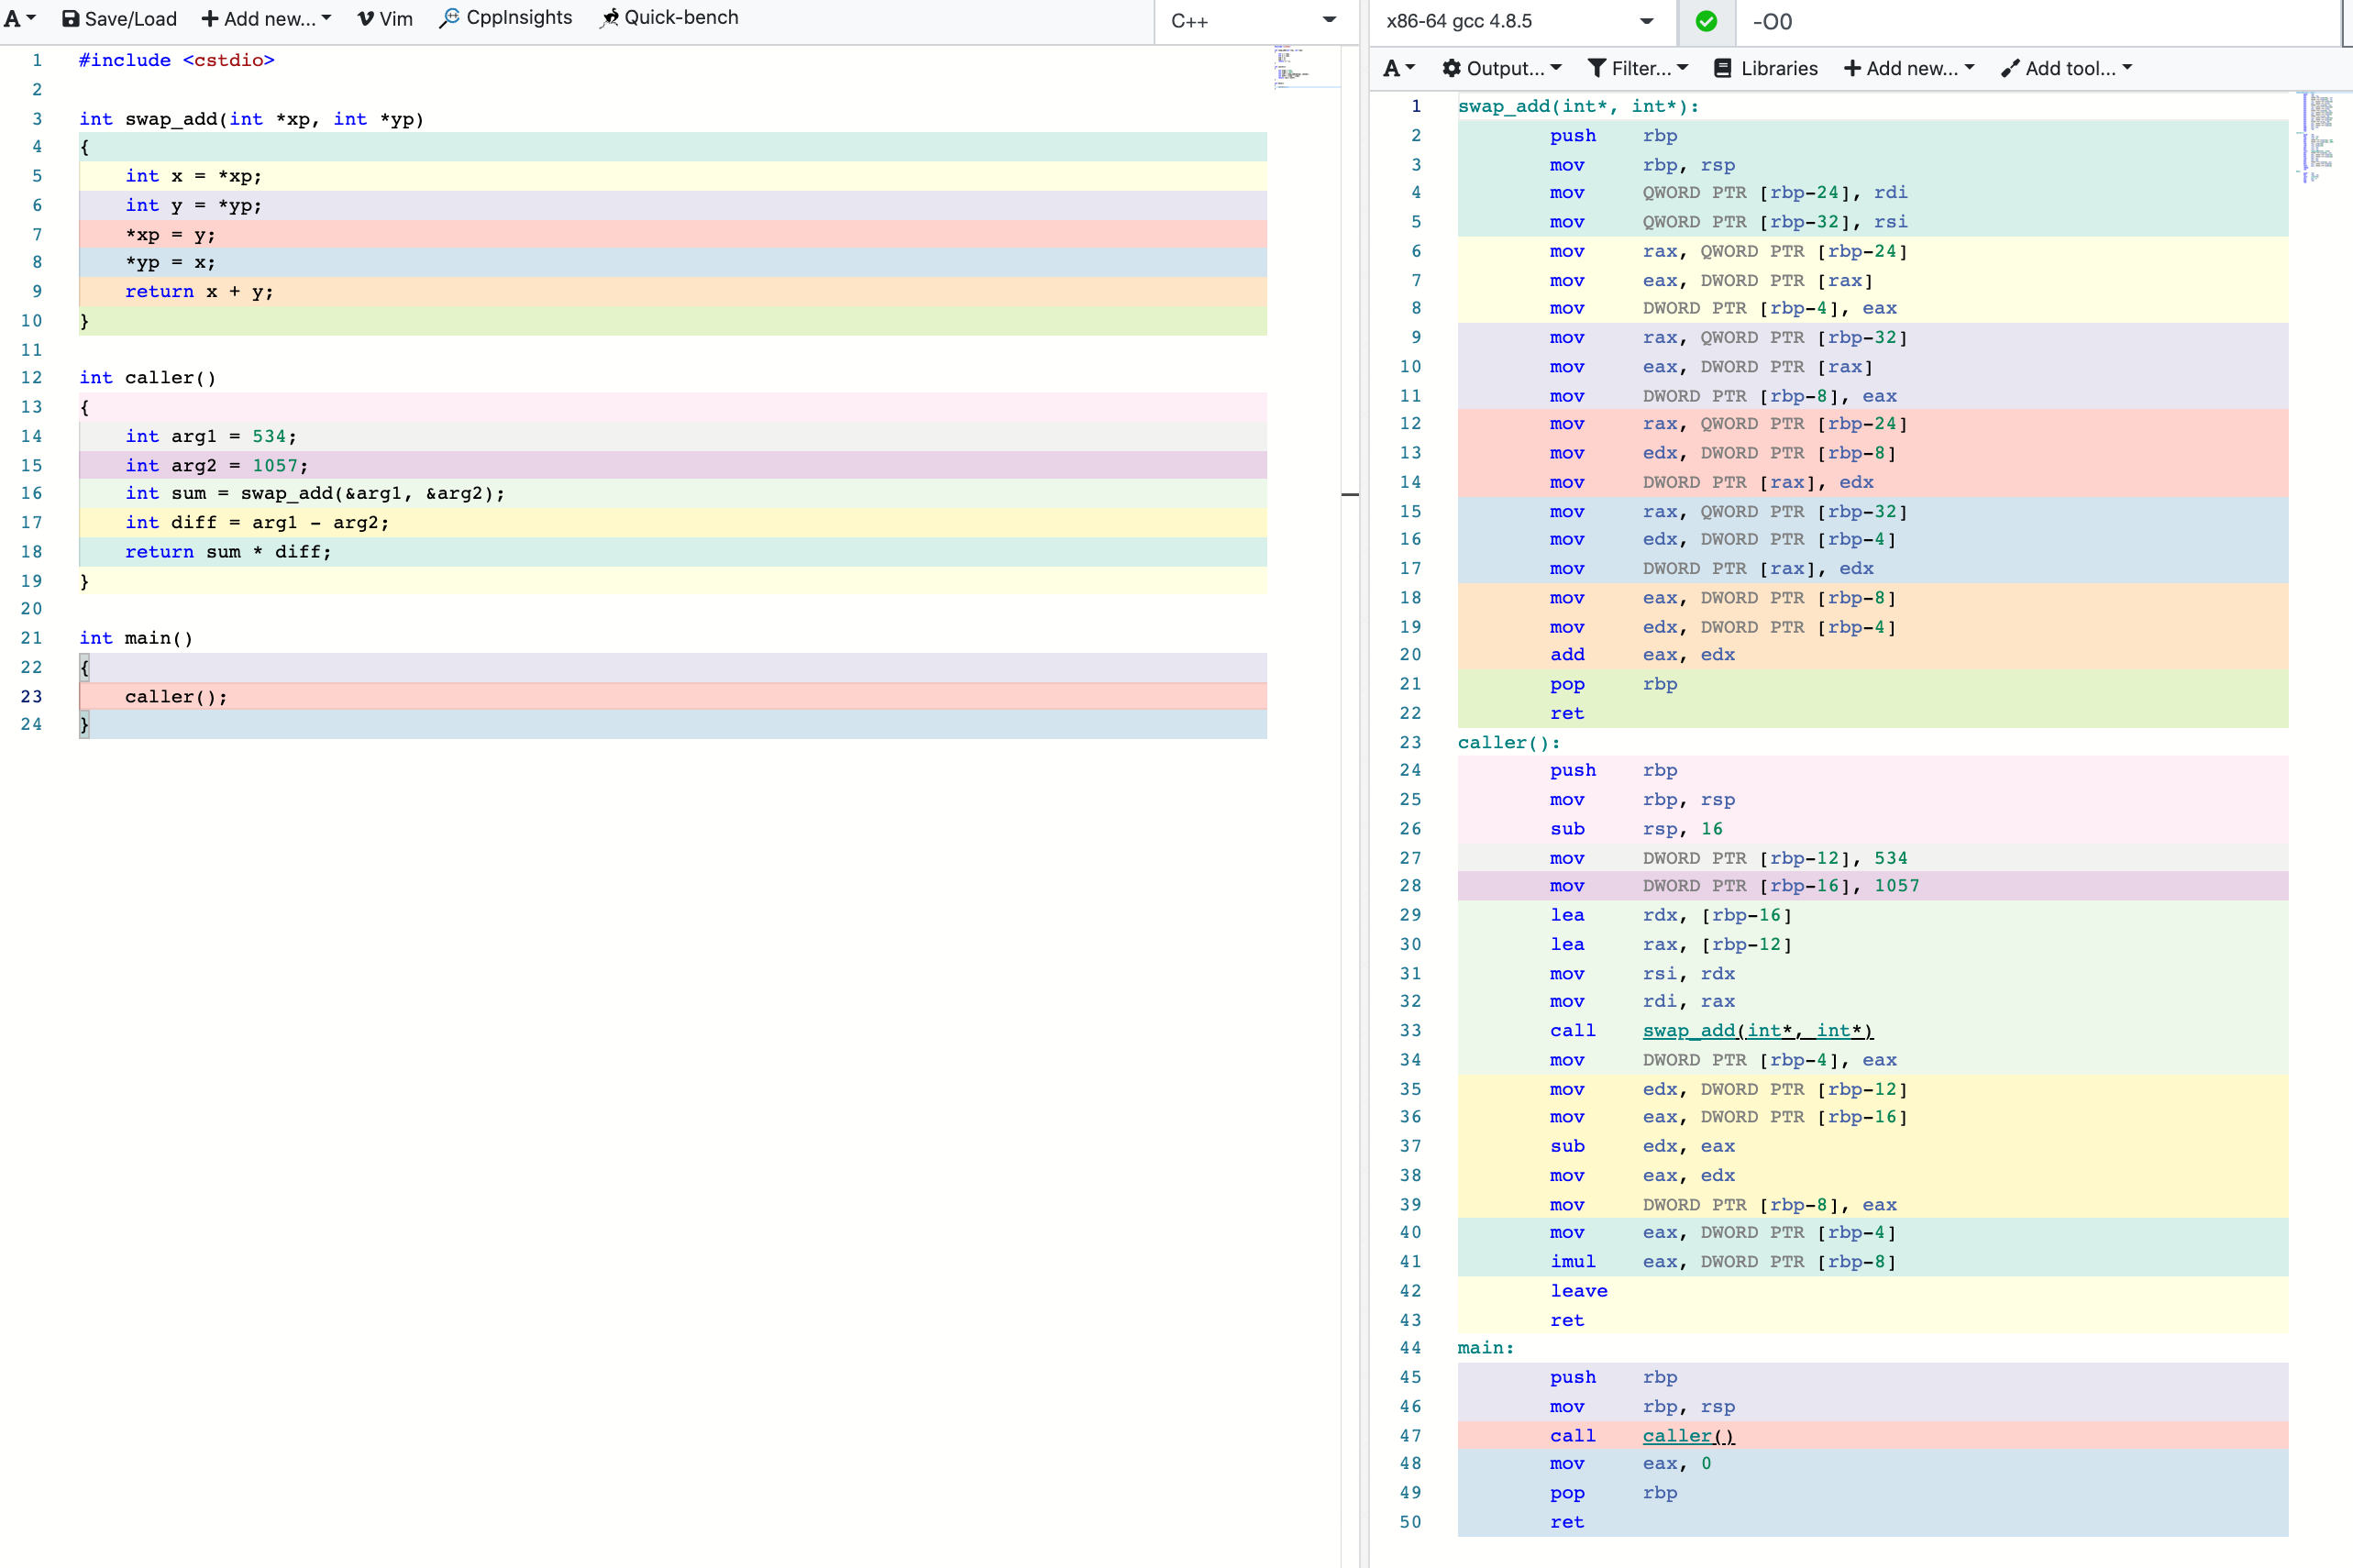
函数调用栈示例
#include <cstdio>

int swap_add(int *xp, int *yp)
{
    int x = *xp;
    int y = *yp;
    *xp = y;
    *yp = x;
    return x + y;
}

int caller()
{
    int arg1 = 534;
    int arg2 = 1057;
    int sum = swap_add(&arg1, &arg2);
    int diff = arg1 - arg2;
    return sum * diff;
}

int main()
{
    caller();
}
汇编解释:
swap_add(int*, int*):
        push    rbp                           ; 保存上一层函数的 ebp
        mov     rbp, rsp                      ; 将当前 ebp 设置为 esp,即,栈桢底部

        mov     QWORD PTR [rbp-24], rdi       ; 获取 xp
        mov     QWORD PTR [rbp-32], rsi       ; 获取 yp

        mov     rax, QWORD PTR [rbp-24]
        mov     eax, DWORD PTR [rax]
        mov     DWORD PTR [rbp-4], eax        ; 分配局部变量 x

        mov     rax, QWORD PTR [rbp-32]
        mov     eax, DWORD PTR [rax]
        mov     DWORD PTR [rbp-8], eax        ; 分配局部变量 y

        mov     rax, QWORD PTR [rbp-24]
        mov     edx, DWORD PTR [rbp-8]
        mov     DWORD PTR [rax], edx          ; y 赋值给 xp

        mov     rax, QWORD PTR [rbp-32]
        mov     edx, DWORD PTR [rbp-4]
        mov     DWORD PTR [rax], edx          ; x 赋值给 yp

        mov     eax, DWORD PTR [rbp-8]
        mov     edx, DWORD PTR [rbp-4]
        add     eax, edx                      ; 计算 x + y

        pop     rbp                           ; restore ebp
        ret                                   ; return

caller():
        push    rbp                            ; 保存上一层函数的 ebp
        mov     rbp, rsp                       ; 将当前 ebp 设置为 esp,即,栈桢底部
        sub     rsp, 16                        ; 分配 16B 空间
        mov     DWORD PTR [rbp-12], 534        ; 分配局部变量 arg1 为 534
        mov     DWORD PTR [rbp-16], 1057       ; 分配局部变量 arg2 为 1057
        lea     rdx, [rbp-16]                  ; 计算 &arg2 并放入 rdx
        lea     rax, [rbp-12]                  ; 计算 &arg1 并放入 rax
        mov     rsi, rdx
        mov     rdi, rax

        call    swap_add(int*, int*)           ; 调用 swap_add 函数

        mov     DWORD PTR [rbp-4], eax         ; 分配局部变量 sum 为 swap_add 函数的返回值 eax

        mov     edx, DWORD PTR [rbp-12]
        mov     eax, DWORD PTR [rbp-16]

        sub     edx, eax                       ; 计算 arg1 - arg2

        mov     eax, edx
        mov     DWORD PTR [rbp-8], eax         ; 分配局部变量 diff

        mov     eax, DWORD PTR [rbp-4]
        imul    eax, DWORD PTR [rbp-8]         ; 计算 sum * diff

        leave                                  ; 恢复栈顶指针位置

        ret                                    ; return

main:
        push    rbp
        mov     rbp, rsp
        call    caller()
        mov     eax, 0                         ; 返回值 0
        pop     rbp
        ret
解释:
sub rsp, 16为什么申请了16字节的空间?在现代处理器中,栈帧必须16字节对齐,就是说栈底和栈顶的地址必须是16的整数倍。refer: 联合、数据对齐和缓冲区溢出攻击lea(load effective address) 将有效地址传送到指定的的寄存器,类似C语言中的&
函数调用约定
x86-64 函数调用约定:https://en.wikipedia.org/wiki/X86_calling_conventions#System_V_AMD64_ABI
| Argument Type | Registers |
|---|---|
| Integer/Pointer Arguments 1-6 | RDI, RSI, RDX, RCX, R8, R9 |
| Floating Point Arguments 1-8 | XMM0 - XMM7 |
| Excess Arguments | Stack |
| Static chain pointer | R10 |
Common Knowledge
- 汇编指令是机器指令的助记符,同机器指令一一对应。
- 每一种 CPU 都有自己的汇编指令集。
- CPU 可以直接使用的信息在存储器中存放。
- 在存储器中
指令和数据没有任何区别,都是二进制信息。 - 存储单元从零开始顺序编号。
- 一个存储单元可以存储8 个 bit,即 8 位二进制数。
- 1B=8b 1KB=1024B 1MB=1024KB 1GB=1024MB
- 每一个 CPU 芯片都有许多管脚,这些管脚和总线相连。也可以说,这些管脚引出总线。一个 CPU 可以引出三种总线的宽度标志了这个 CPU 的不同方面的性能:
- 地址总线 的宽度决定了 CPU 的寻址能力;
- 数据总线 的宽度决定了 CPU 与其他器件进行数据传送时的一次数据传送量;
- 控制总线 的宽度决定了 CPU 对系统中其他器件的控制能力。
- 内存地址空间
什么是内存地址空间呢?举例来讲,一个 CPU 的地址线宽度为 10 ,那么可以寻址 1024 个内存单元,这 1024 个可寻到的内存单元就构成这个 CPU 的内存地址空间。
注意:最终运行程序的是 CPU ,我们用汇编编程的时候,必须要从 CPU 角度考虑问题。对 CPU 来讲,系统中的所有存储器中的存储单元都处于一个统一的逻辑存储器中,它的容量受 CPU 寻址能力的限制。这个逻辑存储器即是我们所说的内存地址空间。
- 主板
在每一台 PC 机中,都有一个主板,主板上有核心器件和一些主要器件,这些器件通过总线 ( 地址总线、数据总线、控制总线 ) 相连。这些器件有: CPU 、存储器、外围芯片组、扩展插槽等。扩展插槽上一般插有 RAM 内存条和各类接口卡。
- 接口卡
计算机系统中,所有可用程序控制其工作的设备,必须受到 CPU 的控制。 CPU 对外部设备都不能直接控制,如显示器、音响、打印机等。直接控制这些设备进行工作的是插在扩展插槽上的接口卡。扩展插槽通过总线和 CPU 相连,所以接口卡也通过总线同 CPU 相连。 CPU 可以直接控制这些接口卡,从而实现 CPU 对外设的间接控制。简单地讲,就是 CPU 通过总线向接口卡发送命令,接口卡根据 CPU 的命令控制外设进行工作 。
- 各类存储器芯片
一台 PC 机中,装有多个存储器芯片,这些存储器芯片从物理连接上看是独立的、不同的器件。从读写属性上 看分为两类:随机存储器 (RAM) 和 只读存储器 (ROM) 。随机存储器可读可写,但必须带电存储,关机后存储的内容丢失;只读存储器只能读取不能写入,关机后其中的内容不丢失。这些存储器从功能和连接上 又分为以下几类:
随机存储器:用于存放供 CPU 使用的绝大部分程序和数据 ,主随机存储器一般由两个位置上的 RAM 组成,装在主板上的 RAM 和插在扩展插槽上的 RAM 。
装有 BIOS (Basic Input/Output System , 基本输入输出系统 ) 的 ROM:BIOS 是由主板和各类接口卡 ( 如 : 显卡、网卡等 ) 厂商提供的软件系统 , 可以通过它利用该硬件设备进行最基本的输入输出。在主板和某些接口卡上插有存储相应 BIOS 的 ROM 。例如:主板上的 ROM 中存储着主板的 BIOS( 通常称为系统 BIOS) ;显卡上的 ROM 中存储着显卡的 BIOS ;如果网卡上装有 ROM ,那其中就可以存储网卡的 BIOS 。
- 接口卡上的 RAM
某些接口卡需要对大批量输入、输出数据进行暂时存储,在其上装有 RAM 。最典型的是显示卡上的 RAM ,一般称为显存。显示卡随时将显存中的数据向显示器上输出。换句话说,我们将需要显示的内容写入显存,就会出现在显示器上。
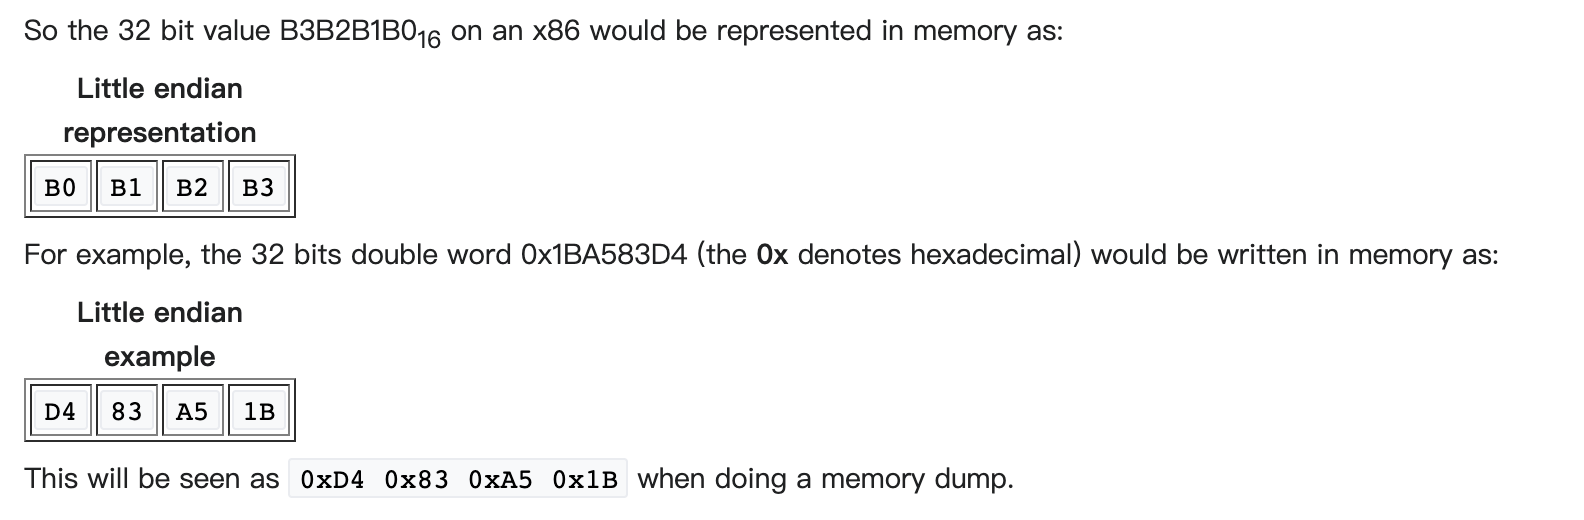
Memory
The x86 architecture is little-endian, meaning that multi-byte values are written least significant byte first. (This refers only to the ordering of the bytes, not to the bits.)
Stack
The stack is a Last In First Out (LIFO) data structure; data is pushed onto it and popped off of it in the reverse order.
mov ax, 006Ah
mov bx, F79Ah
mov cx, 1124h

push ax ; push the value in AX onto the top of the stack, which now holds the value 0x006A.
push bx ; do the same thing to the value in BX; the stack now has 0x006A and 0xF79A.
push cx ; now the stack has 0x006A, 0xF79A, and 0x1124.

call do_stuff ; do some stuff. The function is not forced to save the registers it uses, hence us saving them.

pop cx ; pop the element on top of the stack, 0x1124, into CX; the stack now has 0x006A and 0xF79A.
pop bx ; pop the element on top of the stack, 0xF79A, into BX; the stack now has just 0x006A.
pop ax ; pop the element on top of the stack, 0x006A, into AX; the stack is now empty.
The Stack is usually used to pass arguments to functions or procedures and also to keep track of control flow when the call instruction is used. The other common use of the Stack is temporarily saving registers.
CPU Registers (CPU 寄存器)
| 寄存器 | 8 位 | 16 位 | 32 位 | 64 位 | |
|---|---|---|---|---|---|
| 通用寄存器 | 累加寄存器 | AH : AL | AX | EAX | RAX |
| 基址寄存器 | BH : BL | BX | EBX | RBX | |
| 计数寄存器 | CH : CL | CX | ECX | RCX | |
| 数据寄存器 | DH : DL | DX | EDX | RDX | |
| 堆栈基指针 | BP | EBP | RBP | ||
| 堆栈指针 | SP | ESP | RSP | ||
| 变址寄存器 | SI | ESI | RSI | ||
| 指令寄存器 | DI | EDI | RDI | ||
| 指令指针寄存器 | IP | EIP | RIP | ||
| 新增 | r8 - r15 |
- AX,BX,CX,DX 这些寄存器用来保存操作数和运算结果等信息,从而节省读取操作数所需占用总线和访问存储器的时间。
- 指针寄存器(SP,BP),用于维护和访问堆栈存储单元。SP 为堆栈指针(Stack Pointer)寄存器,用它只可访问栈顶;BP 为基指针(Base Pointer)寄存器,用它可直接存取堆栈中的数据。
- 变址寄存器(SI,DI),Index Register,它们主要用于存放存储单元在段内的偏移量。
-
指令指针寄存器(IP),Instruction Pointer,是存放下次将要执行的指令在代码段的偏移量。在具有预取指令功能的系统中,下次要执行的指令通常已被预取到指令队列中,除非发生转移情况。
- AT&T 格式和 Intel 格式的指令的源操作数和目的操作数的顺序是相反的。下面指令的含义是将 rax 寄存器的值存入 rdi 寄存器中。
| AT&T格式 | Intel格式 |
|---|---|
| mov %rax %rdi | mov rdi rax |
- 汇编中的寻址方式:立即数寻址,直接寻址,间接寻址,变址寻址;下面是AT&T指令格式示例。
| 寻址方式 | 指令 | AT&T格式 |
|---|---|---|
| 立即数寻址 | movl $0x123, %edx | 数字->寄存器 |
| 直接寻址 | movl 0x123, %edx | 0x123 指向内存数据->寄存器 |
| 间接寻址 | movl (%ebx), %edx | ebx 寄存器指向内存数据-> edx 寄存器 |
| 变址寻址 | movl 4(%ebx), %edx | ebx+4 指向内存数据-> edx 寄存器 |
- lea 指令,装入有效地址到寄存器
- 跳转指令:call,ret。
# cpu 执行 call 跳转指令时,cpu 做了如下操作:

rsp = rsp – 8
rsp = rip
# 即跳转之前会将下一条要执行语句指令地址压入栈顶
# call等同于以下两条语句,但call本身就一条指令
push %rip
jmp 标号
类似 ret 指令会将栈顶的内容弹出到 rip 寄存器中,继续执行:
rip = rsp
rsp = rsp + 8
# 等同于
pop %rip
- GCC 关于寄存器的使用
GCC 中对这些寄存器的调用规则如下:
rax 作为函数返回值使用; rsp 栈指针寄存器,指向栈顶; rdi,rsi,rdx,rcx,r8,r9 用作函数参数,依次对应第1参数,第2参数等。当参数超过6个,才会通过压栈的方式传参数。 rbx,rbp,r12,r13,r14,r15 用作数据存储,遵循被调用者保存规则,简单说就是随便用,在调用函数中如果要使用这些寄存器要先备份它,退出调用函数前进行恢复; r10,r11 用作数据存储,遵循调用者保存规则,简单说就是调用函数之前要先保存原值;
Registers are a space in the CPU that can be used to hold data. In an x64 CPU, each register can hold 64 bits.
The most common registers are the general-purpose registers. They are called general-purpose because they can be used to store any kind of data. x64 defines 16 of these registers: rax, rbx, rcx, rdx, rsi, rdi, rbp, rsp, r8, r9, r10, r11, r12, r13, r14 and r15
There is another kind of registers called special-purpose registers. These registers have a specific pupose. To give an example, rip is called the instruction pointer; it always points to the next instruction to be executed by the program. Another example is rflags; this register contains various flags that change depending on the result of an operation; the flags tell you things like if the result was zero, there was a carry or an overflow, etc. There are more special purpose registers, but I won’t explore them in this article.

补充:协程切换原理
X86-64 架构有如图 16 个通用目的寄存器,还有指令指针寄存器 rip,指向下一条要执行的指令地址。CPU 工作时根据 rip 寄存器取得指令的地址,取指译码执行。而在调用函数时,函数的返回地址、局部变量等就依次压入由 rsp 寄存器所指的栈中。这样只需改变 rip 和 rsp 的值 ,让其指向所要切换到的代码处和所使用的栈空间,就可以改变 CPU 的工作流,实现用户态的协程切换。而在需要切换回来时,则将之前的寄存器值恢复即可。
x86 Assembly/X86 Architecture
The x86 architecture has 8 General-Purpose Registers (GPR), 6 Segment Registers, 1 Flags Register and an Instruction Pointer. 64-bit x86 has additional registers.
General-Purpose Registers (GPR) - 16-bit naming conventions
The 8 GPRs are:
- Accumulator register (
AX). Used in arithmetic operations - Counter register (
CX). Used in shift/rotate instructions and loops. - Data register (
DX). Used in arithmetic operations and I/O operations. - Base register (
BX). Used as a pointer to data (located in segment register DS, when in segmented mode). - Stack Pointer register (
SP). Pointer to the top of the stack. - Stack Base Pointer register (
BP). Used to point to the base of the stack. - Source Index register (
SI). Used as a pointer to a source in stream operations. - Destination Index register (
DI). Used as a pointer to a destination in stream operations.
All registers can be accessed in 16-bit and 32-bit modes. In 16-bit mode, the register is identified by its two-letter abbreviation from the list above. In 32-bit mode, this two-letter abbreviation is prefixed with an ‘E’ (extended). For example, ‘EAX’ is the accumulator register as a 32-bit value.
Similarly, in the 64-bit version, the ‘E’ is replaced with an ‘R’ (register), so the 64-bit version of ‘EAX’ is called ‘RAX’.
It is also possible to address the first four registers (AX, CX, DX and BX) in their size of 16-bit as two 8-bit halves. The least significant byte (LSB), or low half, is identified by replacing the ‘X’ with an ‘L’. The most significant byte (MSB), or high half, uses an ‘H’ instead. For example, CL is the LSB of the counter register, whereas CH is its MSB.
In total, this gives us five ways to access the accumulator, counter, data and base registers: 64-bit, 32-bit, 16-bit, 8-bit LSB, and 8-bit MSB. The other four are accessed in only four ways: 64-bit, 32-bit, 16-bit, and 8-bit. The following table summarises this:

Segment Registers
The 6 Segment Registers are:
- Stack Segment (
SS). Pointer to the stack. - Code Segment (
CS). Pointer to the code. - Data Segment (
DS). Pointer to the data. - Extra Segment (
ES). Pointer to extra data (‘E’ stands for ‘Extra’). - F Segment (
FS). Pointer to more extra data (‘F’ comes after ‘E’). - G Segment (
GS). Pointer to still more extra data (‘G’ comes after ‘F’).
Most applications on most modern operating systems (like FreeBSD, Linux or Microsoft Windows) use a memory model that points nearly all segment registers to the same place (and uses paging instead), effectively disabling their use. Typically the use of FS or GS is an exception to this rule, instead being used to point at thread-specific data.
EFLAGS Register
The EFLAGS is a 32-bit register used as a collection of bits representing Boolean values to store the results of operations and the state of the processor.
Instruction Pointer
The EIP register contains the address of the next instruction to be executed if no branching is done. EIP can only be read through the stack after a call instruction.
Intel vs AT&T
There are two ways to write assembly; Intel syntax, which in the beginning was used mostly in the windows world and AT&T syntax, which was used everywhere else. Which syntax you use can also depend on the assembler.
Here is an example instruction in Intel:
mov rax, 1
And the same instruction in AT&T:
mov $1, %rax
Both instructions set the registry rax to the value 1. We can see in the AT&T case that the value 1 is prefixed with $ and the registry name is prefixed with %. The order of the parameters is also different.
In the rest of the article I will use only Intel syntax because it’s the one supported by NASM.
+------------------------------+------------------------------------+
|       Intel Code             |      AT&T Code                     |
+------------------------------+------------------------------------+
| mov     eax,1                |  movl    $1,%eax                   |
| mov     ebx,0ffh             |  movl    $0xff,%ebx                |
| int     80h                  |  int     $0x80                     |
| mov     ebx, eax             |  movl    %eax, %ebx                |
| mov     eax,[ecx]            |  movl    (%ecx),%eax               |
| mov     eax,[ebx+3]          |  movl    3(%ebx),%eax              |
| mov     eax,[ebx+20h]        |  movl    0x20(%ebx),%eax           |
| add     eax,[ebx+ecx*2h]     |  addl    (%ebx,%ecx,0x2),%eax      |
| lea     eax,[ebx+ecx]        |  leal    (%ebx,%ecx),%eax          |
| sub     eax,[ebx+ecx*4h-20h] |  subl    -0x20(%ebx,%ecx,0x4),%eax |
+------------------------------+------------------------------------+
refer: http://www.ibiblio.org/gferg/ldp/GCC-Inline-Assembly-HOWTO.html
Installing an assembler
Assembly is a low level language where we tell the computer exactly which instructions to execute, but the code we write in a text editor has to be transformed into a binary file that the OS and processor can execute. An assembler takes care of this step.
Nasm is one of the most popular assemblers out there. It has great support for x64 and works in multiple platforms. To install nasm in Ubuntu, you can do:
sudo apt-get install nasm
You can verify it installed correctly:
$ nasm -v
NASM version 2.13.02
Assembling a program
The general format for assembling a program is:
nasm -f <format> -o <output file> <source file>
The format is the platform for which the program will be assembled (windows, linux, etc). To see the list of supported formats you can use:
# For a list of valid output formats, use -hf
$ nasm -hf

valid output formats for -f are (`*' denotes default):
  * bin       flat-form binary files (e.g. DOS .COM, .SYS)
    ith       Intel hex
    srec      Motorola S-records
    aout      Linux a.out object files
    aoutb     NetBSD/FreeBSD a.out object files
    coff      COFF (i386) object files (e.g. DJGPP for DOS)
    elf32     ELF32 (i386) object files (e.g. Linux)
    elf64     ELF64 (x86_64) object files (e.g. Linux)
    elfx32    ELFX32 (x86_64) object files (e.g. Linux)
    as86      Linux as86 (bin86 version 0.3) object files
    obj       MS-DOS 16-bit/32-bit OMF object files
    win32     Microsoft Win32 (i386) object files
    win64     Microsoft Win64 (x86-64) object files
    rdf       Relocatable Dynamic Object File Format v2.0
    ieee      IEEE-695 (LADsoft variant) object file format
    macho32   NeXTstep/OpenStep/Rhapsody/Darwin/MacOS X (i386) object files
    macho64   NeXTstep/OpenStep/Rhapsody/Darwin/MacOS X (x86_64) object files
    dbg       Trace of all info passed to output stage
    elf       ELF (short name for ELF32)
    macho     MACHO (short name for MACHO32)
    win       WIN (short name for WIN32)
Since I’m using Linux, I’ll use something like this to assemble my programs:
nasm -f elf64 -o example.o example.asm
There is one more step before our program is ready to run. We need to link it. Linking a program is helpful to combine many object files together and is necessary to create the executable we need. For linking a program, I’ll use GNU linker (ld):
ld -o <executable name> <object file>
We can try these steps with an empty file and see what happens:
touch example.asm
nasm -f elf64 -o example.o example.asm
ld -o example example.o
If you run those commands, you will notice that the assembly step finishes successfully, but there is an error in the linking step:
$ touch example.asm
$ nasm -f elf64 -o example.o example.asm
$ hexdump example.o
0000000 457f 464c 0102 0001 0000 0000 0000 0000
0000010 0001 003e 0001 0000 0000 0000 0000 0000
0000020 0000 0000 0000 0000 0040 0000 0000 0000
0000030 0000 0000 0040 0000 0000 0040 0004 0001
0000040 0000 0000 0000 0000 0000 0000 0000 0000
*
0000080 0001 0000 0003 0000 0000 0000 0000 0000
0000090 0000 0000 0000 0000 0140 0000 0000 0000
00000a0 001b 0000 0000 0000 0000 0000 0000 0000
00000b0 0001 0000 0000 0000 0000 0000 0000 0000
00000c0 000b 0000 0002 0000 0000 0000 0000 0000
00000d0 0000 0000 0000 0000 0160 0000 0000 0000
00000e0 0030 0000 0000 0000 0003 0000 0002 0000
00000f0 0008 0000 0000 0000 0018 0000 0000 0000
0000100 0013 0000 0003 0000 0000 0000 0000 0000
0000110 0000 0000 0000 0000 0190 0000 0000 0000
0000120 000d 0000 0000 0000 0000 0000 0000 0000
0000130 0001 0000 0000 0000 0000 0000 0000 0000
0000140 2e00 6873 7473 7472 6261 2e00 7973 746d
0000150 6261 2e00 7473 7472 6261 0000 0000 0000
0000160 0000 0000 0000 0000 0000 0000 0000 0000
0000170 0000 0000 0000 0000 0001 0000 0004 fff1
0000180 0000 0000 0000 0000 0000 0000 0000 0000
0000190 6500 6178 706d 656c 612e 6d73 0000 0000
00001a0

$ ld -o example example.o
ld: warning: cannot find entry symbol _start; not setting start address
An assembly program needs a_start entry point. Let’s modify our example so it works:
section .text
  global _start
_start:
This is the tiniest program that can be linked successfully, but it does nothing. Not only, it does nothing, but it fails to execute:
$ nasm -f elf64 -o example.o example.asm
$ hexdump example.o
0000000 457f 464c 0102 0001 0000 0000 0000 0000
0000010 0001 003e 0001 0000 0000 0000 0000 0000
0000020 0000 0000 0000 0000 0040 0000 0000 0000
0000030 0000 0000 0040 0000 0000 0040 0005 0002
0000040 0000 0000 0000 0000 0000 0000 0000 0000
*
0000080 0001 0000 0001 0000 0006 0000 0000 0000
0000090 0000 0000 0000 0000 0180 0000 0000 0000
00000a0 0000 0000 0000 0000 0000 0000 0000 0000
00000b0 0010 0000 0000 0000 0000 0000 0000 0000
00000c0 0007 0000 0003 0000 0000 0000 0000 0000
00000d0 0000 0000 0000 0000 0180 0000 0000 0000
00000e0 0021 0000 0000 0000 0000 0000 0000 0000
00000f0 0001 0000 0000 0000 0000 0000 0000 0000
0000100 0011 0000 0002 0000 0000 0000 0000 0000
0000110 0000 0000 0000 0000 01b0 0000 0000 0000
0000120 0060 0000 0000 0000 0004 0000 0003 0000
0000130 0008 0000 0000 0000 0018 0000 0000 0000
0000140 0019 0000 0003 0000 0000 0000 0000 0000
0000150 0000 0000 0000 0000 0210 0000 0000 0000
0000160 0014 0000 0000 0000 0000 0000 0000 0000
0000170 0001 0000 0000 0000 0000 0000 0000 0000
0000180 2e00 6574 7478 2e00 6873 7473 7472 6261
0000190 2e00 7973 746d 6261 2e00 7473 7472 6261
00001a0 0000 0000 0000 0000 0000 0000 0000 0000
*
00001c0 0000 0000 0000 0000 0001 0000 0004 fff1
00001d0 0000 0000 0000 0000 0000 0000 0000 0000
00001e0 0000 0000 0003 0001 0000 0000 0000 0000
00001f0 0000 0000 0000 0000 000d 0000 0010 0001
0000200 0000 0000 0000 0000 0000 0000 0000 0000
0000210 6500 6178 706d 656c 612e 6d73 5f00 7473
0000220 7261 0074 0000 0000 0000 0000 0000 0000
0000230
$ ld -o example example.o
$ ./example
-bash: ./example: cannot execute binary file: Exec format error
Adding an instruction to our program fixes this problem:
section .text
  global _start
_start:
  mov rax, 1
But we get a segmentation fault:
$ nasm -f elf64 -o example.o example.asm
$ ld -o example example.o
$ ./example
Segmentation fault (core dumped)
The reason we get a segmentation fault is that the program doesn’t end correctly. In higher level programming languages, the runtime (the compiler) takes care of this. In assembly, this needs to be done by the programmer. To do this, we need to use syscall 60 (sys_exit). The interface for sys_exit is:
rdi int error_code
What this means is that is takes a single int argument in the rdi register. This argument is the exit code for the program. A successful program should finish with code 0.
Let’s make our program end successfully:
section .text
  global _start
_start:
  mov rax, 60
  mov rdi, 0
  syscall
Looking at the program, you’ll notice that we first have to move the value 60 (The id of sys_exit) to the rax register. This is necessary to execute any system call. The next step is to populate the correct registers with the arguments that system call needs. In this case, it only needs the exit code in rdi. Finally, execute the system call.
This program can be executed, and although it doesn’t do anything, it will end successfully:
$ nasm -f elf64 -o example.o example.asm
$ ld -o example example.o
$ ./example
$ echo $?
0
$ ls -rtlh
total 12K
-rw-rw-r-- 1 ubuntu ubuntu  75 May  5 12:10 example.asm
-rw-rw-r-- 1 ubuntu ubuntu 576 May  5 12:10 example.o
-rwxrwxr-x 1 ubuntu ubuntu 704 May  5 12:10 example
$ strip example
$ ls -rtlh
total 12K
-rw-rw-r-- 1 ubuntu ubuntu  75 May  5 12:10 example.asm
-rw-rw-r-- 1 ubuntu ubuntu 576 May  5 12:10 example.o
-rwxrwxr-x 1 ubuntu ubuntu 352 May  5 12:10 example
After strip, you may find that the size of tiniest elf is about 350 bytes.
Variables
The simplest way do declare variables is by initializing them in the .data segment of a program. The format to define initialized data is:
[variable-name] define-directive initial-value [,initial-value] ...
An example use:
section .data
  exit_code dq 0
  sys_call dq 60

section .text
  global _start

_start:
  mov rax, [sys_call]
  mov rdi, [exit_code]
  syscall
When a variable is defined, some space in memory will be set for it. The dq directive is used to reserve 64 bits in memory (8 bytes).
Something new in this code snippet is the use of square brackets []. If we didn’t use the brackets, we would be assigning the memory address of the variable instead of the value in that memory address.
If you take a look at the initialization template above, you will notice that you can supply multiple initial values. When this is done, the variable works like an array. i.e. it uses one name to refer to multiple contiguous memory locations:
some_array dq 1, 1, 2, 3, 5, 8
Something similar can be done for strings, but luckily they allow us to type the whole value instead of having to type one character at a time:
some_string db "Hello world"
In this case, we used db to allocate one byte per character.
To make large strings easier to type, they can be split into multiple lines like this:
some_string db "Hello world, I'm trying to learn assembly, but it's hard. Do "
            db "you know what is the fastest way to learn?", 0
The variable name only needs to be specified once, but the define-directive needs to be repeated.
Printing a string
Now that we know how to create strings, let’s try a simple program that prints a string. Before we start, Let’s look at the interface for syscall 1 (sys_write):
rdi   int               file_descriptor
rsi   memory_location   string_to_print
rdx   int               string_size
For rdi we will use 1 because that is the file descriptor for stdout. Let’s see how this works in a program:
section .data
  some_string dq "Hello world"
  some_string_size dq 11           ; "Hello world" contains 11 characters

section .text
  global _start

_start:
  ; Print the string
  mov rax, 1                       ; 1 means sys_write
  mov rdi, 1                       ; 1 means stdout
  mov rsi, some_string             ; The memory address to the beginning of the string
  mov rdx, [some_string_size]      ; Number of characters to print
  syscall

  ; Exit the program
  mov rax, 60
  mov rdi, 0
  syscall
Executing this code will print Hello world to the terminal.
$ nasm -f elf64 -o example.o example.asm
$ ld -o example example.o
$ ./example
Hello world
$ ls -rtlh
total 12K
-rw-rw-r-- 1 ubuntu ubuntu 329 May  5 13:28 example.asm
-rw-rw-r-- 1 ubuntu ubuntu 944 May  5 13:28 example.o
-rwxrwxr-x 1 ubuntu ubuntu 984 May  5 13:29 example
$ strip example
$ ls -rtlh
total 12K
-rw-rw-r-- 1 ubuntu ubuntu 329 May  5 13:28 example.asm
-rw-rw-r-- 1 ubuntu ubuntu 944 May  5 13:28 example.o
-rwxrwxr-x 1 ubuntu ubuntu 528 May  5 13:29 example
We may compare this asm program to c program:
#include <stdio.h>
int main()
{
    printf("Hello world");
    return 0;
}
then we can get asm code by using gcc -S:
$ gcc -S helloworld.s helloworld.c
$ gcc helloworld.s
$ ls -rtlh
total 20K
-rw-rw-r-- 1 ubuntu ubuntu   95 May  4 14:13 helloworld.c
-rw-rw-r-- 1 ubuntu ubuntu  521 May  5 13:59 helloworld.s
-rwxrwxr-x 1 ubuntu ubuntu 8.2K May  5 14:02 a.out
$ strip a.out
$ ls -rtlh
total 16K
-rw-rw-r-- 1 ubuntu ubuntu   95 May  4 14:13 helloworld.c
-rw-rw-r-- 1 ubuntu ubuntu  521 May  5 13:59 helloworld.s
-rwxrwxr-x 1 ubuntu ubuntu 6.0K May  5 14:02 a.out
.file   "helloworld.c"
        .text
        .section        .rodata
.LC0:
        .string "hello world"
        .text
        .globl  main
        .type   main, @function
main:
.LFB0:
        .cfi_startproc
        pushq   %rbp
        .cfi_def_cfa_offset 16
        .cfi_offset 6, -16
        movq    %rsp, %rbp
        .cfi_def_cfa_register 6
        subq    $16, %rsp
        movl    %edi, -4(%rbp)
        movq    %rsi, -16(%rbp)
        leaq    .LC0(%rip), %rdi
        call    puts@PLT
        movl    $0, %eax
        leave
        .cfi_def_cfa 7, 8
        ret
        .cfi_endproc
.LFE0:
        .size   main, .-main
        .ident  "GCC: (Ubuntu 7.3.0-27ubuntu1~18.04) 7.3.0"
        .section        .note.GNU-stack,"",@progbits
We can find the size of c program is bigger than the prior asm program. (6 KB > 528 B)
Instructions
Instructions are how we tell the computer to do something. The exact number of instructions on the x64 architecture is hard to find, but it might be somewhere close to one thousand. An instruction consists of an opcode and optionally 1 or more operands. Let’s look at some common instructions.
mov
We have already used the mov instruction before:
mov rax, 60
The opcode is mov and it receives 2 operands rax and 60. What this instruction does is move the value 60 to the rax register.
add, sub, imul
These are all binary operations. They take two operands and the result will be stored on the first operand:
mov rax, 60
sub rax, 50    ; rax is now 10
add rax, 5     ; rax is now 15
imul rax, 3    ; rax is now 45
inc, dec
To increment an operand we can use inc and to decrement it, we can use dec:
mov rax, 60
inc rax      ; rax is 61
dec rax      ; rax is 60 again
or, xor, and
These are binary bitwise operations:
mov rax, 5      ; 5 in binary is 101
and rax, 6      ; 6 in binary is 110. rax now holds 4 (100 in binary)
or rax, 8       ; 8 in binary is 1000. rax is now 12 (1100 in binary)
xor rax, 11     ; 11 in binary is 1011. rax is now 7 (111 in binary)
These are just some of the instructions available in an x64 processor. There are many more that I’m not going to cover in this article.
x86 Instruction Set
- Data Transfer Instructions
- Control Flow Instructions
- Arithmetic Instructions
- Logic Instructions
- Shift and Rotate Instructions
- Other Instructions
- x86 Interrupts
Conventions
# The following template will be used for instructions that take no operands:
Instr

# The following template will be used for instructions that take 1 operand:
Instr arg

# The following template will be used for instructions that take 2 operands. Notice how the format of the instruction is different for different assemblers.
Instr src, dest	    [GAS Syntax](https://en.wikibooks.org/wiki/X86_Assembly/GAS_Syntax)
Instr dest, src     [Intel Syntax](https://en.wikibooks.org/wiki/X86_Assembly/MASM_Syntax)

# The following template will be used for instructions that take 3 operands. Notice how the format of the instruction is different for different assemblers.
Instr aux, src, dest    [GAS Syntax](https://en.wikibooks.org/wiki/X86_Assembly/GAS_Syntax)
Instr dest, src, aux    [Intel Syntax](https://en.wikibooks.org/wiki/X86_Assembly/MASM_Syntax)
Suffixes
Some instructions, especially when built for non-Windows platforms (i.e. Unix, Linux, etc.), require the use of suffixes to specify the size of the data which will be the subject of the operation. Some possible suffixes are:
- b (byte) = 8 bits.
- w (word) = 16 bits.
- l (long) = 32 bits.
- q (quad) = 64 bits.
An example of the usage with the mov instruction on a 32-bit architecture, GAS syntax:
movl $0x000F, %eax # Store the value F into the eax register
On Intel Syntax you don’t have to use the suffix. Based on the register name and the used immediate value the compiler knows which data size to use.
MOV EAX, 0x000F
Addressing modes
One of the most fundamental things about assembly is understanding addressing modes. An addressing mode is a way to specify which values are going to be used as operands for an instruction. We already used addressing modes in the examples above. In this section, we are going to give them names and understand them a little more.
Immediate mode (立刻的)
The immediate mode looks like this:
mov rax, 60
This mode is very simple because there is no indirection. The rax register will be set to 60. The value 60 is called an immediate constant (立即数). Immediate constants can be specified in decimal, binary, octal or hexadecimal. These instructions all do the same:
mov rax, 60         ; decimal
mov rax, 0b111100   ; binary
mov rax, 0o74       ; octal
mov rax, 0x3C       ; hexadecimal
Register mode
This mode is also very easy to understand. Information inside a register will be used:
mov rax, rbx
In this case, the value of rax will be set to whichever value is currently in rbx.
Indirect mode
In this mode, the register contains a memory address, the value we care about, is the value in that memory address:
mov rdi, [rax]
In the example above, rax contains a memory address. rdi will be set to the value in that memory address. This is easier to understand with an example. Imagine registers and memory looked like this before executing the instruction above:
| Registers | |
|---|---|
| rax | 0x40 |
| rbx | 0x0 |
| … | |
| rdi | 0x0 |
| Memory | |
|---|---|
| 0x40 | 0xA |
| 0x48 | 0x00 |
| 0x50 | 0x00 |
| 0x58 | 0x00 |
After the instruction is executed, rdi will contain 0xA because rax contains the value 0x40, which is a memory address. By looking at that memory address, we find the value 0xA.
We can also use indirect mode for variables, as we did for some of the examples:
mov rdx, [some_string_size] ; indirect mode for variable
With indirect mode, we can also do memory displacements, which is useful for arrays. Assumming we have this array:
some_array dq 1, 1, 2, 3, 5
We can access its elements like this:
mov rax, [some_array]         ; rax = 1 (first element)
mov rax, [some_array + 8]     ; rax = 1 (second element)
mov rax, [some_array + 16]    ; rax = 2 (third element)
mov rax, [some_array + 24]    ; rax = 3 (fourth element)
mov rax, [some_array + 32]    ; rax = 5 (fifth element)
To understand this a little better we have to remember that each memory address can hold 8 bytes. The dq instruction used to create the array, reserves 64 bits per value, so we need 8 addresses to hold a single value (64 / 8 = 8. This is the number of memory addresses it takes to hold a value).
The array looks something like this in memory:
| Memory | |
|---|---|
| 0xA0 | 0x1 |
| 0xAB | 0x1 |
| 0xB0 | 0x2 |
| 0xB8 | 0x3 |
| 0xC0 | 0x5 |
Notice that the address after 0xA0 is not 0xA1 but 0xA8. This is because each number uses 8 memory addresses (64 bits). This way, every displacement(移位) on the example above, takes us to the next number in the array.
Objdump Disassemble
objdump除了可以对bin文件反汇编,同时还可以显示每条汇编指令的大小。
$ objdump -d example

example:     file format elf64-x86-64


Disassembly of section .text:

00000000004000b0 <_start>:
  4000b0:       b8 01 00 00 00          mov    $0x1,%eax
  4000b5:       bf 01 00 00 00          mov    $0x1,%edi
  4000ba:       48 be dc 00 60 00 00    movabs $0x6000dc,%rsi
  4000c1:       00 00 00
  4000c4:       48 8b 14 25 ec 00 60    mov    0x6000ec,%rdx
  4000cb:       00
  4000cc:       0f 05                   syscall
  4000ce:       b8 3c 00 00 00          mov    $0x3c,%eax
  4000d3:       bf 00 00 00 00          mov    $0x0,%edi
  4000d8:       0f 05                   syscall
- https://stackoverflow.com/questions/5125896/how-to-disassemble-a-binary-executable-in-linux-to-get-the-assembly-code
- What does data16 mean in objdump output?
Debugging assembly with GDB
We can use this command to assemble program:
nasm -f elf64 -o example.o example.asm
The elf64 (Executable and linkable format) parameter specifies the format of the output file. This will generate a file with enough information so the Operating System can execute it, but it doesn’t contain any information to help debugging. If we want our executable to contain debug information (information about the file and line number a program is executing) we need to say so when we assemble the program.
$ gdb example
GNU gdb (Ubuntu 8.1-0ubuntu3.2) 8.1.0.20180409-git
Copyright (C) 2018 Free Software Foundation, Inc.
License GPLv3+: GNU GPL version 3 or later <http://gnu.org/licenses/gpl.html>
This is free software: you are free to change and redistribute it.
There is NO WARRANTY, to the extent permitted by law.  Type "show copying"
and "show warranty" for details.
This GDB was configured as "x86_64-linux-gnu".
Type "show configuration" for configuration details.
For bug reporting instructions, please see:
<http://www.gnu.org/software/gdb/bugs/>.
Find the GDB manual and other documentation resources online at:
<http://www.gnu.org/software/gdb/documentation/>.
For help, type "help".
Type "apropos word" to search for commands related to "word"...
Reading symbols from example...(no debugging symbols found)...done.  # 没有调试信息
(gdb)
To see what are the formats for debug information available in your version of nasm, you can use:
# For a list of debug formats, use -f <form> -y
$ nasm -f elf64 -y

valid debug formats for 'elf64' output format are ('*' denotes default):
    dwarf     ELF64 (x86-64) dwarf debug format for Linux/Unix
    stabs     ELF64 (x86-64) stabs debug format for Linux/Unix
so we can use:
$ nasm -f elf64 -g -F dwarf -o example.o example.asm
$ ld -o example example.o
$ ls -rtlh
total 12K
-rw-rw-r-- 1 ubuntu ubuntu  329 May  5 13:28 example.asm
-rw-rw-r-- 1 ubuntu ubuntu 2.3K May  5 15:43 example.o
-rwxrwxr-x 1 ubuntu ubuntu 2.0K May  5 15:44 example

$ gdb --quiet example
Reading symbols from example...done.
(gdb) l
1
2       section .data
3         some_string dq "Hello world"
4         some_string_size dq 11   ; "Hello world" contains 11 characters
5
6       section .text
7         global _start
8
9       _start:
10        ; Print the string
(gdb)
11        mov rax, 1
12        mov rdi, 1
13        mov rsi, some_string
14        mov rdx, [some_string_size]
15        syscall
16
17        ; Exit the program
18        mov rax, 60
19        mov rdi, 0
20        syscall
(gdb)
Line number 21 out of range; example.asm has 20 lines.
Debugging with GDB
Now, we can debug this program with GDB:
$ gdb --quiet example
Reading symbols from example...done.
(gdb) b _start
Breakpoint 1 at 0x4000b0: file example.asm, line 11.
(gdb) r
Starting program: /home/ubuntu/code/nasm/example

Breakpoint 1, _start () at example.asm:11
11        mov rax, 1
(gdb) l
6       section .text
7         global _start
8
9       _start:
10        ; Print the string
11        mov rax, 1
12        mov rdi, 1
13        mov rsi, some_string
14        mov rdx, [some_string_size]
15        syscall
(gdb) p $rax
$1 = 0
(gdb) n
12        mov rdi, 1
(gdb) p $rax
$2 = 1
(gdb) i r rax
rax            0x1      1           # The first column is the hexadecimal value (0x1) and the second is decimal (1)
(gdb) n
13        mov rsi, some_string
(gdb)
14        mov rdx, [some_string_size]
(gdb)
15        syscall
(gdb)
Hello world18     mov rax, 60
(gdb)
19        mov rdi, 0
(gdb)
20        syscall
(gdb)
[Inferior 1 (process 26432) exited normally]
(gdb)
Use q to quit gdb.
Inspecting registers
Writing assembly code, you will find yourself moving things in and out of registers very often. It is then natural that debugging a program we might want to see their contents. To see the contents of all registers we can use info registers or the abbreviation i r. Using the same example program:
$ gdb --quiet example
Reading symbols from example...done.
(gdb) b _start
Breakpoint 1 at 0x4000b0: file example.asm, line 11.
(gdb) r
Starting program: /home/ubuntu/code/nasm/example

Breakpoint 1, _start () at example.asm:11
11        mov rax, 1
(gdb) i r
rax            0x0      0
rbx            0x0      0
rcx            0x0      0
rdx            0x0      0
rsi            0x0      0
rdi            0x0      0
rbp            0x0      0x0
rsp            0x7fffffffe420   0x7fffffffe420
r8             0x0      0
r9             0x0      0
r10            0x0      0
r11            0x0      0
r12            0x0      0
r13            0x0      0
r14            0x0      0
r15            0x0      0
rip            0x4000b0 0x4000b0 <_start>
eflags         0x202    [ IF ]
cs             0x33     51
ss             0x2b     43
ds             0x0      0
es             0x0      0
fs             0x0      0
gs             0x0      0
(gdb) n
12        mov rdi, 1
(gdb) i r
rax            0x1      1
rbx            0x0      0
rcx            0x0      0
rdx            0x0      0
rsi            0x0      0
rdi            0x0      0
rbp            0x0      0x0
rsp            0x7fffffffe420   0x7fffffffe420
r8             0x0      0
r9             0x0      0
r10            0x0      0
r11            0x0      0
r12            0x0      0
r13            0x0      0
r14            0x0      0
r15            0x0      0
rip            0x4000b5 0x4000b5 <_start+5>
eflags         0x202    [ IF ]
cs             0x33     51
ss             0x2b     43
ds             0x0      0
es             0x0      0
fs             0x0      0
gs             0x0      0
(gdb)
By printing the registers we can see that the breakpoint takes effect before executing the line: mov rax, 60. In many cases we probably only want to see a specific register. To do this we just need to add the register name to the command: i r <register>:
Inspecting memory
Note that we need to cast the variable to the correct type or we’ll get an error. Another thing we can do is get the memory address by info address, then We can also see the data at a memory address using an asterisk (*)
$ gdb --quiet example
Reading symbols from example...done.
(gdb) b _start
Breakpoint 1 at 0x4000b0: file example.asm, line 11.
(gdb) r
Starting program: /home/ubuntu/code/nasm/example

Breakpoint 1, _start () at example.asm:11
11        mov rax, 1
(gdb) l
6       section .text
7         global _start
8
9       _start:
10        ; Print the string
11        mov rax, 1
12        mov rdi, 1
13        mov rsi, some_string
14        mov rdx, [some_string_size]
15        syscall
(gdb) p some_string_size
'some_string_size' has unknown type; cast it to its declared type
(gdb) p (int) some_string_size
$1 = 11
(gdb) info address some_string_size
Symbol "some_string_size" is at 0x6000ec in a file compiled without debugging.
(gdb) p (int) *0x6000ec
$2 = 11
GCC Inline Assembly
Basic
With extended asm you can read and write C variables from assembler and perform jumps from assembler code to C labels. Extended asm syntax uses colons (‘:’) to delimit the operand parameters after the assembler template:
asm asm-qualifiers ( AssemblerTemplate
                 : OutputOperands
                 [ : InputOperands
                 [ : Clobbers ] ])

asm asm-qualifiers ( AssemblerTemplate
                      : OutputOperands
                      : InputOperands
                      : Clobbers
                      : GotoLabels)
where in the last form, asm-qualifiers contains goto (and in the first form, not).
- GCC-Inline-Assembly-HOWTO, Sandeep.S,翻译修正版:https://linux.cn/article-7688-1.html
- Extended Asm - Assembler Instructions with C Expression Operands
What do the E and R prefixes stand for in the names of Intel 32-bit and 64-bit registers?
Rjust stands for “register”. The AMD64 ISA extension added 8 additional general-purpose registers, namedR8throughR15. The 64-bit extended versions of the original 8 registers had anRprefix added to them for symmetry.Estands for “extended” or “enhanced”. (Wikipedia says “extended”.) They are the “extended” versions of the 16-bit registers, in that they offer 16 additional bits for 32 bits total.Xis also for “extended”—or perhaps it implies 16 as in hexadecimal. The X-suffixed registers are the 16-bit extended versions of the 8-bit registers. For 8-bit registers, the L suffix means “low”, and the H suffix means “high”.
Therefore, taking one particular register as an example, you have the 8-bit AL and AH registers, which are the low and high bytes of the 16-bit AX register, which is the low word of the 32-bit EAX register, which is the low double-word of the 64-bit RAX register.
| 63 - 32 | 31 - 16 | 15 - 8 | 7 - 0 |
======================================
.         .         | AH     | AL    |
.         .         | AX             |
.         | EAX                      |
| RAX                                |
======================================
| 63 - 32 | 31 - 16 | 15 - 8 | 7 - 0 |

64-bit register | Lower 32 bits | Lower 16 bits | Lower 8 bits
==============================================================
rax             | eax           | ax            | al
rbx             | ebx           | bx            | bl
rcx             | ecx           | cx            | cl
rdx             | edx           | dx            | dl
rsi             | esi           | si            | sil
rdi             | edi           | di            | dil
rbp             | ebp           | bp            | bpl
rsp             | esp           | sp            | spl
r8              | r8d           | r8w           | r8b
r9              | r9d           | r9w           | r9b
r10             | r10d          | r10w          | r10b
r11             | r11d          | r11w          | r11b
r12             | r12d          | r12w          | r12b
r13             | r13d          | r13w          | r13b
r14             | r14d          | r14w          | r14b
r15             | r15d          | r15w          | r15b
- How do AX, AH, AL map onto EAX?
- Assembly registers in 64-bit architecture
- What are the names of the new X86_64 processors registers?
- The MSDN documentation includes information about the x64 registers
Q&A
test 命令
From Not sure about using test command with al in assembly:
The first command is “anding” together the constant 1 and eax. If eax is something like 10101010 and 1 is: 00000001, then “anding” them together would produce: 0. But what does testing the lowest four bits of the register have to do with anything - and why is it important? What is this entire expression doing?
8049ac0:       83 e0 01                and    $0x1,%eax // "and" these bits together
8049ac3:       84 c0                   test   %al,%al  // check the last
8049ac5:       74 05                   je     8049acc <level_4+0x60> // if it is equal, then skip down.
解释:
The test instruction is actually redundant, so doesn’t do anything useful. It probably comes about because the compiler that produced this code is not very good at optimizing, so included an unnecessary instruction that doesn’t hurt anything.
and  $1,%eax    ; clear all bits of %eax except the lowest, set ZF if all bits are now zero
test %al,%al    ; set ZF if %al (the lowest 8 bits of %eax) are all clear
je   somewhere  ; branch if ZF is set
So the and instruction will set the ZF flag equal to the complement of the lowest bit of %eax, and the test instruction will set it again to the same thing. This probably comes from code that looks like:
if (var & 1) {
    // ... do something ...
}
where it loads var into %eax just before your code snip, and the branch target is just after the }. The code that is generated first computes var & 1 into a temp register (the and instruction), then tests to see if the result is non-zero (the test instruction), then branches over the ...do something... if the test was false (the je instruction).
The register are named, for example:
8bits lowest -> AL
8bits highest of the 16bits lowest -> AH
16bits -> AX
32bits -> EAX
64bits -> RAX
In x86 Wikipedia is a more detail explanation of CPU registers and pictures of then to better understand.
In your case you are clearing all the bits of EAX (32bits register) except the lowest and testing the 8 lowest bits of EAX (AL). The test instruction will perform a Bitwise AND and update the cpu flags accordingly, this flags will be used by je (jump if equal, that test for the Zero Flag). In this case is checking if the lowest 8 bits of EAX are 0 or not, if they are, jump to the address indicate in the jump.
More
- Assembly Language Step By Step, for Linux, by Jeff Duntemann
- Linux Assembly Tutorial - Step-by-Step Guide, by Derick Swanepoel
- PC Assembly Language
- x86 Assembly
- x86 assembly language
Refer
- 汇编语言(第2版),清华大学出版社,王爽
- https://en.wikipedia.org/wiki/X86
- x86 instruction listings
- Introduction to assembly - Assembling a program - Posted by adrian.ancona on January 30, 2019
- Assembly - Variables, instructions and addressing modes - Posted by adrian.ancona on February 27, 2019
- Smallest executable program (x86-64)
- Debugging assembly with GDB - Posted by adrian.ancona on December 11, 2019
- Introduction to x64 Assembly - Published on March 19, 2012
- A Whirlwind Tutorial on Creating Really Teensy ELF Executables for Linux
- GCC-Inline-Assembly-HOWTO, Sandeep.S
- Extended Asm - Assembler Instructions with C Expression Operands
- Constraints for asm Operands
- Constraints for Particular Machines
- Intel 64 and IA-32 Software Developer Manuals
- AMD64 Architecture Programmer’s Manual (Volume 1-5)
- Basic yet thorough assembly tutorial (linux)