Clang in Action
- C++ Compiler Support
- LLVM
- 安装 Clang
- 升级 GLIBC
- C++ ABI library
- C++ standard library
- Clangd (提升 C++ 代码编写体验)
- LLD (The LLVM Linker)
- lldb
- Toolchain
- Example
- Manual
C++ Compiler Support
https://en.cppreference.com/w/cpp/compiler_support
LLVM
The LLVM Project is a collection of modular and reusable compiler and toolchain technologies. Despite its name, LLVM has little to do with traditional virtual machines. The name “LLVM” itself is not an acronym; it is the full name of the project.
The primary sub-projects of LLVM are:
-
The LLVM Core libraries provide a modern source- and target-independent optimizer, along with code generation support for many popular CPUs (as well as some less common ones!) These libraries are built around a well specified code representation known as the LLVM intermediate representation (“LLVM IR”). The LLVM Core libraries are well documented, and it is particularly easy to invent your own language (or port an existing compiler) to use LLVM as an optimizer and code generator.
-
Clang is an “LLVM native” C/C++/Objective-C compiler, which aims to deliver amazingly fast compiles, extremely useful error and warning messages and to provide a platform for building great source level tools. The Clang Static Analyzer and clang-tidy are tools that automatically find bugs in your code, and are great examples of the sort of tools that can be built using the Clang frontend as a library to parse C/C++ code.
-
The LLDB project builds on libraries provided by LLVM and Clang to provide a great native debugger. It uses the Clang ASTs and expression parser, LLVM JIT, LLVM disassembler, etc so that it provides an experience that “just works”. It is also blazing fast and much more memory efficient than GDB at loading symbols.
-
The libc++ and libc++ ABI projects provide a standard conformant and high-performance implementation of the C++ Standard Library, including full support for
C++11andC++14. -
The compiler-rt project provides highly tuned implementations of the low-level code generator support routines like “__fixunsdfdi” and other calls generated when a target doesn’t have a short sequence of native instructions to implement a core IR operation. It also provides implementations of run-time libraries for dynamic testing tools such as AddressSanitizer, ThreadSanitizer, MemorySanitizer, and DataFlowSanitizer.
-
The LLD project is a new linker. That is a drop-in replacement for system linkers and runs much faster.
More: https://llvm.org/
Building LLVM with CMake
CMake is a cross-platform build-generator tool. CMake does not build the project, it generates the files needed by your build tool (GNU make, Visual Studio, Xcode, etc.) for building LLVM.
编译时问题:
- Host GCC version must be at least 5.1 (使用
scl enable devtoolset-7 bash切换高版本的gcc) -DLLVM_ENABLE_PROJECTS已经废弃,改为-DLLVM_ENABLE_RUNTIMESCould NOT find Python3,需要安装Python3- 执行
sudo yum groupinstall 'Development Tools'安装需要的依赖 refer: Can’t Install build-essential on CentOS - 编译错误可以查看日志:
build/CMakeFiles/CMakeError.log
make.sh
#!/bin/bash

export LLVM_DIR=$HOME/llvm
export LLVM_INSTALL_DIR=$HOME/llvm/install

mkdir -p $LLVM_INSTALL_DIR
cd $LLVM_DIR

git clone https://github.com/llvm/llvm-project llvm-project
mkdir build
cd build

## -DCMAKE_BUILD_TYPE=type — Valid options for type are Debug, Release, RelWithDebInfo, and MinSizeRel. Default is Debug
## -DCMAKE_INSTALL_PREFIX=directory — Specify for directory the full pathname of where you want the LLVM tools and libraries to be installed (default /usr/local)

cmake -G "Unix Makefiles" -DCMAKE_BUILD_TYPE=Release -DBUILD_SHARED_LIBS=On -DLLVM_TARGETS_TO_BUILD='X86' -DLLVM_ENABLE_PROJECTS="clang;libcxx;libcxxabi;libunwind;lldb;compiler-rt;lld" -DCMAKE_INSTALL_PREFIX=$LLVM_INSTALL_DIR ../llvm-project/llvm

## The --build option tells cmake to invoke the underlying build tool (make, ninja, xcodebuild, msbuild, etc.)
cmake --build .

## After LLVM has finished building, install it from the build directory
cmake --build . --target install
CMakeLists.txt
cmake_minimum_required(VERSION 3.13.4)
project(SimpleProject)

find_package(LLVM REQUIRED CONFIG)

message(STATUS "Found LLVM ${LLVM_PACKAGE_VERSION}")
message(STATUS "Using LLVMConfig.cmake in: ${LLVM_DIR}")

# Set your project compile flags.
# E.g. if using the C++ header files
# you will need to enable C++11 support
# for your compiler.

include_directories(${LLVM_INCLUDE_DIRS})
add_definitions(${LLVM_DEFINITIONS})

# Now build our tools
add_executable(simple-tool tool.cpp)

# Find the libraries that correspond to the LLVM components
# that we wish to use
llvm_map_components_to_libnames(llvm_libs support core irreader)

# Link against LLVM libraries
target_link_libraries(simple-tool ${llvm_libs})
refer:
Clang (C Language Family Front-end)
LLVM is very demanding(严格的) of the host C++ compiler, and as such tends to expose bugs in the compiler. We also attempt to follow improvements and developments in the C++ language and library reasonably closely. As such, we require a modern host C++ toolchain, both compiler and standard library, in order to build LLVM. LLVM is written using the subset of C++ documented in coding standards.
Clang is a compiler front-end for the C family of languages(C, C++, Objective-C, and Objective-C++) which is built as part of the LLVM compiler infrastructure project.
Unlike many other compiler frontends, Clang is useful for a number of things beyond just compiling code: we intend for Clang to be host to a number of different source-level tools. One example of this is the Clang Static Analyzer.
If you’re interested in more (including how to build Clang) it is best to read the relevant web sites. Here are some pointers:
Information on Clang: http://clang.llvm.org/ Building and using Clang: http://clang.llvm.org/get_started.html Clang Static Analyzer: http://clang-analyzer.llvm.org/ Information on the LLVM project: http://llvm.org/
Clang is released as part of regular LLVM releases. You can download the release versions from https://llvm.org/releases/. Clang is also provided in all major BSD or GNU/Linux distributions as part of their respective packaging systems. From Xcode 4.2, Clang is the default compiler for Mac OS X.
Install
apt-get install clang
apt-get install clang-3.9
Building Clang and Working with the Code
On Unix-like Systems
If you would like to check out and build Clang, the current procedure is as follows:
Get the required tools
- See Getting Started with the LLVM System - Requirements.
- Note also that Python is needed for running the test suite. Get it at: https://www.python.org/downloads/
- Standard build process uses
CMake. Get it at: https://cmake.org/download/
Hardware
Note that Debug builds require a lot of time and disk space. An LLVM-only build will need about 1-3 GB of space. A full build of LLVM and Clang will need around 15-20 GB of disk space. The exact space requirements will vary by system. (It is so large because of all the debugging information and the fact that the libraries are statically linked into multiple tools).
If you are space-constrained, you can build only selected tools or only selected targets. The Release build requires considerably less space.
The LLVM suite may compile on other platforms, but it is not guaranteed to do so. If compilation is successful, the LLVM utilities should be able to assemble, disassemble, analyze, and optimize LLVM bitcode. Code generation should work as well, although the generated native code may not work on your platform.
Software
Compiling LLVM requires that you have several software packages installed. The table below lists those required packages. The Package column is the usual name for the software package that LLVM depends on. The Version column provides “known to work” versions of the package. The Notes column describes how LLVM uses the package and provides other details.
| Package | Version | Notes |
|---|---|---|
| CMake | >=3.13.4 | Makefile/workspace generator |
| GCC | >=5.1.0 | C/C++ compiler (1) |
| python | >=3.6 | Automated test suite (2) |
| zlib | >=1.2.3.4 | Compression library (3) |
| GNU Make | 3.79, 3.79.1 | Makefile/build processor (4) |
Note:
- (1) Only the C and C++ languages are needed so there’s no need to build the other languages for LLVM’s purposes. See below for specific version info.
- (2) Only needed if you want to run the automated test suite in the llvm/test directory.
- (3) Optional, adds compression / uncompression capabilities to selected LLVM tools.
- (4) Optional, you can use any other build tool supported by CMake.
Check out the LLVM project
- Change directory to where you want the llvm directory placed.
git clone https://github.com/llvm/llvm-project.git- The above command is very slow. It can be made faster by creating a shallow clone. Shallow clone saves storage and speeds up the checkout time. This is done by using the command:
git clone --depth=1 https://github.com/llvm/llvm-project.git(using this only the latest version of llvm can be built)- For normal users looking to just compile, this command works fine. But if someone later becomes a contributor, since they can’t push code from a shallow clone, it needs to be converted into a full clone:
cd llvm-projectgit fetch --unshallow
Build LLVM and Clang
- This builds both LLVM and Clang for debug mode.
- Note: For subsequent Clang development, you can just run make clang.
- CMake allows you to generate project files for several IDEs: Xcode, Eclipse CDT4, CodeBlocks, Qt-Creator (use the CodeBlocks generator), KDevelop3. For more details see Building LLVM with CMake page.
cd llvm-project
mkdir build (in-tree build is not supported)
cd build
cmake -DLLVM_ENABLE_PROJECTS=clang -G "Unix Makefiles" ../llvm
make
Others
If you intend to use Clang’s C++ support, you may need to tell it how to find your C++ standard library headers. In general, Clang will detect the best version of libstdc++ headers available and use them - it will look both for system installations of libstdc++ as well as installations adjacent to Clang itself. If your configuration fits neither of these scenarios, you can use the -DGCC_INSTALL_PREFIX cmake option to tell Clang where the gcc containing the desired libstdc++` is installed.
Try it out (assuming you add llvm/build/bin to your path):
clang --help
clang file.c -fsyntax-only (check for correctness)
clang file.c -S -emit-llvm -o - (print out unoptimized llvm code)
clang file.c -S -emit-llvm -o - -O3
clang file.c -S -O3 -o - (output native machine code)
Run the testsuite:
make check-clang
Clang Compiler Driver (Drop-in Substitute for GCC)
The clang tool is the compiler driver and front-end, which is designed to be a drop-in replacement for the gcc command. Here are some examples of how to use the high-level driver:
$clang -v
clang version 3.5.2 (tags/RELEASE_352/final)
Target: x86_64-unknown-linux-gnu
Thread model: posix
Found candidate GCC installation: /usr/lib/gcc/x86_64-redhat-linux/4.4.7
Found candidate GCC installation: /usr/lib/gcc/x86_64-redhat-linux/4.8.2
Found candidate GCC installation: /usr/lib/gcc/x86_64-redhat-linux/4.8.5
Selected GCC installation: /usr/lib/gcc/x86_64-redhat-linux/4.8.5
Candidate multilib: .;@m64
Candidate multilib: 32;@m32
Selected multilib: .;@m64
$ cat t.c
#include <stdio.h>
int main(int argc, char **argv) { printf("hello world\n"); }
$ clang t.c
$ ./a.out
hello world
The clang driver is designed to work as closely to GCC as possible to maximize portability. The only major difference between the two is that Clang defaults to gnu99 mode while GCC defaults to gnu89 mode. If you see weird link-time errors relating to inline functions, try passing -std=gnu89 to clang.
// test.c
typedef float V __attribute__((vector_size(16)));
V foo(V a, V b)
{
    return a + b * a;
}
Preprocessing:
//$clang test.c -E
# 1 "test.c"
# 1 "<built-in>" 1
# 1 "<built-in>" 3
# 312 "<built-in>" 3
# 1 "<command line>" 1
# 1 "<built-in>" 2
# 1 "test.c" 2

typedef float V __attribute__((vector_size(16)));

V foo(V a, V b)
{
 return a + b * a;
}
Type checking:
$clang -fsyntax-only test.c
GCC options:
$clang -fsyntax-only test.c -pedantic
Pretty printing from the AST:
Note, the
-cc1argument indicates the compiler front-end, and not the driver, should be run. The compiler front-end has several additional Clang specific features which are not exposed through the GCC compatible driver interface.
// $clang -cc1 test.c -ast-print
typedef __attribute__((__vector_size__(4 * sizeof(float)))) float V;
V foo(V a, V b) {
    return a + b * a;
}
Code generation with LLVM:
// $clang test.c -S -emit-llvm -o -
; ModuleID = 'test.c'
target datalayout = "e-m:e-i64:64-f80:128-n8:16:32:64-S128"
target triple = "x86_64-unknown-linux-gnu"

; Function Attrs: nounwind uwtable
define <4 x float> @foo(<4 x float> %a, <4 x float> %b) #0 {
  %1 = alloca <4 x float>, align 16
  %2 = alloca <4 x float>, align 16
  store <4 x float> %a, <4 x float>* %1, align 16
  store <4 x float> %b, <4 x float>* %2, align 16
  %3 = load <4 x float>* %1, align 16
  %4 = load <4 x float>* %2, align 16
  %5 = load <4 x float>* %1, align 16
  %6 = fmul <4 x float> %4, %5
  %7 = fadd <4 x float> %3, %6
  ret <4 x float> %7
}

attributes #0 = { nounwind uwtable "less-precise-fpmad"="false" "no-frame-pointer-elim"="true" "no-frame-pointer-elim-non-leaf" "no-infs-fp-math"="false" "no-nans-fp-math"="false" "stack-protector-buffer-size"="8" "unsafe-fp-math"="false" "use-soft-float"="false" }

!llvm.ident = !{!0}

!0 = metadata !{metadata !"clang version 3.5.2 (tags/RELEASE_352/final)"}
refer:
- https://github.com/llvm/llvm-project/tree/main/clang
- Getting Started: Building and Running Clang
- LLVM Download Page
安装 Clang
GCC 安装脚本:
https://github.com/owent-utils/bash-shell/tree/main/GCC%20Installer
Clang 安装脚本:
https://github.com/owent-utils/bash-shell/tree/main/LLVM&Clang%20Installer
Clang 3.5.2
下载 llvm 源码:
wget http://releases.llvm.org/3.5.2/llvm-3.5.2.src.tar.xz
tar xf llvm-3.5.2.src.tar.xz
mv llvm-3.5.2.src llvm
下载 clang 源码:
cd llvm/tools
wget http://releases.llvm.org/3.5.2/cfe-3.5.2.src.tar.xz
tar xf cfe-3.5.2.src.tar.xz
mv cfe-3.5.2.src clang
下载 compiler-rt 源码:
cd ../projects
wget http://releases.llvm.org/3.5.2/compiler-rt-3.5.2.src.tar.xz
tar xf compiler-rt-3.5.2.src.tar.xz
mv compiler-rt-3.5.2.src compiler-rt
配置编译选项:
cd ..
./configure --enable-optimized CC=gcc CXX=g++
编译 llvm:
make -j16
编译成功后的提示:
llvm[0]: ***** Completed Release+Asserts Build
安装编译好的 llvm:
# 会安装在 /usr/local/bin 目录
make install
检查 clang 的版本:
clang --version
clang version 3.5.2 (tags/RELEASE_352/final)
Refer:
- http://releases.llvm.org/download.html#3.5.2
- https://www.cnblogs.com/dudu/p/4294374.html
Clang 11.0.0
wget https://github.com/llvm/llvm-project/releases/download/llvmorg-11.0.0/llvm-project-11.0.0.tar.xz

xz -d llvm-project-11.0.0.tar.xz
tar -xvf llvm-project-11.0.0.tar

cd llvm-project-11.0.0
mkdir build
cd build

# 编译 clang 和 asan 等工具
# Host GCC version must be at least 5.1
cmake -DCMAKE_BUILD_TYPE=Release -DLLVM_ENABLE_RTTI=ON -DLLVM_ENABLE_PROJECTS="clang;clang-tools-extra;libcxx;libcxxabi;libunwind;lldb;compiler-rt;lld;polly" -G "Unix Makefiles" ../llvm

#cmake -DCMAKE_BUILD_TYPE=Release -DLLVM_ENABLE_RTTI=ON -DLLVM_ENABLE_PROJECTS="clang;libcxx;libcxxabi" -G "Unix Makefiles" ../llvm

make -j16 && make install

clang --version
LLVM_ENABLE_PROJECTS:STRING 用法参考:https://llvm.org/docs/CMake.html
Semicolon-separated list of projects to build, or all for building all (clang, lldb, lld, polly, etc) projects. This flag assumes that projects are checked out side-by-side and not nested, i.e. clang needs to be in parallel of llvm instead of nested in llvm/tools. This feature allows to have one build for only LLVM and another for clang+llvm using the same source checkout. The full list is: clang;clang-tools-extra;cross-project-tests;libc;libclc;lld;lldb;openmp;polly;pstl
升级 gcc
yum install centos-release-scl -y
yum install devtoolset-7 -y --skip-broken

# 如果安装 devtoolset-7 依赖报错,可能需要安装 kernel-debug-devel
yum install kernel-debug-devel-3.10.0-327.el7.x86_64 -y

# 新创建一个 bash 切换到 devtoolset-7,退出当前 bash 则切换到原来版本
scl enable devtoolset-7 bash

# 如果希望固定到 gcc-7 环境则将配置写入文件
source /opt/rh/devtoolset-7/enable
echo "source /opt/rh/devtoolset-7/enable" >> ~/.bash_profile  source /opt/rh/devtoolset-7/enable
升级 ld 为 2.30
wget https://ftp.gnu.org/gnu/binutils/binutils-2.30.tar.gz --no-check-certificate
tar zxvf binutils-2.30.tar.gz
cd binutils-2.30

./configure --prefix=/usr/local/bin
make -j16 && make install

mv /bin/ld /bin/ld2.23
ln -s /usr/local/bin/bin/ld /bin/ld
对 LLVM_ENABLE_PROJECTS 安装项目的解释说明:
在上面的编译命令中,启用了以下LLVM项目:clang、clang-tools-extra、libcxx、libcxxabi、libunwind、lldb、compiler-rt、lld和polly。以下是这些项目的功能和使用场景的简要介绍:

Clang:Clang是一个C、C++、Objective-C和Objective-C++编程语言的编译器。它基于LLVM编译器基础结构,提供快速编译、高性能代码生成和更好的诊断信息。使用场景包括编译C/C++代码、静态分析等。

Clang-tools-extra:这个项目包含了一组与Clang一起使用的额外工具,如clang-tidy(静态分析、代码风格检查)、clang-format(代码格式化工具)等。这些工具在代码审查、自动代码重构和代码风格统一等场景中非常有用。

libcxx:libc++是一个C++标准库的实现,它与LLVM和Clang紧密集成。它提供了C++11、C++14、C++17等标准所需的数据结构和算法。使用场景包括在C++项目中使用标准库功能。

libcxxabi:libc++abi是libc++的低级抽象层,提供了异常处理和运行时类型信息(RTTI)支持。它与libc++一起使用,以实现C++标准库的完整功能。

libunwind:libunwind是一个可移植、高效的C++堆栈展开库,用于处理异常和堆栈跟踪。它在C++程序中处理异常和生成堆栈跟踪等场景中非常有用。

LLDB:LLDB是一个高性能、可扩展的源代码级调试器,支持C、C++、Objective-C等编程语言。它用于调试程序、查找错误和问题。使用场景包括设置断点、单步执行、变量检查等。

Compiler-RT:compiler-rt是一个LLVM项目的运行时库,提供了各种编译器支持功能,如内置函数、代码覆盖率、地址/内存/线程/未定义行为检查等。使用场景包括编译器优化、代码覆盖率分析和运行时错误检查等。

LLD:LLD是一个高性能、兼容的链接器,支持ELF(Unix)、COFF(Windows)、Mach-O(macOS)等格式。它旨在与GNU ld、Gold等链接器兼容。使用场景包括链接生成可执行文件、动态库和静态库。

Polly:Polly是一个LLVM的子项目,提供了高级循环优化和数据局部性分析。它可以自动分析循环结构,以提高内存访问和并行性。使用场景包括高性能计算、科学计算等。

这些项目共同构成了LLVM工具链的核心部分,覆盖了编译、链接、运行时库、调试等方面。它们可以满足C/C++项目的各种需求,从编译和链接到调试和性能优化。
完整的 clang 安装,包括安装一些辅助工具,例如 lld, lldb, clang-tools-extra 等:
#!/bin/bash

# Download the LLVM project
if ! wget https://github.com/llvm/llvm-project/releases/download/llvmorg-11.0.0/llvm-project-11.0.0.tar.xz; then
        echo "Error: Failed to download LLVM project"
        exit 1
fi

# Extract the archive
if ! tar xvfJ llvm-project-11.0.0.tar.xz; then
        echo "Error: Failed to extract the tarball"
        exit 1
fi

# Enter the extracted directory
cd llvm-project-11.0.0 || { echo "Error: Failed to enter the extracted directory"; exit 1; }

# Create a build directory
mkdir build
cd build || { echo "Error: Failed to enter the build directory"; exit 1; }

# Configure the build with CMake
if ! cmake -DCMAKE_BUILD_TYPE=Release -DLLVM_ENABLE_RTTI=ON -DLLVM_ENABLE_PROJECTS="clang;clang-tools-extra;libcxx;libcxxabi;libunwind;lldb;compiler-rt;lld;polly" -G "Unix Makefiles" ../llvm; then
        echo "Error: Failed to configure the build with CMake"
        exit 1
fi

# Get the number of CPU cores
num_cores=$(nproc)

# Build Clang and other tools
if ! make -j"${num_cores}"; then
        echo "Error: Failed to build Clang and other tools"
        exit 1
fi

# Check if the user has root privileges before installing
if [ "$(id -u)" != "0" ]; then
        echo "Error: Installation requires root privileges" 1>&2
        exit 1
fi

# Install Clang and other tools
if ! make install; then
        echo "Error: Failed to install Clang and other tools"
        exit 1
fi

# Print the installed Clang version
clang --version
升级 GLIBC
参考 glibc升级到2.29 升级 glibc 可行。
例如,升级 glibc 2.18
mkdir ~/glibc_install; cd ~/glibc_install
wget http://ftp.gnu.org/gnu/glibc/glibc-2.18.tar.gz
tar zxvf glibc-2.18.tar.gz
cd glibc-2.18
mkdir build
cd build

# 注意 --prefix=/usr
../configure --prefix=/usr --disable-profile --enable-add-ons --with-headers=/usr/include --with-binutils=/usr/bin

make -j4
sudo make install
验证:
$ ll /lib64/libc.so.6
lrwxrwxrwx 1 root root 12 10月 11 21:33 /lib64/libc.so.6 -> libc-2.18.so
$ strings /lib64/libc.so.6 | grep ^GLIBC
GLIBC_2.2.5
GLIBC_2.2.6
GLIBC_2.3
GLIBC_2.3.2
GLIBC_2.3.3
GLIBC_2.3.4
GLIBC_2.4
GLIBC_2.5
GLIBC_2.6
GLIBC_2.7
GLIBC_2.8
GLIBC_2.9
GLIBC_2.10
GLIBC_2.11
GLIBC_2.12
GLIBC_2.13
GLIBC_2.14
GLIBC_2.15
GLIBC_2.16
GLIBC_2.17
GLIBC_2.18
GLIBC_PRIVATE
GLIBC_2.8
GLIBC_2.5
GLIBC_2.9
GLIBC_2.7
GLIBC_2.6
GLIBC_2.18
GLIBC_2.11
GLIBC_2.16
GLIBC_2.10
GLIBC_2.17
GLIBC_2.13
GLIBC_2.2.6
refer:
C++ ABI library
Clang supports a wide variety of C standard library implementations.
The C++ ABI library provides an implementation of the library portion of the Itanium C++ ABI, covering both the support functionality in the main Itanium C++ ABI document and Level II of the exception handling support. References to the functions and objects in this library are implicitly generated by Clang when compiling C++ code.
While it is possible to link C++ code using libstdc++ and code using libc++ together into the same program (so long as you do not attempt to pass C++ standard library objects across the boundary), it is not generally possible to have more than one C++ ABI library in a program.
The version of the C++ ABI library used by Clang will be the one that the chosen C++ standard library was linked against. Several implementations are available:
libc++abi (LLVM)
libc++abi is LLVM’s implementation of this specification.
libsupc++ (GNU)
libsupc++ is GCC’s implementation of this specification. However, this library is only used when libstdc++ is linked statically. The dynamic library version of libstdc++ contains a copy of libsupc++.
NOTE: Clang does not currently automatically link against libsupc++ when statically linking libstdc++. You may need to manually add -lsupc++ to support this configuration when using -static or -static-libstdc++.
libcxxrt (PathScale)
This is another implementation of the Itanium C++ ABI specification. See libcxxrt.
C++ standard library
Clang supports use of either LLVM’s libc++ or GCC’s libstdc++ implementation of the C++ standard library.
libc++ (LLVM)
libc++ is LLVM’s implementation of the C++ standard library, aimed at being a complete implementation of the C++ standards from C++11 onwards.
You can instruct Clang to use libc++ with the -stdlib=libc++ flag.
libstdc++ (GNU)
libstdc++ is GCC’s implementation of the C++ standard library. Clang supports libstdc++ 4.8.3 (released 2014-05-22) and later. Historically Clang implemented workarounds for issues discovered in libstdc++, and these are removed as fixed libstdc++ becomes sufficiently old.
You can instruct Clang to use libstdc++ with the -stdlib=libstdc++ flag.
Clangd (提升 C++ 代码编写体验)
- Getting started:https://clangd.llvm.org/installation#project-setup
- vscode clangd 扩展:https://github.com/clangd/vscode-clangd
工欲善其事,必先利其器。LLVM 项目推出的 Clangd 拥有稳定的体验、完善的功能和活跃的社区,它作为一个稳定高效的 C++ 代码插件可以成倍地提升代码编写体验,是每个C++程序员提升代码效率的不二之选。
参考 有谁可以介绍一下谷歌大牛Jeff Dean以及与他相关的事迹么?
Compilers don’t warn Jeff Dean. Jeff Dean warns compilers. 编译器从来不给Jeff编译警告,而是Jeff警告编译器
而对于普通人还是需要借助工具(例如,clang-tidy)来提示或规避一些常见问题。
在业界,C++ 常用的代码检查工具有 cpplint,coverity,clang-tidy(clangd 背后也是通过 clang-tidy 检查,这里是指 clang-tidy 二进制本身独立使用)等,它们往往无法兼顾代码检查的完整性和实时性。如果要做到完整检查,就需要编译代码,通过代码的 IR 表示去分析逻辑流,比如 coverity,这种检查往往是 CI/CD 流水线的一部分,不能实时检查。而 cpplint 则是不编译代码,这是通过词法分析,检查代码格式不符合标准的地方或者局部的问题,没有办法检测代码的逻辑错误。如果要兼顾完整性和实时性,就需要一个编译器在后台实时地编译我们的代码,而 clangd 恰好就提供这种功能。
clangd 是 LLVM 项目推出的 C++ 语言服务器,通过 LSP(Language Server Protocal) 协议向编辑器如 vscode/vim/emacs 提供语法补全、错误检测、跳转、格式化等等功能。C++ 的 LSP 曾经是cquery, ccls, clangd 三足鼎立。但是 clangd 支持 clang-tidy 实时检查的功能是另外两者不具备的,而且 cquery 和 ccls 都是单个开发者主导的项目,clangd 背后则是有 LLVM 的背书。
clangd 常用功能
clangd helps developers write, understand and improve C/C++ code by providing:
- code completion (代码补全)
- compile errors and warnings (代码建议以及错误提示)
- go-to-definition and cross references (代码跳转)
- hover information and inlay hints
- include management
- code formatting (代码格式化)
- simple refactorings
Full documentation for clangd is at clangd.llvm.org.
clangd server
The extension requires the clangd language server. You will be prompted to download it if it’s not found on your PATH. (Automatic installation is possible on x86-64 Linux, Windows, and Mac).
If you have an old version of clangd installed on your system already, you can run “Check for clangd language server update” from the command palette.
Project setup
clangd is based on the clang C++ compiler, and understands even complex C++ code. However, you must tell clangd how your project is built (compile flags). A compile_commands.json file can usually be generated by your build system (e.g. with CMake, by setting -DCMAKE_EXPORT_COMPILE_COMMANDS=1).
See Project Setup in the clangd documentation for details and alternatives.
The clangd server also supports a number of feature customizations using its config file.
clangd 安装方式
建议下载最新的版本,可以使用最新的特性。
- 系统包管理
- mac: brew install llvm
- debian/ubuntu: sudo apt-get install clangd-14
- 手动下载最新的二进制
- https://github.com/clangd/clangd/releases/tag/15.0.0
- 源码编译
- https://github.com/llvm/llvm-project/tree/main/clang-tools-extra/clangd#building-and-testing-clangd
注意:
- 在 vscode 扩展中,clangd 比 C/C++ 扩展执行效率更高且功能更丰富,但是 clangd 需要使用 GLIBC_2.18 版本。
- clangd 可以单独下载然后在 vscode 配置中指定安装路径,也可以通过 vscode 的 clangd 扩展自动提示下载。
- 禁用或卸载 C/C++ 扩展,防止相互影响
code --install-extension llvm-vs-code-extensions.vscode-clangd
# We also need make sure that Microsoft's C++ extension is not involved and interfering.
code --uninstall-extension ms-vscode.cpptools
clangd 作为 vscode 扩展的配置方法
vscode 上使用 clangd 的配置 (项目根目录 .vscode/settings.json )
{
    // clangd configuration for jmesh project (C++20, CMake)
    "clangd.arguments": [
        "--compile-commands-dir=${workspaceFolder}/build",
        "--clang-tidy", // 开启 clang-tidy 代码检查
        "--clang-tidy-checks=*,-clang-analyzer-*,-readability-identifier-length,-readability-magic-numbers,-cppcoreguidelines-avoid-magic-numbers",
        "--all-scopes-completion",
        "--completion-style=detailed",
        "--header-insertion=never",
        "--pch-storage=disk", // 如果内存够大可以关闭这个选项
        "--log=error",
        "--j=8", // 后台线程数,可根据机器配置自行调整
        "--background-index",
        "--query-driver=**", // 支持更多编译器驱动
        "--fallback-style=llvm", // 当无法从 compile_commands.json 获取格式信息时使用 LLVM 风格
        "--function-arg-placeholders=false", // 禁用函数参数占位符,减少干扰
        "--suggest-missing-includes=true", // 自动建议缺失的头文件
        "--cross-file-rename" // 支持跨文件重命名
    ],
    "clangd.path": "/usr/bin/clangd", // 安装的 clangd 地址
    "clangd.checkUpdates": false, // 禁用自动更新检查
    "clangd.onConfigChanged": "restart", // 配置更改时自动重启
    "[cpp]": {
        "editor.defaultFormatter": "llvm-vs-code-extensions.vscode-clangd", //  CPP 语言文件支持
        "editor.formatOnSave": true, // 保存时自动格式化
        "editor.suggest.insertMode": "replace" // 优化补全体验
    },
    "[c]": {
        "editor.defaultFormatter": "llvm-vs-code-extensions.vscode-clangd" // C 语言文件支持
    }
}
clangd 需要知道如何编译你的项目,因此需要一个“编译数据库”,通常情况下我们需要向 clangd 提供一个 compile_commands.json 文件,这个文件的生成需要依赖你的编译系统.
参考 https://clangd.llvm.org/installation.html Project setup 一节说明:
To understand your source code, clangd needs to know your build flags. (This is just a fact of life in C++, source files are not self-contained).
compile_commands.json - This file provides compile commands for every source file in a project. It is usually generated by tools.
clangd will look in the parent directories of the files you edit looking for it, and also in subdirectories named build/. For example, if editing $SRC/gui/window.cpp, we search in $SRC/gui/, $SRC/gui/build/, $SRC/, $SRC/build/, …
CMake-based projects
If your project builds with CMake, it can generate this file. You should enable it with:
cmake -DCMAKE_EXPORT_COMPILE_COMMANDS=1
compile_commands.json will be written to your build directory. If your build directory is $SRC or $SRC/build, clangd will find it. Otherwise, symlink or copy it to $SRC, the root of your source tree.
ln -s ~/myproject-build/compile_commands.json ~/myproject/
clang-tidy
clang-tidy is a clang-based C++ “linter” tool. Its purpose is to provide an extensible framework for diagnosing and fixing typical programming errors, like style violations, interface misuse, or bugs that can be deduced via static analysis. clang-tidy is modular and provides a convenient interface for writing new checks.
Clang 项目也提供了其他一些工具,包括代码的静态检查工具 Clang-Tidy 。这是一个比较全面的工具,它除了会提示你危险的用法,也会告诉你如何去现代化你的代码。默认情况下,Clang-Tidy 只做基本的分析。你也可以告诉它你想现代化你的代码和提高代码的可读性:
clang-tidy --checks='clang-analyzer-*,modernize-*,readability-*' test.cpp
配置方法
在 vscode 通过配置 clangd + clang-tidy + Error Lens 插件,实现代码检查和提示。在项目根目录创建 .clang-tidy 配置文件。
.clang-tidy 配置内容如下,可根据官方定义的规则进行自定义,同时也可以参考其他开源项目的配置示例。
---
# @refer
# https://clang.llvm.org/extra/clang-tidy/checks/list.html
# https://github.com/googleapis/google-cloud-cpp/blob/main/.clang-tidy
# https://github.com/apache/arrow/blob/master/.clang-tidy

Checks: >
  -*,
  bugprone-*,
  google-*,
  misc-*,
  modernize-*,
  performance-*,
  portability-*,
  readability-*,
  -modernize-use-trailing-return-type,
  -bugprone-lambda-function-name,
  -google-runtime-references,
  -readability-magic-numbers,
  -bugprone-easily-swappable-parameters,
  -readability-identifier-length,
  -bugprone-narrowing-conversions,
  -misc-const-correctness,
  -modernize-avoid-c-arrays,
  -modernize-use-nullptr,
  -misc-no-recursion,
  -bugprone-reserved-identifier,
  -bugprone-macro-parentheses,
  -readability-redundant-access-specifiers,
  -misc-non-private-member-variables-in-classes,
  -unknown_typename,

# Turn all the warnings from the checks above into errors.
WarningsAsErrors: "performance-*, bugprone-*"

CheckOptions:
  - { key: readability-identifier-naming.NamespaceCase, value: aNy_CasE }
  - { key: readability-identifier-naming.ClassCase, value: CamelCase }
  - { key: readability-identifier-naming.StructCase, value: CamelCase }
  - { key: readability-identifier-naming.TemplateParameterCase, value: aNy_CasE }
  - { key: readability-identifier-naming.FunctionCase, value: aNy_CasE }
  - { key: readability-identifier-naming.VariableCase, value: aNy_CasE }
  - { key: readability-identifier-naming.ClassMemberCase, value: aNy_CasE }
  - { key: readability-identifier-naming.EnumConstantCase, value: CamelCase }
  - { key: readability-identifier-naming.EnumConstantPrefix, value: k }
  - { key: readability-identifier-naming.ConstexprVariableCase, value: CamelCase }
  - { key: readability-identifier-naming.ConstexprVariablePrefix, value: k }
  - { key: readability-identifier-naming.GlobalConstantCase, value: CamelCase }
  - { key: readability-identifier-naming.GlobalConstantPrefix, value: k }
  - { key: readability-identifier-naming.MemberConstantCase, value: CamelCase }
  - { key: readability-identifier-naming.MemberConstantPrefix, value: k }
  - { key: readability-identifier-naming.StaticConstantCase, value: CamelCase }
  - { key: readability-identifier-naming.StaticConstantPrefix, value: k }
  - { key: misc-non-private-member-variables-in-classes.IgnoreClassesWithAllMemberVariablesBeingPublic, value: 1 }
  - { key: readability-function-cognitive-complexity.Threshold, value: 100 }
  - { key: readability-implicit-bool-conversion.AllowPointerConditions, value: 1}
Suppressing Undesired Diagnostics
参考:https://clang.llvm.org/extra/clang-tidy/#suppressing-undesired-diagnostics
clang-tidy diagnostics are intended to call out code that does not adhere(遵守) to a coding standard, or is otherwise problematic in some way. However, if the code is known to be correct, it may be useful to silence the warning. Some clang-tidy checks provide a check-specific way to silence the diagnostics, e.g. bugprone-use-after-move can be silenced by re-initializing the variable after it has been moved out, bugprone-string-integer-assignment can be suppressed by explicitly casting the integer to char, readability-implicit-bool-conversion can also be suppressed by using explicit casts, etc.
If a specific suppression mechanism is not available for a certain warning, or its use is not desired for some reason, clang-tidy has a generic mechanism to suppress diagnostics using NOLINT, NOLINTNEXTLINE, and NOLINTBEGIN … NOLINTEND comments.
The NOLINT comment instructs clang-tidy to ignore warnings on the same line (it doesn’t apply to a function, a block of code or any other language construct; it applies to the line of code it is on). If introducing the comment on the same line would change the formatting in an undesired way, the NOLINTNEXTLINE comment allows suppressing clang-tidy warnings on the next line. The NOLINTBEGIN and NOLINTEND comments allow suppressing clang-tidy warnings on multiple lines (affecting all lines between the two comments).
All comments can be followed by an optional list of check names in parentheses (see below for the formal syntax). The list of check names supports globbing, with the same format and semantics as for enabling checks. Note: negative globs are ignored here, as they would effectively re-activate the warning.
For example:
class Foo {
  // Suppress all the diagnostics for the line
  Foo(int param); // NOLINT

  // Consider explaining the motivation to suppress the warning
  Foo(char param); // NOLINT: Allow implicit conversion from `char`, because <some valid reason>

  // Silence only the specified checks for the line
  Foo(double param); // NOLINT(google-explicit-constructor, google-runtime-int)

  // Silence all checks from the `google` module
  Foo(bool param); // NOLINT(google*)

  // Silence all checks ending with `-avoid-c-arrays`
  int array[10]; // NOLINT(*-avoid-c-arrays)

  // Silence only the specified diagnostics for the next line
  // NOLINTNEXTLINE(google-explicit-constructor, google-runtime-int)
  Foo(bool param);

  // Silence all checks from the `google` module for the next line
  // NOLINTNEXTLINE(google*)
  Foo(bool param);

  // Silence all checks ending with `-avoid-c-arrays` for the next line
  // NOLINTNEXTLINE(*-avoid-c-arrays)
  int array[10];

  // Silence only the specified checks for all lines between the BEGIN and END
  // NOLINTBEGIN(google-explicit-constructor, google-runtime-int)
  Foo(short param);
  Foo(long param);
  // NOLINTEND(google-explicit-constructor, google-runtime-int)

  // Silence all checks from the `google` module for all lines between the BEGIN and END
  // NOLINTBEGIN(google*)
  Foo(bool param);
  // NOLINTEND(google*)

  // Silence all checks ending with `-avoid-c-arrays` for all lines between the BEGIN and END
  // NOLINTBEGIN(*-avoid-c-arrays)
  int array[10];
  // NOLINTEND(*-avoid-c-arrays)
};
基于 clang-tidy AST 语法树代码自定义检查
- 场景:标准工具覆盖不到的场景
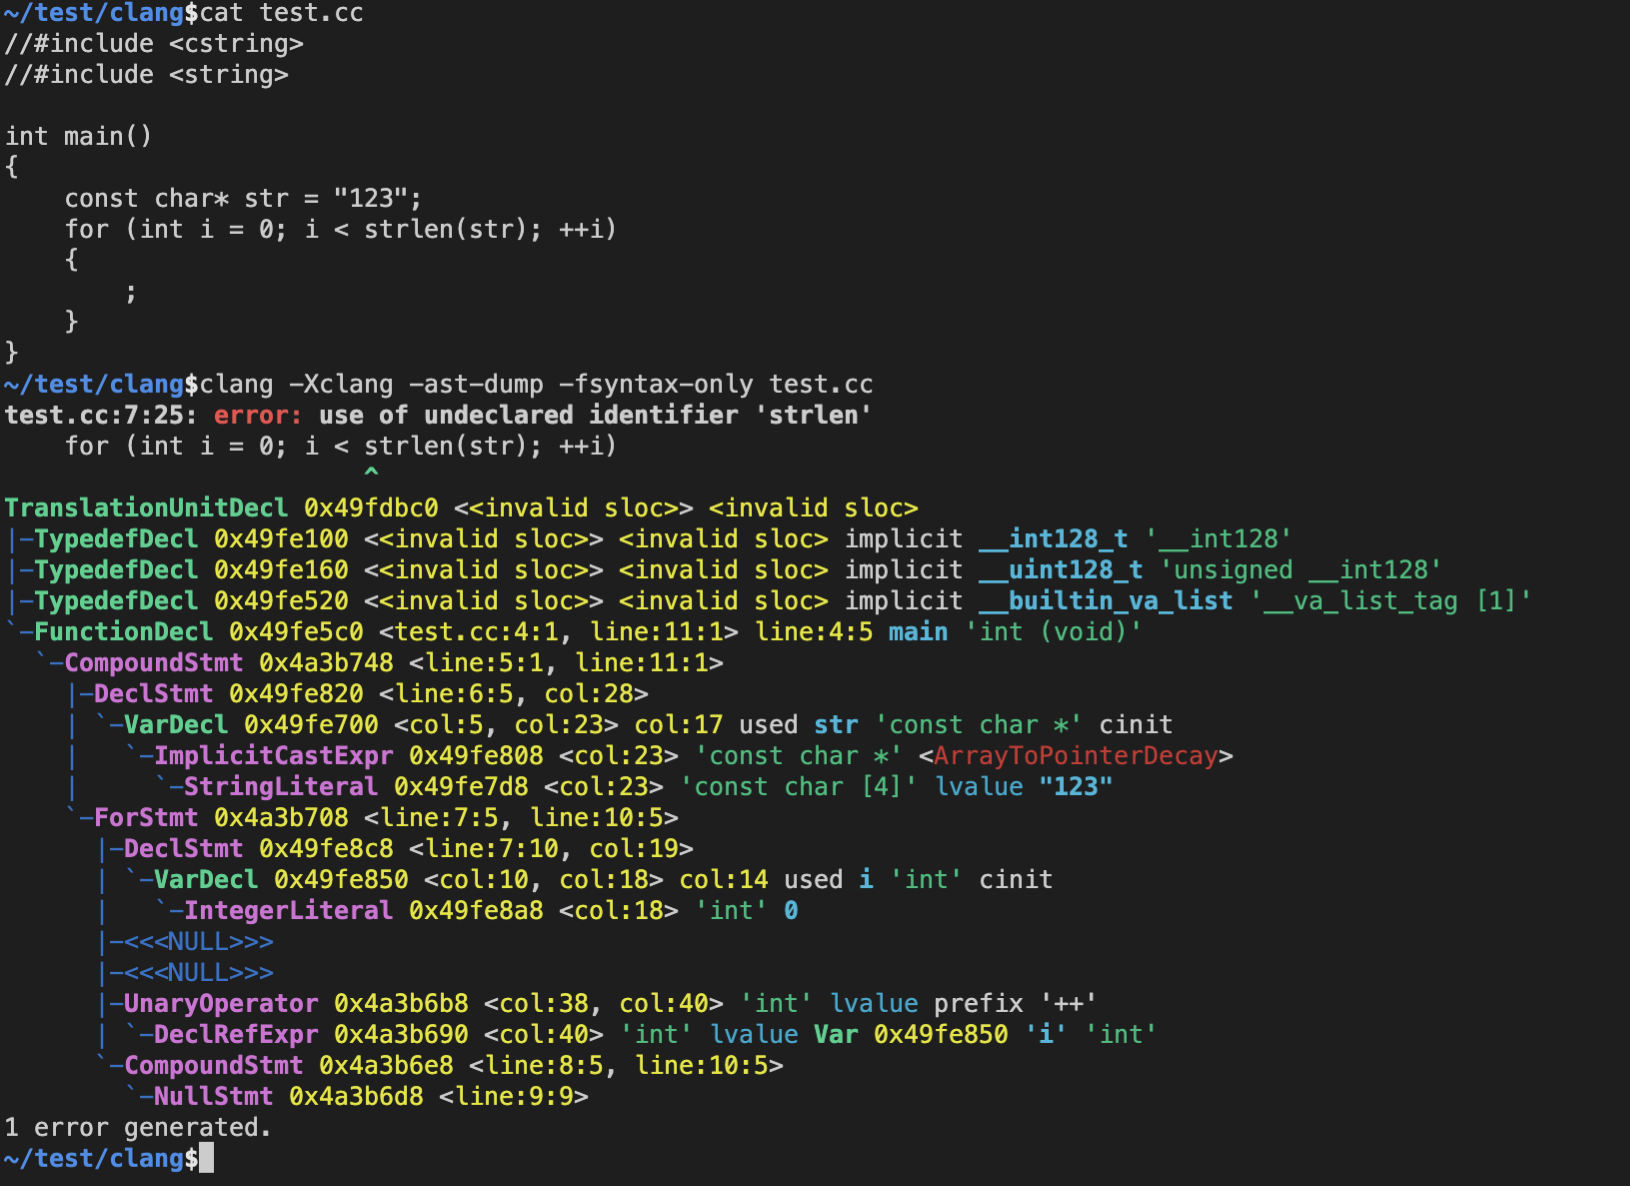
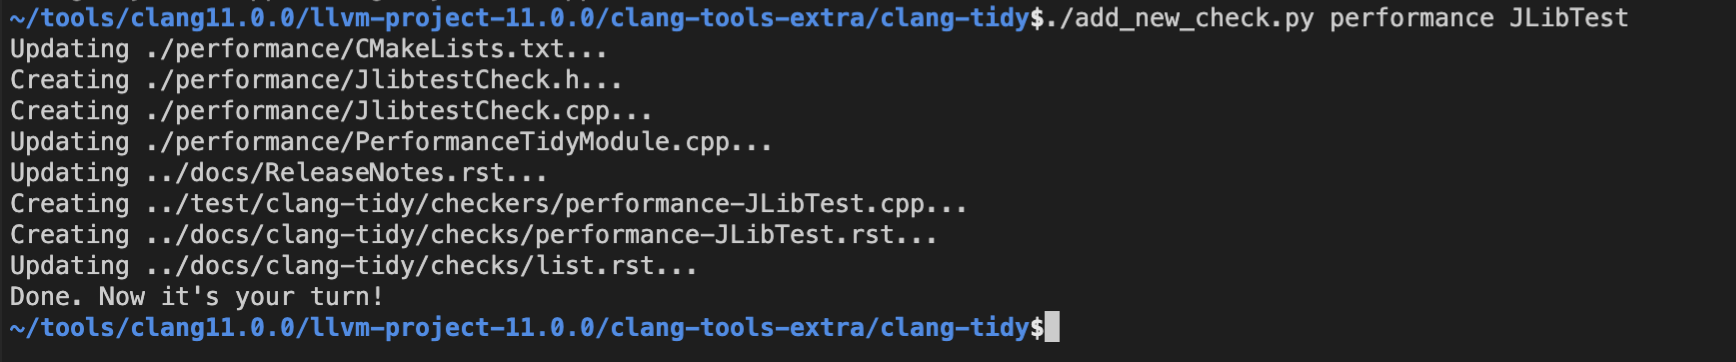
- 生成规则代码
$ cd llvm-project-11.0.0/clang-tools-extra/clang-tidy
$ ./add_new_check.py performance JLibTest
$ cd performance
$ ls JlibtestCheck.*
JlibtestCheck.cpp  JlibtestCheck.h
- 实现代码检查规则
// JlibtestCheck.h

//===--- JlibtestCheck.h - clang-tidy ---------------------------*- C++ -*-===//
//
// Part of the LLVM Project, under the Apache License v2.0 with LLVM Exceptions.
// See https://llvm.org/LICENSE.txt for license information.
// SPDX-License-Identifier: Apache-2.0 WITH LLVM-exception
//
//===----------------------------------------------------------------------===//

#ifndef LLVM_CLANG_TOOLS_EXTRA_CLANG_TIDY_PERFORMANCE_JLIBTESTCHECK_H
#define LLVM_CLANG_TOOLS_EXTRA_CLANG_TIDY_PERFORMANCE_JLIBTESTCHECK_H

#include "../ClangTidyCheck.h"

namespace clang {
namespace tidy {
namespace performance {

/// FIXME: Write a short description.
///
/// For the user-facing documentation see:
/// http://clang.llvm.org/extra/clang-tidy/checks/performance-JLibTest.html
class JlibtestCheck : public ClangTidyCheck {
public:
  JlibtestCheck(StringRef Name, ClangTidyContext *Context)
      : ClangTidyCheck(Name, Context) {}
  void registerMatchers(ast_matchers::MatchFinder *Finder) override;
  void check(const ast_matchers::MatchFinder::MatchResult &Result) override;
};

} // namespace performance
} // namespace tidy
} // namespace clang

#endif // LLVM_CLANG_TOOLS_EXTRA_CLANG_TIDY_PERFORMANCE_JLIBTESTCHECK_H
// JlibtestCheck.cpp
//===--- JlibtestCheck.cpp - clang-tidy -----------------------------------===//
//
// Part of the LLVM Project, under the Apache License v2.0 with LLVM Exceptions.
// See https://llvm.org/LICENSE.txt for license information.
// SPDX-License-Identifier: Apache-2.0 WITH LLVM-exception
//
//===----------------------------------------------------------------------===//
#include "JlibtestCheck.h"
#include "clang/AST/ASTContext.h"
#include "clang/ASTMatchers/ASTMatchFinder.h"
using namespace clang::ast_matchers;
namespace clang {
namespace tidy {
namespace performance {
void JlibtestCheck::registerMatchers(MatchFinder *Finder) {
// FIXME: Add matchers.
//Finder->addMatcher(functionDecl().bind("x"), this);
// Matcher for for-loops having a call to strlen in the loop condition.
//Finder->addMatcher(forStmt(hasCondition(hasDescendant(callExpr(callee(functionDecl(hasName("strlen"))))))).bind("myForLoop"), this);
Finder->addMatcher(
forStmt(hasCondition(hasDescendant(
callExpr(callee(functionDecl(hasName("strlen")))))))
.bind("myForLoop"),
this);
}
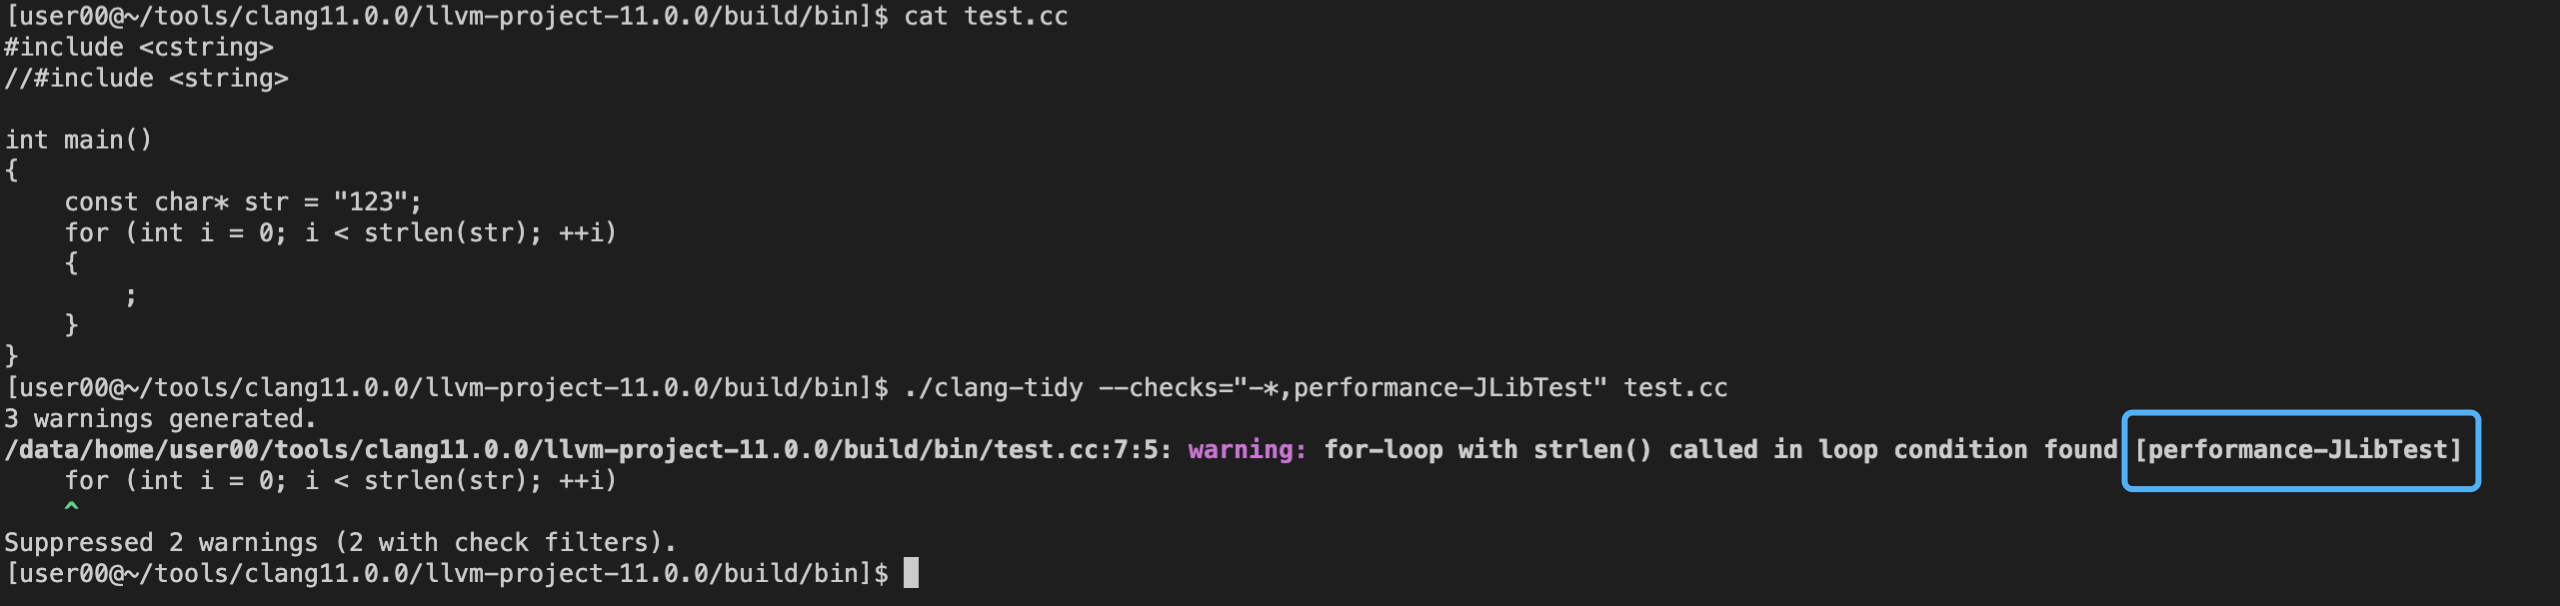
void JlibtestCheck::check(const MatchFinder::MatchResult &Result) {
// FIXME: Add callback implementation.
// Retrieve the matched for-loop node.
const ForStmt *myForLoop = Result.Nodes.getNodeAs<ForStmt>("myForLoop");
// If for some reason it's not retrieved, return early.
if (!myForLoop) {
return;
}
// Initialize a diagnostic message.
diag(myForLoop->getBeginLoc(), "for-loop with strlen() called in loop condition found");
// Apply possible fixes, if necessary.
/*
const auto *MatchedDecl = Result.Nodes.getNodeAs<FunctionDecl>("x");
if (MatchedDecl->getName().startswith("awesome_"))
return;
diag(MatchedDecl->getLocation(), "function %0 is insufficiently awesome")
<< MatchedDecl;
diag(MatchedDecl->getLocation(), "insert 'awesome'", DiagnosticIDs::Note)
<< FixItHint::CreateInsertion(MatchedDecl->getLocation(), "awesome_");
*/
}
} // namespace performance
} // namespace tidy
} // namespace clang
- 构建编译 clang-tidy
$ cd llvm-project-11.0.0/build
$ cmake -DLLVM_ENABLE_PROJECTS="clang-tools-extra" -DCMAKE_BUILD_TYPE=Release -G "Unix Makefiles" ../llvm
$ make -j16
$ cd bin
$ ls clang-tidy
clang-tidy
- 使用方法
$ cd llvm-project-11.0.0/build/bin
$ ./clang-tidy --checks="-*,performance-JLibTest" test.cc
- 更多参考
- 2022 全球 C++ 及系统软件技术大会 - C++ 性能、工具、库 - 陈硕
- How to build a C++ processing tool using the Clang libraries
- AST Matcher Reference
- https://zhuanlan.zhihu.com/p/573342695
- https://acefish.github.io/15541003911598.html
clang-format 配置方法
同样,可以在项目根目录下添加.clang-format文件,实现代码的自动格式化。
可以参考:CPP ClangFormat in Action
Q&A
禁止自动插入包含头文件
Any option to disable auto headers import? (clangd-9)
There’s a flag: -header-insertion=never. You should be able to set you editor to pass that flag to clangd.
clangd 内存开销过大问题
Excessive memory consumption #251
Clion clangd, how to limit memory usage
- 设置
--background-index选项 (Index project code in the background and persist index on disk) - 设置
--pch-storage=disk选项 (Storing PCHs in memory increases memory usages, but may improve performance)
Default limit for clangd is 8GB, but you can easily customize it. BTW, clangd works only with opened files. So as few files opened in editor as less memory clangd eats.
将 preamble-xxx.pch 默认的 root 输出目录改为用户目录
vscode 的 clangd 插件在 disk 模式下会在 /tmp 目录下产生大量的 preamble-xxx.pch 的文件,导致 / 挂载盘空间占满。 解决方案:(将 tmp 文件重定向到用户 data 目录下)
- ~/.bash_profile 中加上 export TMPDIR=$HOME/tmp
- kill 掉服务器上的 vscode 进程,重新连接进入
其他参考
- https://marketplace.visualstudio.com/items?itemName=llvm-vs-code-extensions.vscode-clangd
- https://github.com/llvm/llvm-project/tree/main/clang-tools-extra/clangd#building-and-testing-clangd
- https://github.com/clangd/clangd/releases/tag/15.0.1
- https://clangd.llvm.org/installation.html
- https://manpages.debian.org/experimental/clangd/clangd.1.en.html
LLD (The LLVM Linker)
参考 https://clang.llvm.org/docs/Toolchain.html
LLD is a linker from the LLVM project that is a drop-in replacement for system linkers and runs much faster than them. It also provides features that are useful for toolchain developers.
The linker supports ELF (Unix), PE/COFF (Windows), Mach-O (macOS) and WebAssembly in descending order of completeness. Internally, LLD consists of several different linkers.
More:
- LLD - The LLVM Linker
- LLD and GNU linker incompatibilities (兼容性说明)
- lld: A Fast, Simple and Portable Linker (特别好)
- https://zhuanlan.zhihu.com/p/339693863
Features
- LLD is a drop-in replacement for the GNU linkers that accepts the same command line arguments and linker scripts as GNU.
- LLD is very fast. When you link a large program on a multicore machine, you can expect that LLD runs more than twice as fast as the GNU gold linker. Your mileage may vary, though.
- It supports various CPUs/ABIs.
- It is always a cross-linker, meaning that it always supports all the above targets however it was built.
- You can embed LLD in your program to eliminate dependencies on external linkers. All you have to do is to construct object files and command line arguments just like you would do to invoke an external linker and then call the linker’s main function,
lld::lldMain, from your code. - It is small. We are using LLVM libObject library to read from object files, so it is not a completely fair comparison, but as of February 2017, LLD/ELF consists only of 21k lines of C++ code while GNU gold consists of 198k lines of C++ code.
- Link-time optimization (
LTO) is supported by default. Essentially, all you have to do to doLTOis to pass the-fltooption to clang. Then clang creates object files not in the native object file format but in LLVM bitcode format. LLD reads bitcode object files, compile them using LLVM and emit an output file. Because in this way LLD can see the entire program, it can do the whole program optimization. - Some very old features for ancient Unix systems (pre-90s or even before that) have been removed. Some default settings have been tuned for the 21st century. For example, the stack is marked as non-executable by default to tighten security.
Build
If you have already checked out LLVM using SVN, you can check out LLD under tools directory just like you probably did for clang. For the details, see Getting Started with the LLVM System.
If you haven’t checked out LLVM, the easiest way to build LLD is to check out the entire LLVM projects/sub-projects from a git mirror and build that tree. You need cmake and of course a C++ compiler.
历史版本:3.5.2
https://github.com/llvm/llvm-project/releases/tag/llvmorg-3.5.2 (目前这个版本使用 cmake 单独构建 lld 项目会失败)
$ git clone https://github.com/llvm/llvm-project llvm-project    # 最新版本,可以编译成功
$ mkdir build
$ cd build
$ cmake -DCMAKE_BUILD_TYPE=Release -DLLVM_ENABLE_PROJECTS=lld -DCMAKE_INSTALL_PREFIX=/usr/local ../llvm-project/llvm
$ make install
依赖:
- cmake 3.20
- gcc 7.1
- Python 3.8
$ls -lh /usr/local/bin/lld
-rwxr-xr-x 1 root root 125M 7月  19 16:35 /usr/local/bin/lld
$ls -lh /usr/local/bin/ld.lld
lrwxrwxrwx 1 root root 3 7月  19 16:45 /usr/local/bin/ld.lld -> lld
注意:-fuse-ld=lld 用法依赖 /usr/local/bin/ld.lld 软链。
一些下载地址:
- LLVM Download Page
- https://releases.llvm.org/download.html#3.5.2
- https://releases.llvm.org/3.5.2/lld-3.5.2.src.tar.xz
- https://github.com/llvm/llvm-project/releases
- https://github.com/muttleyxd/clang-tools-static-binaries
- https://github.com/llvm-mirror/lld
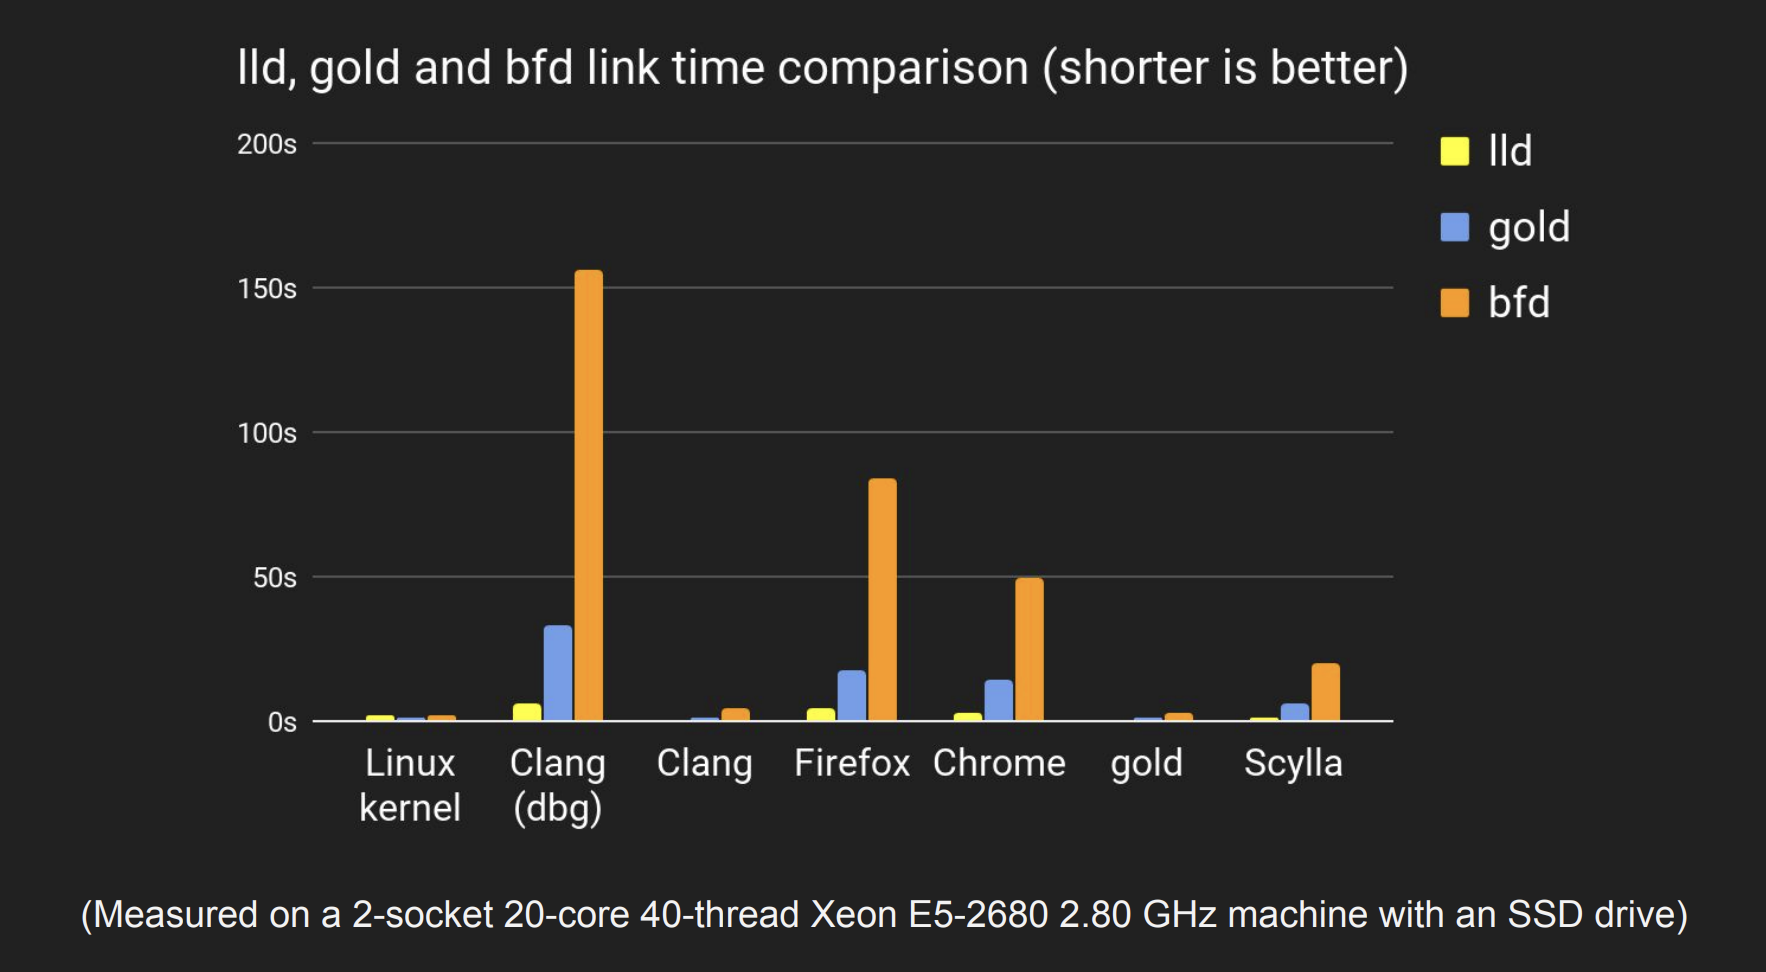
Two GNU linkers
GNU binutils have two linkers, bfd and gold
- bfd linker got ELF support in 1993
- gold started in 2006 as a ELF-only, faster replacement for bfd
bfd linker is written on top of the BFD library. gold is written to completely remove that abstraction layer, and that’s why gold is much faster than bfd. lld is written from scratch just like gold, and it is significantly faster than gold.
Performance
- In general testing,
lldranges from two to four times as fast asgold lldis better at large programs, which is when the link time matters most
It depends on target programs, number of available cores, and command line options
参考:https://llvm.org/devmtg/2017-10/slides/Ueyama-lld.pdf
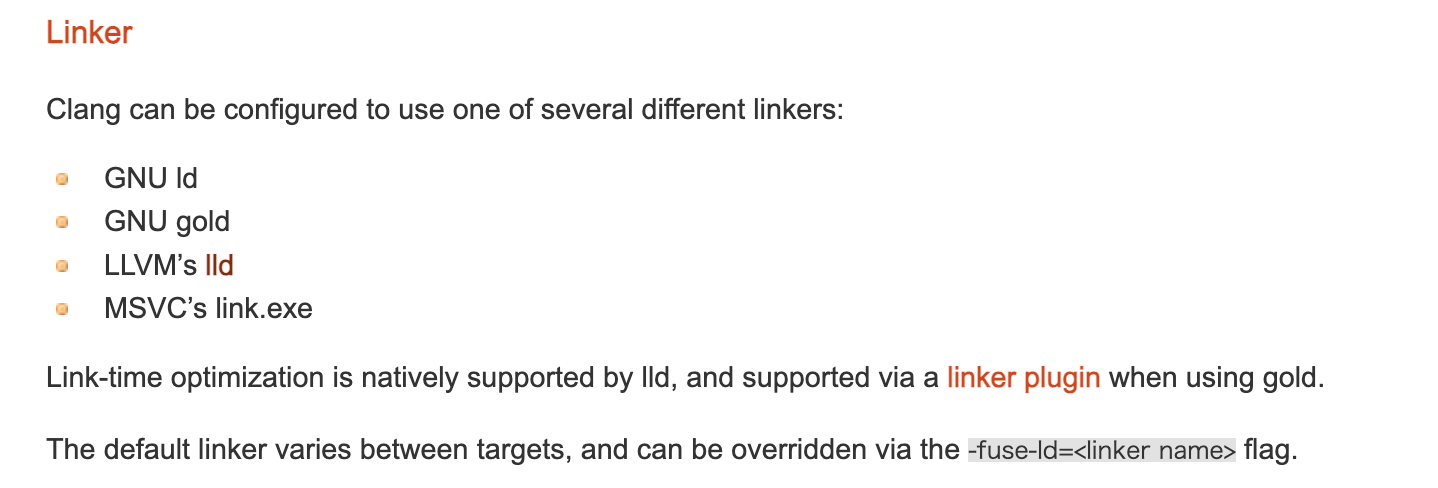
Using LLD
LLD is installed as ld.lld. On Unix, linkers are invoked by compiler drivers, so you are not expected to use that command directly. There are a few ways to tell compiler drivers to use ld.lld instead of the default linker.
The easiest way to do that is to overwrite the default linker. After installing LLD to somewhere on your disk, you can create a symbolic link by doing ln -s /path/to/ld.lld /usr/bin/ld so that /usr/bin/ld is resolved to LLD.
If you don’t want to change the system setting, you can use clang’s -fuse-ld option. In this way, you want to set -fuse-ld=lld to LDFLAGS when building your programs.
LLD leaves its name and version number to a .comment section in an output. If you are in doubt whether you are successfully using LLD or not, run readelf --string-dump .comment <output-file> and examine the output. If the string “Linker: LLD” is included in the output, you are using LLD.
$lld --version
lld is a generic driver.
Invoke ld.lld (Unix), ld64.lld (macOS), lld-link (Windows), wasm-ld (WebAssembly) instead
~$ls -lh /usr/bin/ld
lrwxrwxrwx 1 root root 20 3月   5 2021 /usr/bin/ld -> /etc/alternatives/ld
~$ls -lh /etc/alternatives/ld
lrwxrwxrwx 1 root root 15 3月   5 2021 /etc/alternatives/ld -> /usr/bin/ld.bfd
~$ls -lh /usr/bin/ld.bfd
-rwxr-xr-x 1 root root 983K 10月 29 2019 /usr/bin/ld.bfd
~$/usr/bin/ld.bfd --version
GNU ld version 2.27-41.base.tl2.1
Copyright (C) 2016 Free Software Foundation, Inc.
这个程序是自由软件;您可以遵循GNU 通用公共授权版本 3 或
(您自行选择的) 稍后版本以再次散布它。
这个程序完全没有任何担保。
~$ls -lh /usr/bin/ld.gold
-rwxr-xr-x 1 root root 5.2M 10月 29 2019 /usr/bin/ld.gold
~$/usr/bin/ld.gold --version
GNU gold (version 2.27-41.base.tl2.1) 1.12
Copyright (C) 2016 Free Software Foundation, Inc.
这个程序是自由软件;您可以遵循GNU 通用公共授权版本 3 或
(您自行选择的) 稍后版本以再次散布它。
这个程序完全没有任何担保。
修改 ld 的软链:
# ls -lh /usr/bin/ld
lrwxrwxrwx 1 root root 20 3月   5 2021 /usr/bin/ld -> /etc/alternatives/ld
# rm /usr/bin/ld
# which ld.lld
/usr/local/bin/ld.lld
# ln -s /usr/local/bin/ld.lld /usr/bin/ld
# ls -lh /usr/bin/ld
lrwxrwxrwx 1 root root 21 7月  19 17:46 /usr/bin/ld -> /usr/local/bin/ld.lld
生效后:
~$ld --version
LLD 17.0.0 (compatible with GNU linkers)
~$which ld
/bin/ld
~$ls -lh /bin/ld
lrwxrwxrwx 1 root root 21 7月  19 17:46 /bin/ld -> /usr/local/bin/ld.lld
~$/usr/local/bin/ld.lld --version
LLD 17.0.0 (compatible with GNU linkers)
Semantic differences between lld and GNU linkers
lld’s symbol resolution semantics is different from traditional Unix linkers.
How traditional Unix linkers work:
- Maintains a set
Sof undefined symbols - Visits files in the order they appeared in the command line, which adds or removes (resolves) symbols to/from
S - When visiting an archive, it pulls out object files to resolve as many undefined symbols as possible
File order is important in GNU linkers. Assume that object.o contains undefined symbols that archive.a can resolve.
- Works:
ld object.o archive.a - Does not work:
ld archive.a object.o
lld’s semantics
In lld, archive files don’t have to appear before object files
- Works:
ld object.o archive.a - Also work:
ld archive.a object.o
This is (in my opinion) intuitive and efficient but could result in a different symbol resolution result, if two or more archives provide the same symbols.
No need to worry too much; in FreeBSD, there were only a few programs that didn’t work because of the difference, but you want to keep it in mind.
Other features
Link-Time Optimization
lld has built-in LTO (link-time optimization) support
- Unlike
gold, you don’t need a linker plugin - To use
LTO, all you need to do is to use clang as a compiler, and addC{,XX}FLAGS=-fltoandLDFLAGS=-fuse=lld
Cross-linking
- It always supports all targets
- In fact, we do not provide a
./configure-timeoption to enable/disable targets. All lld executables can handle all targets - It should make it easier to use lld as part of a cross toolchain
- In fact, we do not provide a
- It is agnostic on the host operating system
- There’s no implicit default setting
- It works fine because all options we need are passed explicitly by compilers
- Again, it is cross toolchain-friendly
ld 切换脚本
#!/bin/bash

CUR_DIR=$(dirname $(readlink -f $0))

LD_BFD_PATH="/usr/bin/ld.bfd"
LD_GOLD_PATH="/usr/bin/ld.gold"
LD_LLD_PATH="$TOOLS_DIR/llvm/lld/lld"

ORIG_LD_LINK_PATH="/usr/bin/ld"

# Check input arguments
if [[ $# -ne 1 ]]; then
  echo "Usage: $0 {bfd|gold|lld}"
  exit 1
fi

# Choose the linker to use based on the argument
case $1 in
  bfd)
    LD_PATH="$LD_BFD_PATH"
    ;;
  gold)
    LD_PATH="$LD_GOLD_PATH"
    ;;
  lld)
    LD_PATH="$LD_LLD_PATH"
    ;;
  *)
    echo "Invalid LD type: $1. Valid options are: bfd, gold, lld"
    exit 1
    ;;
esac

# Check if the chosen linker exists
if [[ ! -f "$LD_PATH" ]]; then
  echo "Linker not found at $LD_PATH"
  exit 1
fi

# Create a symlink to the chosen linker
sudo ln -sf "$LD_PATH" "$ORIG_LD_LINK_PATH"

echo "Successfully replaced ld with $1"
LLD and GNU linker incompatibilities - Is ld.lld a drop-in replacement for GNU ld?
The motivation for this article was someone challenging the “drop-in replacement” claim on LLD’s website (the discussion was about Linux-like ELF toolchain):
LLD is a linker from the LLVM project that is a drop-in replacement for system linkers and runs much faster than them. It also provides features that are useful for toolchain developers.
99.9% pieces of software work with ld.lld without a change. Some linker script applications may need an adaption (such adaption is oftentimes due to brittle assumptions: asking too much from GNU ld’s behavior which should be fixed anyway). So I defended for this claim.
Piotr Kubaj said that this is a probably more of a marketing term than a technical term, the term tries to lure existing users into thinking “it’s the same you know, but better!”. I think that this is fair in some senses: for many applications ld.lld has achieved much faster speed and much lower memory usage than GNU ld. A more important thing is that ld.lld adds a third choice to the spectrum. It brings competitive pressure to both sides, gives incentive for improvement, and makes for more standardized future features/extensions. One reason that I am subscribed to the binutils mailing list is I want to participate in its design processes (I am proud to say that I have managed to find some early issues of various new things).
Anyway, I thought documenting the compatibility problems between the ELF ports of ld.lld and GNU ld is useful, not only to others but also to my future self, hence this article. I will try to describe GNU gold behaviors as well.
So here is the long list. Please keep in mind that many compatibility issues do not really matter and a user may never run into such an issue. Many of them just serve as educational purposes and my personal reference. There some some user perceivable differences but quite a lot are WONTFIX on both GNU ld and ld.lld. ld.lld, as a newer linker, has less legacy compatibility burden and can make good default choices in some cases and say no to some unneeded features/behaviors. A large number of features are duplicated in GNU ld’s various ports. It is also common that one thing behaves this way in port A and another way in port B.
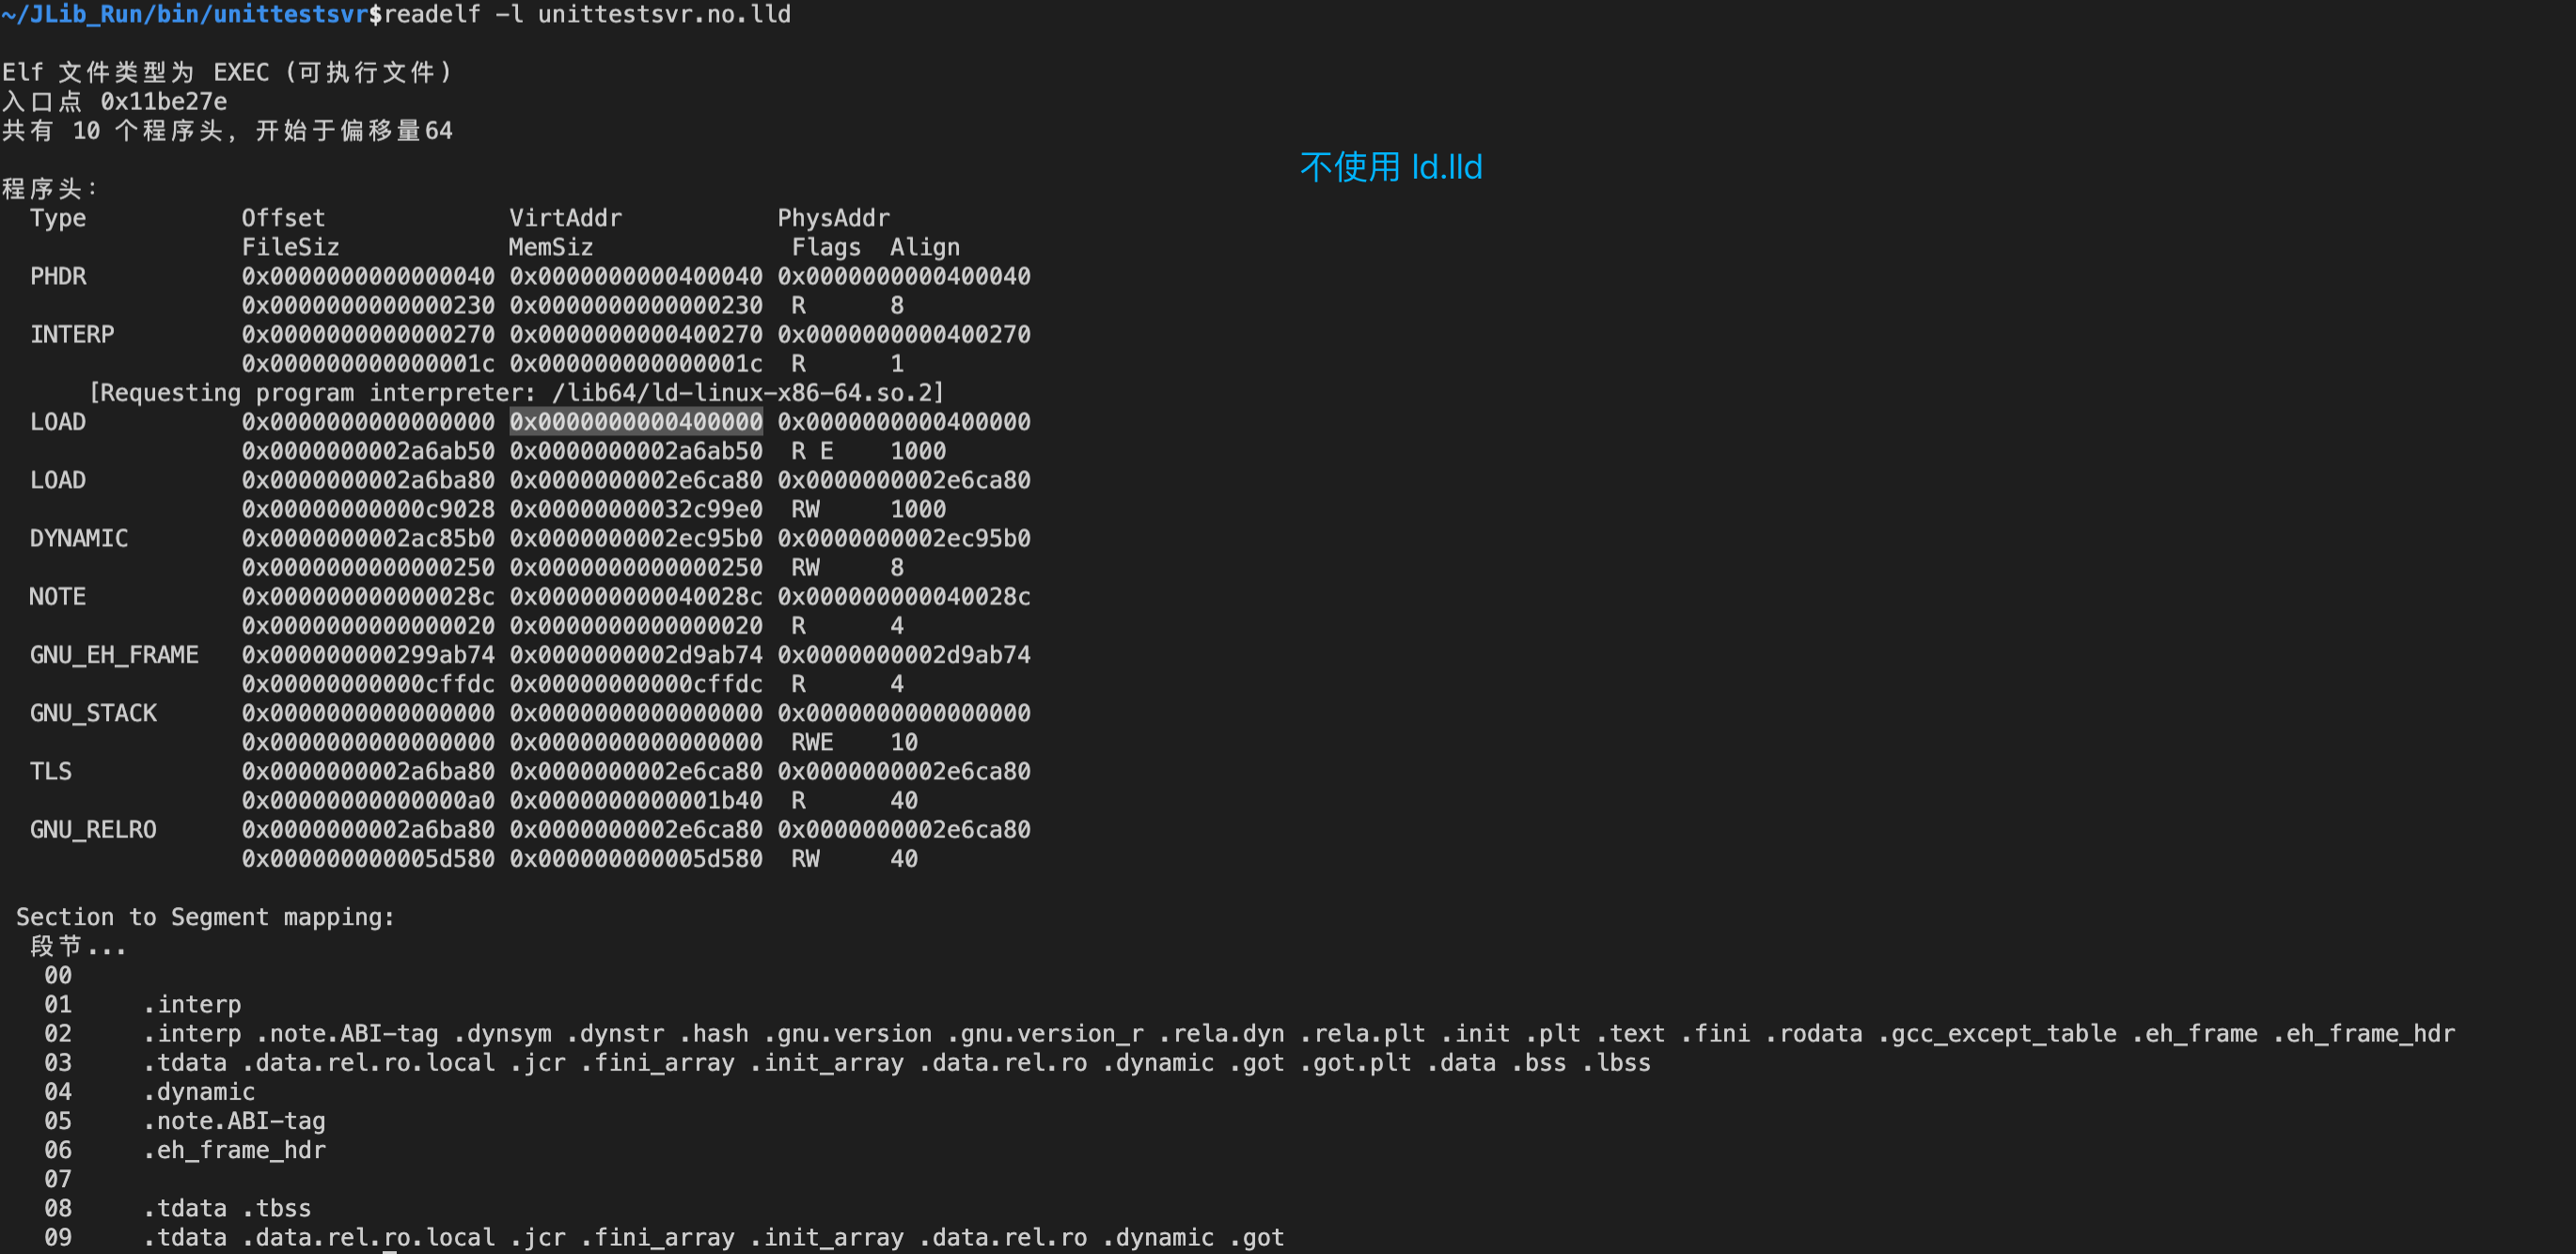
基址不同
The default image base for -no-pie links is different. For example, on x86-64, GNU ld defaults to 0x400000 while ld.lld defaults to 0x200000.
-no-pie(Position Independent Executable)是一个编译器选项,用于在构建程序时禁用位置无关可执行文件(PIE)。位置无关可执行文件是一种可执行文件,它可以在内存中的任何位置加载并执行,而不需要修改其代码。这是通过在编译时使用位置无关代码(PIC)来实现的。
启用PIE的主要优点是增加了安全性,因为它允许操作系统使用地址空间布局随机化(ASLR)技术,这可以使攻击者更难利用内存相关漏洞。然而,在某些情况下,你可能不希望使用PIE,例如在嵌入式系统中,或者在对性能要求很高的应用程序中,因为PIE可能会导致轻微的性能损失。
-no-pie选项在编译时禁用PIE,生成的可执行文件将不使用位置无关代码。这意味着可执行文件将在固定的内存地址运行,不使用ASLR技术。
使用 readelf -l 或 objdump -p 查看二进制文件的基址信息:
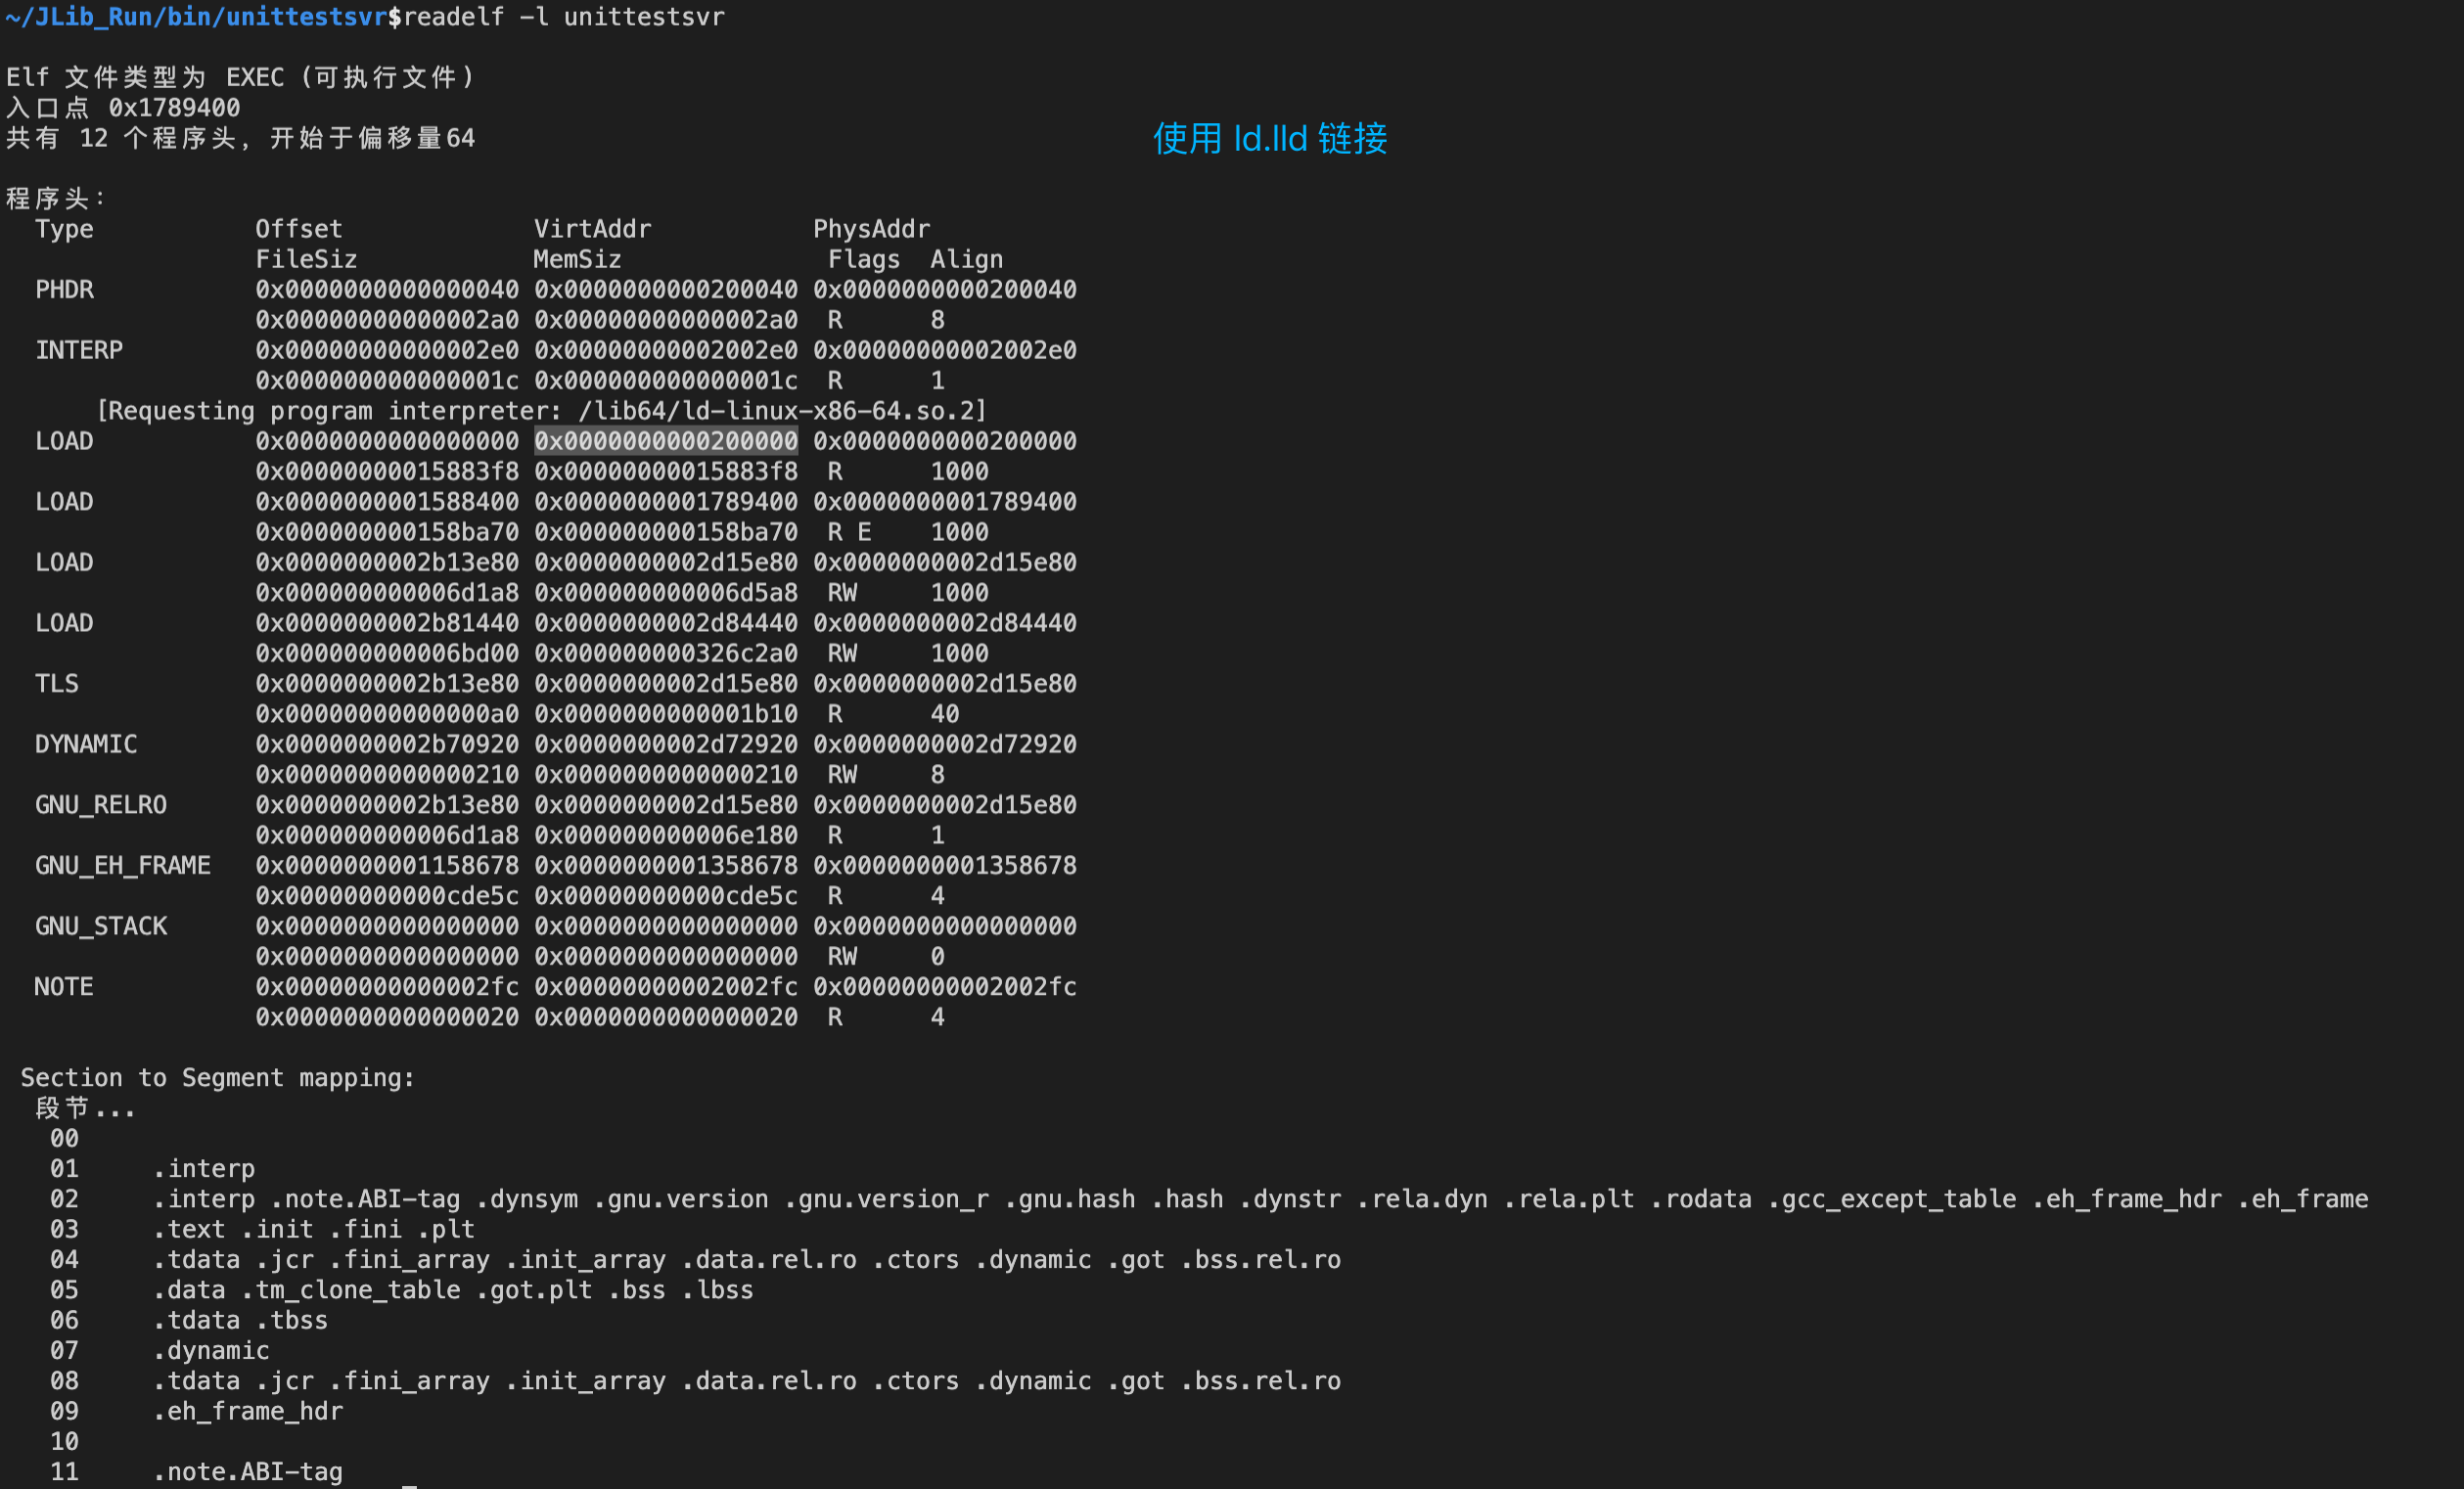
使用 -Wl,--image-base 选项可以修改 lld 默认的基址:
SET(CMAKE_EXE_LINKER_FLAGS "${CMAKE_EXE_LINKER_FLAGS} -fuse-ld=lld -Wl,--image-base=0x400000")
Mold: A Modern Linker
mold is a faster drop-in replacement for existing Unix linkers. It is several times quicker than the LLVM lld linker, the second-fastest open-source linker, which I initially developed a few years ago. mold aims to enhance developer productivity by minimizing build time, particularly in rapid debug-edit-rebuild cycles.
Here is a performance comparison of GNU gold, LLVM lld, and mold when linking final debuginfo-enabled executables for major large programs on a simulated 8-core, 16-thread machine.
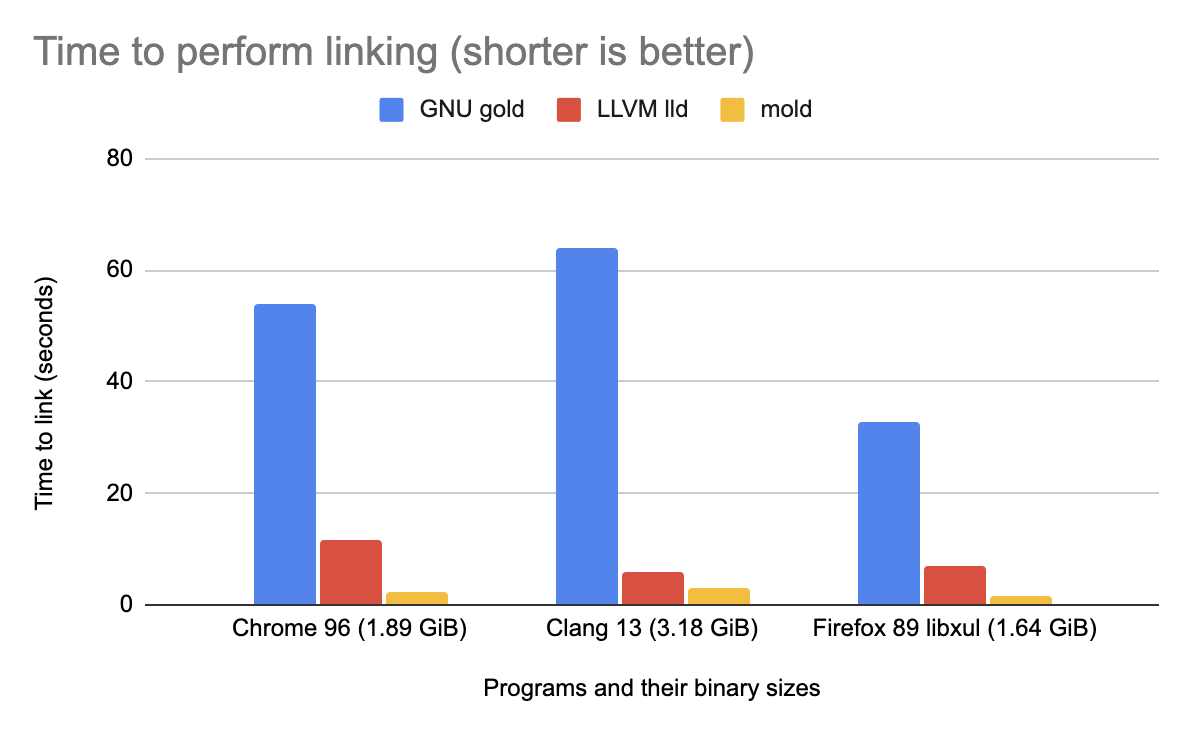
mold is so fast that it is only 2x slower than the cp command on the same machine. If you find that mold is not faster than other linkers, please feel free to file a bug report.
mold supports x86-64, i386, ARM64, ARM32, 64-bit/32-bit little/big-endian RISC-V, 32-bit PowerPC, 64-bit big-endian PowerPC ELFv1, 64-bit little-endian PowerPC ELFv2, s390x, 64-bit/32-bit LoongArch, SPARC64, m68k, SH-4, and DEC Alpha.
How to Build:
mold is written in C++20, so if you build mold yourself, you will need a recent version of a C++ compiler and a C++ standard library. We recommend GCC 10.2 or Clang 12.0.0 (or later) and libstdc++ 10 or libc++ 7 (or later).
lldb
LLDB是一个高性能、可扩展的源代码级调试器,它是LLVM项目的一部分。LLDB支持C、C++、Objective-C以及其他编程语言,并且可以在多种平台上运行,如macOS、Linux、Windows等。LLDB的主要功能是帮助开发人员调试程序,找出错误和问题。
以下是LLDB的一些主要功能和使用场景:
断点设置:LLDB允许您在程序的特定行或函数上设置断点。当程序执行到断点处时,它会暂停执行,允许您检查变量的值、调用栈等。
单步执行:在程序暂停执行时,您可以使用LLDB逐行执行代码。这可以帮助您观察程序的执行过程,以找出可能的错误和问题。
变量检查:使用LLDB,您可以在程序暂停执行时检查变量的值。这对于了解程序状态以及识别错误非常有用。
内存检查:LLDB允许您检查程序的内存布局,例如查看堆栈、堆等。这对于识别内存相关问题(如内存泄漏、越界访问等)非常有用。
表达式求值:LLDB可以在程序暂停执行时计算表达式。这可以帮助您了解程序状态,或尝试修复问题。
调用栈检查:当程序暂停执行时,您可以使用LLDB查看调用栈。这可以帮助您了解程序的执行流程以及问题的来源。
要在命令行中使用LLDB调试程序,请运行以下命令:
lldb my_program
这将启动LLDB并加载my_program可执行文件。在LLDB中,您可以使用各种命令来设置断点、执行代码、检查变量等。例如,要在main函数上设置一个断点,请使用以下命令:
(lldb) breakpoint set --name main
要运行程序,请使用以下命令:
(lldb) run
当程序暂停执行时,您可以使用step、next、finish等命令来逐行执行代码,使用print命令来检查变量的值,使用bt命令来查看调用栈等。
有关LLDB的详细使用方法和命令,请参阅LLDB官方文档。
$lldb -h
OVERVIEW: LLDB

USAGE: lldb [options]

ATTACHING:
  --attach-name <name> Tells the debugger to attach to a process with the given name.
  --attach-pid <pid>   Tells the debugger to attach to a process with the given pid.
  -n <value>           Alias for --attach-name
  -p <value>           Alias for --attach-pid
  --wait-for           Tells the debugger to wait for a process with the given pid or name to launch before attaching.
  -w                   Alias for --wait-for

COMMANDS:
  --batch              Tells the debugger to run the commands from -s, -S, -o & -O, and then quit.
  -b                   Alias for --batch
  -K <value>           Alias for --source-on-crash
  -k <value>           Alias for --one-line-on-crash
  --local-lldbinit     Allow the debugger to parse the .lldbinit files in the current working directory, unless --no-lldbinit is passed.
  --no-lldbinit        Do not automatically parse any '.lldbinit' files.
  --one-line-before-file <command>
                       Tells the debugger to execute this one-line lldb command before any file provided on the command line has been loaded.
  --one-line-on-crash <command>
                       When in batch mode, tells the debugger to run this one-line lldb command if the target crashes.
  --one-line <command> Tells the debugger to execute this one-line lldb command after any file provided on the command line has been loaded.
  -O <value>           Alias for --one-line-before-file
  -o <value>           Alias for --one-line
  -Q                   Alias for --source-quietly
  --source-before-file <file>
                       Tells the debugger to read in and execute the lldb commands in the given file, before any file has been loaded.
  --source-on-crash <file>
                       When in batch mode, tells the debugger to source this file of lldb commands if the target crashes.
  --source-quietly     Tells the debugger to execute this one-line lldb command before any file has been loaded.
  --source <file>      Tells the debugger to read in and execute the lldb commands in the given file, after any file has been loaded.
  -S <value>           Alias for --source-before-file
  -s <value>           Alias for --source
  -x                   Alias for --no-lldbinit

OPTIONS:
  --arch <architecture> Tells the debugger to use the specified architecture when starting and running the program.
  -a <value>            Alias for --arch
  --capture-path <filename>
                        Tells the debugger to use the given filename for the reproducer.
  --capture             Tells the debugger to capture a reproducer.
  --core <filename>     Tells the debugger to use the full path to <filename> as the core file.
  -c <value>            Alias for --core
  --debug               Tells the debugger to print out extra information for debugging itself.
  -d                    Alias for --debug
  --editor              Tells the debugger to open source files using the host's "external editor" mechanism.
  -e                    Alias for --editor
  --file <filename>     Tells the debugger to use the file <filename> as the program to be debugged.
  -f <value>            Alias for --file
  --help                Prints out the usage information for the LLDB debugger.
  -h                    Alias for --help
  --no-use-colors       Do not use colors.
  --replay <filename>   Tells the debugger to replay a reproducer from <filename>.
  --reproducer-generate-on-exit
                        Generate reproducer on exit.
  --reproducer-no-generate-on-signal
                        Don't generate reproducer when a signal is received.
  --reproducer-no-version-check
                        Disable the reproducer version check.
  --version             Prints out the current version number of the LLDB debugger.
  -v                    Alias for --version
  -X                    Alias for --no-use-color

REPL:
  -r=<flags>     Alias for --repl=<flags>
  --repl-language <language>
                 Chooses the language for the REPL.
  --repl=<flags> Runs lldb in REPL mode with a stub process with the given flags.
  --repl         Runs lldb in REPL mode with a stub process.
  -R <value>     Alias for --repl-language
  -r             Alias for --repl

SCRIPTING:
  -l <value>    Alias for --script-language
  --python-path Prints out the path to the lldb.py file for this version of lldb.
  -P            Alias for --python-path
  --script-language <language>
                Tells the debugger to use the specified scripting language for user-defined scripts.

EXAMPLES:
  The debugger can be started in several modes.

  Passing an executable as a positional argument prepares lldb to debug the
  given executable. To disambiguate between arguments passed to lldb and
  arguments passed to the debugged executable, arguments starting with a - must
  be passed after --.

    lldb --arch x86_64 /path/to/program program argument -- --arch arvm7

  For convenience, passing the executable after -- is also supported.

    lldb --arch x86_64 -- /path/to/program program argument --arch arvm7

  Passing one of the attach options causes lldb to immediately attach to the
  given process.

    lldb -p <pid>
    lldb -n <process-name>

  Passing --repl starts lldb in REPL mode.

    lldb -r

  Passing --core causes lldb to debug the core file.

    lldb -c /path/to/core

  Command options can be combined with these modes and cause lldb to run the
  specified commands before or after events, like loading the file or crashing,
  in the order provided on the command line.

    lldb -O 'settings set stop-disassembly-count 20' -o 'run' -o 'bt'
    lldb -S /source/before/file -s /source/after/file
    lldb -K /source/before/crash -k /source/after/crash

  Note: In REPL mode no file is loaded, so commands specified to run after
  loading the file (via -o or -s) will be ignored.
Toolchain
https://clang.llvm.org/docs/Toolchain.html
Clang is only one component in a complete tool chain for C family programming languages. In order to assemble a complete toolchain, additional tools and runtime libraries are required. Clang is designed to interoperate with existing tools and libraries for its target platforms, and the LLVM project provides alternatives for a number of these components.
This document describes the required and optional components in a complete toolchain, where to find them, and the supported versions and limitations of each option.
Example
- https://github.com/remysys/llvm-example
Manual
- http://developer.amd.com/wordpress/media/2013/12/AOCC-1.1-Clang-the-C-C-Compiler.pdf
- Clang Compiler User’s Manual