Debugging Assembly Code with GDB
- GNU Debugger - GDB
- What is GDB
- Install
- How to Use
- Compiling for Debugging
- Invoking or Quitting GDB
- What GDB Does During Startup
- Continuing and Stepping
- Shell Commands
- GDB Commands
- Program’s Environment
- Program’s Working Directory
- Program’s Input and Output
- Debugging Programs with Multiple Threads
- Debugging Forks
- Breakpoints
- Watchpoints
- Catchpoints
- Disassemble
- Add index files to speed up GDB
- Other
- 常用命令
- Information About a Frame
- 常用技巧
- 《Debug Hacks》和调试技巧
- Refer
GNU Debugger - GDB
The GNU Debugger (GDB) is a portable debugger that runs on many Unix-like systems and works for many programming languages, including Ada, Assembly, C, C++, D, Fortran, Go, Objective-C, OpenCL C, Modula-2, Pascal, Rust, and partially others.
GDB was first written by Richard Stallman in 1986 as part of his GNU system, after his GNU Emacs was “reasonably stable”. GDB is free software released under the GNU General Public License (GPL). It was modeled after the DBX debugger, which came with Berkeley Unix distributions.
From 1990 to 1993 it was maintained by John Gilmore. Now it is maintained by the GDB Steering Committee which is appointed by the Free Software Foundation.
What is GDB
The purpose of a debugger such as GDB is to allow you to see what is going on “inside” another program while it executes—or what another program was doing at the moment it crashed. GDB can do four main kinds of things (plus other things in support of these) to help you catch bugs in the act:
- Start your program, specifying anything that might affect its behavior.
- Make your program stop on specified conditions.
- Examine what has happened, when your program has stopped.
- Change things in your program, so you can experiment with correcting the effects of one bug and go on to learn about another.
You can use GDB to debug programs written in C and C++. For more information, see Supported Languages. For more information, see C and C++.
Install
https://ftp.gnu.org/gnu/gdb/
How to Use
Compiling for Debugging
In order to debug a program effectively, you need to generate debugging information when you compile it. This debugging information is stored in the object file; it describes the data type of each variable or function and the correspondence between source line numbers and addresses in the executable code.
To request debugging information, specify the -g option when you run the compiler.
- Programs that are to be shipped to your customers are compiled with optimizations, using the
-Ocompiler option. However, some compilers are unable to handle the-gand-Ooptions together. Using those compilers, you cannot generate optimized executables containing debugging information. ( -g 与 -O 冲突的情况) - GCC, the GNU C/C++ compiler, supports
-gwith or without-O, making it possible to debug optimized code. We recommend that you always use-gwhenever you compile a program. You may think your program is correct, but there is no sense in pushing your luck. For more information, see Optimized Code. - GDB knows about preprocessor macros and can show you their expansion (see Macros). Most compilers do not include information about preprocessor macros in the debugging information if you specify the
-gflag alone. Version 3.1 and later of GCC, the GNU C compiler, provides macro information if you are using the DWARF debugging format, and specify the option-g3.
Options for Debugging Your Program: http://gcc.gnu.org/onlinedocs/gcc/Debugging-Options.html#Debugging-Options
Invoking or Quitting GDB
# debug a program
gdb program

# debug a core file
gdb program core

# debug a running process
gdb program 1234
gdb -p 1234

# This will cause gdb to debug gcc, and to set gcc’s command-line arguments to ‘-O2 -c foo.c’
gdb --args gcc -O2 -c foo.c

# Quit
quit / q / Ctrl-d
Your Program’s Arguments:https://sourceware.org/gdb/current/onlinedocs/gdb/Arguments.html#Arguments
$ gdb --silent a.out
Reading symbols from a.out...done.
(gdb) l
1       #include <stdio.h>
2
3       int main(int argc, char* argv[])
4       {
5               printf("hello world\n");
6
7               return 0;
8       }
(gdb)
Starting your Program: https://sourceware.org/gdb/current/onlinedocs/gdb/Starting.html#Starting
What GDB Does During Startup
https://sourceware.org/gdb/current/onlinedocs/gdb/Startup.html#Startup
Continuing and Stepping
https://sourceware.org/gdb/current/onlinedocs/gdb/Continuing-and-Stepping.html
Shell Commands
If you need to execute occasional shell commands during your debugging session, there is no need to leave or suspend GDB; you can just use the shell command.
shell command-string
!command-string
GDB Commands
You can abbreviate a GDB command to the first few letters of the command name, if that abbreviation is unambiguous(明确的); and you can repeat certain GDB commands by typing just RET. You can also use the TAB key to get GDB to fill out the rest of a word in a command (or to show you the alternatives available, if there is more than one possibility).
Program’s Environment
The environment consists of a set of environment variables and their values. Environment variables conventionally record such things as your user name, your home directory, your terminal type, and your search path for programs to run. Usually you set up environment variables with the shell and they are inherited by all the other programs you run. When debugging, it can be useful to try running your program with a modified environment without having to start GDB over again.
# Add directory to the front of the PATH environment variable (the search path for executables) that will be passed to your program
path directory

# Display the list of search paths for executables (the PATH environment variable).
show paths
https://sourceware.org/gdb/current/onlinedocs/gdb/Environment.html#Environment
Program’s Working Directory
# Print the GDB working directory
pwd

# Set the GDB working directory to directory. If not given, directory uses '~'
cd [directory]
https://sourceware.org/gdb/current/onlinedocs/gdb/Working-Directory.html#Working-Directory
Program’s Input and Output
You can redirect your program’s input and/or output using shell redirection with the run command. For example,
run > outfile
https://sourceware.org/gdb/current/onlinedocs/gdb/Input_002fOutput.html#Input_002fOutput
Debugging Programs with Multiple Threads
In some operating systems, such as GNU/Linux and Solaris, a single program may have more than one thread of execution. The precise semantics of threads differ from one operating system to another, but in general the threads of a single program are akin to multiple processes—except that they share one address space (that is, they can all examine and modify the same variables). On the other hand, each thread has its own registers and execution stack, and perhaps private memory.
GDB provides these facilities for debugging multi-thread programs:
- automatic notification of new threads
thread thread-id, a command to switch among threadsinfo threads, a command to inquire about existing threadsthread apply [thread-id-list | all] args, a command to apply a command to a list of threads- thread-specific breakpoints
set print thread-events, which controls printing of messages on thread start and exit.
https://sourceware.org/gdb/current/onlinedocs/gdb/Threads.html#Threads
All-Stop Mode
用 gdb 调试多线程程序时,一旦程序断住,所有的线程都处于暂停状态。此时当你调试其中一个线程时(比如执行 step,next 命令),所有的线程都会同时执行。如果想在调试一个线程时,让其它线程暂停执行,可以使用 set scheduler-locking on 命令。
In all-stop mode, whenever your program stops under GDB for any reason, all threads of execution stop, not just the current thread. This allows you to examine the overall state of the program, including switching between threads, without worrying that things may change underfoot.
Conversely, whenever you restart the program, all threads start executing. This is true even when single-stepping with commands like step or next.
On some OSes, you can modify GDB’s default behavior by locking the OS scheduler to allow only a single thread to run.
# Set the scheduler locking mode. It applies to normal execution, record mode, and replay mode. mode can be one of the following
set scheduler-locking mode
off- There is no locking and any thread may run at any time.
on- Only the current thread may run when the inferior is resumed.
stepreplay- Behaves like on in replay mode, and off in either record mode or during normal execution. This is the default mode.
# Display the current scheduler locking mode.
show scheduler-locking

# 禁止线程调度切换,固定当前线程
set scheduler-locking on
refer:
- https://github.com/hellogcc/100-gdb-tips/blob/master/src/set-scheduler-locking-on.md
- https://sourceware.org/gdb/onlinedocs/gdb/All_002dStop-Mode.html#All_002dStop-Mode
- https://code.visualstudio.com/docs/cpp/cpp-debug
Debugging Forks
If you want to follow the child process instead of the parent process, use the command set follow-fork-mode.
# Set the debugger response to a program call of fork or vfork. A call to fork or vfork creates a new process.
set follow-fork-mode child

# Display the current debugger response to a fork or vfork call.
show follow-fork-mode

# On Linux, if you want to debug both the parent and child processes, use the command set detach-on-fork.
set detach-on-fork mode

# Show whether detach-on-fork mode is on/off.
show detach-on-fork
https://sourceware.org/gdb/current/onlinedocs/gdb/Forks.html#Forks
https://stackoverflow.com/questions/15126925/debugging-child-process-after-fork-follow-fork-mode-child-configured
Breakpoints
A breakpoint makes your program stop whenever a certain point in the program is reached. For each breakpoint, you can add conditions to control in finer detail whether your program stops. You can set breakpoints with the break command and its variants (see Setting Breakpoints), to specify the place where your program should stop by line number, function name or exact address in the program.
On some systems, you can set breakpoints in shared libraries before the executable is run.
https://sourceware.org/gdb/current/onlinedocs/gdb/Breakpoints.html#Breakpoints
Watchpoints
A watchpoint is a special breakpoint that stops your program when the value of an expression changes. The expression may be a value of a variable, or it could involve values of one or more variables combined by operators, such as ‘a + b’. This is sometimes called data breakpoints. You must use a different command to set watchpoints (see Setting Watchpoints), but aside from that, you can manage a watchpoint like any other breakpoint: you enable, disable, and delete both breakpoints and watchpoints using the same commands.
You can arrange to have values from your program displayed automatically whenever GDB stops at a breakpoint. See Automatic Display.
Catchpoints
A catchpoint is another special breakpoint that stops your program when a certain kind of event occurs, such as the throwing of a C++ exception or the loading of a library. As with watchpoints, you use a different command to set a catchpoint (see Setting Catchpoints), but aside from that, you can manage a catchpoint like any other breakpoint. (To stop when your program receives a signal, use the handle command; see Signals.)
(gdb) catch syscall 1
warning: Can not parse XML syscalls information; XML support was disabled at compile time.
Catchpoint 1 (syscall 1)
(gdb) c
Continuing.
[Switching to Thread 0x7f4f727e9700 (LWP 2345035)]

Thread 4 "100_Log" hit Catchpoint 1 (call to syscall 1), 0x00007f4f739d8a1d in write () from /lib64/libc.so.6
(gdb) i b
Num     Type           Disp Enb Address            What
1       catchpoint     keep y                      syscall "1"
        catchpoint already hit 1 time
(gdb) d 1
(gdb) i b
Disassemble
Disassembles a specified function or a function fragment.
disassemble
disassemble [Function]
disassemble [Address]
disassemble [Start],[End]
disassemble [Function],+[Length]
disassemble [Address],+[Length]
disassemble /m [...]
disassemble /r [...]
Parameters
- Function
Specifies the function to disassemble. If specified, the disassemble command will produce the disassembly output of the entire function.
- Address
Specifies the address inside a function to disassemble. Note that when only one address is specified, this command will disassemble the entire function that includes the given address, including the instructions above it.
- Start/End
Specifies starting and ending addresses to disassemble. If this form is used, the command won’t disassemble the entire function, but only the instructions between the starting and ending addresses.
- Length
Specifies the amount of bytes to disassemble starting from the given address or function.
- /m
When this option is specified, the disassemble command will show the source lines that correspond to the disassembled instructions.
- /r
When this option is specified, the disassemble command will show the raw byte values of all disassembled instructions.
https://visualgdb.com/gdbreference/commands/disassemble
Add index files to speed up GDB
对于比较大的二进制文件,为了缩短gdb的加载时间可以对程序文件事先创建符号索引。
gdb-add-index filename
https://man7.org/linux/man-pages/man1/gdb-add-index.1.html
Other
gdb is the GNU source-level debugger that is standard on linux (and many other unix) systems. It can be used both for programs written in high-level languages like C and C++ and for assembly code programs; this document concentrates on the latter.
For detailed information on the use of gdb, consult the documentation. Unfortunately, this is not in form of a man page, and even the info page does not seem to be installed on the linuxlab machines; the best thing is to read it on the web at http://sourceware.org/gdb/current/onlinedocs/gdb/.
gdb will work in an ordinary terminal window, and this is fine for debugging assembly code. For use with higher-level source code, it is more convenient to use gdb from within the emacs editor (a good one to learn!) or using a graphical front-end like ddd. The basic commands remain the same.
To use gdb with high-level language programs, you should compile with the -g option. This will include information in the object file to relate it back to the source file. When assembling .s files to be debugged, the -g option is not necessary, but it is harmless.
gcc -m64 -g -o foo fooDriver.c fooRoutine.s
To invoke the debugger on foo, type
gdb foo
This loads program foo and brings up the gdb command line interpreter, which then waits for you to type commands. Program execution doesn’t begin until you say so.
Here are some useful commands. Many can be abbreviated, as shown. Hitting return generally repeats the last command, sometimes advancing the current location.
h[elp] [keyword]
Displays help information.
r[un] [args]
Begin program execution. If the program normally takes command-line arguments (e.g., foo hi 3), you should specify them here (e.g., run hi 3).
b[reak] [address]
Set a breakpoint at the specified address (or at the current address if none specified). Addresses can be given symbolically (e.g., foo) or numerically (e.g. 0x10a38). When execution reaches a breakpoint, you are thrown back into the gdb command line interpreter.
c[ontinue]
Continue execution after stopping at a breakpoint.
i[nfo] b[reak]
Display numbered list of all breakpoints currently set.
d[elete] b[reakpoints] number
Delete specified breakpoint number.
p[rint][/format] expr
Print the value of an expression using the specified format (decimal if unspecified). Expressions can involve program variables or registers, which are specified
using a $ rather than a % sign. Useful formats include:
+ d decimal
+ x hex
+ t binary
+ f floating point
+ i instruction
+ c character
For example, to display the value of register %rdi in decimal, type p/x $rdi. Note that you need to use the 64-bit (%r) forms of register names. To see the
value of the current program counter, type p/x $rip.
i[nfo] r[egisters] register
An alternative way to print the value of a register (or, if none is specified, of all registers) in hex and decimal. Specify the register without a leading %, e.g., i r rdi.
x/[count][format] [address]
Examine the contents of a specified memory address, or the current address if none specified. If count is specified, displays specified number of words. Addresses can be symbolic (e.g., main) or numeric (e.g., 0x10a44). Formats are as for print. Particularly useful for printing the program text, e.g., x/100i foo disassembles and prints 100 instructions starting at foo.n
disas[semble] address [,address]
Another way to print the assembly program text surrounding an address, or between two addresses.
set var = expr
Set specified register or memory location to value of expression. Examples: set $rdi=0x456789AB or set myVar=myVar*2.
s[tep]i
Execute a single instruction and then return to the command line interpreter.
n[ext]i
Like stepi, except that if the instruction is a subroutine call, the entire subroutine is executed before control returns to the interpreter.
whe[re]\backtrace (bt)
Show current activation stack.
q[uit]\Ctrl-d
To exit GDB, use the quit command (abbreviated q), or type an end-of-file character (usually Ctrl-d). An interrupt (often Ctrl-c) does not exit from GDB, but rather terminates the action of any GDB command that is in progress and returns to GDB command level.
常用命令
gdb中简写命令配合tab键使用
| 命令 | 作用 |
|---|---|
| dir path | 切换目录 |
| gdb -p PID; b xxx; c | PID方式调试(或 gdb program pid) |
| gdb bin; b xxx; r 参数 | bin方式调试 |
| break filename:lineno | 在文件某行设置断点 |
| list filename:lineno | 选择显示文件的哪一行 |
| list | 显示当前文件的默认行数代码信息 |
| run para | 调试带参数的程序 |
| print VarName | 显示变量当前的值 |
| ptype VarName | 显示变量的类型 |
| frame 0 | 显示栈顶的信息 |
| frame 1 | 显示堆栈栈顶下一层信息 |
| up n | 表示向栈的上面移动n层,可以不打n,表示向上移动一层 |
| down n | 表示向栈的下面移动n层,可以不打n,表示向下移动一层 |
| info break | 查看所有断点的信息 |
| info threads | 查看所有线程的信息 |
| info registers | 查看所有寄存器的信息 |
| info variables | list “All global and static variable names” (huge list) |
| info locals | list “Local variables of current stack frame” (names and values), including static variables in that function |
| info args | list “Arguments of the current stack frame” (names and values) |
| shell date | 在gdb中调用shell,使用完后exit重新返回到gdb中 |
| set args | 可指定运行时参数(如:set args 10 20 30 40 50) |
| show args | 命令可以查看设置好的运行参数 |
| next | Continue to the next source line in the current (innermost) stack frame. This is similar to step, but function calls that appear within the line of code are executed without stopping. |
| nexti | Execute one machine instruction, but if it is a function call, proceed until the function returns |
| step | Continue running your program until control reaches a different source line, then stop it and return control to GDB |
| stepi | Execute one machine instruction, then stop and return to the debugger |
| finish/fin | 跳出当前函数栈 |
| set variable i = 10 | 修改变量值 |
Information About a Frame
TODO
常用技巧
通过地址查找符号 info symbol $address
(gdb) bt
#0  0x00007fb44dc8f820 in __nanosleep_nocancel () at ../sysdeps/unix/syscall-template.S:81
#1  0x00007fb44dc8f6d4 in __sleep (seconds=0) at ../sysdeps/unix/sysv/linux/sleep.c:137
#2  0x0000000000400690 in allocate_memory () at test.cc:13
#3  0x000000000040069b in main () at test.cc:17
(gdb) f 2
#2  0x0000000000400690 in allocate_memory () at test.cc:13
13              sleep(-1);  // 让程序暂停一段时间,以便我们可以检查 /proc/[pid]/smaps
(gdb) l
8               int *data = (int *)malloc(100000 * sizeof(int));
9               for (int i = 0; i < 100000; i++) {
10                      data[i] = 1;
11              }
12              static int a = 1;
13              sleep(-1);  // 让程序暂停一段时间,以便我们可以检查 /proc/[pid]/smaps
14      }
15
16      int main() {
17              allocate_memory();
(gdb) i locals
data = 0x7fb44ea45010
a = 1
(gdb) p &a
$1 = (int *) 0x402028 <allocate_memory()::a>
(gdb) info symbol 0x7fb44ea45010
No symbol matches 0x7fb44ea45010.
(gdb) info symbol 0x402028
allocate_memory()::a in section .data of /data/home/gerryyang/test/perf/a.out
(gdb) p g_a
$2 = 1
(gdb) p &g_a
$3 = (int *) 0x402024 <g_a>
(gdb) info symbol 0x402024
g_a in section .data of /data/home/gerryyang/test/perf/a.out
打印内存的值
#include <stdio.h>

int main(void)
{
    int i = 0;
    char a[100];

    for (i = 0; i < sizeof(a); i++)
    {
        a[i] = i;
    }

    return 0;
}
gdb 中使用 x 命令来打印内存的值,格式为 x/nfu addr。含义为以f格式打印从addr开始的n个长度单元为u的内存值。参数具体含义如下:
n:输出单元的个数f:是输出格式。比如,x是以 16 进制形式输出,o是以 8 进制形式输出u:标明一个单元的长度。b是一个 byte,h是两个byte(halfword),w是四个 byte(word),g`是八个 byte(giant word)
使用示例:
// 打印某个地址开始的 8 字节内容
(gdb) x /1gx 0x7fd3e1ed30b8
0x7fd3e1ed30b8: 0x00007fd3d00019fd


// 以 16 进制格式打印数组前 a 16 个 byte 的值
(gdb) x/16xb a
0x7fffffffe4a0: 0x00    0x01    0x02    0x03    0x04    0x05    0x06    0x07
0x7fffffffe4a8: 0x08    0x09    0x0a    0x0b    0x0c    0x0d    0x0e    0x0f
GDB print to file instead of stdout
You need to enable logging:
(gdb) set logging on
Now GDB will log to ./gdb.txt. You can tell it which file to use:
(gdb) set logging file my_god_object.log
And you can examine the current logging configuration:
(gdb) show logging
打印 STL 容器中的内容
#include <iostream>
#include <vector>

using namespace std;

int main ()
{
  vector<int> vec(10); // 10 zero-initialized elements

  for (int i = 0; i < vec.size(); i++)
    vec[i] = i;

  cout << "vec contains:";
  for (int i = 0; i < vec.size(); i++)
    cout << ' ' << vec[i];
  cout << '\n';

  return 0;
}
https://github.com/hellogcc/100-gdb-tips/blob/master/src/print-STL-container.md
命令行执行 gdb
gdb -q -ex "show envir" -ex "quit" your_bin your_corefile | grep your_env
- https://unix.stackexchange.com/questions/456294/gdb-in-one-command
- How to get environment of a program while debugging it in GDB
从 corefile 获取环境变量
gdb -q -ex "p *__environ" -ex "quit" your_bin your_corefile

# 环境变量基本都是在core文件的末尾,所以只需要搜索后面的内容即可
tail -c 1048576  your_corefile | grep -a -o -P 'gerry=\K[^[:cntrl:]]*'
How to get environment variable from a core dump
条件断点
set scheduler-locking on
b CMemoryPool::StatOnFree if uSize==112
c
https://wizardforcel.gitbooks.io/100-gdb-tips/content/set-condition-break.html
查找符号
(gdb) i var CCoroutineMgr
All variables matching regular expression "CCoroutineMgr":

Non-debugging symbols:
0x00000000000000c0  JLib::IThreadSingleton<JLib::CCoroutineMgr>::GetSingletonPtr()::g_pPtr
0x00000000000fe9b0  JLib::CCoroutineMgr::GetLogFeature() const::pInfo
0x00000000000fe9b8  guard variable for JLib::CCoroutineMgr::GetLogFeature() const::pInfo
...
(gdb) p 'JLib::IThreadSingleton<JLib::CCoroutineMgr>::GetSingletonPtr()::g_pPtr'
$1 = 74619576
调试 static 全局静态变量
info var _instance
print static variable from member function of template class in gdb
调试 __thead 线程变量
Debugging __thead variables from coredumps
在 gdb 中执行 shell 命令
(gdb) !date
调用函数 (call)
在 GDB 中执行 call (void)malloc_trim(0) 的作用是在调试过程中手动触发内存回收。malloc_trim 是一个 C 库函数,它用于释放 malloc 分配的内存空间中未使用的内存,将其归还给操作系统。这个函数通常在程序运行过程中自动调用,但在某些情况下,可能希望手动触发内存回收以释放未使用的内存。
call (void)malloc_trim(0) 命令在 GDB 中的含义如下:
call:告诉 GDB 调用一个函数。(void):将函数的返回值类型转换为 void,表示我们不关心函数的返回值。malloc_trim(0):调用 malloc_trim 函数并传递参数 0。参数 0 表示尝试释放所有未使用的内存。
通过执行这个命令,可以在调试过程中手动触发内存回收,以便观察程序在回收内存后的行为。这对于分析内存泄漏或内存使用情况等问题可能很有帮助。
将 GDB 的输出信息重定向到文件
在 GDB 中,启用日志记录并将输出重定向到一个文件,例如 gdb_output.txt:
set logging file gdb_output.txt
set logging on
如果想停止将 GDB 输出重定向到文件,可以使用以下命令:
set logging off
对 gdb 的输出内容自动翻页
(gdb) set pagination off
打印完整的字符串
(gdb) show print elements
(gdb) set print elements 0
(gdb) show print elements
《Debug Hacks》和调试技巧
作者为吉冈弘隆、大和一洋、大岩尚宏、安部东洋、吉田俊辅,有中文版《Debug Hacks中文版—深入调试的技术和工具》。这本书涉及了很多调试技巧,对调试器使用、内核调试方法、常见错误的原因,还介绍了 systemtap、strace、ltrace 等一大堆工具,非常值得一读。
记录历史
先执行 mkdir ~/.history 把下面几行添加到 ~/.gdbinit 中,gdb 启动时会自动读取里面的命令并执行:
set history save on
set history size 10000
set history filename ~/.history/gdb
在 ~/.history 堆放各个历史文件。有了历史,使用 readline 的 reverse-search-history (C-r) 就能轻松唤起之前输入过的命令。
修改任意内存地址的值
set {int}0x83040 = 4
显示 intel 风格的汇编指令
set disassembly-flavor intel
示例:
#include <iostream>
int main()
{
    int a = 1;
    std::cout << a << std::endl;
}
(gdb) disass
Dump of assembler code for function main():
   0x0000000000401156 <+0>:     push   %rbp
   0x0000000000401157 <+1>:     mov    %rsp,%rbp
   0x000000000040115a <+4>:     sub    $0x10,%rsp
   0x000000000040115e <+8>:     movl   $0x1,-0x4(%rbp)
=> 0x0000000000401165 <+15>:    mov    -0x4(%rbp),%eax
   0x0000000000401168 <+18>:    mov    %eax,%esi
   0x000000000040116a <+20>:    mov    $0x404040,%edi
   0x000000000040116f <+25>:    callq  0x401050 <_ZNSolsEi@plt>
   0x0000000000401174 <+30>:    mov    $0x0,%eax
   0x0000000000401179 <+35>:    leaveq
   0x000000000040117a <+36>:    retq
End of assembler dump.
(gdb) set disassembly-flavor intel
(gdb) disass
Dump of assembler code for function main():
   0x0000000000401156 <+0>:     push   rbp
   0x0000000000401157 <+1>:     mov    rbp,rsp
   0x000000000040115a <+4>:     sub    rsp,0x10
   0x000000000040115e <+8>:     mov    DWORD PTR [rbp-0x4],0x1
=> 0x0000000000401165 <+15>:    mov    eax,DWORD PTR [rbp-0x4]
   0x0000000000401168 <+18>:    mov    esi,eax
   0x000000000040116a <+20>:    mov    edi,0x404040
   0x000000000040116f <+25>:    call   0x401050 <_ZNSolsEi@plt>
   0x0000000000401174 <+30>:    mov    eax,0x0
   0x0000000000401179 <+35>:    leave
   0x000000000040117a <+36>:    ret
End of assembler dump.
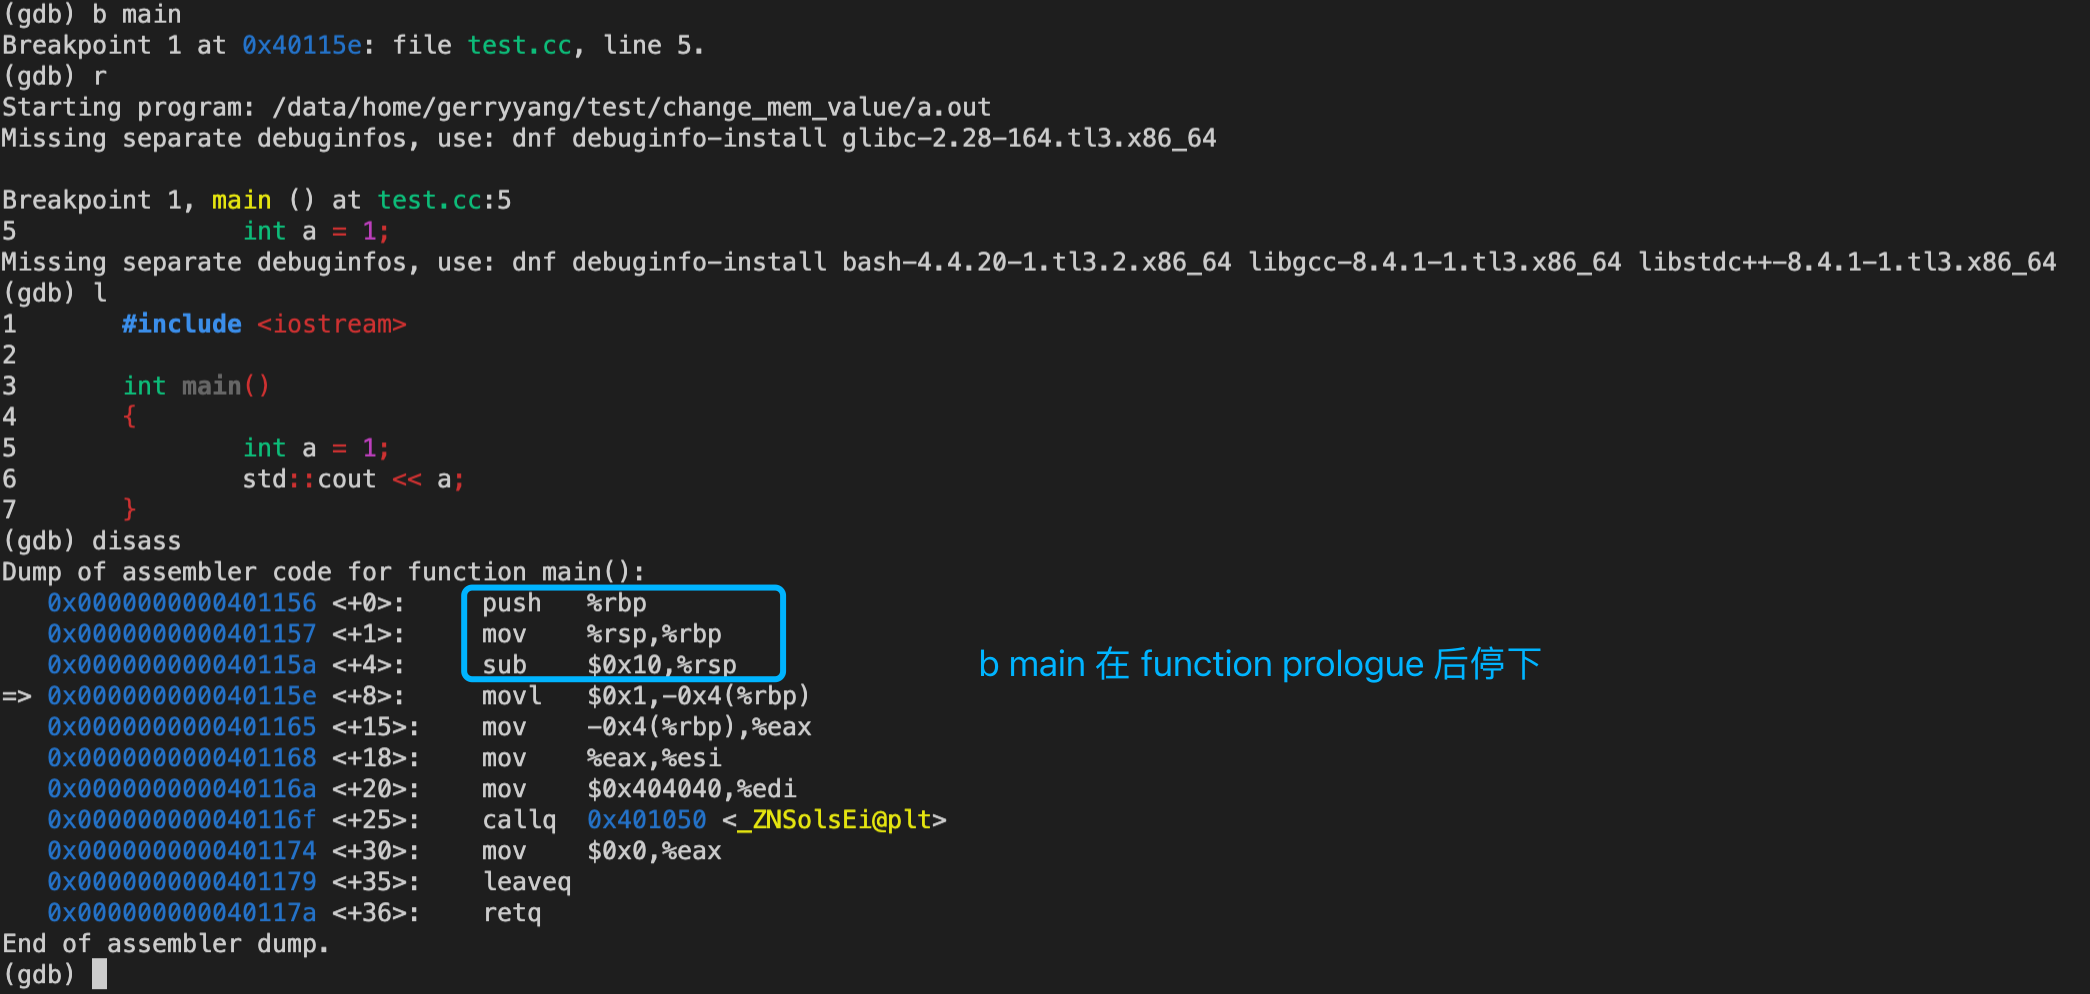
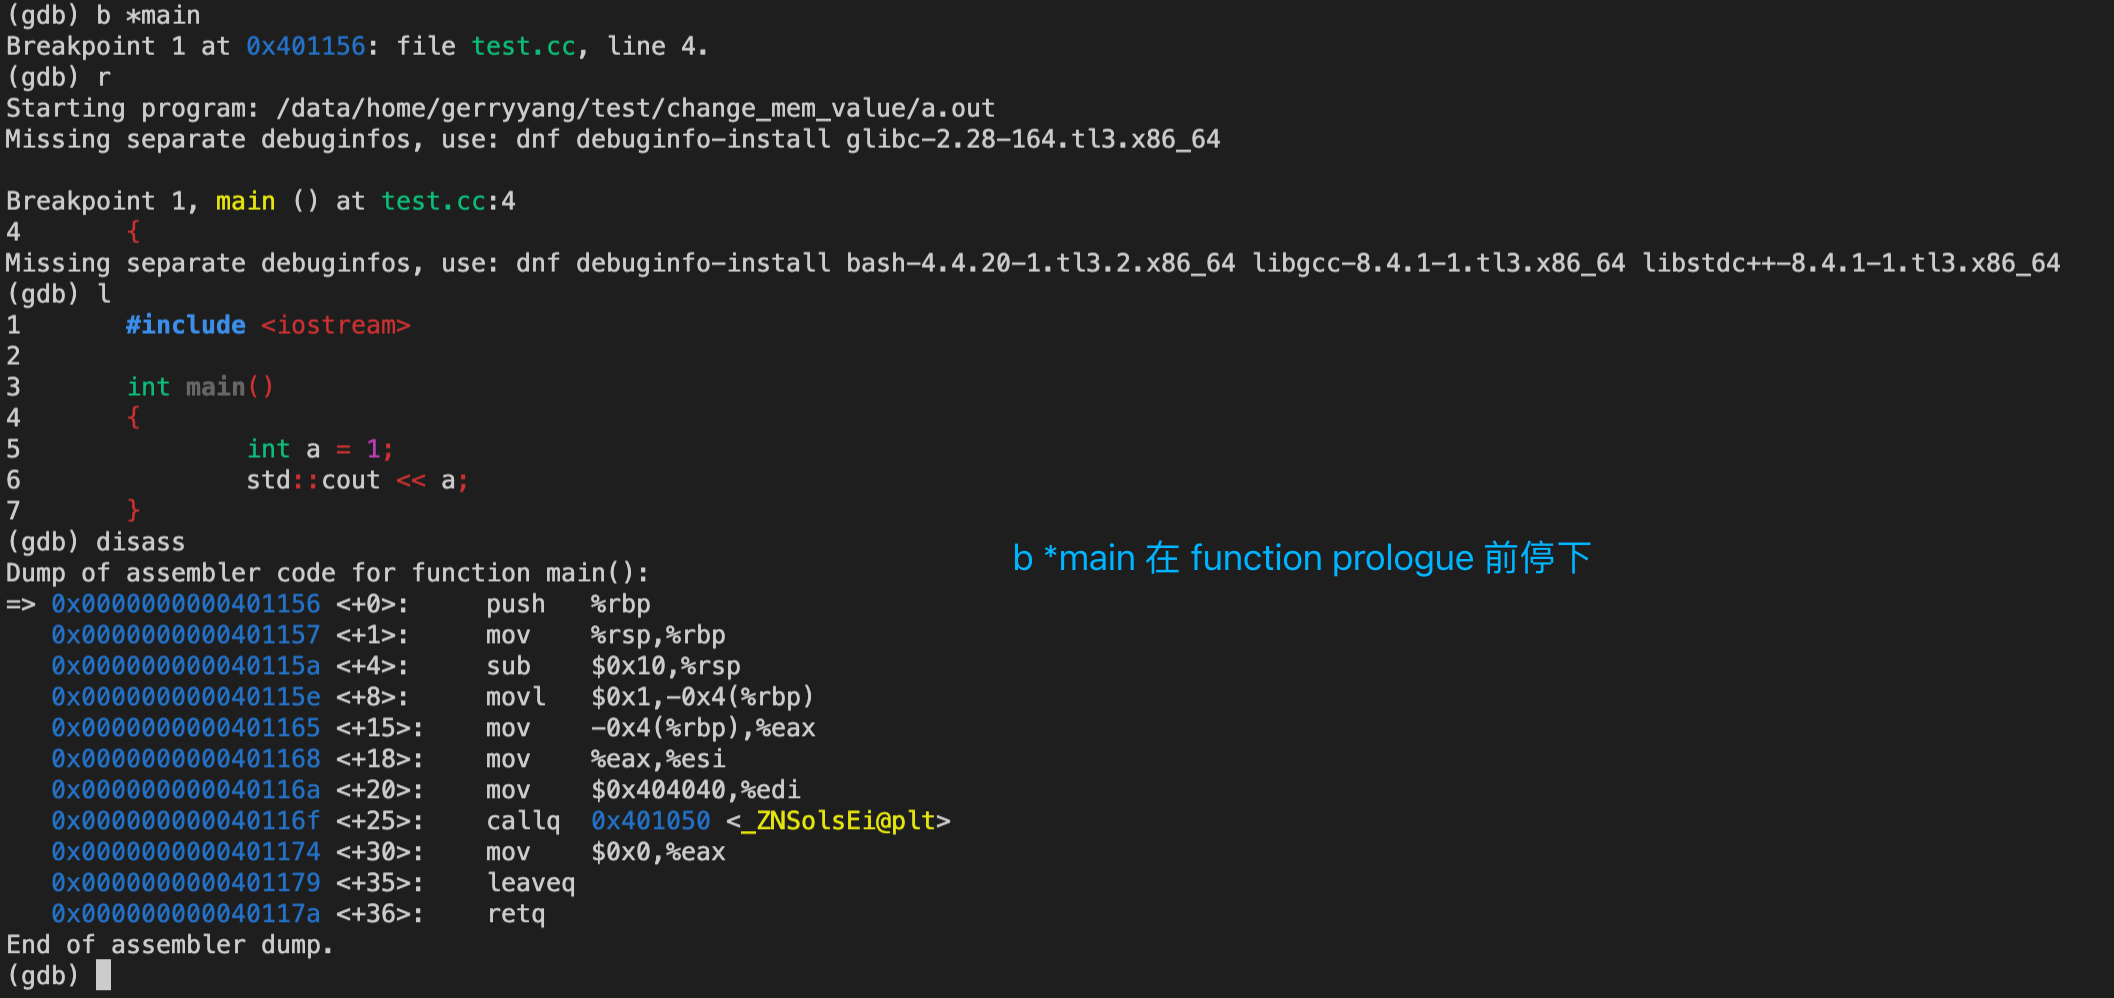
断点在 function prologue (开场白,序言) 前
先说一下 function prologue 吧,每个函数最前面一般有三四行指令用来保存旧的帧指针(rbp),并腾出一部分栈空间(通常用于储存局部变量、为当前函数调用其他函数腾出空间存放参数,有时候还会存储字面字符串,当有nested function时也会用于保存当前的栈指针)。
在x86-64环境下典型的funcition prologue长成这样:
push rbp
mov rbp, rsp
sub rsp, 0x10
可能还会有and指令用于对齐rsp。如果编译时加上-fomit-frame-pointer (Visual Studio 中文版似乎译作 “省略框架指针”),那么生成的指令就会避免使用rbp,function prologue 就会简化成下面一行:
sub rsp, 0x10
-fomit-frame-pointer 是一个编译器选项,用于告诉编译器在生成代码时省略帧指针。帧指针(通常是 ebp 寄存器,在 x86 架构上,或 rbp 寄存器,在 x86-64 架构上)用于在函数调用期间保存调用者的堆栈帧的基址。这在调试和分析函数调用栈时非常有用。

然而,在许多情况下,帧指针并不是严格必需的,因为编译器可以使用其他方法来跟踪堆栈帧。通过省略帧指针,编译器可以将帧指针寄存器用于其他目的,从而提高代码的性能。这在寄存器有限的体系结构(如 x86)上尤其有益,因为它可以减少寄存器溢出并提高代码的性能。

-fomit-frame-pointer 选项的主要优点是性能提升,但它也有一些缺点:

1. 调试困难:省略帧指针可能会导致调试过程变得更加困难,因为调试器可能无法准确地重建函数调用栈。这可能会导致错误的堆栈跟踪和调试信息。

2. 分析困难:像 gprof 这样的性能分析工具可能无法正确分析没有帧指针的代码,从而导致不准确的分析结果。

总之,-fomit-frame-pointer 编译选项的作用是告诉编译器在生成代码时省略帧指针,从而提高代码性能。然而,这可能会导致调试和分析过程变得更加困难。在权衡性能和调试需求时,您可以根据实际情况决定是否使用此选项。
例如,上面的代码示例:
g++ -g test.cc -fomit-frame-pointer
(gdb) disass
Dump of assembler code for function main():
=> 0x0000000000401156 <+0>:     sub    $0x18,%rsp
   0x000000000040115a <+4>:     movl   $0x1,0xc(%rsp)
   0x0000000000401162 <+12>:    mov    0xc(%rsp),%eax
   0x0000000000401166 <+16>:    mov    %eax,%esi
   0x0000000000401168 <+18>:    mov    $0x404040,%edi
   0x000000000040116d <+23>:    callq  0x401050 <_ZNSolsEi@plt>
   0x0000000000401172 <+28>:    mov    $0x0,%eax
   0x0000000000401177 <+33>:    add    $0x18,%rsp
   0x000000000040117b <+37>:    retq
End of assembler dump.
设置断点时如果使用了b *func的格式,也就是说在函数名前加上*,gdb 就会在执行 function prologue 前停下,而b func则是在执行 function prologue 后停下。
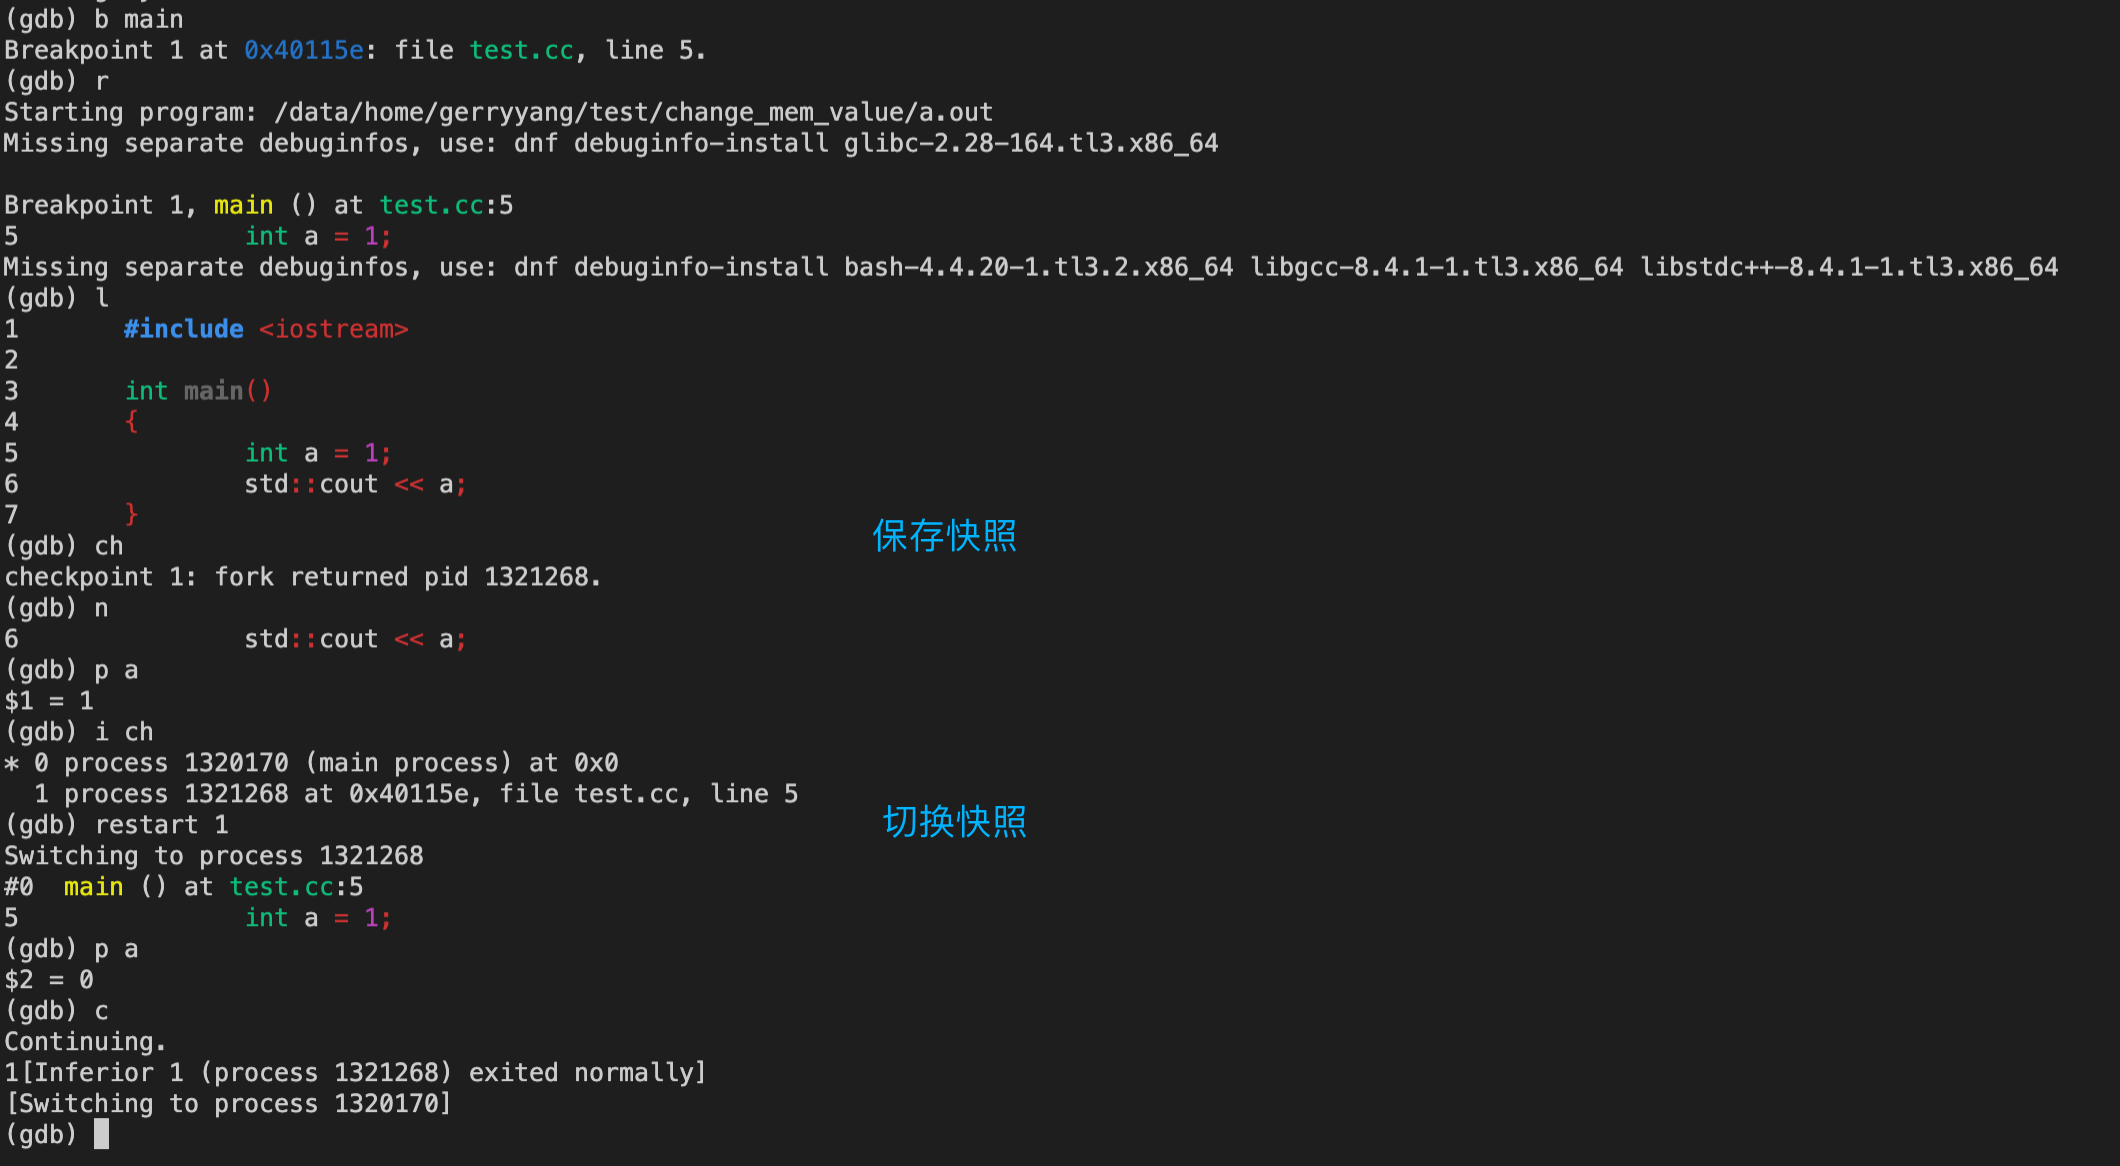
Checkpoint
gdb 可以为被调试的程序创建一个快照,即保存程序运行时的状态,等待以后恢复。这个是非常方便的一个功能,特别适合需要探测接下来会发生什么但又不想离开当前状态时使用。
ch是创建快照,d c ID是删除指定编号的快照,i ch是查看所有快照,restart ID是切换到指定编号的快照,详细说明可以在 shell 里键入info '(gdb) Checkpoint/Restart'查看。
pstack
打印指定进程的系统栈。本质是一段脚本,核心是下面这句话:
#!/bin/zsh
gdb -q -nx -p $1 <<< 't a a bt' 2>&- | sed -ne '/^#/p'
这是一个使用gdb调试器获取指定进程堆栈跟踪(stack trace)的shell命令。逐步分析这个命令:
-
gdb -q -nx -p $1:这是调用 gdb 的命令。选项-q表示 quiet 模式,减少 gdb 的输出;-nx表示不执行任何.gdbinit文件中的命令;-p $1表示附加到给定进程 ID(由$1指定)。 -
<<< 't a a bt':这是一个 “here string”,它将字符串t a a bt作为 gdb 的输入。t a a bt是 gdb 命令的缩写,表示thread apply all backtrace,用于获取所有线程的堆栈跟踪。 -
2>&-:这是一个文件描述符重定向,将标准错误(file descriptor 2)重定向到/dev/null(关闭)。这样,gdb 产生的错误信息将不会显示在输出中。 -
| sed -ne '/^#/p':这是一个管道,将 gdb 的输出传递给 sed 命令。sed 命令使用-n选项表示只打印匹配的行,-e选项表示执行后面的脚本。脚本'/^#/p'表示匹配以#开头的行并打印。这样,最终的输出将只包含堆栈跟踪中的实际帧(以#开头)。
综上所述,这个命令的作用是获取指定进程 ID(由 $1 给出)的所有线程的堆栈跟踪,并仅显示堆栈帧。
$ pstack $$
#0  0x00007f2cc5dac44c in __libc_waitpid (pid=-1, stat_loc=0x7ffddd9f59c0, options=10) at ../sysdeps/unix/sysv/linux/waitpid.c:31
#1  0x0000000000442a64 in waitchld.isra.10 ()
#2  0x0000000000443d1c in wait_for ()
#3  0x00000000004347fe in execute_command_internal ()
#4  0x0000000000434a1e in execute_command ()
#5  0x000000000041ece5 in reader_loop ()
#6  0x000000000041d2ae in main ()
在 gdb 中输入如下命令,可实现 pstack 相同的功能,并将所有线程的堆栈信息输出到文件中:
(gdb) set logging file threadinfo.txt   # 设置输出的文件名
(gdb) set logging on                    # 输入这个命令后,此后的调试信息将输出到文件
(gdb) thread apply all bt               # 打印所有线程栈信息
(gdb) set logging off                   # 关闭到指定文件的输出
(gdb) quit                              # 退出 gdb 调试
Refer
- Debugging with GDB - Tenth Edition
- Debugging Assembly Code with gdb
- 100个gdb小技巧
- 100个gdb小技巧 (gitbook)
- GDB中应该知道的几个调试方法 - CoolShell
- Introduction to GDB - Posted by adrian.ancona on February 9, 2018
- Debugging assembly with GDB - Posted by adrian.ancona on December 11, 2019
- 以色列的 Haifa Linux club 有一次讲座讲 gdb,讲稿值得一看:http://haifux.org/lectures/210/gdb_-_customize_it.html