Go Concurrency in Action
- Go 异步编程
- 使用 go 关键字
- 通过 channel 获取返回值
- 使用 sync.WaitGroup 等待一组协程完成其任务
- 使用 errgroup 实现协程组的错误处理
- 使用 channel 的 range 和 close 操作
- 使用 select 语句实现多个异步操作的等待
- 使用 select 和 time.After() 实现超时控制
- 使用 time.Tick() 和 time.After() 进行定时操作
- 使用 sync.Mutex 或 sync.RWMutex 进行并发安全访问
- 使用 sync.Cond 进行条件变量控制
- 使用 sync.Pool 管理对象池
- 使用 sync.Once 实现只执行一次的操作
- 使用 sync.Once 和 context.Context 实现资源清理
- 使用 sync.Map 实现并发安全的映射
- 使用 context.Context 进行协程管理和取消
- 使用 context.WithDeadline() 和 context.WithTimeout() 设置截止时间
- 使用 context.WithValue() 传递上下文值
- 使用 atomic 包进行原子操作
- 线程模型
- G-P-M 模型
- G-P-M 模型调度
- 调度器状态的查看方法
- 大规模 Goroutine 的瓶颈
- 实现一个 Goroutine Pool - ants (协程池)
- 任务调度策略
- 同步等待处理模型
- 异步多路复用处理模型
- 协程(同步编程异步执行)处理模型
- goroutine 协程
- Go scheduler
- 一些思考
- Multitasking
- Context Switch
- The cost of context switches ?
- Context switching can be selective and store only those registers that need storing ?
- Pre-emptive multitasking (time slice/instruction cycle) VS co-operative multitasking (non-preemptive multitasking) ?
- User thread: Coroutines(a language-level construct)
- switch-case
- non-local jump
- Context Control
- Boost.Context
- Performance of context switch
- TDF (腾讯计费平台部的后台协程框架)
- 协程优化
- Refer
Go 异步编程
使用 go 关键字
func main() {
	go func() {
		fmt.Println("hello world1")
	}()
	go func() {
		fmt.Println("hello world2")
	}()
}
func main() {
	go Announce("hello world1")
	go Announce("hello world2")
}
func Announce(message string) {
	fmt.Println(message)
}
// 使用匿名函数传递参数
data := "Hello, World!"
go func(msg string) {
      // 使用msg进行异步任务逻辑处理
      fmt.Println(msg)
}(data)
以下是完整的代码:
package main

import (
	"fmt"
	"time"
)

func main() {
	data := "Hello, World!"
	go func(msg string) {
		// 使用msg进行异步任务逻辑处理
		fmt.Println(msg)
	}(data)

	// 等待协程完成(通常情况下,你应该使用 sync.WaitGroup 或 channel 等待协程完成,这里我们只是为了简单演示)
	time.Sleep(1 * time.Second)
}
(data) 的作用是将 data 作为参数传递给匿名函数(也称为闭包)。go 关键字会启动一个新的 goroutine 并在该 goroutine 中异步执行该匿名函数。这样,函数可以并发地运行,而不会阻塞主程序的执行。go func(msg string) { ... }(data):定义一个匿名函数,接受一个字符串参数 msg。然后使用 go 关键字在新的 goroutine 中异步执行该函数,并将 data 作为参数传递给它。
通过 channel 获取返回值
创建一个无缓冲的 channel。请注意,当使用无缓冲的 channel 时,发送操作将阻塞,直到有协程准备好接收值。这意味着在这种情况下,发送和接收操作将同步进行。
package main

import (
	"fmt"
	"time"
)

func main() {
	ch := make(chan int) // 创建一个无缓冲的 channel

	go func() {
		// 异步任务逻辑
		time.Sleep(2 * time.Second)
		result := 42
		ch <- result // 将结果发送到 channel

		// 异步任务逻辑
		// 注意:在这个示例中,我们不需要关闭 channel,因为我们只关心一个值。
		// 如果你需要发送多个值,那么在发送完所有值后关闭 channel 是一个好的做法。
	}()

	// 在需要的时候从 channel 接收结果
	result := <-ch
	fmt.Println("Received result:", result)
}
创建一个带缓冲的 channel。
package main

import (
	"fmt"
	"time"
)

func main() {
	ch := make(chan int, 1)    // 创建一个带缓冲的 channel

	go func() {
		// 异步任务逻辑
		time.Sleep(2 * time.Second)
		result := 42
		ch <- result // 将结果发送到 channel

		// 异步任务逻辑
		close(ch) // 关闭 channel,表示任务完成
	}()

	// 在需要的时候从 channel 接收结果
	result := <-ch
	fmt.Println("Received result:", result)
}
使用 sync.WaitGroup 等待一组协程完成其任务
通过 Add() 方法增加等待的协程数量,Done() 方法标记协程完成,Wait() 方法阻塞直到所有协程完成。
package main

import (
	"fmt"
	"sync"
	"time"
)

func main() {
	var wg sync.WaitGroup

	// 启动多个协程
	for i := 0; i < 5; i++ {
		wg.Add(1)

		go func(index int) {
			defer wg.Done()

			// 异步任务逻辑
			fmt.Printf("Starting goroutine %d\n", index)
			time.Sleep(2 * time.Second)
			fmt.Printf("Finishing goroutine %d\n", index)
		}(i)
	}

	// 等待所有协程完成
	wg.Wait()
	fmt.Println("All goroutines completed")
}
使用 errgroup 实现协程组的错误处理
如果想简单获取协程返回的错误,errgroup 包很适合,errgroup 包是 Go 语言标准库中的一个实用工具,用于管理一组协程并处理它们的错误。可以使用 errgroup.Group 结构来跟踪和处理协程组的错误。
package main

import (
	"errors"
	"fmt"
	"golang.org/x/sync/errgroup"
)

func main() {
	var eg errgroup.Group

	for i := 0; i < 5; i++ {
		eg.Go(func() error {
			return errors.New("error")
		})

		eg.Go(func() error {
			return nil
		})
	}

	if err := eg.Wait(); err != nil {
		fmt.Println("Received an error:", err)
	} else {
		fmt.Println("All goroutines finished successfully")
	}
}
创建了一个 errgroup.Group,然后在该组中启动了一些协程。每个协程都有一个返回错误的函数。使用 eg.Go 方法来启动这些协程。
然后调用 eg.Wait 方法来等待所有的协程完成。如果任何协程返回错误,eg.Wait 将返回该错误。在这个例子中,由于有一个协程总是返回一个错误,所以 eg.Wait 将返回该错误,在控制台上打印出 “Received an error: error”。如果所有协程都成功完成(即它们的函数都返回 nil),那么 eg.Wait 将返回 nil,将在控制台上打印出 “All goroutines finished successfully”。
使用 channel 的 range 和 close 操作
range 操作可以在接收通道上迭代值,直到通道关闭。可以使用 close 函数关闭通道,以向接收方指示没有更多的值。
package main

import (
	"fmt"
)

func main() {
	ch := make(chan int)

	go func() {
		for i := 0; i < 5; i++ {
			ch <- i // 发送值到通道
		}
		close(ch) // 关闭通道
	}()

	// 使用 range 迭代接收通道的值
	for val := range ch {
		fmt.Println("Received:", val)
	}
}
使用 select 语句实现多个异步操作的等待
package main

import (
	"fmt"
	"time"
)

func main() {
	ch1 := make(chan int)
	ch2 := make(chan string)

	go func() {
		// 异步任务 1 逻辑
		time.Sleep(1 * time.Second)
		result1 := 42
		ch1 <- result1
	}()

	go func() {
		// 异步任务 2 逻辑
		time.Sleep(2 * time.Second)
		result2 := "hello"
		ch2 <- result2
	}()

	// 在主 goroutine 中等待多个异步任务完成
	select {
	case res1 := <-ch1:
		fmt.Println("Received result 1:", res1)
	case res2 := <-ch2:
		fmt.Println("Received result 2:", res2)
	}
}
使用 select 和 time.After() 实现超时控制
如果需要在异步操作中设置超时,可以使用 select 语句结合 time.After() 函数实现。
package main

import (
	"fmt"
	"time"
)

func main() {
	ch := make(chan int)

	go func() {
		// 异步任务逻辑
		time.Sleep(2 * time.Second)
		result := 42
		ch <- result
	}()

	// 设置超时时间
	select {
	case res := <-ch:
		fmt.Println("Received result:", res)
	case <-time.After(3 * time.Second):
		fmt.Println("Timeout: operation took too long")
	}
}
使用 time.Tick() 和 time.After() 进行定时操作
time.Tick() 函数返回一个通道,定期发送时间值,可以用于执行定时操作。time.After() 函数返回一个通道,在指定的时间后发送一个时间值。
package main

import (
	"fmt"
	"time"
)

func main() {
	tick := time.Tick(1 * time.Second) // 每秒执行一次操作

	go func() {
		for {
			select {
			case <-tick:
				fmt.Println("Tick: executing per-second operation")
			}
		}
	}()

	select {
	case <-time.After(5 * time.Second):
		fmt.Println("After 5 seconds: executing operation")
	}
}
使用 sync.Mutex 或 sync.RWMutex 进行并发安全访问
当多个协程并发访问共享数据时,需要确保数据访问的安全性。sync.Mutex 和 sync.RWMutex 提供了互斥锁和读写锁,用于在访问共享资源之前进行锁定,以避免数据竞争。 sync.RWMutex 是一种读写锁,可以在多个协程之间提供对共享资源的并发访问控制。多个协程可以同时获取读锁,但只有一个协程可以获取写锁。
package main

import (
	"fmt"
	"sync"
	"time"
)

var mutex sync.Mutex
var data int

func writeData(value int) {
	mutex.Lock()
	data = value
	mutex.Unlock()
}

func readData() int {
	mutex.Lock()
	value := data
	mutex.Unlock()
	return value
}

var rwMutex sync.RWMutex
var sharedData = make(map[string]string)

func readSharedData(key string) string {
	rwMutex.RLock()
	defer rwMutex.RUnlock()
	return sharedData[key]
}

func writeSharedData(key, value string) {
	rwMutex.Lock()
	defer rwMutex.Unlock()
	sharedData[key] = value
}

func main() {
	go writeData(123)
	fmt.Println("Data after writing:", readData())

	go writeSharedData("hello", "world")
	fmt.Println("Shared data after writing:", readSharedData("hello"))

	// 等待协程完成(通常情况下,你应该使用 sync.WaitGroup 或 channel 等待协程完成,这里我们只是为了简单演示)
	time.Sleep(1 * time.Second)
}
sync.Mutex 和 sync.RWMutex 的锁嵌套使用规则如下:
- sync.Mutex 的锁不可以嵌套使用:这意味着如果你在已经获取了 sync.Mutex 锁的情况下再次尝试获取锁,将会导致死锁。在这种情况下,协程将被阻塞,无法继续执行。
var mu sync.Mutex
mu.Lock()
mu.Lock() // 这将导致死锁
- sync.RWMutex 的 RLock() 可以嵌套使用:这意味着你可以在同一个协程中多次获取读锁,但是你必须释放相同数量的读锁,才能最终释放锁。
var mu sync.RWMutex
mu.RLock()
mu.RLock() // 这是允许的
mu.RUnlock()
mu.RUnlock() // 必须释放相同数量的读锁
- sync.RWMutex 的 Lock() 不可以嵌套:这与 sync.Mutex 的行为相同,尝试在已经获取了写锁的情况下再次获取写锁,将会导致死锁。
var mu sync.RWMutex
mu.Lock()
mu.Lock() // 这将导致死锁
sync.RWMutex的Lock()中不可以嵌套RLock():尝试在已经获取了写锁的情况下获取读锁,将会导致死锁。
var mu sync.RWMutex
mu.Lock()
mu.RLock() // 这将导致死锁
总的来说,你应该避免在同一个协程中嵌套使用锁,除非你完全理解这样做的后果,并且确保正确地释放了所有的锁,以避免死锁。在大多数情况下,你应该尽量简化你的并发控制逻辑,避免复杂的锁嵌套使用。
使用 sync.Cond 进行条件变量控制
sync.Cond 是一个条件变量,用于在协程之间进行通信和同步。它可以在指定的条件满足之前阻塞等待,并在条件满足时唤醒等待的协程。
package main

import (
	"fmt"
	"sync"
	"time"
)

func main() {
	var cond = sync.NewCond(&sync.Mutex{})
	var ready bool

	go func() {
		// 模拟异步任务逻辑
		time.Sleep(2 * time.Second)
		cond.L.Lock()
		ready = true
		cond.L.Unlock()

		// 通知等待的协程条件已满足
		cond.Broadcast()
	}()

	// 在某个地方等待条件满足
	cond.L.Lock()
	for !ready {
		cond.Wait()
	}
	cond.L.Unlock()
	fmt.Println("Condition is satisfied")
}
使用 sync.Pool 管理对象池
sync.Pool 是一个对象池,用于缓存和复用临时对象,可以提高对象的分配和回收效率。
package main

import (
	"fmt"
	"sync"
)

type MyObject struct {
	// 对象结构
	ID int
}

var objectPool = sync.Pool{
	New: func() interface{} {
		// 创建新对象
		return &MyObject{}
	},
}

func main() {
	// 从对象池获取对象
	obj := objectPool.Get().(*MyObject)

	// 使用对象
	obj.ID = 42
	fmt.Println("Object ID:", obj.ID)

	// 将对象放回对象池
	objectPool.Put(obj)

	// 再次从对象池获取对象
	newObj := objectPool.Get().(*MyObject)
	fmt.Println("New object ID:", newObj.ID) // 输出:New object ID: 42
}
请注意,sync.Pool 的主要用途是提高临时对象的分配和回收效率,以减少垃圾收集的开销。当你从 sync.Pool 中 Get 一个对象时,如果对象池为空,sync.Pool 会调用你提供的 New 函数来创建一个新对象。当你 Put 一个对象回 sync.Pool 时,该对象将被保存在对象池中,以便后续的 Get 操作复用。
此外,需要注意的是,sync.Pool 中的对象在每次垃圾收集后可能会被清除,所以它主要适用于临时对象的缓存和复用。
使用 sync.Once 实现只执行一次的操作
sync.Once 用于确保某个操作只执行一次,无论有多少个协程尝试执行它,常用于初始化或加载资源等场景。
package main

import (
	"fmt"
	"sync"
	"time"
)

type Resource struct {
	// 资源结构
	ID int
}

var once sync.Once
var resource *Resource

func initResource() *Resource {
	fmt.Println("Initializing resource")
	time.Sleep(2 * time.Second)
	return &Resource{ID: 42}
}

func getResource() *Resource {
	once.Do(func() {
		// 执行初始化资源的操作,仅执行一次
		resource = initResource()
	})
	return resource
}

func main() {
	// 在多个协程中获取资源
	go func() {
		res := getResource()
		// 使用资源
		fmt.Println("Resource ID in goroutine 1:", res.ID)
	}()

	go func() {
		res := getResource()
		// 使用资源
		fmt.Println("Resource ID in goroutine 2:", res.ID)
	}()

	// 等待协程完成(通常情况下,你应该使用 sync.WaitGroup 或 channel 等待协程完成,这里我们只是为了简单演示)
	time.Sleep(3 * time.Second)
}
首先定义一个 Resource 结构体和一个 sync.Once。然后,我们定义了一个 getResource 函数,该函数使用 once.Do 确保 initResource 函数只执行一次。initResource 函数模拟了资源的初始化过程。
在 main 函数中,在两个协程中调用 getResource 函数。由于 sync.Once 的保证,无论有多少协程调用 getResource,initResource 函数都只会执行一次,所以资源只会被初始化一次。
使用 sync.Once 和 context.Context 实现资源清理
可以结合使用 sync.Once 和 context.Context 来确保在多个协程之间只执行一次资源清理操作,并在取消或超时时进行清理。
package main

import (
	"context"
	"fmt"
	"sync"
	"time"
)

var once sync.Once

func cleanup() {
	// 执行资源清理操作
	fmt.Println("Cleaning up resources")
}

func doTask(ctx context.Context) {
	go func() {
		select {
		case <-ctx.Done():
			once.Do(cleanup) // 只执行一次资源清理
		}
	}()

	// 异步任务逻辑
	fmt.Println("Doing task")
	time.Sleep(1 * time.Second)
}

func main() {
	ctx, cancel := context.WithTimeout(context.Background(), 2*time.Second)
	defer cancel()

	// 在多个协程中执行任务
	go doTask(ctx)
	go doTask(ctx)

	// 等待任务完成或超时
	<-ctx.Done()
	fmt.Println("Main function done")
}
使用 sync.Map 实现并发安全的映射
sync.Map 是 Go 语言标准库中提供的并发安全的映射类型,可在多个协程之间安全地进行读写操作。
package main

import (
	"fmt"
	"sync"
	"time"
)

func main() {
	var m sync.Map

	// 存储键值对
	m.Store("key", "value")

	// 获取值
	if val, ok := m.Load("key"); ok {
		fmt.Println("Value before goroutines:", val)
	}

	// 在多个协程中操作 sync.Map
	go func() {
		m.Store("key", "value1")
	}()

	go func() {
		m.Store("key", "value2")
	}()

	// 等待协程完成(通常情况下,你应该使用 sync.WaitGroup 或 channel 等待协程完成,这里我们只是为了简单演示)
	time.Sleep(1 * time.Second)

	// 获取值
	if val, ok := m.Load("key"); ok {
		fmt.Println("Value after goroutines:", val)
	}

	// 删除键
	m.Delete("key")
}
首先创建一个 sync.Map。然后,我们存储一个键值对,并在主协程中获取该值。接下来在两个协程中操作 sync.Map,并确保映射的读写操作是并发安全的。最后,在主协程中再次获取值并删除键。
使用 context.Context 进行协程管理和取消
context.Context 用于在协程之间传递上下文信息,并可用于取消或超时控制。可以使用 context.WithCancel() 创建一个可取消的上下文,并使用 context.WithTimeout() 创建一个带有超时的上下文。
package main

import (
	"context"
	"fmt"
	"time"
)

func main() {
	// 使用 context.WithTimeout 创建一个带有超时的上下文
	ctx, cancel := context.WithTimeout(context.Background(), 5*time.Second)
	defer cancel()

	go func() {
		// 异步任务逻辑
		for i := 0; i < 5; i++ {
			fmt.Println("Doing task", i)
			time.Sleep(1 * time.Second)
			if i == 3 {
				cancel() // 取消任务
				break
			}
		}
	}()

	// 等待任务完成或取消
	select {
	case <-ctx.Done():
		// 通过检查 ctx.Err() 来区分任务是被取消还是超时
		if ctx.Err() == context.Canceled {
			fmt.Println("Task is cancelled")
		} else if ctx.Err() == context.DeadlineExceeded {
			fmt.Println("Task is timeout")
		}
	}

	// 等待协程完成(通常情况下,你应该使用 sync.WaitGroup 或 channel 等待协程完成,这里我们只是为了简单演示)
	time.Sleep(1 * time.Second)
}
- 创建一个带有超时的上下文:使用
context.WithTimeout(context.Background(), 5*time.Second)创建了一个带有 5 秒超时的上下文。ctx是一个context.Context类型的变量,它包含了一个超时时间。cancel是一个函数,当调用它时,会取消与ctx关联的所有操作。 - 当任务被取消或超时时,可以通过检查
ctx.Err()的返回值来区分任务是被取消还是超时。如果返回值是context.Canceled,则表示任务被取消;如果返回值是context.DeadlineExceeded,则表示任务超时。
使用 context.WithDeadline() 和 context.WithTimeout() 设置截止时间
context.WithDeadline() 和 context.WithTimeout() 函数可以用于创建带有截止时间的上下文,以限制异步任务的执行时间。
package main

import (
	"context"
	"fmt"
	"time"
)

func doTask(ctx context.Context) {
	// 异步任务逻辑
	for i := 0; i < 5; i++ {
		select {
		case <-time.After(5 * time.Second):
			// 超时处理
			fmt.Println("Task timeout")
			return
		case <-ctx.Done():
			// 上下文取消处理
			fmt.Println("Task cancelled")
			return
		default:
			fmt.Println("Doing task", i)
			time.Sleep(1 * time.Second)
		}
	}
}

func main() {
	ctx := context.Background()
	ctx, cancel := context.WithTimeout(ctx, 3*time.Second)
	defer cancel()

	go doTask(ctx)

	// 继续其他操作
	time.Sleep(6 * time.Second)
}
首先定义了一个 doTask 函数,它接受一个 context.Context 参数。在函数中,使用 select 语句同时监听任务超时(通过 time.After())和上下文取消(通过 ctx.Done())。当任务超时或上下文被取消时,执行相应的处理操作。
在 main 函数中,使用 context.WithTimeout() 创建一个带有 3 秒超时的上下文。然后,将这个上下文传递给 doTask 函数,并在一个新的协程中执行该函数。这样,可以在异步任务中处理任务超时和上下文取消事件。
package main

import (
	"context"
	"fmt"
	"time"
)

func doTask(ctx context.Context) {
	// 异步任务逻辑
	for i := 0; i < 5; i++ {
		select {
		case <-ctx.Done():
			// 上下文截止日期到达或取消处理
			if ctx.Err() == context.DeadlineExceeded {
				fmt.Println("Task deadline exceeded")
			} else {
				fmt.Println("Task cancelled")
			}
			return
		default:
			fmt.Println("Doing task", i)
			time.Sleep(1 * time.Second)
		}
	}
}

func main() {
	ctx := context.Background()
	// 设置一个 3 秒后的截止时间
	deadline := time.Now().Add(3 * time.Second)
	ctx, cancel := context.WithDeadline(ctx, deadline)
	defer cancel()

	go doTask(ctx)

	// 继续其他操作
	time.Sleep(6 * time.Second)
}
使用 context.WithDeadline() 创建一个带有截止时间的上下文。设置了一个 3 秒后的截止时间,然后将这个上下文传递给 doTask 函数,并在一个新的协程中执行该函数。当截止时间到达或上下文被取消时,可以检测到这一事件并执行相应的处理操作。
与 context.WithTimeout() 类似,context.WithDeadline() 也可以用于限制异步任务的执行时间。不同之处在于,context.WithTimeout() 使用一个持续时间作为参数,而 context.WithDeadline() 使用一个具体的截止时间作为参数。
使用 context.WithValue() 传递上下文值
context.WithValue() 函数可用于在上下文中传递键值对,以在协程之间共享和传递上下文相关的值。
package main

import (
	"context"
	"fmt"
)

type keyContextValue string

func doTask(ctx context.Context) {
	if val := ctx.Value(keyContextValue("key")); val != nil {
		// 使用上下文值
		fmt.Println("Context value:", val)
	}
}

func main() {
	ctx := context.WithValue(context.Background(), keyContextValue("key"), "value")
	go doTask(ctx)

	// 继续其他操作
	time.Sleep(1 * time.Second)
}
首先定义了一个 keyContextValue 类型,它用作上下文值的键。然后,定义了一个 doTask 函数,它接受一个 context.Context 参数。在函数中,使用 ctx.Value() 函数获取上下文值,并在找到值时使用它。
在 main 函数中,使用 context.WithValue() 创建一个带有键值对的上下文。然后,将这个上下文传递给 doTask 函数,并在一个新的协程中执行该函数。这样,可以在异步任务中使用上下文值。
使用 atomic 包进行原子操作
atomic 包提供了一组函数,用于实现原子操作,以确保在并发环境中对共享变量的读写操作是原子的。
package main

import (
	"fmt"
	"sync"
	"sync/atomic"
)

var counter int64

func increment() {
	atomic.AddInt64(&counter, 1)
}

func main() {
	var wg sync.WaitGroup

	for i := 0; i < 100; i++ {
		wg.Add(1)
		go func() {
			defer wg.Done()
			increment()
		}()
	}

	wg.Wait()
	fmt.Println("Counter:", counter)
}
首先定义了一个名为 counter 的全局变量,它将在多个协程中共享。然后,定义了一个 increment 函数,它使用 atomic.AddInt64() 函数对 counter 变量进行原子递增操作。在 main 函数中,使用 sync.WaitGroup 来等待所有协程完成。启动 100 个协程,每个协程都调用 increment 函数。由于使用了原子操作,所以即使在并发环境中,对 counter 变量的递增操作也是安全的。最后,在所有协程完成后,打印 counter 变量的值将始终是 100。
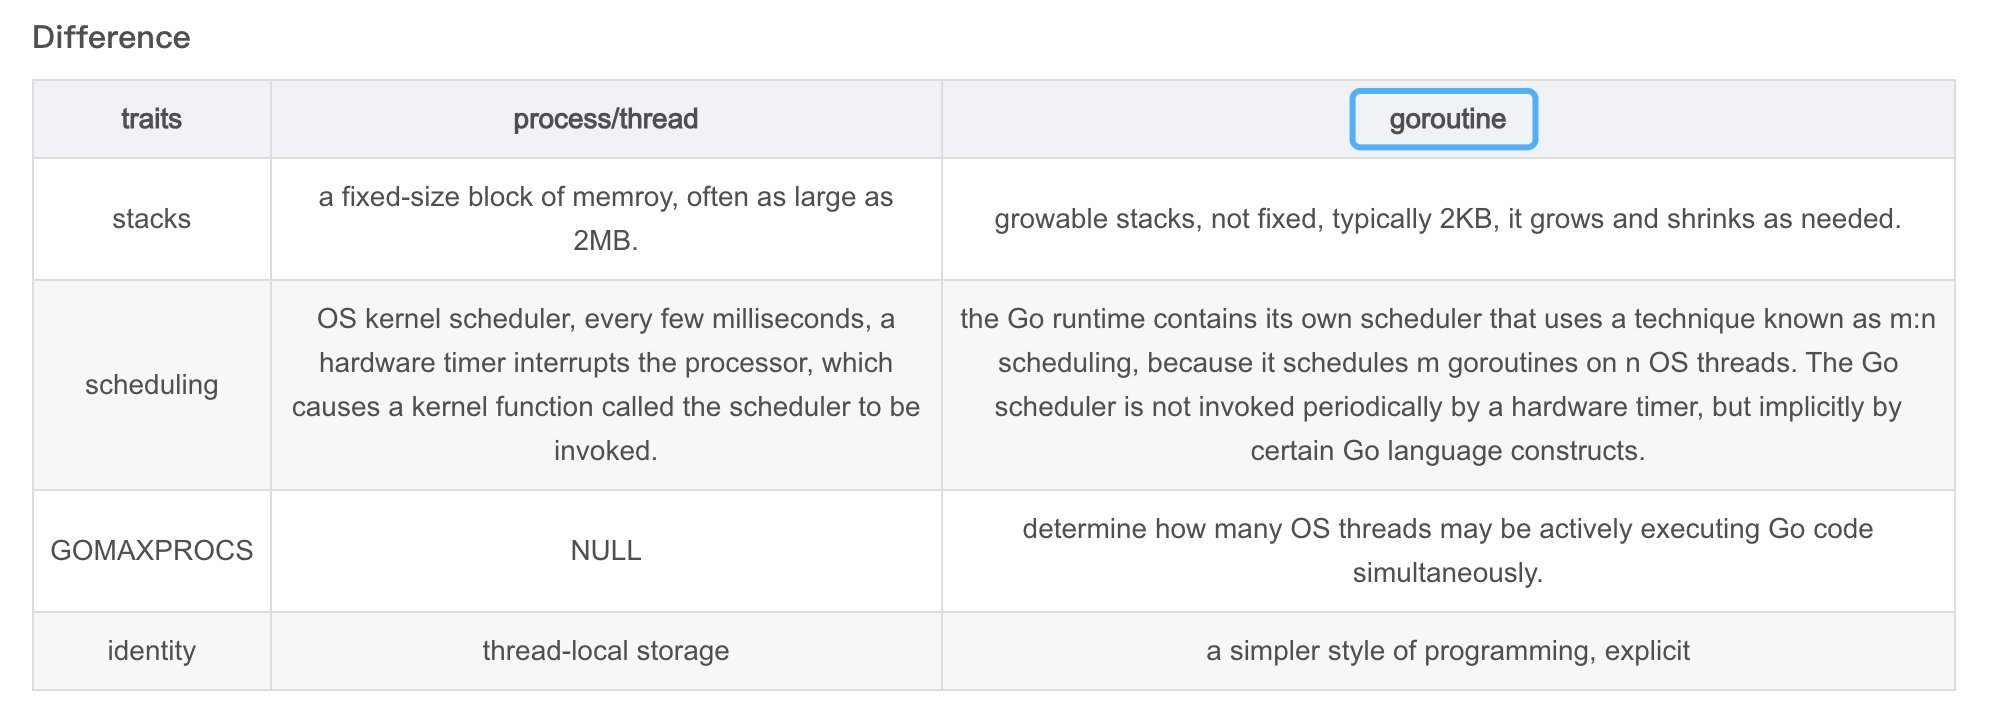
线程模型
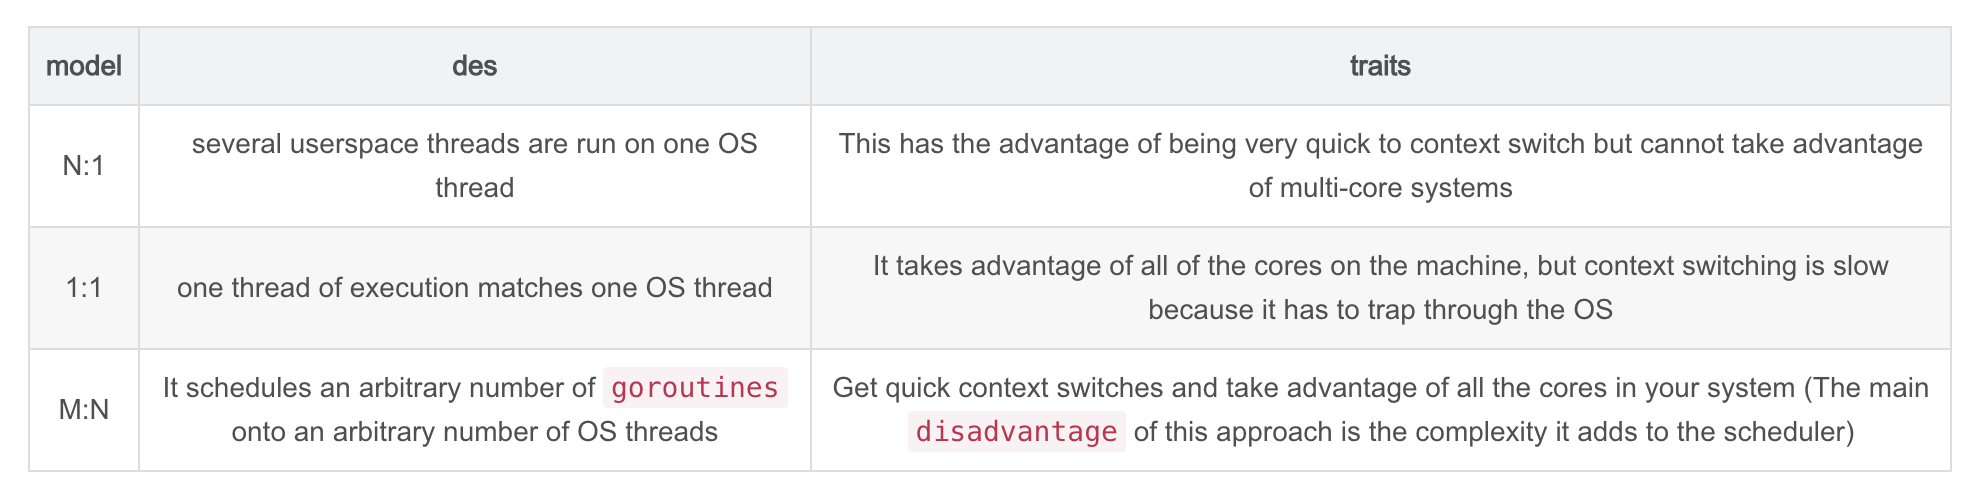
在互联网时代,由于在线用户数量的爆炸,单台服务器处理的连接也水涨船高,迫使编程模式由从前的串行模型升级到并发模型,而几十年来,并发模型也是一代代地升级,有 IO 多路复用、多进程以及多线程。这几种模型都各有长短,现代复杂的高并发架构大多是几种模型协同使用,不同场景应用不同模型,扬长避短,发挥服务器的最大性能。而多线程,因为其轻量和易用,成为并发编程中使用频率最高的并发模型,而后衍生的协程等其他子产品,也都基于它,而 goroutine 也是基于线程。
现在主流的线程模型分为三种:内核级线程模型、用户级线程模型和两级线程模型(也称混合型线程模型)。
它们之间最大的差异就在于用户线程与内核调度实体(KSE,Kernel Scheduling Entity)之间的对应关系上。而所谓的内核调度实体 KSE 就是指可以被操作系统内核调度器调度的对象实体。简单来说 KSE 就是内核级线程,是操作系统内核的最小调度单元,也就是我们写代码的时候通俗理解上的线程了。
传统的协程库属于用户级线程模型,而 goroutine 和它的 Go Scheduler 在底层实现上其实是属于两级线程模型,因此,有时候为了方便理解可以简单把 goroutine 类比成协程,但心里一定要有个清晰的认知:goroutine 并不等同于协程。
用户级线程模型 (传统协程库的实现方式)
用户线程与内核线程 KSE 是多对一 (N : 1) 的映射模型,多个用户线程的一般从属于单个进程并且多线程的调度是由用户自己的线程库来完成,线程的创建、销毁以及多线程之间的协调等操作都是由用户自己的线程库来负责而无须借助系统调用来实现。一个进程中所有创建的线程都只和同一个 KSE 在运行时动态绑定,也就是说,操作系统只知道用户进程而对其中的线程是无感知的,内核的所有调度都是基于用户进程。许多语言实现的 协程库基本上都属于这种方式(比如 python 的 gevent)。
由于线程调度是在用户层面完成的,也就是相较于内核调度不需要让 CPU 在用户态和内核态之间切换,这种实现方式相比内核级线程可以做的很轻量级,对系统资源的消耗会小很多,因此可以创建的线程数量与上下文切换所花费的代价也会小得多。但该模型有个原罪:并不能做到真正意义上的并发。
假设在某个用户进程上的某个用户线程因为一个阻塞调用(比如 I/O 阻塞)而被 CPU 给中断(抢占式调度)了,那么该进程内的所有线程都被阻塞(因为单个用户进程内的线程自调度是没有 CPU 时钟中断的,从而没有轮转调度),整个进程被挂起。即便是多 CPU 的机器,也无济于事,因为在用户级线程模型下,一个 CPU 关联运行的是整个用户进程,进程内的子线程绑定到 CPU 执行是由用户进程调度的,内部线程对 CPU 是不可见的,此时可以理解为 CPU 的调度单位是用户进程。所以很多的协程库会把自己一些阻塞的操作重新封装为完全的非阻塞形式,然后在以前要阻塞的点上,主动让出自己,并通过某种方式通知或唤醒其他待执行的用户线程在该 KSE 上运行,从而避免了内核调度器由于 KSE 阻塞而做上下文切换,这样整个进程也不会被阻塞了。
内核级线程模型
用户线程与内核线程 KSE 是一对一 (1 : 1) 的映射模型,也就是每一个用户线程绑定一个实际的内核线程,而线程的调度则完全交付给操作系统内核去做,应用程序对线程的创建、终止以及同步都基于内核提供的系统调用来完成,大部分编程语言的线程库 (比如 Java 的 java.lang.Thread、C++11 的 std::thread 等) 都是对操作系统的线程(内核级线程)的一层封装,创建出来的每个线程与一个独立的 KSE 静态绑定,因此其调度完全由操作系统内核调度器去做,也就是说,一个进程里创建出来的多个线程每一个都绑定一个 KSE。
这种模型的优势和劣势同样明显:优势是实现简单,直接借助操作系统内核的线程以及调度器,所以 CPU 可以快速切换调度线程,于是多个线程可以同时运行,因此相较于用户级线程模型它真正做到了并行处理;但它的劣势是,由于直接借助了操作系统内核来创建、销毁和以及多个线程之间的上下文切换和调度,因此资源成本大幅上涨,且对性能影响很大。
两级线程模型
两级线程模型是博采众长之后的产物,充分吸收前两种线程模型的优点且尽量规避它们的缺点。在此模型下,用户线程与内核 KSE 是多对多 (N : M) 的映射模型。
- 首先,区别于用户级线程模型,两级线程模型中的一个进程可以与多个内核线程 KSE 关联,也就是说一个进程内的多个线程可以分别绑定一个自己的 KSE,这点和内核级线程模型相似
- 其次,又区别于内核级线程模型,它的进程里的线程并不与 KSE 唯一绑定,而是可以多个用户线程映射到同一个 KSE,当某个 KSE 因为其绑定的线程的阻塞操作被内核调度出 CPU 时,其关联的进程中其余用户线程可以重新与其他 KSE 绑定运行
所以,两级线程模型,既不是用户级线程模型那种完全靠自己调度的,也不是内核级线程模型完全靠操作系统调度的,而是中间态(自身调度与系统调度协同工作)。因为这种模型的高度复杂性,操作系统内核开发者一般不会使用,所以更多时候是作为第三方库的形式出现。
而 Go 语言中的 runtime 调度器就是采用的这种实现方案,实现了 Goroutine 与 KSE 之间的动态关联,不过 Go 语言的实现更加高级和优雅。
因此,两级线程模型,即用户调度器实现用户线程到 KSE 的调度,内核调度器实现 KSE 到 CPU 上的调度。
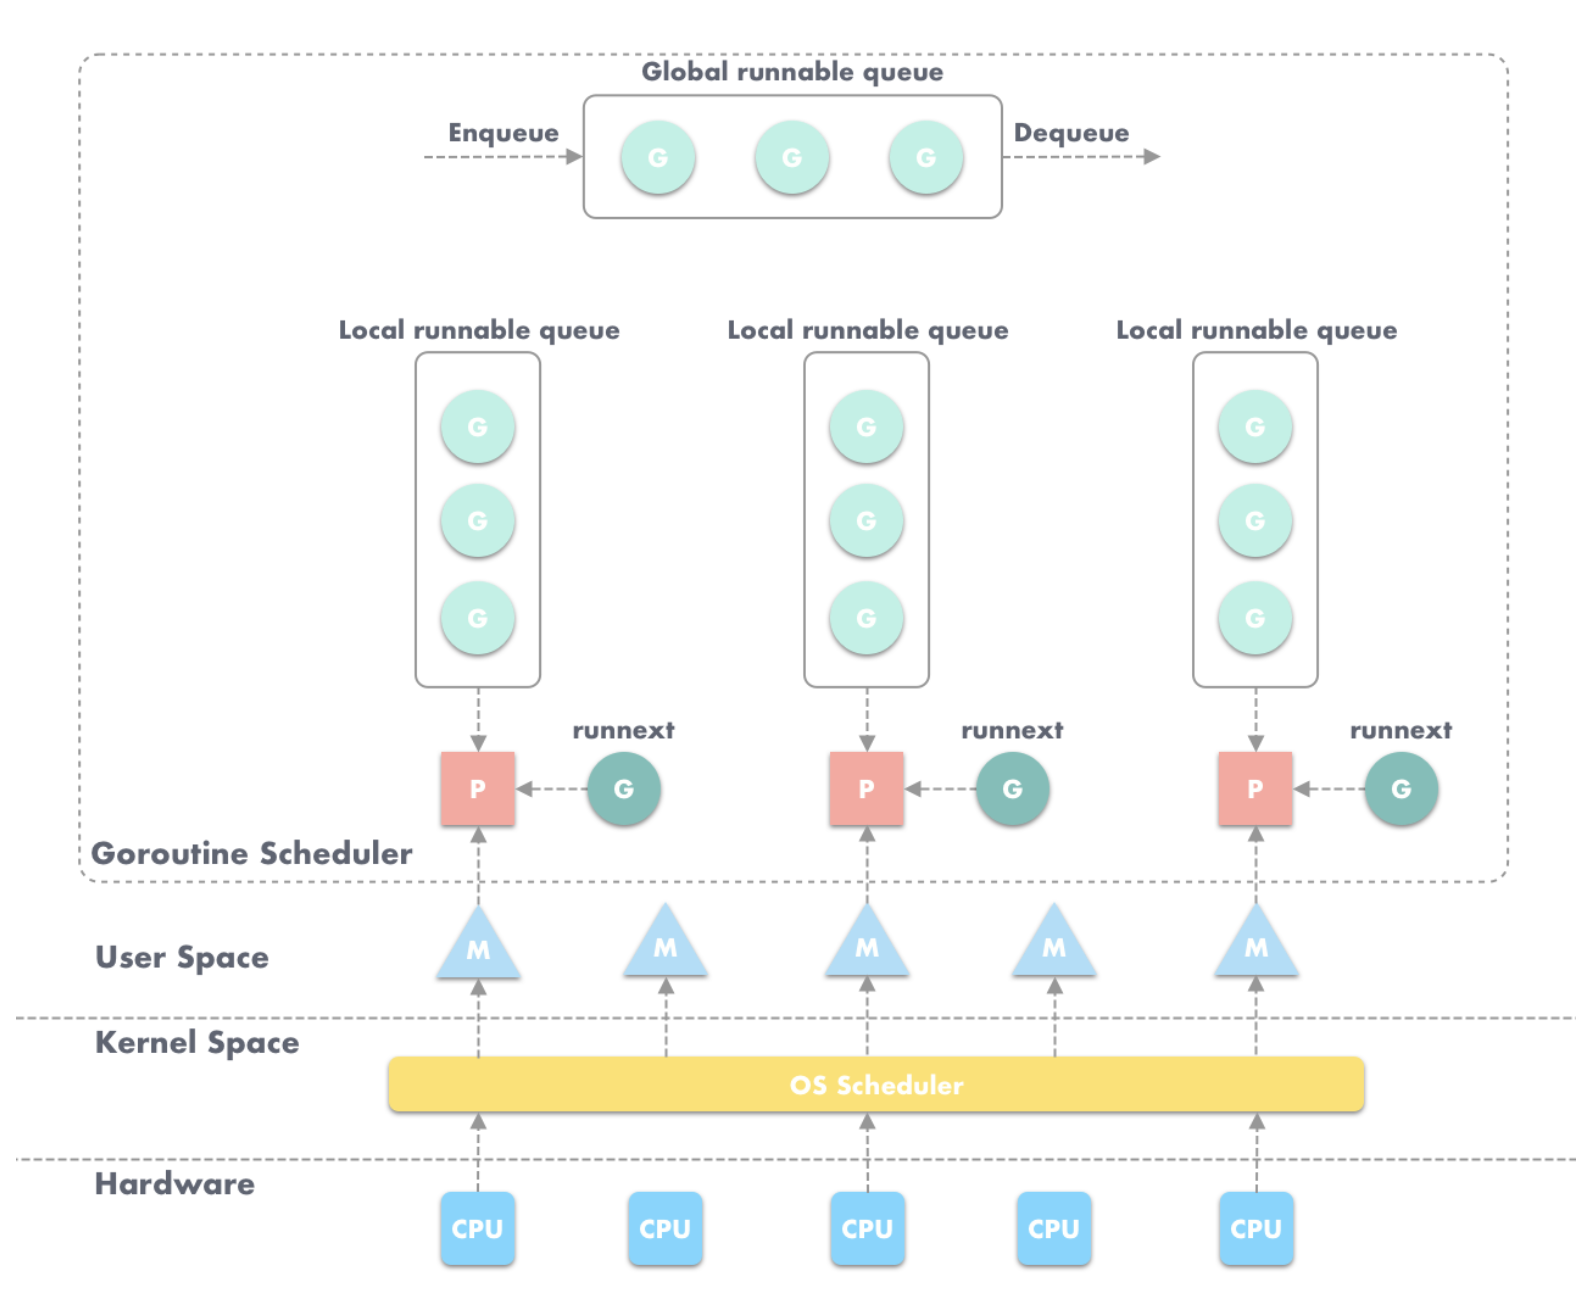
G-P-M 模型
每一个 OS 线程都有一个固定大小的内存块 (一般会是 2MB) 来做栈,这个栈会用来存储当前正在被调用或挂起 (指在调用其它函数时) 的函数的内部变量。这个固定大小的栈同时很大又很小。因为 2MB 的栈对于一个小小的 goroutine 来说是很大的内存浪费,而对于一些复杂的任务(如深度嵌套的递归)来说又显得太小。因此,Go 语言做了它自己的线程。
在 Go 语言中,每一个 goroutine 是一个独立的执行单元,相较于每个 OS 线程固定分配 2M 内存的模式,goroutine 的栈采取了动态扩容方式,初始时仅为 2KB,随着任务执行按需增长,最大可达 1GB (64 位机器最大是 1G,32 位机器最大是 256M),且完全由 golang 自己的调度器 Go Scheduler 来调度。此外,GC 还会周期性地将不再使用的内存回收,收缩栈空间。 因此,Go 程序可以同时并发成千上万个 goroutine 是得益于它强劲的调度器和高效的内存模型。Go 的创造者大概对 goroutine 的定位就是屠龙刀,因为他们不仅让 goroutine 作为 golang 并发编程的最核心组件 (开发者的程序都是基于 goroutine 运行的) 而且 golang 中的许多标准库的实现也到处能见到 goroutine 的身影,比如 net/http 这个包,甚至语言本身的组件 runtime 运行时和 GC 垃圾回收器都是运行在 goroutine 上的,作者对 goroutine 的厚望可见一斑。
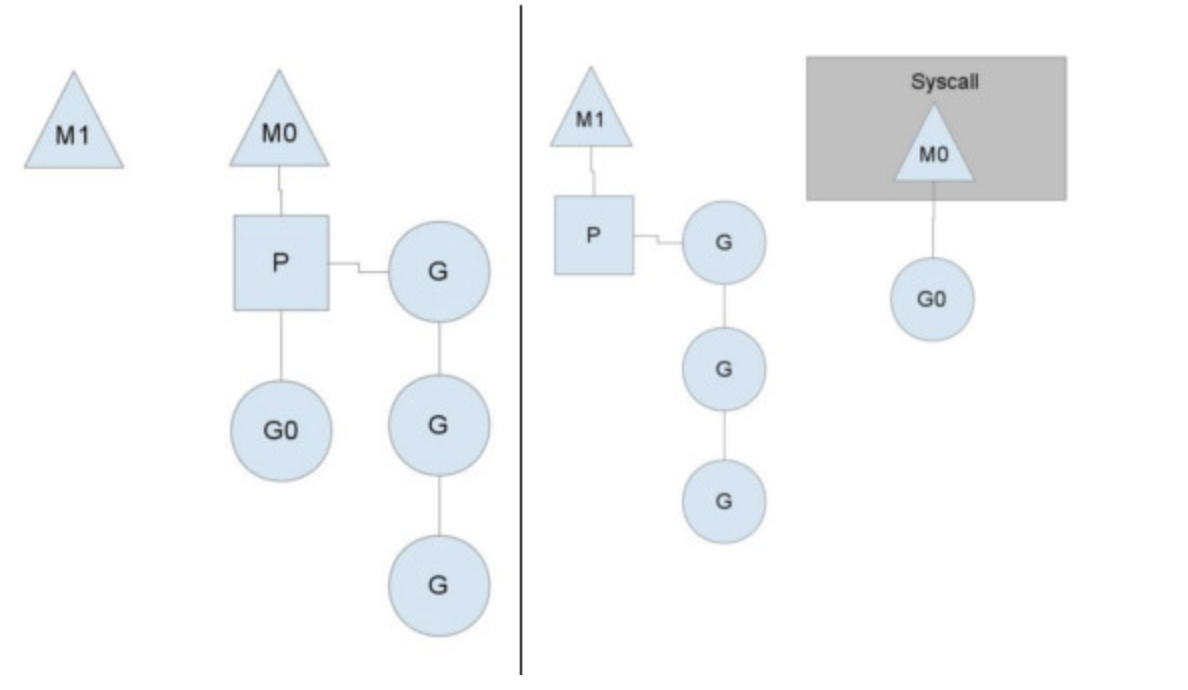
任何用户线程最终肯定都是要交由 OS 线程来执行的,goroutine(称为 G)也不例外,但是 G 并不直接绑定 OS 线程运行,而是由 Goroutine Scheduler 中的 P - Logical Processor (逻辑处理器)来作为两者的中介,P 可以看作是一个抽象的资源或者一个上下文,一个 P 绑定一个 OS 线程,在 golang 的实现里把 OS 线程抽象成一个数据结构:M。G 实际上是由 M 通过 P 来进行调度运行的,但是在 G 的层面来看,P 提供了 G 运行所需的一切资源和环境,因此在 G 看来 P 就是运行它的 “CPU”。由 G、P、M 这三种由 Go 抽象出来的实现,最终形成了 Go 调度器的基本结构:
-
G: 表示Goroutine,每个 Goroutine 对应一个 G 结构体,G 存储 Goroutine 的运行堆栈、状态以及任务函数,可重用。G 并非执行体,每个 G 需要绑定到 P 才能被调度执行。 -
P:Processor,表示逻辑处理器, 对 G 来说,P 相当于 CPU 核,G 只有绑定到 P (在 P 的 local runq 中) 才能被调度。对 M 来说,P 提供了相关的执行环境 (Context),如内存分配状态 (mcache),任务队列 (G) 等,P 的数量决定了系统内最大可并行的 G 的数量(前提:物理 CPU 核数 >= P 的数量),P 的数量由用户设置的GOMAXPROCS决定,但是不论GOMAXPROCS设置为多大,P 的数量最大为 256。 -
M:Machine,OS 线程抽象,代表着真正执行计算的资源,在绑定有效的 P 后,进入 schedule 循环;而 schedule 循环的机制大致是从 Global 队列、P 的 Local 队列以及 wait 队列中获取 G,切换到 G 的执行栈上并执行 G 的函数,调用 goexit 做清理工作并回到 M,如此反复。M 并不保留 G 状态,这是 G 可以跨 M 调度的基础,M 的数量是不定的,由 Go Runtime 调整,为了防止创建过多 OS 线程导致系统调度不过来,目前默认最大限制为 10000 个。
关于 P,在 Go 1.0 发布的时候,它的调度器其实 G-M 模型,也就是没有 P 的,调度过程全由 G 和 M 完成,这个模型暴露出一些问题:
- 单一全局互斥锁 (Sched.Lock) 和集中状态存储的存在导致所有 goroutine 相关操作,比如:创建、重新调度等都要上锁;
- goroutine 传递问题:M 经常在 M 之间传递可运行的 goroutine,这导致调度延迟增大以及额外的性能损耗;
- 每个 M 做内存缓存,导致内存占用过高,数据局部性较差;
- 由于 syscall 调用而形成的剧烈的 worker thread 阻塞和解除阻塞,导致额外的性能损耗。
这些问题实在太扎眼了,导致 Go1.0 虽然号称原生支持并发,却在并发性能上一直饱受诟病,然后,Go 语言委员会中一个核心开发大佬看不下了,亲自下场重新设计和实现了 Go 调度器(在原有的 G-M 模型中引入了 P)并且实现了一个叫做 work-stealing 的调度算法:
- 每个 P 维护一个 G 的本地队列;
- 当一个 G 被创建出来,或者变为可执行状态时,就把他放到 P 的可执行队列中;
- 当一个 G 在 M 里执行结束后,P 会从队列中把该 G 取出;如果此时 P 的队列为空,即没有其他 G 可以执行, M 就随机选择另外一个 P,从其可执行的 G 队列中取走一半。
该算法避免了在 goroutine 调度时使用全局锁。
至此,Go 调度器的基本模型确立:
G-P-M 模型调度
Go 调度器工作时会维护两种用来保存 G 的任务队列:一种是Global 任务队列,一种是每个 P 维护的 Local 任务队列。
当通过 go 关键字创建一个新的 goroutine 的时候,它会优先被放入 P 的本地队列。为了运行 goroutine,M 需要持有(绑定)一个 P,接着 M 会启动一个 OS 线程,循环从 P 的本地队列里取出一个 goroutine 并执行。当然还有上文提及的 work-stealing 调度算法:当 M 执行完了当前 P 的 Local 队列里的所有 G 后,P 也不会就这么在那躺尸啥都不干,它会先尝试从 Global 队列寻找 G 来执行,如果 Global 队列为空,它会随机挑选另外一个 P,从它的队列里中拿走一半的 G 到自己的队列中执行。
如果一切正常,调度器会以上述的那种方式顺畅地运行,但这个世界没这么美好,总有意外发生,以下分析 goroutine 在两种例外情况下的行为。
Go runtime 会在下面的 goroutine 被阻塞的情况下运行另外一个 goroutine:
- blocking syscall (for example opening a file)
- network input
- channel operations
- primitives in the sync package
这 4 种场景又可归类为 2 种类型:
用户态阻塞/唤醒
当 goroutine 因为 channel 操作或者 network I/O 而阻塞时(实际上 golang 已经用 netpoller 实现了 goroutine 网络 I/O 阻塞不会导致 M 被阻塞,仅阻塞 G,这里仅仅是举个例子),对应的 G 会被放置到某个 wait 队列 (如 channel 的 waitq),该 G 的状态由 _Gruning 变为 _Gwaitting ,而 M 会跳过该 G 尝试获取并执行下一个 G,如果此时没有 runnable 的 G 供 M 运行,那么 M 将解绑 P,并进入 sleep 状态;当阻塞的 G 被另一端的 G2 唤醒时(比如 channel 的可读/写通知),G 被标记为 runnable,尝试加入 G2 所在 P 的 runnext,然后再是 P 的 Local 队列和 Global 队列。
系统调用阻塞
当 G 被阻塞在某个系统调用上时,此时 G 会阻塞在 _Gsyscall 状态,M 也处于 block on syscall 状态,此时的 M 可被抢占调度:执行该 G 的 M 会与 P 解绑,而 P 则尝试与其它 idle 的 M 绑定,继续执行其它 G。如果没有其它 idle 的 M,但 P 的 Local 队列中仍然有 G 需要执行,则创建一个新的 M;当系统调用完成后,G 会重新尝试获取一个 idle 的 P 进入它的 Local 队列恢复执行,如果没有 idle 的 P,G 会被标记为 runnable 加入到 Global 队列。
以上就是从宏观的角度对 Goroutine 和它的调度器进行的一些概要性的介绍,当然,Go 的调度中更复杂的抢占式调度、阻塞调度的更多细节,可以自行去找相关资料深入理解,本文只讲到 Go 调度器的基本调度过程。想了解更多细节可以去看看 Go 调度器 G-P-M 模型的设计者 Dmitry Vyukov 写的该模型的设计文档《Go Preemptive Scheduler Design》以及直接去看源码,G-P-M 模型的定义放在 src/runtime/runtime2.go 里面,而调度过程则放在了 src/runtime/proc.go 里。

调度器状态的查看方法
Go 提供了调度器当前状态的查看方法:使用 Go 运行时环境变量 GODEBUG。
$GODEBUG=schedtrace=1000 godoc -http=:6060
SCHED 0ms: gomaxprocs=4 idleprocs=3 threads=3 spinningthreads=0 idlethreads=0 runqueue=0 [0 0 0 0]
SCHED 1001ms: gomaxprocs=4 idleprocs=0 threads=9 spinningthreads=0 idlethreads=3 runqueue=2 [8 14 5 2]
SCHED 2006ms: gomaxprocs=4 idleprocs=0 threads=25 spinningthreads=0 idlethreads=19 runqueue=12 [0 0 4 0]
SCHED 3006ms: gomaxprocs=4 idleprocs=0 threads=26 spinningthreads=0 idlethreads=8 runqueue=2 [0 1 1 0]
SCHED 4010ms: gomaxprocs=4 idleprocs=0 threads=26 spinningthreads=0 idlethreads=20 runqueue=12 [6 3 1 0]
SCHED 5010ms: gomaxprocs=4 idleprocs=0 threads=26 spinningthreads=1 idlethreads=20 runqueue=17 [0 0 0 0]
SCHED 6016ms: gomaxprocs=4 idleprocs=0 threads=26 spinningthreads=0 idlethreads=20 runqueue=1 [3 4 0 10]
GODEBUG 这个 Go 运行时环境变量很是强大,通过给其传入不同的 key1=value1,key2=value2 组合,Go 的 runtime 会输出不同的调试信息,比如在这里给GODEBUG传入了 schedtrace=1000,其含义就是每 1000ms 打印输出一次 goroutine scheduler 的状态,每次一行。每一行各字段含义如下:
以上面例子中最后一行为例:
SCHED 6016ms: gomaxprocs=4 idleprocs=0 threads=26 spinningthreads=0 idlethreads=20 runqueue=1 [3 4 0 10]
- SCHED:调试信息输出标志字符串,代表本行是 goroutine scheduler 的输出;
- 6016ms:即从程序启动到输出这行日志的时间;
- gomaxprocs: P的数量;
- idleprocs: 处于 idle 状态的 P 的数量;通过 gomaxprocs 和 idleprocs 的差值,我们就可知道执行 go 代码的 P 的数量;
- threads: os threads 的数量,包含 scheduler 使用的 m 数量,加上 runtime 自用的类似 sysmon 这样的 thread 的数量;
- spinningthreads: 处于自旋状态的 os thread 数量;
- idlethread: 处于 idle 状态 的os thread 的数量;
- runqueue=1: go scheduler 全局队列中 G 的数量;
关于 go scheduler 调试信息输出的详细信息,可以参考 Dmitry Vyukov 的大作:《Debugging performance issues in Go programs》。这也应该是每个 gopher 必读的经典文章。当然更详尽的代码可参考 $GOROOT/src/runtime/proc.go 中的 schedtrace 函数。
大规模 Goroutine 的瓶颈
既然 Go 调度器已经这么优秀了,是否需要去实现一个 golang 的 Goroutine Pool 呢?事实上,优秀不代表完美,任何不考虑具体应用场景的编程模式都是耍流氓!有基于 G-P-M 的 Go 调度器背书,go 程序的并发编程中,可以任性地起大规模的 goroutine 来执行任务,官方也宣称用 golang 写并发程序的时候随便起个成千上万的 goroutine 毫无压力。
-
首先,即便每个 goroutine 只分配
2KB的内存,但如果是恐怖如斯的数量,聚少成多,内存暴涨,就会对 GC 造成极大的负担。写过 Java 的同学应该知道 jvm GC 那万恶的STW(Stop The World)机制,也就是 GC 的时候会挂起用户程序直到垃圾回收完,虽然 Go1.8 之后的 GC 已经去掉了STW以及优化成了并行 GC,性能上有了不小的提升,但是,如果太过于频繁地进行 GC,依然会有性能瓶颈; -
其次,还记得前面我们说的 runtime 和 GC 也都是 goroutine 吗?是的,如果 goroutine 规模太大,内存吃紧,runtime 调度和垃圾回收同样会出问题,虽然 G-P-M 模型足够优秀,韩信点兵,多多益善,但你不能不给士兵发口粮(内存)吧?巧妇难为无米之炊,没有内存,Go 调度器就会阻塞 goroutine,结果就是 P 的 Local 队列积压,又导致内存溢出,这就是个死循环,甚至极有可能程序直接 Crash 掉,本来是想享受 golang 并发带来的快感效益,结果却得不偿失。
一个 http 标准库引发的血案
作为 golang 拥趸的 Gopher 们一定都使用过它的 net/http 标准库,很多人都说用 golang 写 Web server 完全可以不用借助第三方的 Web framework,仅用 net/http 标准库就能写一个高性能的 Web server。接下来我们就来先看看 net/http 内部是怎么实现的。
net/http 接收请求且开始处理的源码放在 src/net/http/server.go 里,先从入口函数 ListenAndServe 进去:
func (srv *Server) ListenAndServe() error {
	addr := srv.Addr
	if addr == "" {
		addr = ":http"
	}
	ln, err := net.Listen("tcp", addr)
	if err != nil {
		return err
	}
	return srv.Serve(tcpKeepAliveListener{ln.(*net.TCPListener)})
}
看到最后那个 srv.Serve 调用了吗?没错,这个 Serve 方法里面就是实际处理 http 请求的逻辑,我们再进入这个方法内部:
// Serve 方法使服务器开始处理传入的连接
func (srv *Server) Serve(l net.Listener) error {
	// 循环接受来自监听器的连接
	for {
		// 接受一个新的连接
		rw, e := l.Accept()
		// 如果接受连接时发生错误,则返回错误
		if e != nil {
			return e
		}
		// 为每个新的连接创建一个新的 goroutine 来处理请求
		go srv.Serve(rw)
	}
}
首先,这个方法的参数 (l net.Listener) ,是一个 TCP 监听的封装,负责监听网络端口。rw, e := l.Accept() 从网络端口取出一个新的 TCP 连接进行处理,最后 go c.serve(ctx) 就是最后真正去处理这个 http 请求的逻辑了,看到前面的 go 关键字了吗?没错,这里启动了一个新的 goroutine 去执行处理逻辑,而且这是在一个无限循环体里面,所以意味着,每来一个请求它就会开一个 goroutine 去处理,相当任性粗暴啊,不过有 Go 调度器背书,一般来说也没啥压力,然而,如果,我是说如果,突然一大波请求涌进来了(比方说黑客搞了成千上万的肉鸡 DDOS 你,没错!就这么倒霉!),这时候,就很成问题了,他来 10w 个请求你就要开给他 10w 个 goroutine,来 100w 个你就要老老实实开给他 100w 个,线程调度压力陡升,内存爆满,再然后,你就跪了。
优化思路
有问题,就一定有解决的办法,那么,有什么方案可以减缓大规模 goroutine 对系统的调度和内存压力?要想解决问题,最重要的是找到造成问题的根源,这个问题根源是什么?goroutine 的数量过多导致资源侵占,那要解决这个问题就要限制运行的 goroutine 数量,合理复用,节省资源,具体就是 — goroutine 池化。
超大规模并发的场景下,不加限制的大规模的 goroutine 可能造成内存暴涨,给机器带来极大的压力,吞吐量下降和处理速度变慢还是其次,更危险的是可能使得程序 crash。所以,goroutine 池化是有其现实意义的。
首先,100w 个任务,是不是真的需要 100w 个 goroutine 来处理?未必!用 1w 个 goroutine 也一样可以处理,让一个 goroutine 多处理几个任务就是了,池化的核心优势就在于对 goroutine 的复用。此举首先极大减轻了 runtime 调度 goroutine 的压力,其次,便是降低了对内存的消耗。
实现一个 Goroutine Pool - ants (协程池)
ants is a high-performance and low-cost goroutine pool in Go.
ants是一个高性能的 goroutine 池,实现了对大规模 goroutine 的调度管理、goroutine 复用,允许使用者在开发并发程序的时候限制 goroutine 数量,复用资源,达到更高效执行任务的效果。
因为上述陈列的一些由于 goroutine 规模过大而可能引发的问题,需要有方案来解决这些问题,上文已经分析过,把 goroutine 池化是一种行之有效的方案,基于此,可以实现一个 Goroutine Pool,复用 goroutine,减轻 runtime 的调度压力以及缓解内存压力,依托这些优化,在大规模 goroutine 并发的场景下可以极大地提高并发性能。
Goroutine Pool 的实现思路大致如下:
启动服务之时先初始化一个 Goroutine Pool 池,这个 Pool 维护了一个类似栈的 LIFO 队列 ,里面存放负责处理任务的 Worker,然后在 client 端提交 task 到 Pool 中之后,在 Pool 内部,接收 task 之后的核心操作是:
- 检查当前
Worker队列中是否有可用的Worker,如果有,取出执行当前的task; - 没有可用的
Worker,判断当前在运行的Worker是否已超过该 Pool 的容量
是 —> 再判断工作池是否为非阻塞模式:
    是 —> 直接返回 nil
    否 —> 阻塞等待直至有 Worker 被放回 Pool
否 —> 新开一个 Worker(goroutine)处理
- 每个 Worker 执行完任务之后,放回 Pool 的队列中等待
按照这个设计思路,实现了一个高性能的 Goroutine Pool,较好地解决了上述的大规模调度和资源占用的问题,在执行速度和内存占用方面相较于原生 goroutine 并发占有明显的优势,尤其是内存占用,因为复用,所以规避了无脑启动大规模 goroutine 的弊端,可以节省大量的内存。此外,该调度系统还有一个清理过期 Worker 的定时任务,该任务在初始化一个 Pool 之时启动,每隔一定的时间间隔去检查空闲 Worker 队列中是否有已经过期的 Worker,有则清理掉,通过定时清理过期 worker,进一步节省系统资源。完整的项目代码。
实现细节
接下来通过分析这个 Goroutine Pool 的几个核心实现以及它们的联动来引导大家过一遍 Goroutine Pool 的原理。
Pool struct
type sig struct{}

type f func() error

// Pool accept the tasks from client,it limits the total
// of goroutines to a given number by recycling goroutines.
type Pool struct {
	// capacity of the pool.
	capacity int32

	// running is the number of the currently running goroutines.
	running int32

	// expiryDuration set the expired time (second) of every worker.
	expiryDuration time.Duration

	// workers is a slice that store the available workers.
	workers []*Worker

	// release is used to notice the pool to closed itself.
	release chan sig

	// lock for synchronous operation.
	lock sync.Mutex

	once sync.Once
}
Pool 是一个通用的协程池,支持不同类型的任务,亦即每一个任务绑定一个函数提交到池中,批量执行不同类型任务,是一种广义的协程池。
本项目中还实现了另一种协程池 — 批量执行同类任务的协程池 PoolWithFunc ,每一个 PoolWithFunc 只会绑定一个任务函数 pf ,这种 Pool 适用于大批量相同任务的场景,因为每个 Pool 只绑定一个任务函数,因此 PoolWithFunc 相较于 Pool 会更加节省内存,但通用性就不如前者了,为了让大家更好地理解协程池的原理,这里我们用通用的 Pool 来分析。
capacity 是该 Pool 的容量,也就是开启 worker 数量的上限,每一个 worker 绑定一个 goroutine; running 是当前正在执行任务的 worker 数量; expiryDuration 是 worker 的过期时长,在空闲队列中的 worker 的最新一次运行时间与当前时间之差如果大于这个值则表示已过期,定时清理任务会清理掉这个 worker; workers 是一个 slice,用来存放空闲 worker,请求进入 Pool 之后会首先检查 workers 中是否有空闲 worker,若有则取出绑定任务执行,否则判断当前运行的 worker 是否已经达到容量上限,是 — 阻塞等待,否 — 新开一个 worker 执行任务;release 是当关闭该 Pool 支持通知所有 worker 退出运行以防 goroutine 泄露;lock 是一个锁,用以支持 Pool 的同步操作;once 用在确保 Pool 关闭操作只会执行一次。
初始化 Pool 并启动定期清理过期 worker 任务
// NewPool generates a instance of ants pool
func NewPool(size int) (*Pool, error) {
	return NewTimingPool(size, DefaultCleanIntervalTime)
}

// NewTimingPool generates a instance of ants pool with a custom timed task
func NewTimingPool(size, expiry int) (*Pool, error) {
	if size <= 0 {
		return nil, ErrInvalidPoolSize
	}
	if expiry <= 0 {
		return nil, ErrInvalidPoolExpiry
	}
	p := &Pool{
		capacity:       int32(size),
		freeSignal:     make(chan sig, math.MaxInt32),
		release:        make(chan sig, 1),
		expiryDuration: time.Duration(expiry) * time.Second,
	}
	// 启动定期清理过期worker任务,独立goroutine运行,
	// 进一步节省系统资源
	p.monitorAndClear()
	return p, nil
}
提交任务到 Pool
p.Submit(task f) 实现如下,第一个 if 判断当前 Pool 是否已被关闭,若是则不再接受新任务,否则获取一个 Pool 中可用的 worker,绑定该 task 执行。
// Submit submit a task to pool
func (p *Pool) Submit(task f) error {
	if len(p.release) > 0 {
		return ErrPoolClosed
	}
	w := p.getWorker()
	w.task <- task
	return nil
}
获取可用 worker
p.getWorker() 源码如下。
获取可用 worker 绑定任务执行这个协程池的核心操作,主要就是实现一个 LIFO 队列用来存取可用 worker 达到资源复用的效果,之所以采用 LIFO 后进先出队列,是因为后进先出可以保证空闲 worker 队列是按照每个 worker 的最后运行时间从远到近的顺序排列,方便在后续定期清理过期 worker 时排序以及清理完之后重新分配空闲 worker 队列。
这里还要关注一个地方:达到 Pool 容量限制之后,额外的任务请求需要阻塞等待 idle worker,这里是为了防止无节制地创建 goroutine,事实上 Go 调度器有一个复用机制,每次使用 go 关键字的时候它会检查当前结构体 M 中的 P 中,是否有可用的结构体 G。如果有,则直接从中取一个,否则,需要分配一个新的结构体 G。如果分配了新的 G,需要将它挂到 runtime 的相关队列中,但是调度器却没有限制 goroutine 的数量,这在瞬时性 goroutine 爆发的场景下就可能来不及复用 G 而依然创建了大量的 goroutine,所以 ants 除了复用还做了限制 goroutine 数量。
其他部分可以依照注释理解,这里不再赘述。
// getWorker returns a available worker to run the tasks.
func (p *Pool) getWorker() *Worker {

	var w *Worker

	// 标志变量,判断当前正在运行的worker数量是否已到达Pool的容量上限
	waiting := false

	// 加锁,检测队列中是否有可用worker,并进行相应操作
	p.lock.Lock()

	idleWorkers := p.workers
	n := len(idleWorkers) - 1

	// 当前队列中无可用worker
	if n < 0 {
		// 判断运行worker数目已达到该Pool的容量上限,置等待标志
		waiting = p.Running() >= p.Cap()

	// 当前队列有可用worker,从队列尾部取出一个使用
	} else {
		w = idleWorkers[n]
		idleWorkers[n] = nil
		p.workers = idleWorkers[:n]
	}

	// 检测完成,解锁
	p.lock.Unlock()

	// Pool容量已满,新请求等待
	if waiting {
		// 利用锁阻塞等待直到有空闲worker
		for {
			p.lock.Lock()
			idleWorkers = p.workers
			l := len(idleWorkers) - 1
			if l < 0 {
				p.lock.Unlock()
				continue
			}
			w = idleWorkers[l]
			idleWorkers[l] = nil
			p.workers = idleWorkers[:l]
			p.lock.Unlock()
			break
		}

	// 当前无空闲worker但是Pool还没有满,
	// 则可以直接新开一个worker执行任务
	} else if w == nil {
		w = &Worker{
			pool: p,
			task: make(chan f, 1),
		}
		w.run()

        // 运行worker数加一
		p.incRunning()
	}

	return w
}
任务执行
结合前面的 p.Submit(task f) 和 p.getWorker() ,提交任务到 Pool 之后,获取一个可用 worker,每新建一个 worker 实例之时都需要调用 w.run() 启动一个 goroutine 监听 worker 的任务列表 task ,一有任务提交进来就执行;所以,当调用 worker 的 sendTask(task f) 方法提交任务到 worker 的任务队列之后,马上就可以被接收并执行,当任务执行完之后,会调用 w.pool.putWorker(w *Worker) 方法将这个已经执行完任务的 worker 从当前任务解绑放回 Pool 中,以供下个任务可以使用,至此,一个任务从提交到完成的过程就此结束,Pool 调度将进入下一个循环。
// Worker is the actual executor who runs the tasks,
// it starts a goroutine that accepts tasks and
// performs function calls.
type Worker struct {
	// pool who owns this worker.
	pool *Pool

	// task is a job should be done.
	task chan f

	// recycleTime will be update when putting a worker back into queue.
	recycleTime time.Time
}

// run starts a goroutine to repeat the process
// that performs the function calls.
func (w *Worker) run() {
	go func() {
		// 循环监听任务列表,一旦有任务立马取出运行
		for f := range w.task {
			if f == nil {
                // 退出goroutine,运行worker数减一
				w.pool.decRunning()
				return
			}
			f()
			// worker回收复用
			w.pool.putWorker(w)
		}
	}()
}
Worker 回收(goroutine 复用)
// putWorker puts a worker back into free pool, recycling the goroutines.
func (p *Pool) putWorker(worker *Worker) {
	// 写入回收时间,亦即该worker的最后一次结束运行的时间
	worker.recycleTime = time.Now()
	p.lock.Lock()
	p.workers = append(p.workers, worker)
	p.lock.Unlock()
}
动态扩容或者缩小池容量
// ReSize change the capacity of this pool
func (p *Pool) ReSize(size int) {
	if size == p.Cap() {
		return
	}
	atomic.StoreInt32(&p.capacity, int32(size))
	diff := p.Running() - size
	if diff > 0 {
		for i := 0; i < diff; i++ {
			p.getWorker().task <- nil
		}
	}
}
定期清理过期 Worker
定期检查空闲 worker 队列中是否有已过期的 worker 并清理:因为采用了 LIFO 后进先出队列存放空闲 worker,所以该队列默认已经是按照 worker 的最后运行时间由远及近排序,可以方便地按顺序取出空闲队列中的每个 worker 并判断它们的最后运行时间与当前时间之差是否超过设置的过期时长,若是,则清理掉该 goroutine,释放该 worker,并且将剩下的未过期 worker 重新分配到当前 Pool 的空闲 worker 队列中,进一步节省系统资源。
// clear expired workers periodically.
func (p *Pool) periodicallyPurge() {
	heartbeat := time.NewTicker(p.expiryDuration)
	for range heartbeat.C {
		currentTime := time.Now()
		p.lock.Lock()
		idleWorkers := p.workers
		if len(idleWorkers) == 0 && p.Running() == 0 && len(p.release) > 0 {
			p.lock.Unlock()
			return
		}
		n := 0
		for i, w := range idleWorkers {
			if currentTime.Sub(w.recycleTime) <= p.expiryDuration {
				break
			}
			n = i
			w.task <- nil
			idleWorkers[i] = nil
		}
		n++
		if n >= len(idleWorkers) {
			p.workers = idleWorkers[:0]
		} else {
			p.workers = idleWorkers[n:]
		}
		p.lock.Unlock()
	}
}
How to use
Just imagine that your program starts a massive number of goroutines, resulting in a huge consumption of memory. To mitigate that kind of situation, all you need to do is to import ants package and submit all your tasks to a default pool with fixed capacity, activated when package ants is imported:
package main

import (
	"fmt"
	"sync"
	"sync/atomic"
	"time"

	"github.com/panjf2000/ants/v2"
)

var sum int32

func myFunc(i interface{}) {
	n := i.(int32)
	atomic.AddInt32(&sum, n)
	fmt.Printf("run with %d\n", n)
}

func demoFunc() {
	time.Sleep(10 * time.Millisecond)
	fmt.Println("Hello World!")
}

func main() {
	defer ants.Release()

	runTimes := 1000

	// Use the common pool.
	var wg sync.WaitGroup
	syncCalculateSum := func() {
		demoFunc()
		wg.Done()
	}
	for i := 0; i < runTimes; i++ {
		wg.Add(1)
		_ = ants.Submit(syncCalculateSum)
	}
	wg.Wait()
	fmt.Printf("running goroutines: %d\n", ants.Running())
	fmt.Printf("finish all tasks.\n")

	// Use the pool with a function,
	// set 10 to the capacity of goroutine pool and 1 second for expired duration.
	p, _ := ants.NewPoolWithFunc(10, func(i interface{}) {
		myFunc(i)
		wg.Done()
	})
	defer p.Release()
	// Submit tasks one by one.
	for i := 0; i < runTimes; i++ {
		wg.Add(1)
		_ = p.Invoke(int32(i))
	}
	wg.Wait()
	fmt.Printf("running goroutines: %d\n", p.Running())
	fmt.Printf("finish all tasks, result is %d\n", sum)
	if sum != 499500 {
		panic("the final result is wrong!!!")
	}

	// Use the MultiPool and set the capacity of the 10 goroutine pools to unlimited.
	// If you use -1 as the pool size parameter, the size will be unlimited.
	// There are two load-balancing algorithms for pools: ants.RoundRobin and ants.LeastTasks.
	mp, _ := ants.NewMultiPool(10, -1, ants.RoundRobin)
	defer mp.ReleaseTimeout(5 * time.Second)
	for i := 0; i < runTimes; i++ {
		wg.Add(1)
		_ = mp.Submit(syncCalculateSum)
	}
	wg.Wait()
	fmt.Printf("running goroutines: %d\n", mp.Running())
	fmt.Printf("finish all tasks.\n")

	// Use the MultiPoolFunc and set the capacity of 10 goroutine pools to (runTimes/10).
	mpf, _ := ants.NewMultiPoolWithFunc(10, runTimes/10, func(i interface{}) {
		myFunc(i)
		wg.Done()
	}, ants.LeastTasks)
	defer mpf.ReleaseTimeout(5 * time.Second)
	for i := 0; i < runTimes; i++ {
		wg.Add(1)
		_ = mpf.Invoke(int32(i))
	}
	wg.Wait()
	fmt.Printf("running goroutines: %d\n", mpf.Running())
	fmt.Printf("finish all tasks, result is %d\n", sum)
	if sum != 499500*2 {
		panic("the final result is wrong!!!")
	}
}
Benchmarks
https://github.com/panjf2000/ants/blob/master/ants_test.go
测试结果:
这里为了模拟大规模 goroutine 的场景,两次测试的并发次数分别是 100w 和 1000w,前两个测试分别是执行 100w 个并发任务不使用 Pool 和使用了 ants 的 Goroutine Pool 的性能,后两个则是 1000w 个任务下的表现。
可以直观的看出在执行速度和内存使用上,ants 的 Pool 都占有明显的优势。100w 的任务量,使用 ants ,执行速度与原生 goroutine 相当甚至略快,但只实际使用了不到 5w 个 goroutine 完成了全部任务,且内存消耗仅为原生并发的 40%;而当任务量达到 1000w,优势则更加明显了:用了 70w 左右的 goroutine 完成全部任务,执行速度比原生 goroutine 提高了 100%,且内存消耗依旧保持在不使用 Pool 的 40% 左右。
总结
至此,一个高性能的 Goroutine Pool 开发就完成了,事实上,原理不难理解,总结起来就是一个复用,具体落实到代码细节就是锁同步、原子操作、channel 通信等这些技巧的使用,ant 这整个项目没有借助任何第三方的库,用 golang 的标准库就完成了所有功能,因为本身 golang 的语言原生库已经足够优秀,很多时候开发 golang 项目的时候是可以保持轻量且高性能的,未必事事需要借助第三方库。
关于 ants 的价值,其实前文也提及过了, ants 在大规模的异步和同步批量任务处理都有着明显的性能优势(特别是异步批量任务),而单机上百万上千万的同步批量任务处理现实意义不大,但是在异步批量任务处理方面有很大的应用价值,所以我个人觉得,Goroutine Pool 真正的价值还是在:
- 限制并发的 goroutine 数量
- 复用 goroutine,减轻 runtime 调度压力,提升程序性能
- 规避过多的 goroutine 侵占系统资源(CPU&内存)
任务调度策略
Scheduling can be done at the kernel level or user level, and multitasking can be done preemptively or cooperatively.

同步等待处理模型
- 优点:可以按照人的正常思维实现业务逻辑,开发效率高。
- 缺点:同步接口会导致排队和毛刺现象,并发处理能力弱。
异步多路复用处理模型
- 优点:并发处理能力强。
- 缺点:需要处理各种回调,业务代码实现复杂,开发效率低。
协程(同步编程异步执行)处理模型
进程和线程是抢占式切换,不知道会在什么时刻发生切换,操作系统为了切换到另外的线程再切回到原来的位置,需要保存大部分的寄存器和其他信息。而协程在网络IO函数里发现可能堵塞的情况下进行主动切换,只需要保存函数调用路径中可能发生变化的寄存器(ESP、EIP以及callee-saved寄存器),因此协程之间的切换更高效。
- 优点:
- without race conditions
- light-weight context switch
- understandable (First do this, then do that)
- 缺点:
- responsiveness (can not use blocking system calls)
- coroutine crashes a process
- explicit scheduling/starving problem (Preemptive multithreading is generally considered the superior approach, as it allows the operating system to determine when a context switch should occur.)
goroutine 协程
在 GoLang 中使用 goroutine (a lightweight thread managed by the Go runtime) 来实现并发程序。
go f(x, y, z)
starts a new goroutine running f(x, y, z)
The evaluation of f, x, y, and z happens in the current goroutine and the execution off happens in the new goroutine.
Goroutines run in the same address space, so access to shared memory must be synchronized. The sync package provides useful primitives, although you won’t need them much in Go as there are other primitives. (Channels)
使用示例
package main

import (
	"fmt"
	"time"
)

func main() {

	// A goroutine is a lightweight thread managed by the Go runtime
	//  Goroutines run in the same address space, so access to shared memory must be synchronized
	go say("world")
	say("hello")

	fmt.Println("---------------1")

	a := []int{7, 2, 8, -9, 4, 0}

	// Channels are a typed conduit through which you can send and receive values with the channel operator, <-
	// By default, sends and receives block until the other side is ready. This allows goroutines to synchronize without explicit locks or condition variables
	c := make(chan int)
	go sum(a[:len(a)/2], c)
	go sum(a[len(a)/2:], c)
	x, y := <-c, <-c // receive from c

	fmt.Println(x, y, x+y)

	fmt.Println("---------------2")

	// Channels can be buffered. Provide the buffer length as the second argument to make to initialize a buffered channel
	c2 := make(chan int, 2)
	c2 <- 1
	c2 <- 2
	//c2 <- 3// error, the send buffer is full that will causes deadlock!
	fmt.Println(<-c2)
	fmt.Println(<-c2)
	//fmt.Println(<-c2)// error, the receive buffer is empty that will causes deadlock too!

	fmt.Println("---------------3")
	c3 := make(chan int, 10)
	go fibonacci(cap(c3), c3)
	for i := range c3 {
		fmt.Println(i)
	}

	fmt.Println("---------------4")
	c4 := make(chan int)
	quit := make(chan int)
	go func() {
		for i := 0; i < 10; i++ {
			fmt.Println(<-c4)
		}
		quit <- 0
	}()
	fibonacci2(c4, quit)

	fmt.Println("---------------5")
	// The default case in a select is run if no other case is ready
	// Use a default case to try a send or receive without blocking
	tick := time.Tick(100 * time.Millisecond)
	boom := time.After(500 * time.Millisecond)
	for {
		select {
		case <-tick:
			fmt.Println("tick. ")
		case <-boom:
			fmt.Println("BOOM!")
			return
		default:
			fmt.Println("    .")
			time.Sleep(50 * time.Millisecond)
		}
	}

}

func say(s string) {
	for i := 0; i < 5; i++ {
		time.Sleep(100 * time.Millisecond)
		fmt.Println(s)
	}
}

func sum(a []int, c chan int) {
	sum := 0
	for _, v := range a {
		sum += v
	}
	c <- sum // send sum to c
}

func fibonacci(n int, c chan int) {
	x, y := 0, 1
	for i := 0; i < n; i++ {
		c <- x
		x, y = y, x+y
	}
	// Note: Only the sender should close a channel, never the receiver. Sending on a closed channel will cause a panic
	// Another note: Channels aren't like files; you don't usually need to close them. Closing is only necessary when the receiver must be told there are no more values coming, such as to terminate a range loop
	close(c)
}

// The select statement lets a goroutine wait on multiple communication operations
// A select blocks until one of its cases can run, then it executes that case. It chooses one at random if multiple are ready
func fibonacci2(c, quit chan int) {
	x, y := 0, 1
	for {
		select {
		case c <- x:
			x, y = y, x+y
		case <-quit:
			fmt.Println("quit")
			return
		}
	}
}
/*
output:
hello
world
hello
world
hello
world
hello
world
hello
---------------1
world
17 -5 12
---------------2
1
2
---------------3
0
1
1
2
3
5
8
13
21
34
---------------4
0
1
1
2
3
5
8
13
21
34
quit
---------------5
    .
    .
tick.
    .
    .
tick.
    .
    .
tick.
    .
    .
tick.
    .
    .
BOOM!
*/
顺序管道模式
利用管道如何进行并发计算,需要注意 go 的管道是双向的,而 UNIX 管道是单向的。
本例参考《Go语言程序设计》第七章的一个例子,并添加了一些注释。
package main

import (
	"flag"
	"fmt"
	"log"
	"os"
	"path/filepath"
	"runtime"
	"strings"
)

func main() {

	// Use all the machine's cores
	runtime.GOMAXPROCS(runtime.NumCPU())
	log.SetFlags(0)

	// 处理命令行参数
	algorithm, minSize, maxSize, suffixes, files := handleCommandLine()

	// 开始计算操作
	if algorithm == 1 {
		// 算法1是并行计算, 通过创建各个的goroutine

		// step1: 先通过source函数处理文件列表, 并把处理结果返回到管道里
		// step2: 将符合后缀的文件放到管道里
		// step3: 将符合大小的文件放到管道里
		// step4: 从管道获取结果数据
		sink(filterSize(minSize, maxSize, filterSuffixes(suffixes, source(files))))
	} else {

		// 算法2是串行计算
		channel1 := source(files)
		channel2 := filterSuffixes(suffixes, channel1)
		channel3 := filterSize(minSize, maxSize, channel2)
		sink(channel3)
	}
}

// 命令行参数解析操作
func handleCommandLine() (algorithm int, minSize, maxSize int64,
	suffixes, files []string) {

	// 将命令行参数绑定到对应的变量中
	// algorithm默认为1
	flag.IntVar(&algorithm, "algorithm", 1, "1 or 2")
	// minSize和maxSize默认为-1, 表示没有限制
	flag.Int64Var(&minSize, "min", -1,
		"minimum file size (-1 means no minimum)")
	flag.Int64Var(&maxSize, "max", -1,
		"maximum file size (-1 means no maximum)")
	// suffixes后缀列表默认为空
	var suffixesOpt *string = flag.String("suffixes", "",
		"comma-separated list of file suffixes")

	// 命令行预处理
	flag.Parse()

	if algorithm != 1 && algorithm != 2 {
		algorithm = 1
	}
	if minSize > maxSize && maxSize != -1 {
		// Fatalln is equivalent to Println() followed by a call to os.Exit(1)
		log.Fatalln("minimum size must be < maximum size")
	}

	// 将后缀列表用逗号分隔, 返回suffixes后缀切片
	suffixes = []string{}
	if *suffixesOpt != "" {
		suffixes = strings.Split(*suffixesOpt, ",")
	}

	// Args returns the non-flag command-line arguments
	// 认为非命令选项的参数全为文件参数
	files = flag.Args()
	return algorithm, minSize, maxSize, suffixes, files
}

// 创建管道, 处理文件列表并把结果返回到管道里
func source(files []string) <-chan string {
	out := make(chan string, 1000)
	go func() {
		for _, filename := range files {
			out <- filename
		}
		close(out)
	}()
	return out
}

// 将符合后缀的文件放到管道里
// 根据后缀切片处理管道里的文件, 同样再把结果返回到管道里
// make the buffer the same size as for files to maximize throughput
func filterSuffixes(suffixes []string, in <-chan string) <-chan string {
	out := make(chan string, cap(in))
	go func() {
		for filename := range in {

			// 没有限制后缀的话, 则直接将文件塞到管道里
			if len(suffixes) == 0 {
				out <- filename
				continue
			}

			// 获取文件列表的后缀, 且全部转换为小写
			// Ext returns the file name extension used by path. The extension is the suffix beginning at the final dot in the final element of path; it is empty if there is no dot
			ext := strings.ToLower(filepath.Ext(filename))
			for _, suffix := range suffixes {
				if ext == suffix {
					out <- filename
					break
				}
			}
		}
		close(out)
	}()
	return out
}

// 将符合文件大小的文件放到管道里
// make the buffer the same size as for files to maximize throughput
func filterSize(minimum, maximum int64, in <-chan string) <-chan string {
	out := make(chan string, cap(in))
	go func() {
		for filename := range in {

			// 对文件大小没有限制, 直接将文件塞到管道里
			if minimum == -1 && maximum == -1 {
				out <- filename // don't do a stat call it not needed
				continue
			}

			// 使用操作系统的接口获取文件大小等信息
			// Stat returns a FileInfo describing the named file. If there is an error, it will be of type *PathError
			/*
							type FileInfo interface {
				        Name() string       // base name of the file
				        Size() int64        // length in bytes for regular files; system-dependent for others
				        Mode() FileMode     // file mode bits
				        ModTime() time.Time // modification time
				        IsDir() bool        // abbreviation for Mode().IsDir()
				        Sys() interface{}   // underlying data source (can return nil)
				}
			*/
			finfo, err := os.Stat(filename)
			if err != nil {
				continue // ignore files we can't process
			}
			size := finfo.Size()
			if (minimum == -1 || minimum > -1 && minimum <= size) &&
				(maximum == -1 || maximum > -1 && maximum >= size) {
				out <- filename
			}
		}
		close(out)
	}()
	return out
}

// 从管道获取结果数据
func sink(in <-chan string) {
	for filename := range in {
		fmt.Println(filename)
	}
}

/*
output:
mba:go gerryyang$ ./filter_t -min 1 -suffixes ".cpp" ../c++11/range_for.cpp ../c++11/test ../c++11/test.cpp routines.go
../c++11/range_for.cpp
../c++11/test.cpp
mba:go gerryyang$ ./filter_t -min 1 -max -2 -suffixes ".cpp" ../c++11/range_for.cpp ../c++11/test ../c++11/test.cpp routines.go jjjj
minimum size must be < maximum size
*/
多任务独立模式
并发编程的一种常见方式是有多个任务需要同时处理,并且每个任务都可以独立地完成。在 go 语言里每个任务都在一个独立的 goroutine(协程)里处理,和其他协程之间没有任何通信。下面通过 go 语言的方式模拟一个经典的独立多任务并发模式,程序创建了 3 个带有缓冲区的双向通道,所有的工作都会分发给工作协程来处理,协程的总数量和当前机器的处理器数量相当,将不必要的阻塞尽可能降到最低。
并发编程是 go 语言的最大优势,而协程是实现这一优势的手段。只要需要在函数调用前加上关键字 go,这个函数就会以一个单位协程的形式执行。go 语言向线程派发这些函数的执行,当一个协程阻塞时,调度器会把其他协程转移到其他的线程中去执行,从而实现无等待的并行运行。协程的优势是减少资源的 context 切换提高执行效率,但缺点是不易于调试,需要调度器提供相关调试工具。
package main

import (
	"fmt"
	"runtime"
)

var workers = runtime.NumCPU()

type Result struct {
	jobname    string
	resultcode int
	resultinfo string
}

type Job struct {
	jobname string
	results chan<- Result
}

func main() {

	// go语言里大多数并发程序的开始处都有这一行代码, 但这行代码最终将会是多余的,
	// 因为go语言的运行时系统会变得足够聪明以自动适配它所运行的机器
	runtime.GOMAXPROCS(runtime.NumCPU())

	// 返回当前处理器的数量
	//fmt.Println(runtime.GOMAXPROCS(0))
	// 返回当前机器的逻辑处理器或者核心的数量
	//fmt.Println(runtime.NumCPU())

	// 模拟8个工作任务
	jobnames := []string{"gerry", "wcdj", "golang", "C++", "Lua", "perl", "python", "C"}
	doRequest(jobnames)
}

func doRequest(jobnames []string) {

	// 定义需要的channels切片
	jobs := make(chan Job, workers)
	results := make(chan Result, len(jobnames))
	done := make(chan struct{}, workers)

	// ---------------------------------------------
	/*
	 * 下面是go协程并发处理的一个经典框架
	 */

	// 将需要并发处理的任务添加到jobs的channel中
	go addJobs(jobs, jobnames, results) // Executes in its own goroutine

	// 根据cpu的数量启动对应个数的goroutines从jobs争夺任务进行处理
	for i := 0; i < workers; i++ {
		go doJobs(done, jobs) // Each executes in its own goroutine
	}
	// 新创建一个接受结果的routine, 等待所有worker routiines的完成结果, 并将结果通知主routine
	go awaitCompletion(done, results)
	// 在主routine输出结果
	processResults(results)
	// ---------------------------------------------
}
func addJobs(jobs chan<- Job, jobnames []string, results chan<- Result) {
	for _, jobname := range jobnames {

		// 在channel中添加任务
		jobs <- Job{jobname, results}
	}
	close(jobs)
}

func doJobs(done chan<- struct{}, jobs <-chan Job) {

	// 在channel中取出任务并计算
	for job := range jobs {

		/*
		 * 定义类型自己的方法来处理业务逻辑, 实现框架和业务分离
		 */
		job.Do()
	}

	// 所有任务完成后的结束标志, 一个空结构体切片
	done <- struct{}{}
}

// 方法是作用在自定义类型的值上的一类特殊函数
func (job Job) Do() {

	// 打印当前处理的任务名称
	fmt.Printf("... doing work in [%s]\n", job.jobname)

	// 模拟处理结果
	if job.jobname == "golang" {
		job.results <- Result{job.jobname, 0, "OK"}
	} else {
		job.results <- Result{job.jobname, -1, "Error"}
	}
}

func awaitCompletion(done <-chan struct{}, results chan Result) {
	for i := 0; i < workers; i++ {
		<-done
	}
	close(results)
}

func processResults(results <-chan Result) {
	for result := range results {
		fmt.Printf("done: %s,%d,%s\n", result.jobname, result.resultcode, result.resultinfo)
	}
}
package main

import (
	"bufio"
	"bytes"
	"fmt"
	"io"
	"log"
	"os"
	"path/filepath"
	"regexp"
	"runtime"
)

var workers = runtime.NumCPU()

type Result struct {
	filename string
	lino     int
	line     string
}

type Job struct {
	filename string
	results  chan<- Result
}

func main() {

	// go语言里大多数并发程序的开始处都有这一行代码, 但这行代码最终将会是多余的,
	// 因为go语言的运行时系统会变得足够聪明以自动适配它所运行的机器
	runtime.GOMAXPROCS(runtime.NumCPU())

	// 返回当前处理器的数量
	fmt.Println(runtime.GOMAXPROCS(0))
	// 返回当前机器的逻辑处理器或者核心的数量
	fmt.Println(runtime.NumCPU())

	// Args hold the command-line arguments, starting with the program name
	if len(os.Args) < 3 || os.Args[1] == "-h" || os.Args[1] == "--help" {

		// Base returns the last element of path. Trailing path separators are removed before extracting the last element. If the path is empty, Base returns ".". If the path consists entirely of separators, Base returns a single separator
		fmt.Printf("usage: %s <regexp> <files>\n",
			filepath.Base(os.Args[0]))
		// Exit causes the current program to exit with the given status code. Conventionally, code zero indicates success, non-zero an error. The program terminates immediately; deferred functions are not run
		os.Exit(1)
	}

	// Compile parses a regular expression and returns, if successful, a Regexp object that can be used to match against text
	if lineRx, err := regexp.Compile(os.Args[1]); err != nil {
		log.Fatalf("invalid regexp: %s\n", err)
	} else {
		grep(lineRx, commandLineFiles(os.Args[2:]))
	}
}

func commandLineFiles(files []string) []string {

	// Package runtime contains operations that interact with Go's runtime system, such as functions to control goroutines. It also includes the low-level type information used by the reflect package; see reflect's documentation for the programmable interface to the run-time type system
	// GOOS is the running program's operating system target: one of darwin, freebsd, linux, and so on
	if runtime.GOOS == "windows" {
		args := make([]string, 0, len(files))
		for _, name := range files {

			// Glob returns the names of all files matching pattern or nil if there is no matching file. The syntax of patterns is the same as in Match. The pattern may describe hierarchical names such as /usr/*/bin/ed (assuming the Separator is '/')
			if matches, err := filepath.Glob(name); err != nil {
				args = append(args, name) // Invalid pattern
			} else if matches != nil { // At least one match
				args = append(args, matches...)
			}
		}
		return args
	}
	return files
}

func grep(lineRx *regexp.Regexp, filenames []string) {

	// 定义需要的channels切片
	jobs := make(chan Job, workers)
	results := make(chan Result, minimum(1000, len(filenames)))
	done := make(chan struct{}, workers)

	// ---------------------------------------------
	/*
	 * 下面是go协程并发处理的一个经典框架
	 */

	// 将需要并发处理的任务添加到jobs的channel中
	go addJobs(jobs, filenames, results) // Executes in its own goroutine

	// 根据cpu的数量启动对应个数的goroutines从jobs争夺任务进行处理
	for i := 0; i < workers; i++ {
		go doJobs(done, lineRx, jobs) // Each executes in its own goroutine
	}
	// 新创建一个接受结果的routine, 等待所有worker routiines的完成结果, 并将结果通知主routine
	go awaitCompletion(done, results)
	// 在主routine输出结果
	processResults(results)
	// ---------------------------------------------
}
func addJobs(jobs chan<- Job, filenames []string, results chan<- Result) {
	for _, filename := range filenames {

		// 在channel中添加任务
		jobs <- Job{filename, results}
	}
	close(jobs)
}

func doJobs(done chan<- struct{}, lineRx *regexp.Regexp, jobs <-chan Job) {

	// 在channel中取出任务并计算
	for job := range jobs {

		/*
		 * 定义类型自己的方法来处理业务逻辑
		 */
		job.Do(lineRx)
	}

	// 所有任务完成后的结束标志, 一个空结构体切片
	done <- struct{}{}
}

// 方法是作用在自定义类型的值上的一类特殊函数
func (job Job) Do(lineRx *regexp.Regexp) {
	file, err := os.Open(job.filename)
	if err != nil {
		log.Printf("error: %s\n", err)
		return
	}
	// 延迟释放, 类似C++中的析构函数
	defer file.Close()

	// NewReader returns a new Reader whose buffer has the default size
	reader := bufio.NewReader(file)
	for lino := 1; ; lino++ {

		// ReadBytes reads until the first occurrence of delim in the input, returning a slice containing the data up to and including the delimiter. If ReadBytes encounters an error before finding a delimiter, it returns the data read before the error and the error itself (often io.EOF). ReadBytes returns err != nil if and only if the returned data does not end in delim. For simple uses, a Scanner may be more convenient
		line, err := reader.ReadBytes('\n')

		// Package bytes implements functions for the manipulation of byte slices. It is analogous to the facilities of the strings package
		// TrimRight returns a subslice of s by slicing off all trailing UTF-8-encoded Unicode code points that are contained in cutset
		line = bytes.TrimRight(line, "\n\r")

		// Match reports whether the Regexp matches the byte slice b
		if lineRx.Match(line) {

			// 若匹配则将文件名, 行号, 匹配的行存在结果集里, 结果集是一个管道类型
			job.results <- Result{job.filename, lino, string(line)}
		}

		// 读文件出错
		if err != nil {
			if err != io.EOF {
				log.Printf("error:%d: %s\n", lino, err)
			}
			break
		}
	}
}

func awaitCompletion(done <-chan struct{}, results chan Result) {
	for i := 0; i < workers; i++ {
		<-done
	}
	close(results)
}

func processResults(results <-chan Result) {
	for result := range results {
		fmt.Printf("%s:%d:%s\n", result.filename, result.lino, result.line)
	}
}

func minimum(x int, ys ...int) int {
	for _, y := range ys {
		if y < x {
			x = y
		}
	}
	return x
}
通知多个子 goroutine 退出运行
全局共享变量
这是最简单的实现控制并发的方式,实现步骤是:
- 声明一个全局变量;
- 所有子 goroutine 共享这个变量,并不断轮询这个变量检查是否有更新;
- 在主进程中变更该全局变量;
- 子 goroutine 检测到全局变量更新,执行相应的逻辑。
全局变量的优势是简单方便,不需要过多繁杂的操作,通过一个变量就可以控制所有子 goroutine 的开始和结束;缺点是功能有限,由于架构所致,该全局变量只能是多读一写,否则会出现数据同步问题,当然也可以通过给全局变量加锁来解决这个问题,但那就增加了复杂度。另外这种方式不适合用于子 goroutine 间的通信,因为全局变量可以传递的信息很小;还有就是主进程无法等待所有子 goroutine 退出,因为这种方式只能是单向通知,所以这种方法只适用于非常简单的逻辑且并发量不太大的场景,一旦逻辑稍微复杂一点,这种方法就有点捉襟见肘。
package main

import (
	"fmt"
	"time"
)

func main() {
	running := true
	f := func() {
		for running {
			fmt.Println("sub proc running...")
			time.Sleep(1 * time.Second)
		}
		fmt.Println("sub proc exit")
	}
	go f()
	go f()
	go f()

	time.Sleep(2 * time.Second)
	running = false
	time.Sleep(3 * time.Second)

	fmt.Println("main proc exit")
}
channel通信
另一种更为通用且灵活的实现控制并发的方式是使用 channel 进行通信。channel 是 Go 中的一个核心类型,可以把它看成一个管道,通过它并发核心单元就可以发送或者接收数据进行通讯。要想理解 channel 要先知道 CSP 模型。
CSP是Communicating Sequential Process的简称,中文可以叫做通信顺序进程,是一种并发编程模型,由 Tony Hoare 于 1977 年提出。简单来说,CSP 模型由并发执行的实体(线程或者进程)所组成,实体之间通过发送消息进行通信,这里发送消息时使用的就是通道,或者叫channel。CSP 模型的关键是关注 channel,而不关注发送消息的实体。Go 语言实现了 CSP 部分理论,goroutine 对应 CSP 中并发执行的实体,channel 也就对应着 CSP 中的 channel。也就是说,CSP 描述这样一种并发模型:多个 Process 使用一个 channel 进行通信, 这个 channel 连结的 Process 通常是匿名的,消息传递通常是同步的(有别于 Actor Model)。
这里可以实现优雅等待所有子 goroutine 完全结束之后主进程才结束退出,借助了标准库 sync 里的 Waitgroup,这是一种控制并发的方式,可以实现对多 goroutine 的等待,官方文档是这样描述的:
A WaitGroup waits for a collection of goroutines to finish. The main goroutine calls Add to set the number of goroutines to wait for. Then each of the goroutines runs and calls Done when finished. At the same time, Wait can be used to block until all goroutines have finished.
简单来讲,它的源码里实现了一个类似计数器的结构,记录每一个在它那里注册过的协程,然后每一个协程完成任务之后需要到它那里注销,然后在主进程那里可以等待直至所有协程完成任务退出。 使用步骤:
- 创建一个 Waitgroup 的实例
wg - 在每个 goroutine 启动的时候,调用
wg.Add(1)注册 - 在每个 goroutine 完成任务后退出之前,调用
wg.Done()注销 - 在等待所有 goroutine 的地方调用
wg.Wait()阻塞进程,直到所有 goroutine 都完成任务调用wg.Done()注销之后,Wait()方法会返回
package main

import (
    "fmt"
    "os"
    "os/signal"
    "sync"
    "syscall"
    "time"
)

func consumer(stop <-chan bool) {
	for {
		select {
		case <-stop:
			fmt.Println("exit sub goroutine")
			return
		default:
			fmt.Println("running...")
			time.Sleep(500 * time.Millisecond)
		}
	}
}

func waitForSignal() {
    sigs := make(chan os.Signal)
    signal.Notify(sigs, os.Interrupt)
    signal.Notify(sigs, syscall.SIGTERM)
    <-sigs
}

func main() {
		stop := make(chan bool)
        var wg sync.WaitGroup

        // Spawn example consumers
        for i := 0; i < 3; i++ {
            wg.Add(1)
            go func(stop <-chan bool) {
                defer wg.Done()
                consumer(stop)
            }(stop)
        }

        waitForSignal()
        close(stop)
        fmt.Println("stopping all jobs!")

        wg.Wait()
}
该示例程序是一种 golang 的 select + channel 的典型用法,我们来稍微深入一点分析一下这种典型用法:
首先了解下 channel,可以理解为管道,它的主要功能点是:
- 队列存储数据
- 阻塞和唤醒 goroutine
channel 实现集中在文件 runtime/chan.go 中,channel底层数据结构是这样的:
type hchan struct {
    qcount   uint           // 队列中数据个数
    dataqsiz uint           // channel 大小
    buf      unsafe.Pointer // 存放数据的环形数组
    elemsize uint16         // channel 中数据类型的大小
    closed   uint32         // 表示 channel 是否关闭
    elemtype *_type // 元素数据类型
    sendx    uint   // send 的数组索引
    recvx    uint   // recv 的数组索引
    recvq    waitq  // 由 recv 行为(也就是 <-ch)阻塞在 channel 上的 goroutine 队列
    sendq    waitq  // 由 send 行为 (也就是 ch<-) 阻塞在 channel 上的 goroutine 队列

    // lock protects all fields in hchan, as well as several
    // fields in sudogs blocked on this channel.
    //
    // Do not change another G's status while holding this lock
    // (in particular, do not ready a G), as this can deadlock
    // with stack shrinking.
    lock mutex
}
从源码可以看出它其实就是一个队列加一个锁(轻量),代码本身不复杂,但涉及到上下文很多细节,故而不易通读,有兴趣的同学可以去看一下,我的建议是,从上面总结的两个功能点出发,一个是 ring buffer,用于存数据;一个是存放操作(读写)该 channel 的 goroutine 的队列。
- buf 是一个通用指针,用于存储数据,看源码时重点关注对这个变量的读写
- recvq 是读操作阻塞在 channel 的 goroutine 列表,sendq 是写操作阻塞在 channel 的 goroutine 列表。列表的实现是 sudog,其实就是一个对 g 的结构的封装,看源码时重点关注,是怎样通过这两个变量阻塞和唤醒 goroutine 的
然后是 select 机制,golang 的 select 机制可以理解为是在语言层面实现了和 select, poll, epoll 相似的功能。监听多个描述符的读/写等事件,一旦某个描述符就绪(一般是读或者写事件发生了),就能够将发生的事件通知给关心的应用程序去处理该事件。 golang 的 select 机制是,监听多个 channel,每一个 case 是一个事件,可以是读事件也可以是写事件,随机选择一个执行,可以设置default,它的作用是:当监听的多个事件都阻塞住会执行 default 的逻辑。
select 的源码在 runtime/select.go,看的时候建议是重点关注 pollorder 和 lockorder
- pollorder 保存的是 scase 的序号,乱序是为了之后执行时的随机性。
- lockorder 保存了所有 case 中 channel 的地址,这里按照地址大小堆排了一下 lockorder 对应的这片连续内存。对 chan 排序是为了去重,保证之后对所有 channel 上锁时不会重复上锁。
具体到 demo 代码:
consumer 为协程的具体代码,里面是只有一个不断轮询 channel 变量 stop 的循环,所以主进程是通过 stop 来通知子协程何时该结束运行的,在 main 方法中,close 掉 stop 之后,读取已关闭的 channel 会立刻返回该 channel 数据类型的零值,因此子 goroutine 里的 <-stop 操作会马上返回,然后退出运行。
事实上,通过 channel 控制子 goroutine 的方法可以总结为:循环监听一个 channel,一般来说是 for 循环里放一个 select 监听 channel 以达到通知子 goroutine 的效果。再借助 Waitgroup,主进程可以等待所有协程优雅退出后再结束自己的运行,这就通过 channel 实现了优雅控制 goroutine 并发的开始和结束。
channel 通信控制基于 CSP 模型,相比于传统的线程与锁并发模型,避免了大量的加锁解锁的性能消耗,而又比 Actor 模型更加灵活,使用 Actor 模型时,负责通讯的媒介与执行单元是紧耦合的。每个Actor 都有一个信箱。而使用 CSP 模型,channel 是第一对象,可以被独立地创建,写入和读出数据,更容易进行扩展。
Go scheduler
In Go, each concurrently executing activity is called a goroutine.
f();      // call f() wait for it to return
go f();   // create a new goroutine that calls f() don't wait
Why create a userspace scheduler when the operating system can schedule threads for you? The Go scheduler (Go 1.1 is the new scheduler)
Here are 2 threads (M), each holding a context (P), each running a goroutine (G). In order to run goroutines, a thread must hold a context. The number of contexts is set on startup to the value of the GOMAXPROCS environment variable or through the runtime function GOMAXPROCS().

syscall
a thread giving up its context so that another thread can run it. The scheduler makes sure there are enough threads to run all contexts.
Stealing work
When a context runs out, it will try to steal about half of the runqueue from another context. This makes sure there is always work to do on each of the contexts, which in turn makes sure that all threads are working at their maximum capacity.
go 1.2 之前,goroutine 只会在两种情况下被调度: runtime.GoSched() 和 systemcall。但是从 1.2 开始,为了避免饿死其它 goroutine,在发生任意函数调用的时候,都有机会触发scheduler。所以从 1.2 开始如果 goroutine 中是纯计算,没有任何系统调用,scheduler 仍然有机会介入,不会永远独占 CPU。(Refer: preemptive scheduling)
一些思考
Multitasking
- time-sharing (1960s,voluntarily/hardware interrupt to relinquish the CPU)
- real-time (real-time constraint)
- Multiple processes(heavyweight)are allowed to share processors (CPUs) and other system resources.
- Threads(lightweight)are scheduled preemptively and are described as lightweight processes because switching between threads does not involve changing the memory context. It can make use of machines with multiple processors.
- Others ?
Context Switch
Most commonly, within some scheduling scheme, one process must be switched out of the CPU so another process can run. This context switch can be triggered by the process making itself unrunnable, such as by waiting for an I/O or synchronization operation to complete. On a pre-emptive multitasking system, the scheduler may also switch out processes which are still runnable. To prevent other processes from being starved of CPU time, preemptive schedulers often configure a timer interrupt to fire when a process exceeds its time slice. This interrupt ensures that the scheduler will gain control to perform a context switch.
In computing, a context switch is the process of storing and restoring the state (more specifically, the execution context) of a process or thread so that execution can be resumed from the same point at a later time. This enables multiple processes to share a single CPU and is an essential feature of a multitasking operating system.
- thread switch/process switch/task switch
- mode switch (switching between user mode and kernel mode)
- register switch
- stack frame switch
- address space switch (changing virtual memory to physical memory map)
The cost of context switches ?
Context switches are usually computationally intensive. Switching from one process to another requires a certain amount of time for doing the administration - saving and loading registers and memory maps, updating various tables and lists, etc. For example, in the Linux kernel, context switching involves switching registers, stack pointer, and program counter.
Context switching can be selective and store only those registers that need storing ?
- context switching between threads in the same process is typically faster than context switching between processes. Thread switching is relatively cheap: it requires a context switch (saving and restoring registers and stack pointer), but does not change virtual memory and is thus cache-friendly (leaving TLB valid).
- a context switch between threads requires system calls (involving the OS kernel), which can cost more than thousand CPU cycles on x86 CPUs. By contrast, transferring control among them requires only fewer than hundred CPU cycles because it does not involve system calls as it is done within a single thread.
- Making coroutines fast (reuse of stacks and a lightweight swapcontext implementation.)
Pre-emptive multitasking (time slice/instruction cycle) VS co-operative multitasking (non-preemptive multitasking) ?
Preemptive multitasking involves the use of an interrupt mechanism which suspends the currently executing process and invokes a scheduler to determine which process should execute next. Therefore, all processes will get some amount of CPU time at any given time.
As a cooperatively multitasked system relies on each process regularly giving up time to other processes on the system, one poorly designed program can consume all of the CPU time for itself, either by performing extensive calculations or by busy waiting; both would cause the whole system to hang. In a server environment, this is a hazard that makes the entire environment unacceptably fragile. A cooperative multitasking system wherein processes or tasks must be explicitly programmed to yield when they do not need system resources.
User thread: Coroutines(a language-level construct)
Coroutines(a language-level construct)are computer program components that generalize subroutines for nonpreemptive multitasking, by allowing multiple entry points for suspending and resuming execution at certain locations. Coroutines are well-suited for implementing more familiar program components such as cooperative tasks, exceptions, event loop, iterators, infinite lists and pipes.
According to Donald Knuth, the term coroutine was coined by Melvin Conway in 1958. Coroutines originated as an assembly language method, but are supported in some high-level programming languages. Early examples include Simula(1965) and Modula-2(1978). More recent examples are Ruby(1995), Lua(1993), and Go(2009).
var q := new queue

coroutine produce
    loop
        while q is not full
            create some new items
            add the items to q
        yield to consume

coroutine consume
    loop
        while q is not empty
            remove some items from q
            use the items
        yield to produce
yield:In computer science, yield is an action that occurs in a computer program during multithreading, of forcing a processor to relinquish control of the current running thread, and sending it to the end of the running queue, of the same scheduling priority.
switch-case
Stack-based coroutines
利用 switch-case 的分支跳转特性,以及预编译的 __LINE__ 宏,实现了一种隐式状态机,最终实现了 yield 语义。
// have ten successive calls to the function return the numbers 0 through 9.
#include <stdio.h>

int function(void)
{
    static int i = 0;
    for (; i < 10; ) {
        return i++;
    }

    return 0;
}

int function2(void) {
    static int i, state = 0;
    switch (state) {
    case 0: goto LABEL0;
    case 1: goto LABEL1;
    }
LABEL0: /* start of function */
    for (i = 0; i < 10; i++) {
        state = 1; /* so we will come back to LABEL1 */
        return i;
LABEL1:; /* resume control straight after the return */
    }

    return -1;
}

int function3(void)
{
    static int i, state = 0;
    switch (state) {
    case 0: /* start of function */
        for (i = 0; i < 10; i++) {
            state = 1; /* so we will come back to "case 1" */
            return i;
        case 1:; /* resume control straight after the return */
        }
    }

    return -1;
}

int function4(void)
{
    static int i, state = 0;
    switch (state) {
    case 0: /* start of function */
        for (i = 0; i < 10; i++) {
            state = __LINE__ + 2; /* so we will come back to "case __LINE__" */
            return i;
        case __LINE__:; /* resume control straight after the return */
        }
    }

    return -1;
}

#define Begin() static int state=0; switch(state) { case 0:
#define Yield(x) do { state=__LINE__; return x; case __LINE__:; } while (0)
#define End() }
int function5(void)
{
    static int i;
    Begin();
    for (i = 0; i < 10; i++)
        Yield(i);
    End();

    return -1;
}

int main(int argc, char *argv[])
{
    printf("function() return [%d]\n", function());
    printf("function() return [%d]\n", function());

    printf("function2() return [%d]\n", function2());
    printf("function2() return [%d]\n", function2());

    printf("function3() return [%d]\n", function3());
    printf("function3() return [%d]\n", function3());

    printf("function4() return [%d]\n", function4());
    printf("function4() return [%d]\n", function4());

    printf("function5() return [%d]\n", function5());
    printf("function5() return [%d]\n", function5());

    return 0;
}
non-local jump
早期 C 语言标准不支持嵌套函数声明(Boost.Lambda 和 C++11 的 lambda 已经支持),因此 goto 只能完成在同一个函数中的跳转。而 setjmp()/longjmp() 可以从嵌套函数中跳出。
#include <stdio.h>
#include <stdlib.h>
#include <setjmp.h>

static jmp_buf env;

static void func(int rvar, int vvar)
{
    printf("func(): rvar[%d] vvar[%d]\n", rvar, vvar);
    longjmp(env, 1);
}

int main(int argc, char *argv[])
{
    register int rvar = 1;
    volatile int vvar = 2;

    if (setjmp(env) == 0) {
        rvar = 3;
        vvar = 4;
        func(rvar, vvar);

    } else {
        printf("after longjmp(): rvar[%d] vvar[%d]\n", rvar, vvar);
    }

    return 0;
}
/* output: ?
 * func(): rvar[3] vvar[4]
 * after longjmp(): rvar[3] vvar[4]
 */
在调用 setjmp() 时,env 会保存当前进程的程序计数器(PC)、栈指针寄存器(SP)以及进程的其他信息,这些信息可以保证 longjump() 调用完成后从初始的位置继续执行。但是因为 setjmp() 实现无法保证保存所有寄存器和临时栈信息,因此只能用于简单的语境中。
C99 defines setjmp()/longjmp() to provide non-local jumps but it does not require that longjmp() preserves the current stack frame. Therefore, jumping into a function which was exited via a call to longjmp() is undefined.
Context Control
C library functions (ucontext.h)提供了四个函数(setcontext/getcontext/makecontext/swapcontext)实现上下文的控制。
typedef struct ucontext {
    unsigned long int uc_flags;
    struct ucontext   *uc_link;
    stack_t           uc_stack;
    mcontext_t        uc_mcontext;
    sigset_t          uc_sigmask;
    ...
} ucontext_t;

// example
char stack[SIGSTKSZ];
getcontext(&context);
context.uc_link          = &main_context;
context.uc_stack.ss_sp   = stack;
context.uc_stack.ss_size = sizeof(stack);
// void makecontext(ucontext_t *ucp, void (*func)(), int argc, ...);
makecontext(&context, (void (*)(void)) func, 2, &context, &main_context2);
#include <stdio.h>
#include <ucontext.h>
#include <unistd.h>

int main(int argc, const char *argv[]){
    ucontext_t context;

    getcontext(&context);
    puts("Hello world");
    sleep(1);
    setcontext(&context);

    return 0;
}
/* output: ?
 *
 */
Since POSIX.1-2003 ucontext_t is deprecated and was removed in POSIX.1-2008. POSIX Threads recommended.
The third argument of makecontext() specifies the number of integer arguments that follow which will require function pointer cast if func will accept those arguments which is undefined in C99. The arguments in the var-arg list are required to be integers, passing pointers in var-arg list is not guaranteed to work, especially it will fail for architectures where pointers are larger than integers.
Refer: swapcontext
makecontext() and swapcontext() are provided in glibc since version 2.1.
#include <ucontext.h>

void makecontext(ucontext_t *ucp, void (*func)(), int argc, ...);
int swapcontext(ucontext_t *oucp, ucontext_t *ucp);

int getcontext(ucontext_t *ucp);
int setcontext(const ucontext_t *ucp);
Description
In a System V-like environment, one has the type ucontext_t defined in <ucontext.h> and the four functions getcontext(), setcontext(), makecontext() and swapcontext() that allow user-level context switching between multiple threads of control within a process.
For the type and the first two functions, see getcontext().
The makecontext() function modifies the context pointed to by ucp (which was obtained from a call to getcontext()). Before invoking makecontext(), the caller must allocate a new stack for this context and assign its address to ucp->uc_stack, and define a successor context and assign its address to ucp->uc_link.
When this context is later activated (using setcontext() or swapcontext()) the function func is called, and passed the series of integer (int) arguments that follow argc; the caller must specify the number of these arguments in argc. When this function returns, the successor context is activated. If the successor context pointer is NULL, the thread exits.
The swapcontext() function saves the current context in the structure pointed to by oucp, and then activates the context pointed to by ucp.
Return Value
When successful, swapcontext() does not return. (But we may return later, in case oucp is activated, in which case it looks like swapcontext() returns 0.) On error, swapcontext() returns -1 and sets errno appropriately.
Example
The example program below demonstrates the use of getcontext(), makecontext(), and swapcontext(). Running the program produces the following output:
$ ./a.out
main: swapcontext(&uctx_main, &uctx_func2)
func2: started
func2: swapcontext(&uctx_func2, &uctx_func1)
func1: started
func1: swapcontext(&uctx_func1, &uctx_func2)
func2: returning
func1: returning
main: exiting
#include <ucontext.h>
#include <stdio.h>
#include <stdlib.h>

static ucontext_t uctx_main, uctx_func1, uctx_func2;

#define handle_error(msg) \
    do { perror(msg); exit(EXIT_FAILURE); } while (0)

static void
func1(void)
{
    printf("func1: started\n");
    printf("func1: swapcontext(&uctx_func1, &uctx_func2)\n");
    if (swapcontext(&uctx_func1, &uctx_func2) == -1)
        handle_error("swapcontext");
    printf("func1: returning\n");
}

static void
func2(void)
{
    printf("func2: started\n");
    printf("func2: swapcontext(&uctx_func2, &uctx_func1)\n");
    if (swapcontext(&uctx_func2, &uctx_func1) == -1)
        handle_error("swapcontext");
    printf("func2: returning\n");
}

int
main(int argc, char *argv[])
{
    char func1_stack[16384];
    char func2_stack[16384];

   if (getcontext(&uctx_func1) == -1)
        handle_error("getcontext");
    uctx_func1.uc_stack.ss_sp = func1_stack;
    uctx_func1.uc_stack.ss_size = sizeof(func1_stack);
    uctx_func1.uc_link = &uctx_main;
    makecontext(&uctx_func1, func1, 0);

   if (getcontext(&uctx_func2) == -1)
        handle_error("getcontext");
    uctx_func2.uc_stack.ss_sp = func2_stack;
    uctx_func2.uc_stack.ss_size = sizeof(func2_stack);
    /* Successor context is f1(), unless argc > 1 */
    uctx_func2.uc_link = (argc > 1) ? NULL : &uctx_func1;
    makecontext(&uctx_func2, func2, 0);

   printf("main: swapcontext(&uctx_main, &uctx_func2)\n");
    if (swapcontext(&uctx_main, &uctx_func2) == -1)
        handle_error("swapcontext");

   printf("main: exiting\n");
    exit(EXIT_SUCCESS);
}
Boost.Context
Boost.Context is a foundational library that provides a sort of cooperative multitasking on a single thread.
Boost.Context must be built for the particular compiler(s) and CPU architecture(s)s being targeted. Boost.Context includes assembly code and, therefore, requires GNU AS for supported POSIX systems, MASM for Windows/x86 systems and ARMasm for Windows/arm systems.
// Each instance of fcontext_t represents a context (CPU registers and stack space). Together with its related functions jump_fcontext() and make_fcontext() it provides a execution control transfer mechanism similar interface like ucontext_t. fcontext_t and its functions are located in boost::context and the functions are declared as extern "C".
#include <boost/context/all.hpp>

struct stack_t
{
    void        *sp;
    std::size_t size;
};

struct fcontext_t
{
    < platform specific >

    stack_t  fc_stack;
};

intptr_t jump_fcontext( fcontext_t * ofc, fcontext_t const* nfc, intptr_t vp, bool preserve_fpu = true);
fcontext_t * make_fcontext( void * sp, std::size_t size, void(* fn)(intptr_t) );
Performance of context switch
| Platform | ucontext_t | fcontext_t with fpu (Floating-point unit) | fcontext_t without fpu | boost::function |
|---|---|---|---|---|
| AMD Athlon 64 DualCore 4400+ (32bit Linux) | 846 cycles | 65 cycles | 43 cycles | 15 cycles |
| Intel Core2 Q6700 (64bit Linux) | 1481 cycles | 172 cycles | 63 cycles | 25 cycles |
ucontext_tpreserves signal mask between context switches which involves system calls consuming a lot of CPU cycles (ucontext_tis slower by perfomance_link[factor 13x] relative tofcontext_t).
TDF (腾讯计费平台部的后台协程框架)
TDF 是腾讯内部的一个基于协程的自研后台开发框架,使用 ucontext,N:1 模型。
ready_list = [A, B, C]
while (!ready_list.empty()) {
    for co in ready_list {
        co.process()
        if (co.finished())
        ready_list.remove(co)
    }
}
内部协程调度模型
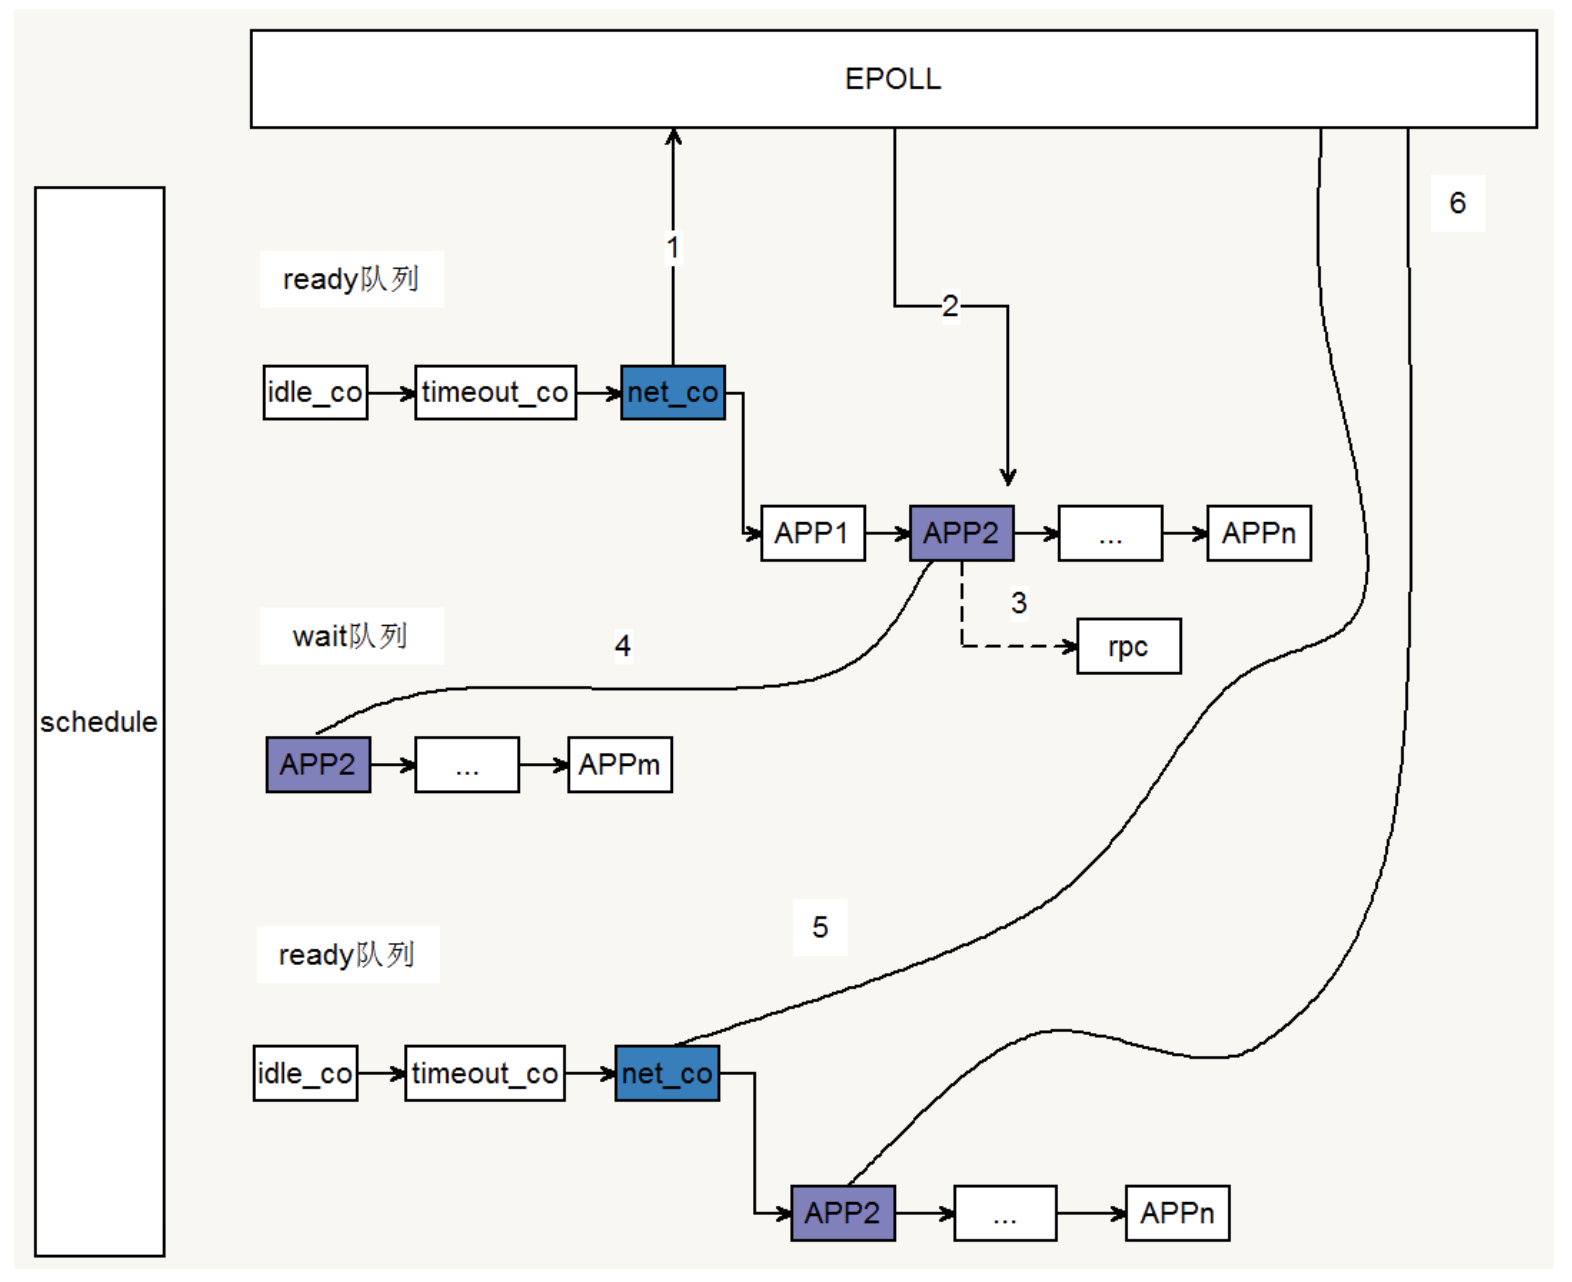
内部事件触发流程
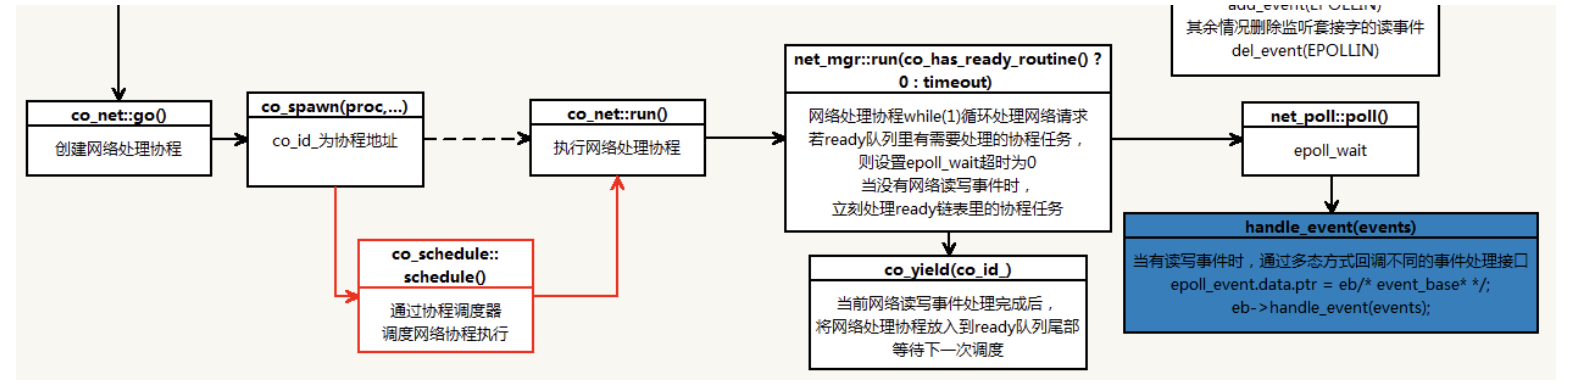
协程优化
Just using an off-the-shelf library like libcoroutine isn’t as fast as you might think. The improvement comes from two optimizations: reuse of stacks and a lightweight swapcontext implementation. (Refer: Making coroutines fast)

Refer
- The Go scheduler
- 也谈goroutine调度器
- Goroutine 并发调度模型深度解析之手撸一个高性能 goroutine 池
- https://strikefreedom.top/archives/goroutine-concurrency-control-and-communication
- GoLang之Concurrency协程goroutine使用方法
- GoLang之Concurrency顺序管道模式
- GoLang之Concurrency多任务独立模式
- GoLang之Concurrency再讨论
- GoLang之并发并行与goroutine的思考