ETCD in Action
- 抽屉原理
- 历史背景
- 思考问题
- 方案选型
- 基本介绍
- 基础架构
- 数据模型
- 基本原理
- Tools
- The Raft Consensus Algorithm
- Raft 协议论文 In Search of an Understandable Consensus Algorithm
- Install v3.5
- 读取模型
- Watch 机制 (高效获取数据变化)
- 事务机制
- Performance
- 腾讯云第三方服务 (腾讯云云原生 etcd)
- How To Set Up and Secure an etcd Cluster with Ansible on Ubuntu 18.04
- Prerequisites
- Step 1 — Configuring Ansible for the Control Node
- Step 2 — Getting the Hostnames of Managed Nodes with Ansible Playbooks
- Step 3 — Installing etcd on the Managed Nodes
- Step 4 — Creating a Unit File for etcd
- Step 5 — Configuring the Data Directory
- Step 6 — Enabling and Starting the etcd Service
- Step 7 — Testing etcd
- Step 8 — Forming a Cluster Using Static Discovery
- Conclusion
- 测试用例
- Tips
- etcd 运维脚本
- 安全访问
- Q&A
- Libraries and tools
- etcd API guarantees
- Next steps
- Refer
抽屉原理
桌上有十个苹果,要把这十个苹果放到九个抽屉里,无论怎样放,我们会发现至少会有一个抽屉里面放不少于两个苹果。这一现象就是我们所说的“抽屉原理”。
抽屉原理的一般含义为:“如果每个抽屉代表一个集合,每一个苹果就可以代表一个元素,假如有 n+1 个元素放到 n 个集合中去,其中必定有一个集合里至少有两个元素。”
抽屉原理有时也被称为鸽巢原理。它是组合数学中一个重要的原理。
历史背景
- etcd 名字的由来?它源于两个方面,Unix 的 /etc 文件夹和分布式系统 (Distribute system) 的 D,组合在一起表示 etcd 是用于存储分布式配置的存储服务。
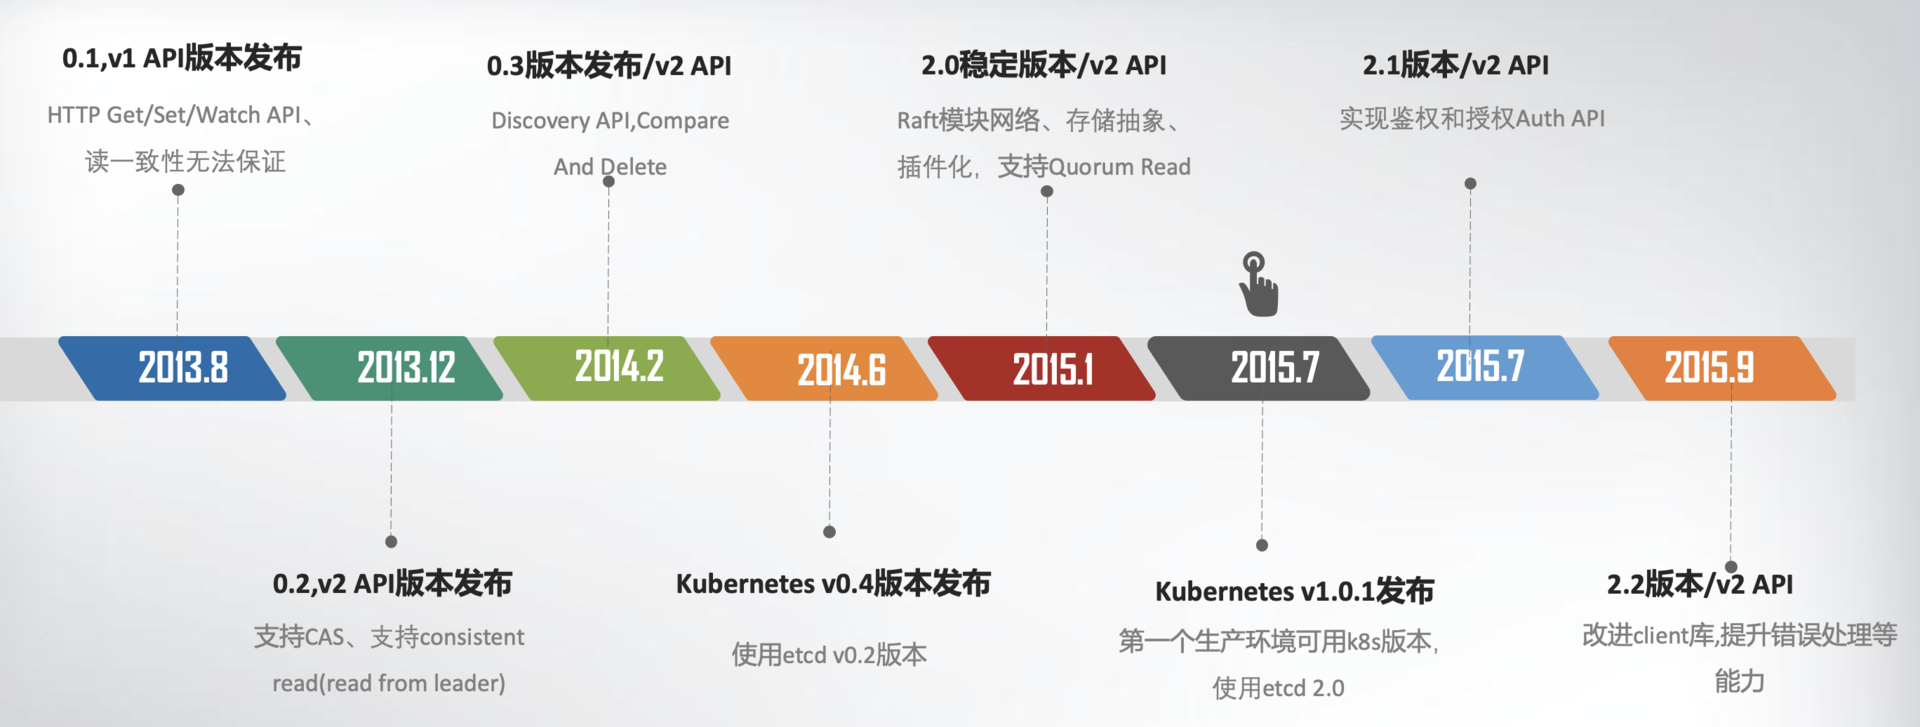
- CoreOS 团队在 2013 年 8 月对外发布了第一个测试版本 v0.1,API v1 版本,命名为 etcd。
- v0.1 版本实现了简单的 HTTP Get/Set/Delete/Watch API,但读数据一致性无法保证。
- v0.2 版本,支持通过指定 consistent 模式,从 Leader 读取数据,并将 Test And Set 机制修正为 CAS(Compare And Swap),解决原子更新的问题,同时发布了新的 API 版本 v2。
- 在 2015 年 1 月,CoreOS 发布了 etcd 第一个稳定版本 2.0,支持了 quorum read,提供了严格的线性一致性读能力。7 月,基于 etcd 2.0 的 Kubernetes 第一个生产环境可用版本 v1.0.1 发布了,Kubernetes 开始了新的里程碑的发展。
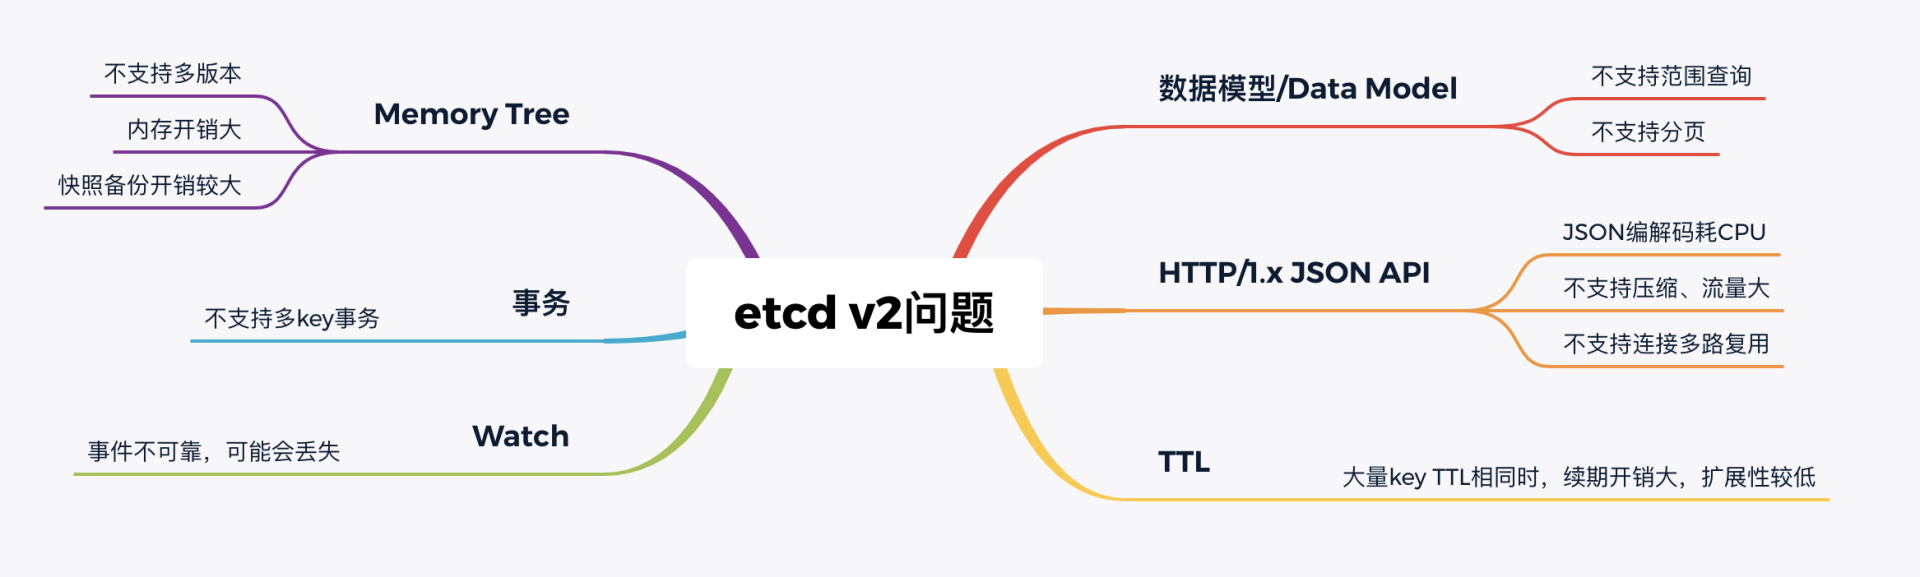
- 随着 Kubernetes 项目不断发展,v2 版本的瓶颈和缺陷逐渐暴露,遇到了若干性能和稳定性问题,Kubernetes 社区呼吁支持新的存储、批评 etcd 不可靠的声音开始不断出现。具体问题如下:
- 功能局限性问题。
- etcd v2 不支持范围查询和分页。分页对于数据较多的场景是必不可少的。在 Kubernetes 中,在集群规模增大后,Pod、Event 等资源可能会出现数千个以上,但是 etcd v2 不支持分页,不支持范围查询,大包等 expensive request 会导致严重的性能乃至雪崩问题。
- etcd v2 不支持多 key 事务。在实际转账等业务场景中,往往我们需要在一个事务中同时更新多个 key。
- Watch 机制可靠性问题。
- Kubernetes 项目严重依赖 etcd Watch 机制,然而 etcd v2 是内存型、不支持保存 key 历史版本的数据库,只在内存中使用滑动窗口保存了最近的 1000 条变更事件,当 etcd server 写请求较多、网络波动时等场景,很容易出现事件丢失问题,进而又触发 client 数据全量拉取,产生大量 expensive request,甚至导致 etcd 雪崩。
- 性能瓶颈问题。
- etcd v2 早期使用了简单、易调试的 HTTP/1.x API,但是随着 Kubernetes 支撑的集群规模越来越大,HTTP/1.x 协议的瓶颈逐渐暴露出来。比如集群规模大时,由于 HTTP/1.x 协议没有压缩机制,批量拉取较多 Pod 时容易导致 APIServer 和 etcd 出现 CPU 高负载、OOM、丢包等问题。
- 另外,etcd v2 client 会通过 HTTP 长连接轮询 Watch 事件,当 watcher 较多的时候,因 HTTP/1.x 不支持多路复用,会创建大量的连接,消耗 server 端过多的 socket 和内存资源。
- 同时 etcd v2 支持为每个 key 设置 TTL 过期时间,client 为了防止 key 的 TTL 过期后被删除,需要周期性刷新 key 的 TTL。实际业务中很有可能若干 key 拥有相同的 TTL,可是在 etcd v2 中,即使大量 key TTL 一样,你也需要分别为每个 key 发起续期操作,当 key 较多的时候,这会显著增加集群负载、导致集群性能显著下降。
- 内存开销问题。
- etcd v2 在内存维护了一颗树来保存所有节点 key 及 value。在数据量略大的场景,如配置项较多、存储了大量 Kubernetes Events,它会导致较大的内存开销,同时 etcd 需要定时把全量内存树持久化到磁盘。这会消耗大量的 CPU 和磁盘 I/O 资源,对系统的稳定性造成一定影响。
- 功能局限性问题。
为什么 etcd v2 有以上若干问题,Consul 等其他竞品依然没有被 Kubernetes 支持呢?
- 一方面当时包括 Consul 在内,没有一个开源项目是十全十美完全满足 Kubernetes 需求。而 CoreOS 团队一直在聆听社区的声音并积极改进,解决社区的痛点。用户吐槽 etcd 不稳定,他们就设计实现自动化的测试方案,模拟、注入各类故障场景,及时发现修复 Bug,以提升 etcd 稳定性。
- 另一方面,用户吐槽性能问题,针对 etcd v2 各种先天性缺陷问题,他们从 2015 年就开始设计、实现新一代 etcd v3 方案去解决以上痛点,并积极参与 Kubernetes 项目,负责 etcd v2 到 v3 的存储引擎切换,推动 Kubernetes 项目的前进。同时,设计开发通用压测工具、输出 Consul、ZooKeeper、etcd 性能测试报告,证明 etcd 的优越性。
etcd v3 就是为了解决以上稳定性、扩展性、性能问题而诞生的。
- 在内存开销、Watch 事件可靠性、功能局限上,它通过引入 B-tree、boltdb 实现一个 MVCC 数据库,数据模型从层次型目录结构改成扁平的 key-value,提供稳定可靠的事件通知,实现了事务,支持多 key 原子更新,同时基于 boltdb 的持久化存储,显著降低了 etcd 的内存占用、避免了 etcd v2 定期生成快照时的昂贵的资源开销。
- 性能上,首先 etcd v3 使用了 gRPC API,使用 protobuf 定义消息,消息编解码性能相比 JSON 超过 2 倍以上,并通过 HTTP/2.0 多路复用机制,减少了大量 watcher 等场景下的连接数。
- 其次使用 Lease 优化 TTL 机制,每个 Lease 具有一个 TTL,相同的 TTL 的 key 关联一个 Lease,Lease 过期的时候自动删除相关联的所有 key,不再需要为每个 key 单独续期。
- 最后是 etcd v3 支持范围、分页查询,可避免大包等 expensive request。
2016 年 6 月,etcd 3.0 诞生,随后 Kubernetes 1.6 发布,默认启用 etcd v3,助力 Kubernetes 支撑 5000 节点集群规模。
下面的时间轴图总结了 etcd3 重要特性及版本发布时间。从图中可以看出,从 3.0 到未来的 3.5,更稳、更快是 etcd 的追求目标。

从 2013 年发布第一个版本 v0.1 到今天的 3.5.0-pre,从 v2 到 v3,etcd 走过了 7 年的历程,etcd 的稳定性、扩展性、性能不断提升。在 Kubernetes 的业务场景磨炼下它不断成长,走向稳定和成熟,成为技术圈众所周知的开源产品,而 v3 方案的发布,也标志着 etcd 进入了技术成熟期,成为云原生时代的首选元数据存储产品。
思考问题
- 原理
- 如何判断 etcd 是否适合你的业务场景?
- 为什么 etcd 适合读多写少?
- 线性读和串行读各自适用什么业务场景,分别是如何实现的?
- etcd Watch 机制能保证事件不丢吗?
- 为什么 Follower 节点的 Raft 日志条目可能会与 Leader 冲突?冲突时 Follower 节点的 WAL 日志如何删除已持久化但冲突的日志条目?
- 不小心删除一个 key 后,可以马上找回来吗?
- 稳定性
- 哪些因素会导致 etcd 集群 Leader 发生切换?
- 为什么 etcd 社区压测结果显示读能达到10几万每秒,但在自己的业务集群中 QPS 可能未过百就出现超时错误?
- etcd 能跨地域部署吗?
- 如何优化提升 etcd 性能和稳定性?
- 一致性
- 为什么基于 Raft 实现的 etcd 还可能会出现数据不一致?
- 延迟
- 为什么集群各节点磁盘 I/O 延迟很低,写请求也会超时?
- 内存
- 为什么只存储一个几百 KB 的 KV,etcd 进程却可能消耗数 G 内存?
- DB 大小
- 为什么删除大量的数据,DB 大小不减少?
- 为何 etcd 社区建议 DB 大小不要超过 8G?
- 哪些因素会导致 DB 大小增加?
- 最佳实践
- 当在一个 namespace 下创建了数万个 Pod/CRD 资源时,同时频繁通过标签去查询指定 Pod/CRD 资源时, APIServer 和 etcd 为什么扛不住?
- 快速增长的业务应如何避免单 etcd 集群出现性能瓶颈?
- 如何构建安全,高可靠的 etcd 集群运维体系?
- Kubernetes
- Kubernetes 创建 Pod 背后 etcd 是如何工作的?
- etcd 如何为 Kubernetes 控制器编程模型提供支撑?
- APIServer 的 “too old resource version” 错误跟 etcd 有什么关系?
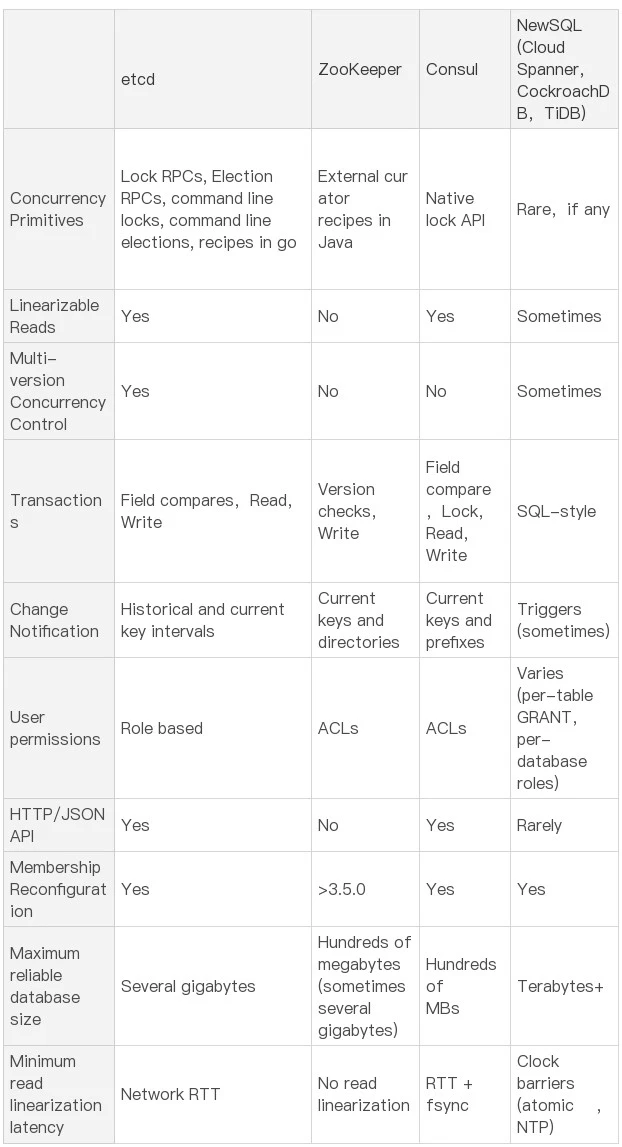
方案选型
etcd versus other key-value stores
方案需要具备的能力:
- 高可用(方案:多节点 -> 问题:数据一致性问题)
- 数据一致性(方案:Raft 协议)
- 存储容量(方案:仅需保存控制面信息,存储上不需要考虑分片)
- 增删改查,监听数据变化(方案:Watch 机制)
- 可维护性(方案:提供 API 等易便的操作接口,降低运维复杂度)
可选方案:
- ZooKeeper
- 维护成本相对较高
- Java 程序部署繁琐且资源开销较高
- 私有 TCP 协议通信,不支持 HTTP 协议调用,调试不方便
- 共识算法,etcd 使用的是 Raft,ZooKeeper 使用的是 Zab
- etcd
- Kubernetes 使用 etcd 作为底层存储
- Raft 共识算法来确保数据在集群中的一致性,相比 Paxos 算法工程化更简单
- 支持 gRPC 和 HTTP 协议调用
- Watch 机制
- Key TTL 特性
- 服务发现
- 分布式锁
- 主备选举
- 事务
- etcd v3 支持范围、分页查询,可避免大包等 expensive request
- Kubernetes 支撑 5000 节点集群规模
- 低容量的关键元数据存储,DB大小一般不超过8G
- etcd 集群异地容灾,建议使用 raft learner 特性,建议在 >= 3.5 版本使用
- Consul
- 在大规模集群中,etcd 的性能会优于 Consul
- etcd v3 在稳定性、扩展性、性能方面做了大量优化
- 支持健康检查功能,可以自动剔除不健康的服务。而 etcd 则没有这个功能,需要额外的工具来实现
- Redis
- 主备异步复制,可能会丢数据
- 存储的一般是用户数据,可以承载上T数据
- 存储引擎和 API 上 Redis 内存实现了各种丰富数据结构
基本介绍
etcd是一个分布式键值 KV 存储系统,应用于服务发现,分布式锁,配置存储,分布式协调等。etcd使用Raft共识算法来确保数据在集群中的一致性。- 支持
gRPC和HTTP协议调用。 - Kubernetes 使用 etcd 作为底层存储。Google 的 Spanner 和微信的 PaxosStore 都是基于 Paxos 协议实现的 KV 存储。Paxos 和 Raft 各有优劣,一般 Raft 工程实现简单,但是有租约不可用的问题;基于无租约 Paxos 协议没有 Leader 节点,可以做到无缝切换。
基础架构
etcd 是基于复制状态机实现的分布式协调服务。如下图所示,由 Raft 共识模块、日志模块、基于 boltdb 持久化存储的状态机组成。
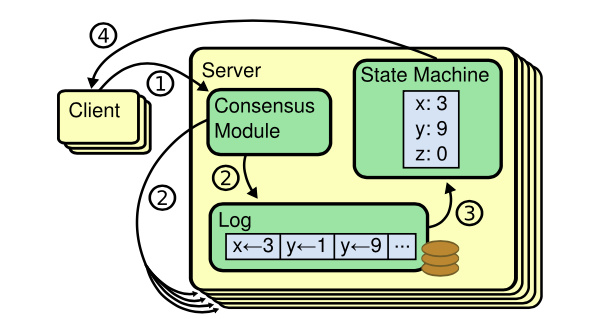
以下是 etcd 基于复制状态机模型的写请求流程:
- client 发起一个写请求(put x = 3)
- etcdserver 模块向 Raft 共识模块提交请求,共识模块生成一个写提案日志条目。若 server 是 Leader,则把日志条目广播给其他节点,并持久化日志条目到 WAL 中
- 当一半以上节点持久化日志条目后,Leader 的共识模块将此日志条目标记为已提交(committed),并通知其他节点提交
- etcdserver 模块从 Raft 共识模块获取已经提交的日志条目,异步应用到 boltdb 状态机存储中,然后返回给 client
按照分层模型,etcd 可分为 Client 层、API 网络层、Raft 算法层、逻辑层和存储层。这些层的功能如下:
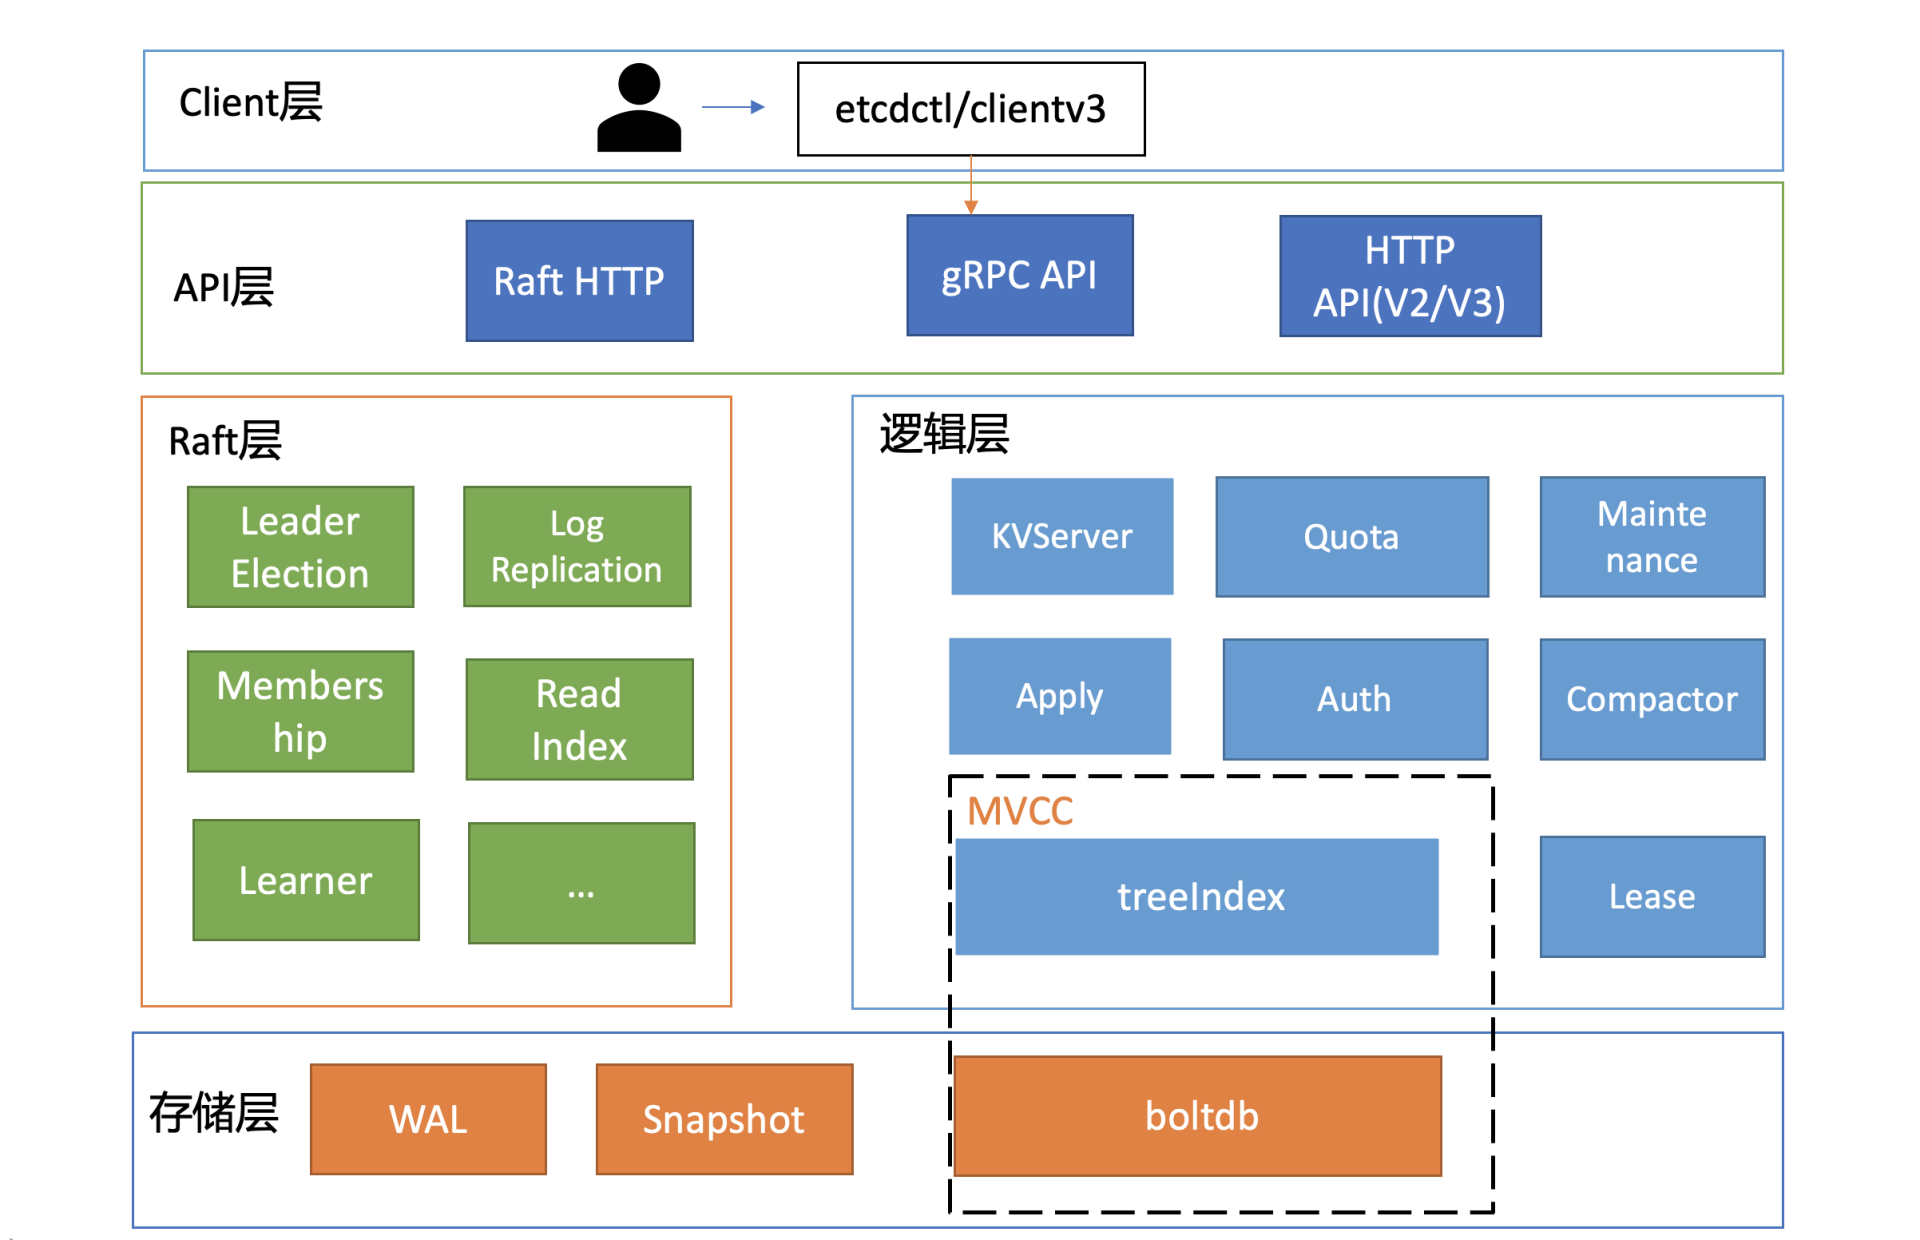
- Client 层:Client 层包括 client v2 和 v3 两个大版本 API 客户端库,提供了简洁易用的 API,同时支持负载均衡、节点间故障自动转移,可极大降低业务使用 etcd 复杂度,提升开发效率、服务可用性。
- API 网络层:API 网络层主要包括 client 访问 server 和 server 节点之间的通信协议。一方面,client 访问 etcd server 的 API 分为 v2 和 v3 两个大版本。v2 API 使用
HTTP/1.x协议,v3 API 使用gRPC协议。同时 v3 通过 etcd grpc-gateway 组件也支持HTTP/1.x协议,便于各种语言的服务调用。另一方面,server 之间通信协议,是指节点间通过 Raft 算法实现数据复制和 Leader 选举等功能时使用的 HTTP 协议。 - Raft 层:Raft 算法层实现了 Leader 选举、日志复制、ReadIndex 等核心算法特性,用于保障 etcd 多个节点间的数据一致性、提升服务可用性等,是 etcd 的基石和亮点。
- 功能逻辑层:etcd 核心特性实现层,如典型的 KVServer 模块、MVCC 模块、Auth 鉴权模块、Lease 租约模块、Compactor 压缩模块等,其中 MVCC 模块主要由 treeIndex 模块和 boltdb 模块组成。
- 存储层:存储层包含预写日志 (WAL) 模块、快照 (Snapshot) 模块、boltdb 模块。其中 WAL 可保障 etcd crash 后数据不丢失,boltdb 则保存了集群元数据和用户写入的数据。
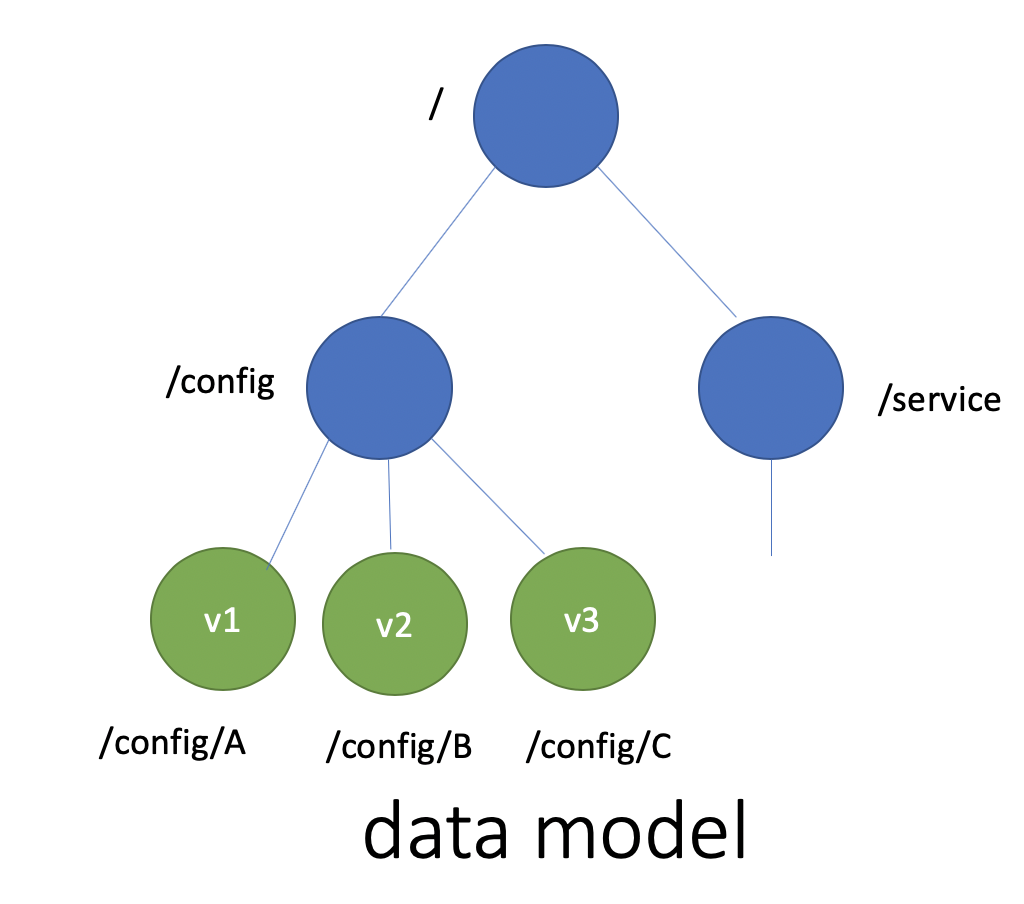
数据模型
etcd 使用的是简单内存树,它的节点数据结构精简后如下,含节点路径、值、孩子节点信息。这是一个典型的低容量设计,数据全放在内存,无需考虑数据分片,只能保存 key 的最新版本,简单易实现。
type node struct {
   Path string                    // 节点路径
   Parent *node                   // 关联父亲节点
   Value string                   // key 的 value 值
   ExpireTime time.Time           // 过期时间v2
   Children map[string]*node      // 此节点的孩子节点
}
基本原理
etcd 一个读请求是如何执行的?
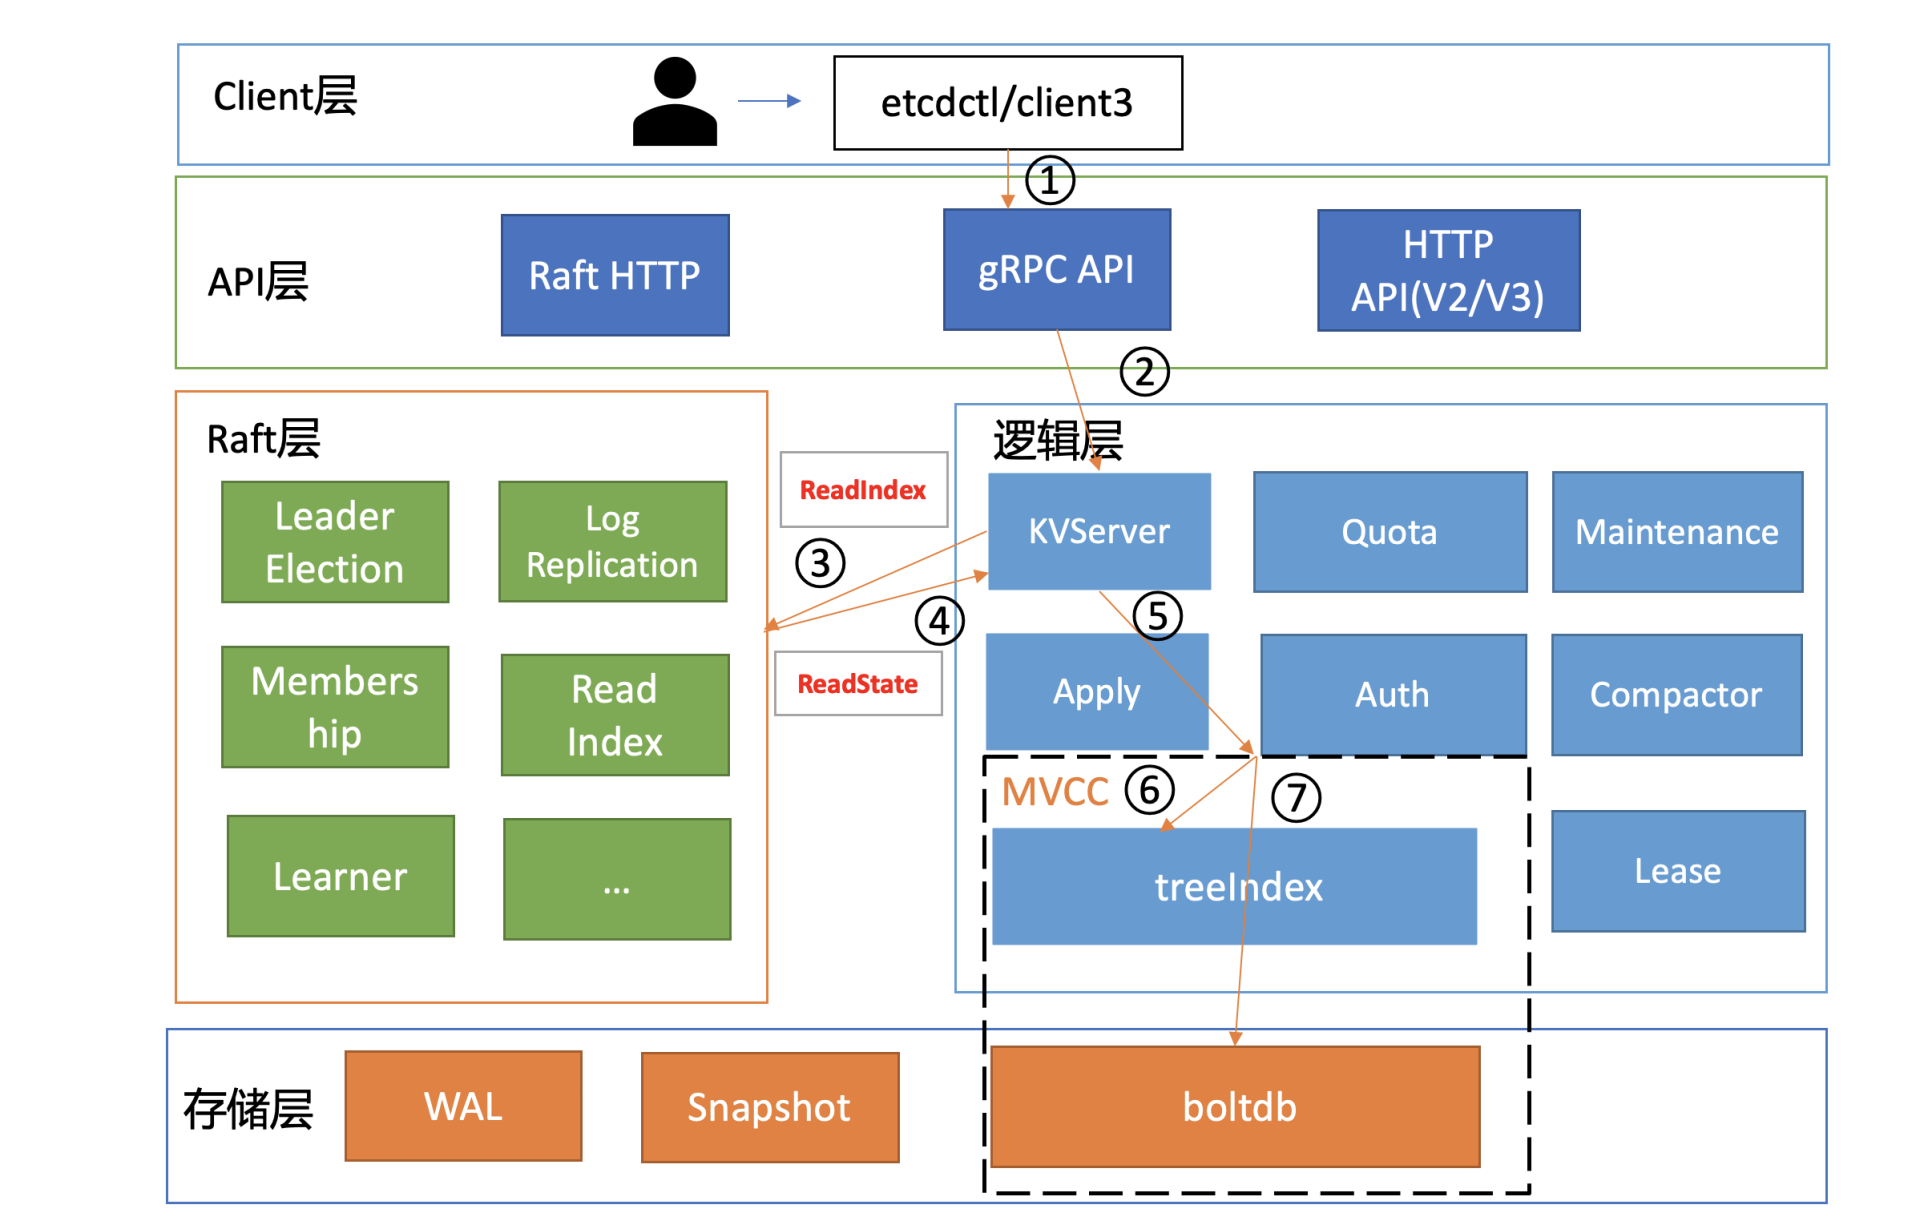
在下面这张架构图中,用序号标识了 etcd 默认读模式(线性读)的执行流程。(以 etcd v3.4.9 版本作为解释示例)
client
启动完 etcd 集群后,用 etcd 的客户端工具 etcdctl 执行一个 get hello 命令时,对应到图中流程1,etcdctl 是如何工作的呢?
$ etcdctl put hello world --endpoints http://127.0.0.1:2379
OK
$ etcdctl get hello --endpoints http://127.0.0.1:2379
hello
world
-
首先,etcdctl 会对命令中的参数进行解析。其中,参数 get 是请求的方法,它是 KVServer 模块的 API;hello 是查询的 key 名;endpoints 是后端的 etcd 地址,通常,生产环境下中需要配置多个 endpoints,这样在 etcd 节点出现故障后,client 就可以自动重连到其它正常的节点,从而保证请求的正常执行。
-
在 etcd v3.4.9 版本中,etcdctl 是通过 clientv3 库来访问 etcd server 的,clientv3 库基于 gRPC client API 封装了操作 etcd KVServer、Cluster、Auth、Lease、Watch 等模块的 API,同时还包含了负载均衡、健康探测和故障切换等特性。
-
在解析完请求中的参数后,etcdctl 会创建一个 clientv3 库对象,使用 KVServer 模块的 API 来访问 etcd server。
-
接下来,就需要为这个 get hello 请求选择一个合适的 etcd server 节点了,这里得用到负载均衡算法。在 etcd 3.4 中,clientv3 库采用的负载均衡算法为 Round-robin。针对每一个请求,Round-robin 算法通过轮询的方式依次从 endpoint 列表中选择一个 endpoint 访问 (长连接),使 etcd server 负载尽量均衡。
-
为请求选择好 etcd server 节点,client 就可调用 etcd server 的 KVServer 模块的 Range RPC 方法,把请求发送给 etcd server。
-
client 和 server 之间的通信,使用的是基于 HTTP/2 的 gRPC 协议。相比 etcd v2 的 HTTP/1.x,HTTP/2 是基于二进制而不是文本、支持多路复用而不再有序且阻塞、支持数据压缩以减少包大小、支持 server push 等特性。因此,基于 HTTP/2 的 gRPC 协议具有低延迟、高性能的特点,有效解决了 etcd v2 中 HTTP/1.x 性能问题。
KVServer
- client 发送 Range RPC 请求到了 server 后,就开始进入架构图中的流程2,也就是 KVServer 模块了。
拦截器
-
etcd 提供了丰富的 metrics、日志、请求行为检查等机制,可记录所有请求的执行耗时及错误码、来源 IP 等,也可控制请求是否允许通过,比如 etcd Learner 节点只允许指定接口和参数的访问,帮助大家定位问题、提高服务可观测性等,而这些特性是怎么非侵入式的实现呢?答案就是拦截器。
-
etcd server 定义了如下的 Service KV 和 Range 方法,启动的时候它会将实现 KV 各方法的对象注册到 gRPC Server,并在其上注册对应的拦截器。下面的代码中的 Range 接口就是负责读取 etcd key-value 的的 RPC 接口。
service KV {
  // Range gets the keys in the range from the key-value store.
  rpc Range(RangeRequest) returns (RangeResponse) {
      option (google.api.http) = {
        post: "/v3/kv/range"
        body: "*"
      };
  }
  ....
}
- 拦截器提供了在执行一个请求前后的 hook 能力,除了上面提到的 debug 日志、metrics 统计、对 etcd Learner 节点请求接口和参数限制等能力,etcd 还基于它实现了以下特性:
- 要求执行一个操作前集群必须有 Leader
- 请求延时超过指定阈值的,打印包含来源 IP 的慢查询日志 (3.5 版本)
- server 收到 client 的 Range RPC 请求后,根据 ServiceName 和 RPC Method 将请求转发到对应的 handler 实现,handler 首先会将上面描述的一系列拦截器串联成一个执行,在拦截器逻辑中,通过调用 KVServer 模块的 Range 接口获取数据。
串行读与线性读
-
进入 KVServer 模块后,就进入核心的读流程了,对应架构图中的流程3和4。知道 etcd 为了保证服务高可用,生产环境一般部署多个节点,那各个节点数据在任意时间点读出来都是一致的吗?什么情况下会读到旧数据呢?
-
这里为了更好的理解读流程,先简单提下写流程。如下图所示,当 client 发起一个更新 hello 为 world 请求后,若 Leader 收到写请求,它会将此请求持久化到 WAL 日志,并广播给各个节点,若一半以上节点持久化成功,则该请求对应的日志条目被标识为已提交,etcdserver 模块异步从 Raft 模块获取已提交的日志条目,应用到状态机 (boltdb 等)。
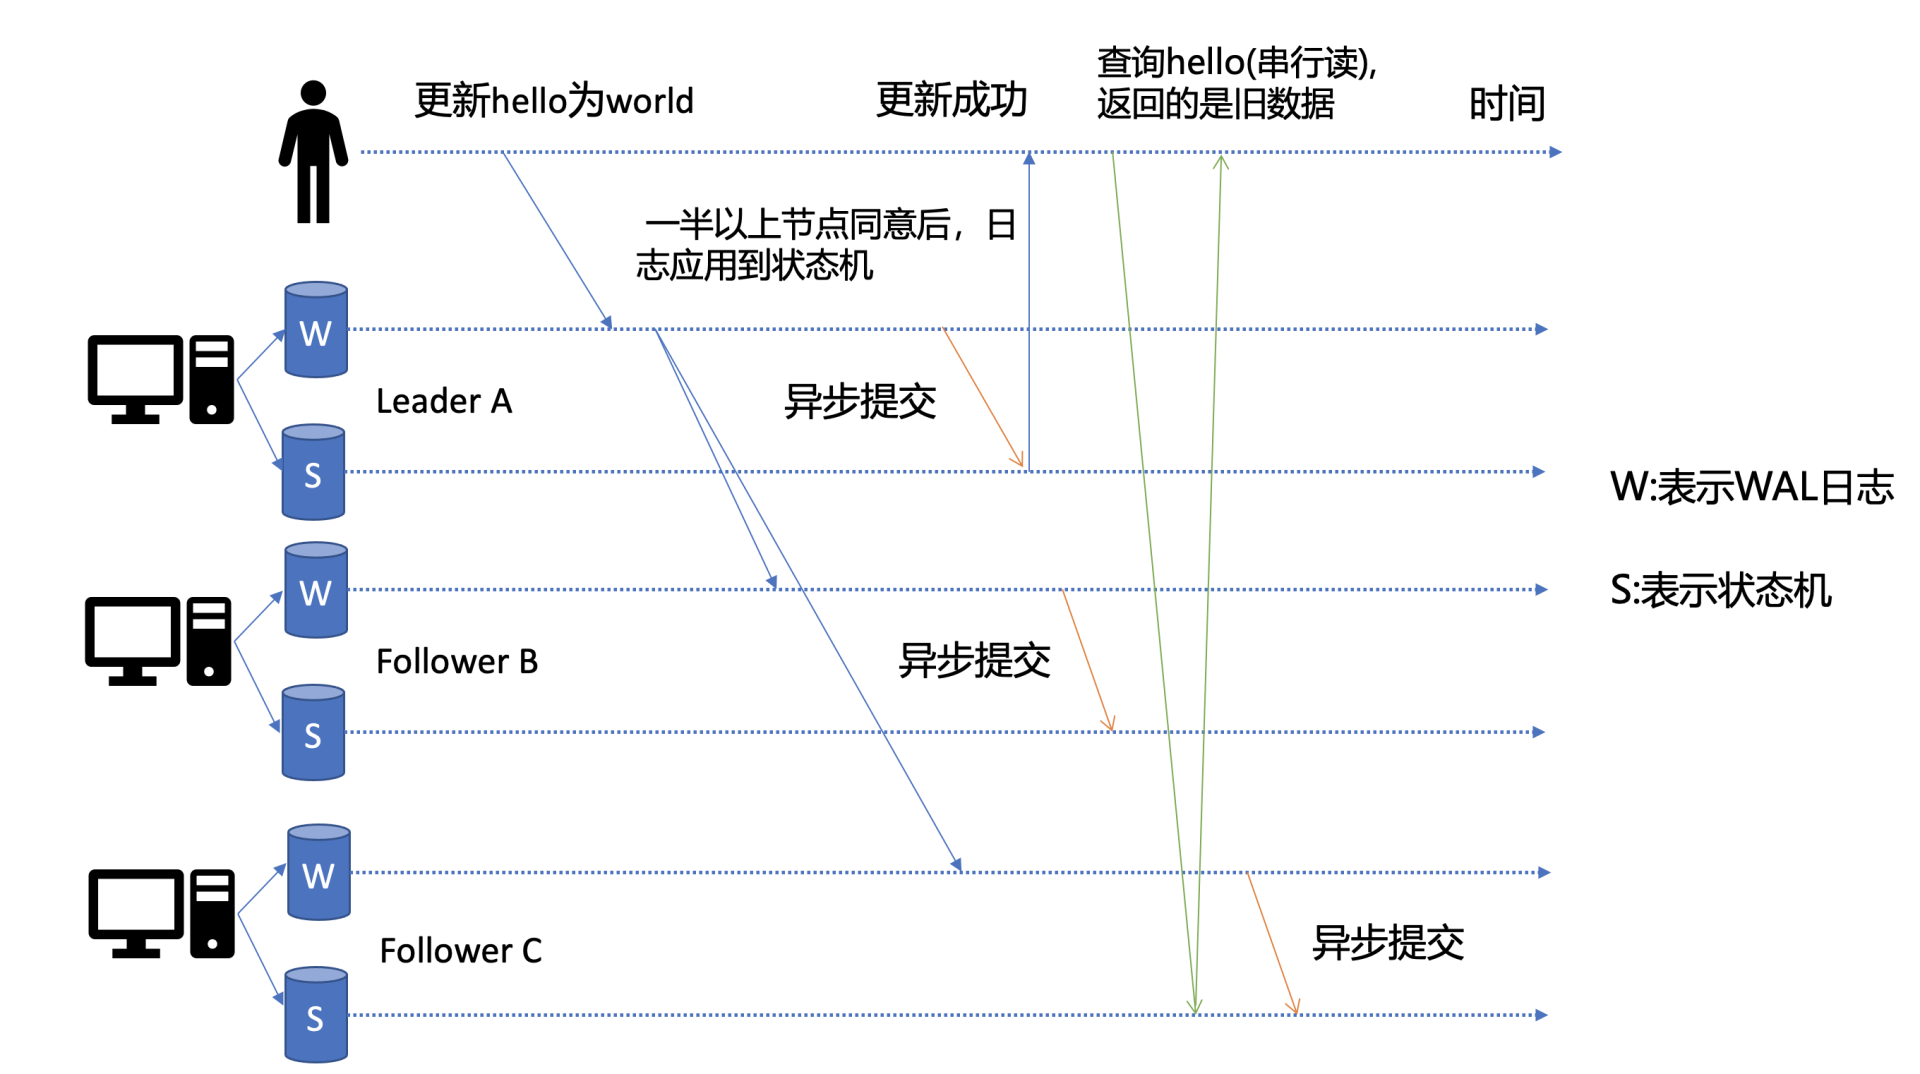
-
此时若 client 发起一个读取 hello 的请求,假设此请求直接从状态机中读取, 如果连接到的是 C 节点,若 C 节点磁盘 I/O 出现波动,可能导致它应用已提交的日志条目很慢,则会出现更新 hello 为 world 的写命令,在 client 读 hello 的时候还未被提交到状态机,因此就可能读取到旧数据,如上图查询 hello 流程所示。
-
从以上介绍可以看出,在多节点 etcd 集群中,各个节点的状态机数据一致性存在差异。而不同业务场景的读请求对数据是否最新的容忍度是不一样的,有的场景它可以容忍数据落后几秒甚至几分钟,有的场景要求必须读到反映集群共识的最新数据。
- 首先来看一个对数据敏感度较低的场景。假如老板让你做一个旁路数据统计服务,希望你每分钟统计下 etcd 里的服务、配置信息等,这种场景其实对数据时效性要求并不高,读请求可直接从节点的状态机获取数据。即便数据落后一点,也不影响业务,毕竟这是一个定时统计的旁路服务而已。这种直接读状态机数据返回、无需通过 Raft 协议与集群进行交互的模式,在 etcd 里叫做串行 (Serializable) 读,它具有低延时、高吞吐量的特点,适合对数据一致性要求不高的场景。
- 再看一个对数据敏感性高的场景。比如说一个转账场景,Alice 给 Bob 转账成功,钱被正常扣出,一刷新页面发现钱又回来了,这也是令人不可接受的。以上的业务场景就对数据准确性要求极高了,在 etcd 里面,提供了一种线性读模式来解决对数据一致性要求高的场景。
什么是线性读呢?
-
可以理解一旦一个值更新成功,随后任何通过线性读的 client 都能及时访问到。虽然集群中有多个节点,但 client 通过线性读就如访问一个节点一样。etcd 默认读模式是线性读,因为它需要经过 Raft 协议模块,反应的是集群共识,因此在延时和吞吐量上相比串行读略差一点,适用于对数据一致性要求高的场景。
-
如果 etcd 读请求显示指定了是串行读,就不会经过架构图流程中的流程3、4。默认是线性读,因此接下来看看读请求进入线性读模块,它是如何工作的。
线性读之 ReadIndex
串行读之所以能读到旧数据,主要原因是 Follower 节点收到 Leader 节点同步的写请求后,应用日志条目到状态机是个异步过程,那么能否有一种机制在读取的时候,确保最新的数据已经应用到状态机中?
-
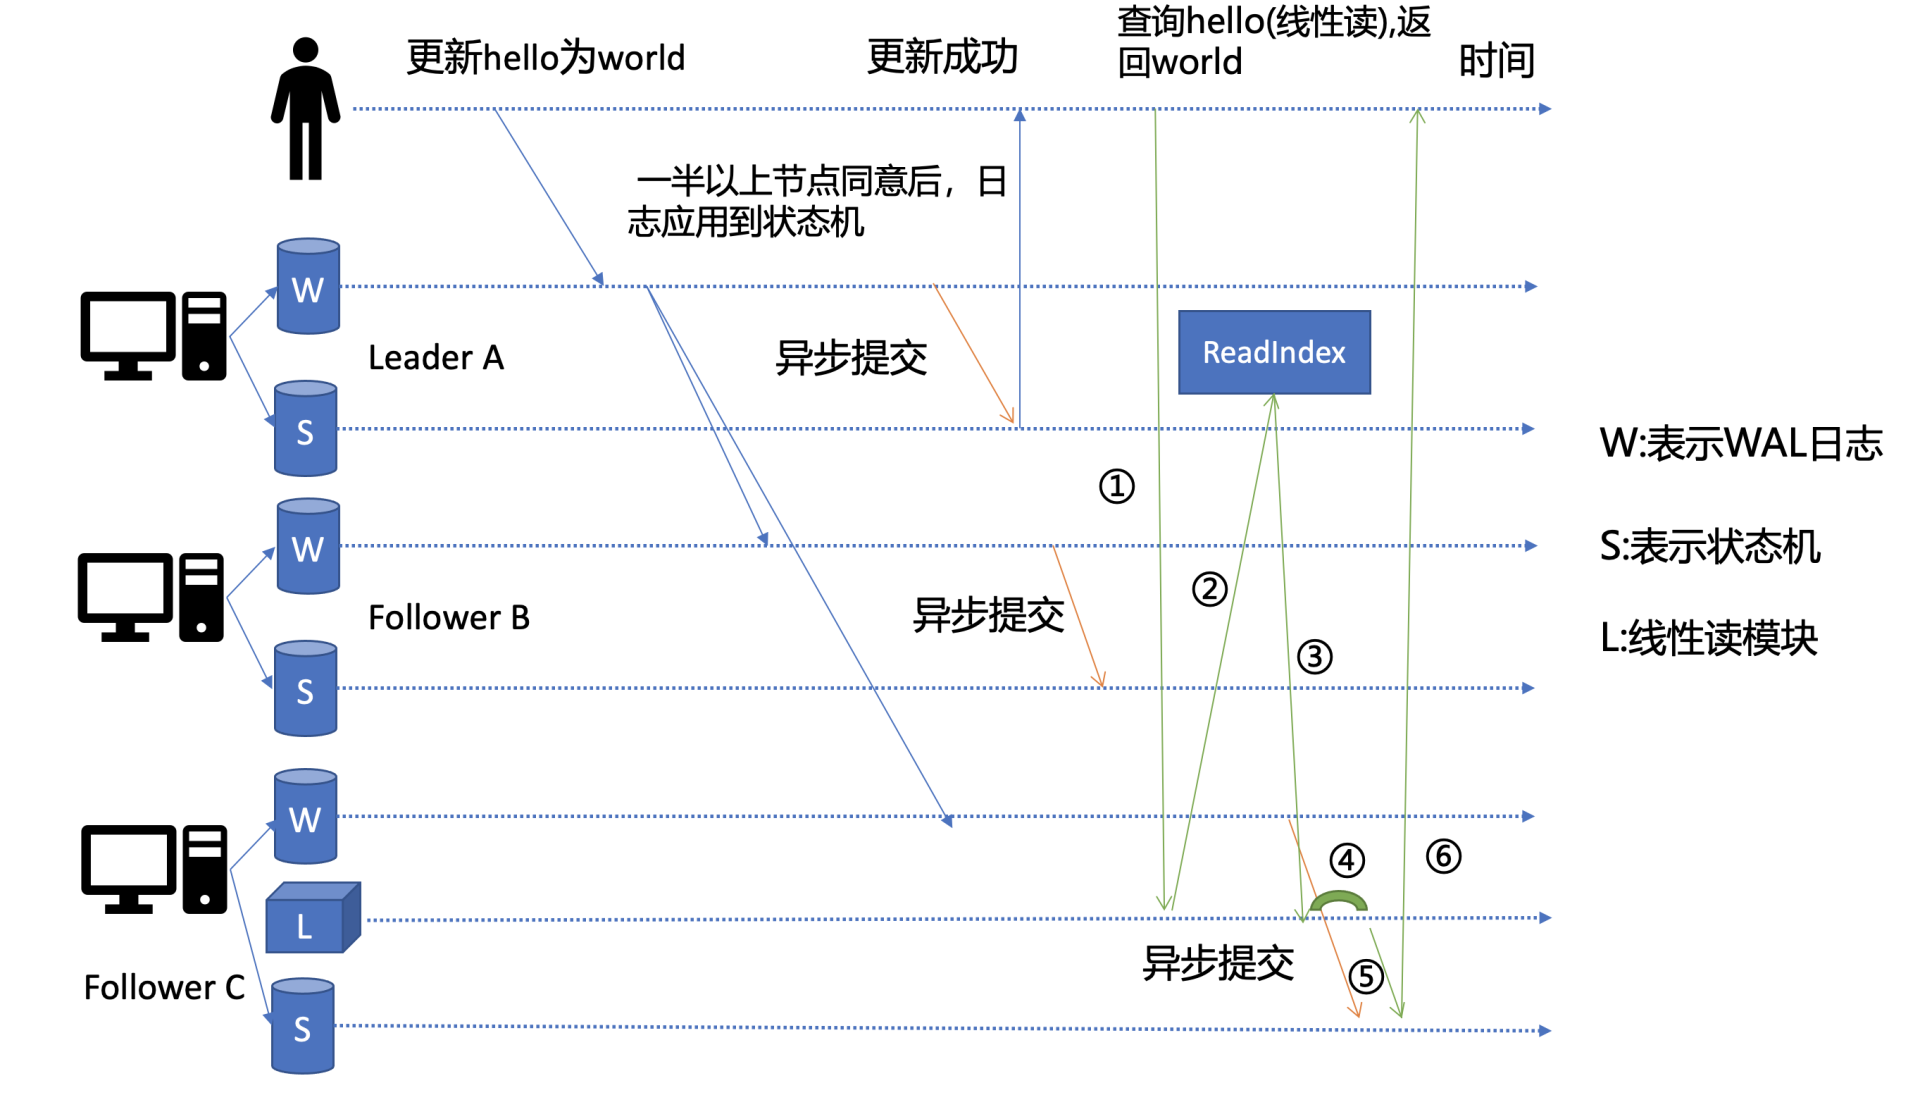
其实这个机制就是叫 ReadIndex,它是在 etcd 3.1 中引入的,把简化后的原理图放在了上面。当收到一个线性读请求时,它首先会从 Leader 获取集群最新的已提交的日志索引 (committed index),如上图中的流程2所示。
-
Leader 收到 ReadIndex 请求时,为防止脑裂等异常场景,会向 Follower 节点发送心跳确认,一半以上节点确认 Leader 身份后才能将已提交的索引 (committed index) 返回给节点 C(上图中的流程3)。
-
C 节点则会等待,直到状态机已应用索引 (applied index) 大于等于 Leader 的已提交索引时 (committed Index)(上图中的流程四),然后去通知读请求,数据已赶上 Leader,你可以去状态机中访问数据了 (上图中的流程5)。
-
以上就是线性读通过 ReadIndex 机制保证数据一致性原理, 当然还有其它机制也能实现线性读,如在早期 etcd 3.0 中读请求通过走一遍 Raft 协议保证一致性,这种 Raft log read 机制依赖磁盘IO,性能相比 ReadIndex 较差。
-
总体而言,KVServer 模块收到线性读请求后,通过架构图中流程3向 Raft 模块发起 ReadIndex 请求,Raft 模块将 Leader 最新的已提交日志索引封装在流程4的 ReadState 结构体,通过 channel 层层返回给线性读模块,线性读模块等待本节点状态机追赶上 Leader 进度,追赶完成后,就通知 KVServer 模块,进行架构图中流程5,与状态机中的 MVCC 模块进行进行交互了。
MVCC
流程5中的多版本并发控制 (Multiversion concurrency control) 模块是为了解决 etcd v2 不支持保存 key 的历史版本、不支持多 key 事务等问题而产生的。
-
它核心由内存树形索引模块 (
treeIndex) 和嵌入式的 KV 持久化存储库boltdb组成。 -
首先需要简单了解下
boltdb,它是个基于 B+ tree 实现的 key-value 键值库,支持事务,提供 Get/Put 等简易 API 给 etcd 操作。 - 那么 etcd 如何基于 boltdb 保存一个 key 的多个历史版本呢?
- 比如现在有以下方案:方案 1 是一个 key 保存多个历史版本的值;方案 2 每次修改操作,生成一个新的版本号 (revision),以版本号为 key,value 为用户 key-value 等信息组成的结构体。
- 很显然方案 1 会导致 value 较大,存在明显读写放大、并发冲突等问题,而方案 2 正是 etcd 所采用的。boltdb 的 key 是全局递增的版本号 (revision),value 是用户 key、value 等字段组合成的结构体,然后通过 treeIndex 模块来保存用户 key 和版本号的映射关系。
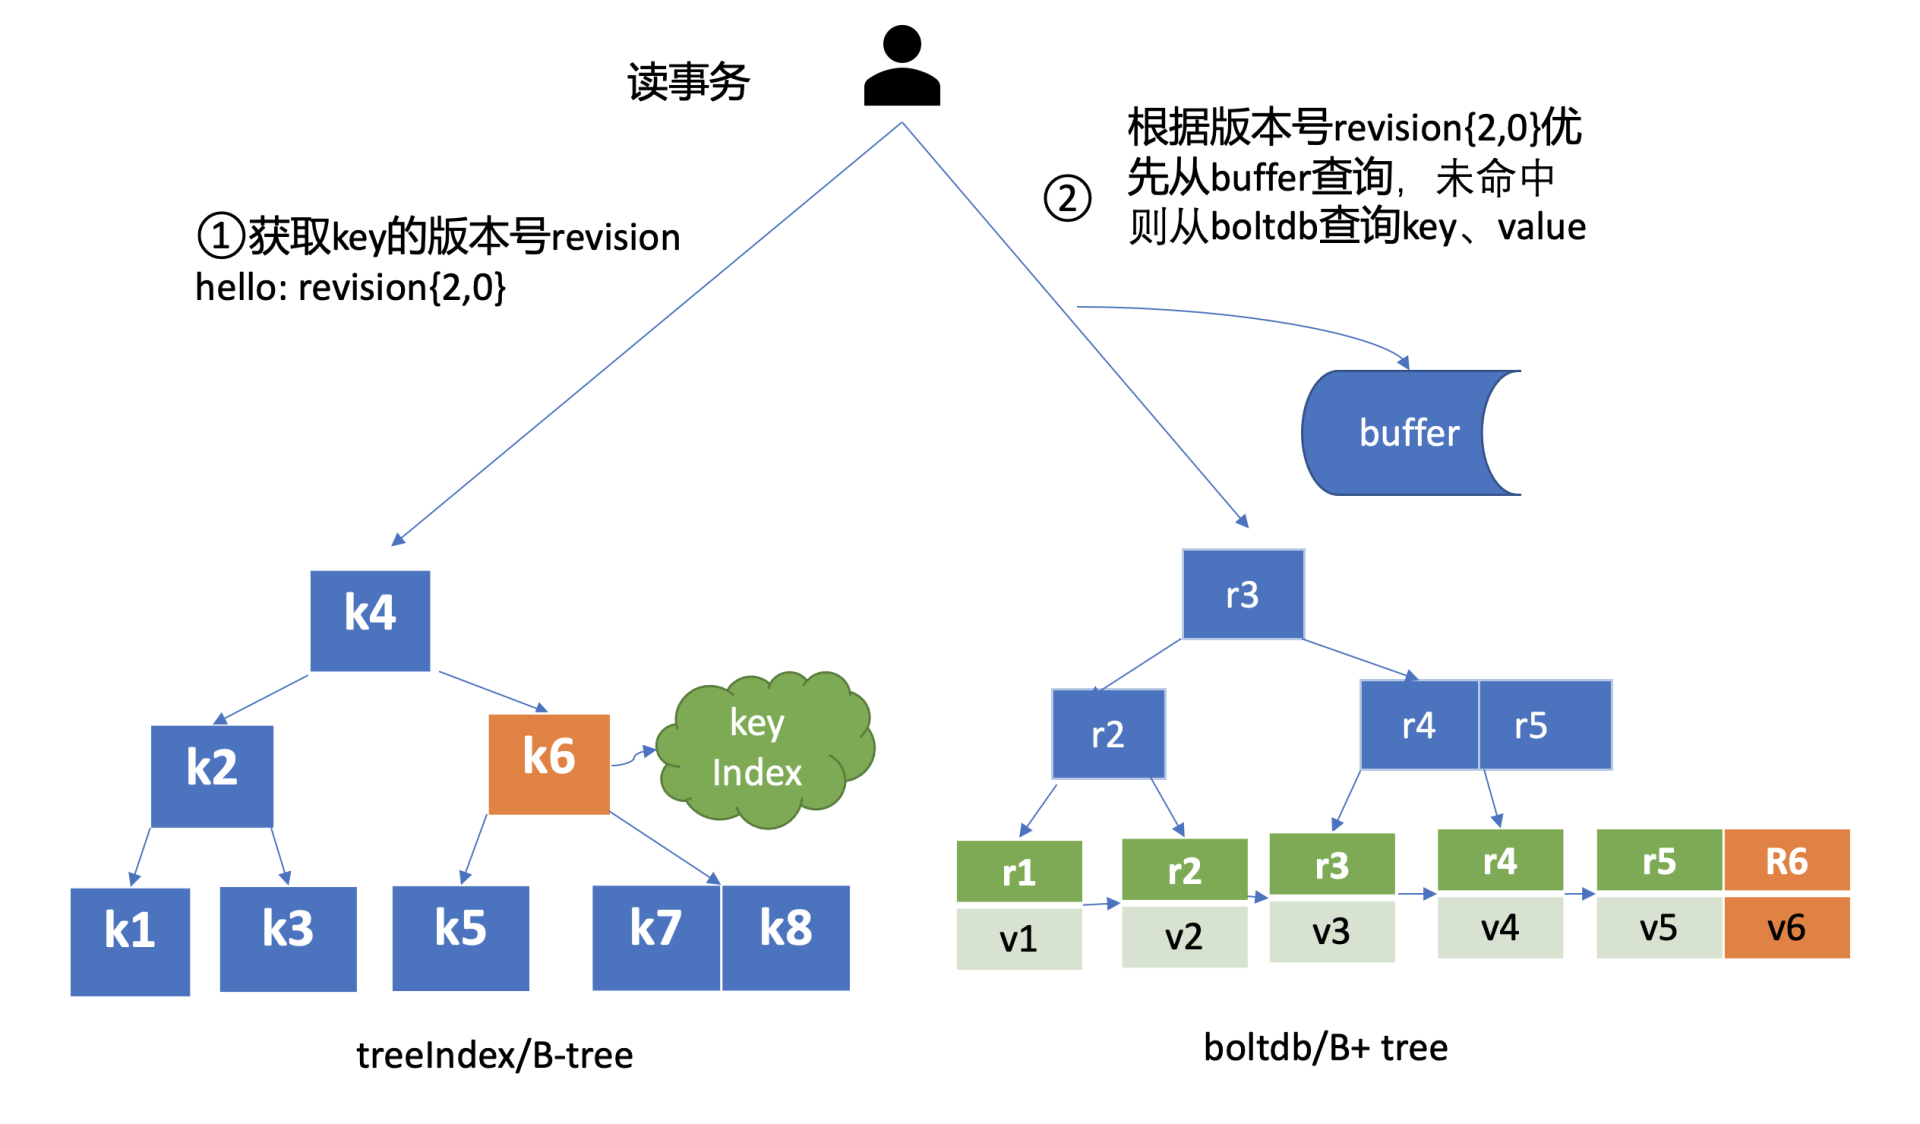
treeIndex与boltdb关系如下面的读事务流程图所示,从treeIndex中获取 key hello 的版本号,再以版本号作为boltdb的 key,从boltdb中获取其value信息。
* B树更适合于需要频繁更新数据的场景,因为它可以在每个节点中存储更多的键值对,从而减少树的高度和磁盘I/O操作。然而,其搜索路径可能较长,不适合顺序访问。
* B+树则更适合于顺序访问和范围查询的场景,如文件系统和数据库索引。它通过将所有数据存储在叶子节点并链接成链表,使得范围查询更加高效。

因此,如果主要关注的是数据的插入和删除效率,可以选择B树;如果更关注顺序访问和范围查询的性能,则应优先考虑B+树。

https://dezeming.top/wp-content/uploads/2023/04/B-Tree%E5%92%8CBTree.pdf
treeIndex
-
treeIndex 模块是基于 Google 开源的内存版 btree 库实现的,为什么 etcd 选择上图中的 B-tree 数据结构保存用户 key 与版本号之间的映射关系,而不是哈希表、二叉树呢?(后面介绍)
-
treeIndex 模块只会保存用户的 key 和相关版本号信息,用户 key 的 value 数据存储在 boltdb 里面,相比 ZooKeeper 和 etcd v2 全内存存储,etcd v3 对内存要求更低。
-
简单介绍了 etcd 如何保存 key 的历史版本后,架构图中流程6也就非常容易理解了,它需要从 treeIndex 模块中获取 hello 这个 key 对应的版本号信息。treeIndex 模块基于 B-tree 快速查找此 key,返回此 key 对应的索引项
keyIndex即可。索引项中包含版本号等信息。
buffer
-
在获取到版本号信息后,就可从 boltdb 模块中获取用户的 key-value 数据了。不过有一点要注意,并不是所有请求都一定要从 boltdb 获取数据。
-
etcd 出于数据一致性、性能等考虑,在访问 boltdb 前,首先会从一个内存读事务 buffer 中,二分查找要访问 key 是否在 buffer 里面,若命中则直接返回。
boltdb
-
若 buffer 未命中,此时就真正需要向 boltdb 模块查询数据了,进入了流程7。
-
我们知道 MySQL 通过 table 实现不同数据逻辑隔离,那么在 boltdb 是如何隔离集群元数据与用户数据的呢?答案是
bucket。boltdb 里每个bucket类似对应 MySQL 一个表,用户的 key 数据存放的 bucket 名字的是 key,etcd MVCC 元数据存放的 bucket 是 meta。 -
因 boltdb 使用 B+ tree 来组织用户的 key-value 数据,获取 bucket key 对象后,通过 boltdb 的游标 Cursor 可快速在 B+ tree 找到 key hello 对应的 value 数据,返回给 client。
-
到这里,一个读请求之路执行完成。
Q&A
etcd 在执行读请求过程中涉及磁盘 IO 吗?如果涉及,是什么模块在什么场景下会触发呢?如果不涉及,又是什么原因呢?
有同学说 buffer 没读到,从 boltdb 读时会产生磁盘 I/O,这是一个常见误区。
实际上,etcd 在启动的时候会通过 mmap 机制将 etcd db 文件映射到 etcd 进程地址空间,并设置了 mmap 的 MAP_POPULATE flag,它会告诉 Linux 内核预读文件,Linux 内核会将文件内容拷贝到物理内存中,此时会产生磁盘 I/O。节点内存足够的请求下,后续处理读请求过程中就不会产生磁盘 I/IO 了。
若 etcd 节点内存不足,可能会导致 db 文件对应的内存页被换出,当读请求命中的页未在内存中时,就会产生缺页异常,导致读过程中产生磁盘 IO,可以通过观察 etcd 进程的 majflt 字段来判断 etcd 是否产生了主缺页中断。
readIndex 需要请求 leader,为什么不直接让 leader 返回读请求的结果,而要等待 follower 的进度赶上 leader?
非常好的问题,我个人认为主要还是性能因素,我记得 etcd v2 早期的时候如果你指定线性读/共识读,它就是直接转发给 leader 的。后来在 etcd v3.0 中实现了 raft log read 但是要走一遍 raft log,读涉及到磁盘IO,v3.1 中引入了 readIndex 机制,它是非常轻量级的,开销较小,相比各个 follower 都转发给 leader 会导致 leader 负载较高,特别是 expensive request 场景,性能会急剧下降,leader 的内存、CPU、网络带宽资源都很容易耗尽,readIndex 机制的引入,使得每个 follower 节点都可以处理读请求,极大扩展提升了写性能。
当 readindex 结束并等待本节点的状态机apply的时候,key又被最新的更新请求给更新了怎么办,这个时候读取到的value是不是又是旧值了?
线性读,读出来的值实际上是你发出读请求时间点的集群最新共识数据,在你读请求发出后,若耗时一定时间还未完成,在这过程中leader又收到了写请求更新了它,的确你原来读出来的值相比最新的集群共识就是旧的,在实际应用中,我们一般会通过增加版本号检测识别此类问题,后面事务篇会详细介绍。
etcd一个写请求是如何执行的?
那么 etcd 一个写请求执行流程又是怎样的呢?在执行写请求过程中,如果进程 crash 了,如何保证数据不丢、命令不重复执行呢?

在如上的架构图中,用序号标识了下面的一个 put hello 为 world 的写请求的简要执行流程,帮助从整体上快速了解一个写请求的全貌。
$ etcdctl put hello world --endpoints http://127.0.0.1:2379
OK
-
首先 client 端通过负载均衡算法选择一个 etcd 节点,发起 gRPC 调用。然后 etcd 节点收到请求后经过 gRPC 拦截器、Quota 模块后,进入 KVServer 模块,KVServer 模块向 Raft 模块提交一个提案,提案内容为“大家好,请使用 put 方法执行一个 key 为 hello,value 为 world 的命令”。
-
随后此提案通过 RaftHTTP 网络模块转发、经过集群多数节点持久化后,状态会变成已提交,etcdserver 从 Raft 模块获取已提交的日志条目,传递给 Apply 模块,Apply 模块通过 MVCC 模块执行提案内容,更新状态机。
-
与读流程不一样的是写流程还涉及 Quota、WAL、Apply 三个模块。crash-safe 及幂等性也正是基于 WAL 和 Apply 流程的 consistent index 等实现的,因此重点介绍这三个模块。
Quota (限额) 模块
-
首先是流程1 client 端发起 gRPC 调用到 etcd 节点,和读请求不一样的是,写请求需要经过流程二 db 配额(Quota)模块,它有什么功能呢?
- 先从此模块的一个常见错误说起,在使用 etcd 过程中是否遇到过 “etcdserver: mvcc: database space exceeded” 错误呢?只要使用过 etcd 或者 Kubernetes,大概率见过这个错误。它是指当前 etcd db 文件大小超过了配额,当出现此错误后,整个集群将不可写入,只读,对业务的影响非常大。
- 哪些情况会触发这个错误呢?一方面默认 db 配额仅为 2G,当业务数据、写入 QPS、Kubernetes 集群规模增大后,etcd db 大小就可能会超过 2G。另一方面 etcd v3 是个 MVCC 数据库,保存了 key 的历史版本,当未配置压缩策略的时候,随着数据不断写入,db 大小会不断增大,导致超限。
- 了解完触发 Quota 限制的原因后,再详细了解下 Quota 模块它是如何工作的。
- 当 etcd server 收到 put/txn 等写请求的时候,会首先检查下当前 etcd db 大小加上请求的 key-value 大小之和是否超过了配额(quota-backend-bytes)。
- 如果超过了配额,它会产生一个告警(Alarm)请求,告警类型是 NO SPACE,并通过 Raft 日志同步给其它节点,告知 db 无空间了,并将告警持久化存储到 db 中。
- 最终,无论是 API 层 gRPC 模块还是负责将 Raft 侧已提交的日志条目应用到状态机的 Apply 模块,都拒绝写入,集群只读。
- 那遇到这个错误时应该如何解决呢?
- 首先当然是调大配额。具体多大合适呢?etcd 社区建议不超过 8G。遇到过这个错误的你是否还记得,为什么当你把配额(quota-backend-bytes)调大后,集群依然拒绝写入呢?
- 原因就是前面提到的 NO SPACE 告警。Apply 模块在执行每个命令的时候,都会去检查当前是否存在 NO SPACE 告警,如果有则拒绝写入。所以还需要你额外发送一个取消告警(etcdctl alarm disarm)的命令,以消除所有告警。
- 其次需要检查 etcd 的压缩(compact)配置是否开启、配置是否合理。etcd 保存了一个 key 所有变更历史版本,如果没有一个机制去回收旧的版本,那么内存和 db 大小就会一直膨胀,在 etcd 里面,压缩模块负责回收旧版本的工作。
- 压缩模块支持按多种方式回收旧版本,比如保留最近一段时间内的历史版本。不过要注意,它仅仅是将旧版本占用的空间打个空闲(Free)标记,后续新的数据写入的时候可复用这块空间,而无需申请新的空间。
- 如果需要回收空间,减少 db 大小,得使用碎片整理(defrag),它会遍历旧的 db 文件数据,写入到一个新的 db 文件。但是它对服务性能有较大影响,不建议在生产集群频繁使用。
- 最后需要注意配额(quota-backend-bytes)的行为,默认0 就是使用 etcd 默认的 2GB 大小,需要根据业务场景适当调优。如果填的是个小于 0 的数,就会禁用配额功能,这可能会让 db 大小处于失控,导致性能下降,不建议禁用配额。
KVServer 模块
- 通过流程2的配额检查后,请求就从 API 层转发到了流程3的 KVServer 模块的 put 方法,我们知道 etcd 是基于 Raft 算法实现节点间数据复制的,因此它需要将 put 写请求内容打包成一个提案消息,提交给 Raft 模块。不过 KVServer 模块在提交提案前,还有如下的一系列检查和限速。
Preflight Check
-
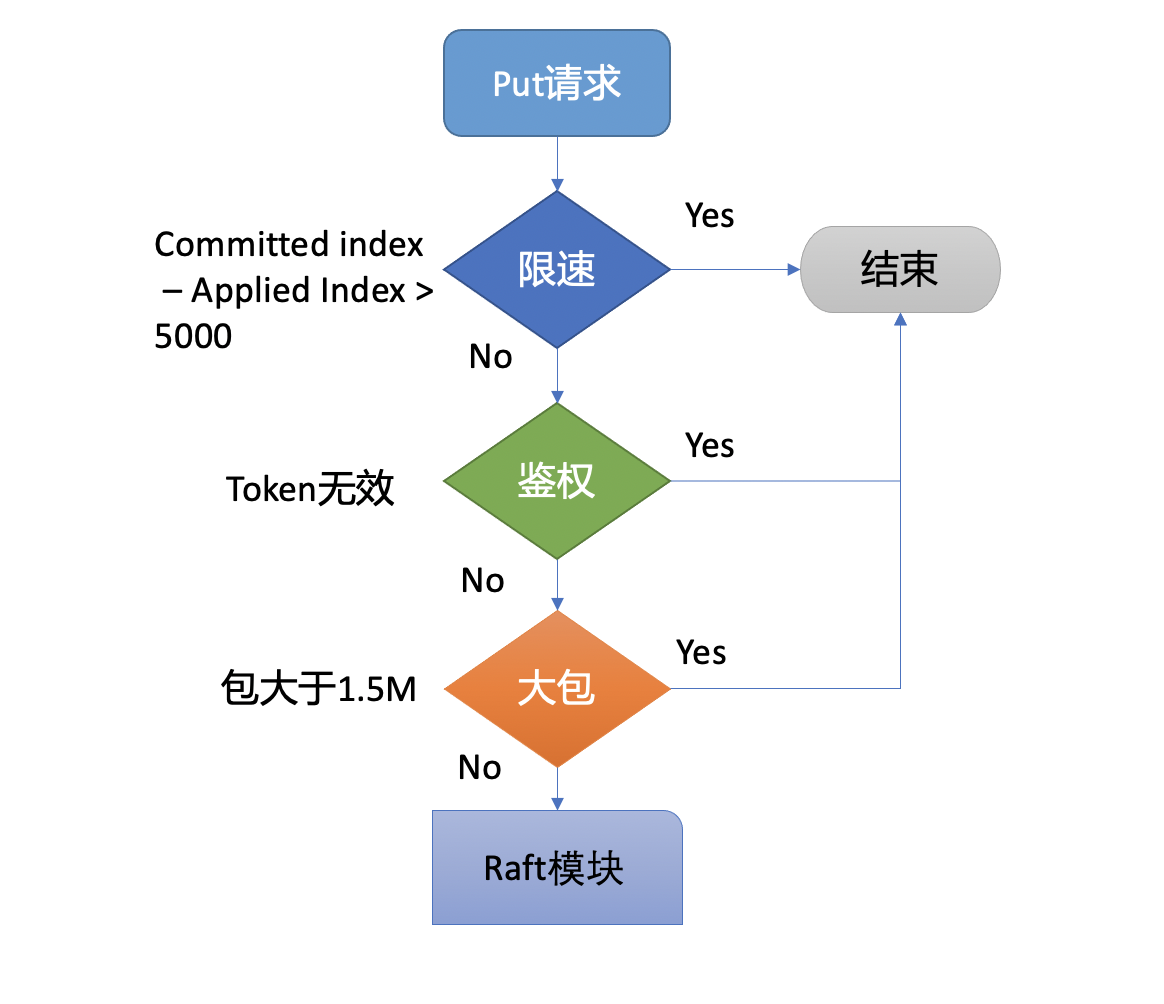
为了保证集群稳定性,避免雪崩,任何提交到 Raft 模块的请求,都会做一些简单的限速判断。如下面的流程图所示,首先,如果 Raft 模块已提交的日志索引(committed index)比已应用到状态机的日志索引(applied index)超过了 5000,那么它就返回一个 “etcdserver: too many requests” 错误给 client。
-
然后它会尝试去获取请求中的鉴权信息,若使用了密码鉴权、请求中携带了 token,如果 token 无效,则返回 “auth: invalid auth token” 错误给 client。
-
其次它会检查你写入的包大小是否超过默认的 1.5MB, 如果超过了会返回 “etcdserver: request is too large” 错误给给 client。
Propose
-
最后通过一系列检查之后,会生成一个唯一的 ID,将此请求关联到一个对应的消息通知 channel,然后向 Raft 模块发起(Propose)一个提案(Proposal),提案内容为 “大家好,请使用 put 方法执行一个 key 为 hello,value 为 world 的命令”,也就是整体架构图里的流程4。
-
向 Raft 模块发起提案后,KVServer 模块会等待此 put 请求,等待写入结果通过消息通知 channel 返回或者超时。etcd 默认超时时间是 7 秒(5 秒磁盘 IO 延时 + 2*1 秒竞选超时时间),如果一个请求超时未返回结果,则可能会出现你熟悉的 “etcdserver: request timed out” 错误。
WAL 模块
-
Raft 模块收到提案后,如果当前节点是 Follower,它会转发给 Leader,只有 Leader 才能处理写请求。Leader 收到提案后,通过 Raft 模块输出待转发给 Follower 节点的消息和待持久化的日志条目,日志条目则封装了上面所说的 put hello 提案内容。
-
etcdserver 从 Raft 模块获取到以上消息和日志条目后,作为 Leader,它会将 put 提案消息广播给集群各个节点,同时需要把集群 Leader 任期号、投票信息、已提交索引、提案内容持久化到一个 WAL(Write Ahead Log)日志文件中,用于保证集群的一致性、可恢复性,也就是图中的流程5模块。
-
WAL 日志结构是怎样的呢?
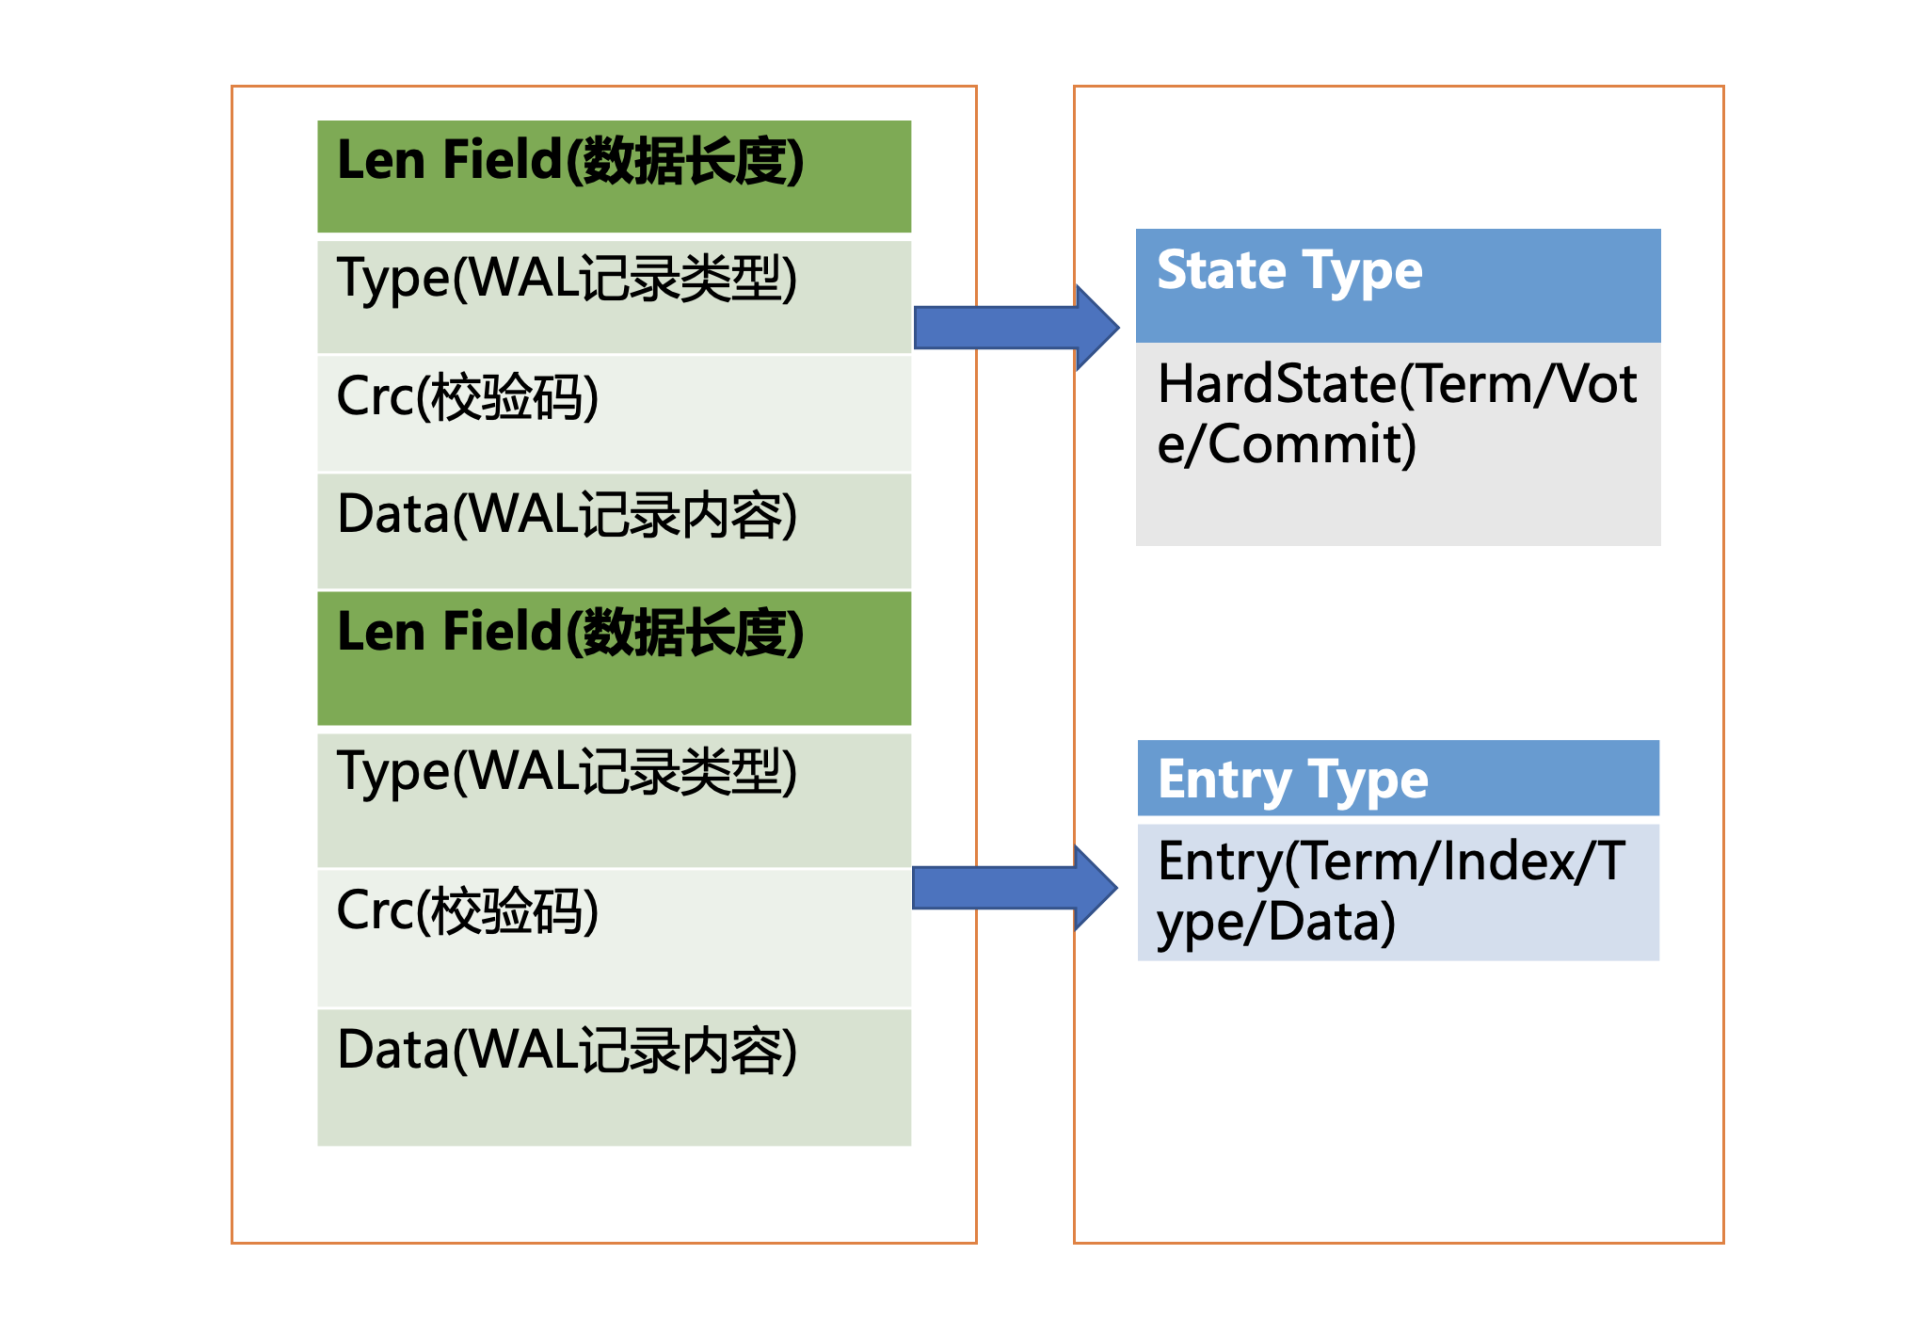
-
上图是 WAL 结构,它由多种类型的 WAL 记录顺序追加写入组成,每个记录由类型、数据、循环冗余校验码组成。不同类型的记录通过 Type 字段区分,Data 为对应记录内容,CRC 为循环校验码信息。
- WAL 记录类型目前支持 5 种,分别是文件元数据记录、日志条目记录、状态信息记录、CRC 记录、快照记录:
- 文件元数据记录包含节点 ID、集群 ID 信息,它在 WAL 文件创建的时候写入;
- 日志条目记录包含 Raft 日志信息,如 put 提案内容;
- 状态信息记录,包含集群的任期号、节点投票信息等,一个日志文件中会有多条,以最后的记录为准;
- CRC 记录包含上一个 WAL 文件的最后的 CRC(循环冗余校验码)信息, 在创建、切割 WAL 文件时,作为第一条记录写入到新的 WAL 文件, 用于校验数据文件的完整性、准确性等;
- 快照记录包含快照的任期号、日志索引信息,用于检查快照文件的准确性。
- WAL 模块又是如何持久化一个 put 提案的日志条目类型记录呢? 首先来看看 put 写请求如何封装在 Raft 日志条目里面。下面是 Raft 日志条目的数据结构信息,它由以下字段组成:
- Term 是 Leader 任期号,随着 Leader 选举增加;
- Index 是日志条目的索引,单调递增增加;
- Type 是日志类型,比如是普通的命令日志(EntryNormal)还是集群配置变更日志(EntryConfChange);
- Data 保存上面描述的 put 提案内容。
type Entry struct {
   Term             uint64    `protobuf:"varint,2,opt,name=Term" json:"Term"`
   Index            uint64    `protobuf:"varint,3,opt,name=Index" json:"Index"`
   Type             EntryType `protobuf:"varint,1,opt,name=Type,enum=Raftpb.EntryType" json:"Type"`
   Data             []byte    `protobuf:"bytes,4,opt,name=Data" json:"Data,omitempty"`
}
-
了解完 Raft 日志条目数据结构后,再看 WAL 模块如何持久化 Raft 日志条目。它首先先将 Raft 日志条目内容(含任期号、索引、提案内容)序列化后保存到 WAL 记录的 Data 字段, 然后计算 Data 的 CRC 值,设置 Type 为 Entry Type, 以上信息就组成了一个完整的 WAL 记录。
-
最后计算 WAL 记录的长度,顺序先写入 WAL 长度(Len Field),然后写入记录内容,调用
fsync持久化到磁盘,完成将日志条目保存到持久化存储中。 -
当一半以上节点持久化此日志条目后,Raft 模块就会通过 channel 告知 etcdserver 模块,put 提案已经被集群多数节点确认,提案状态为已提交,可以执行此提案内容了。
-
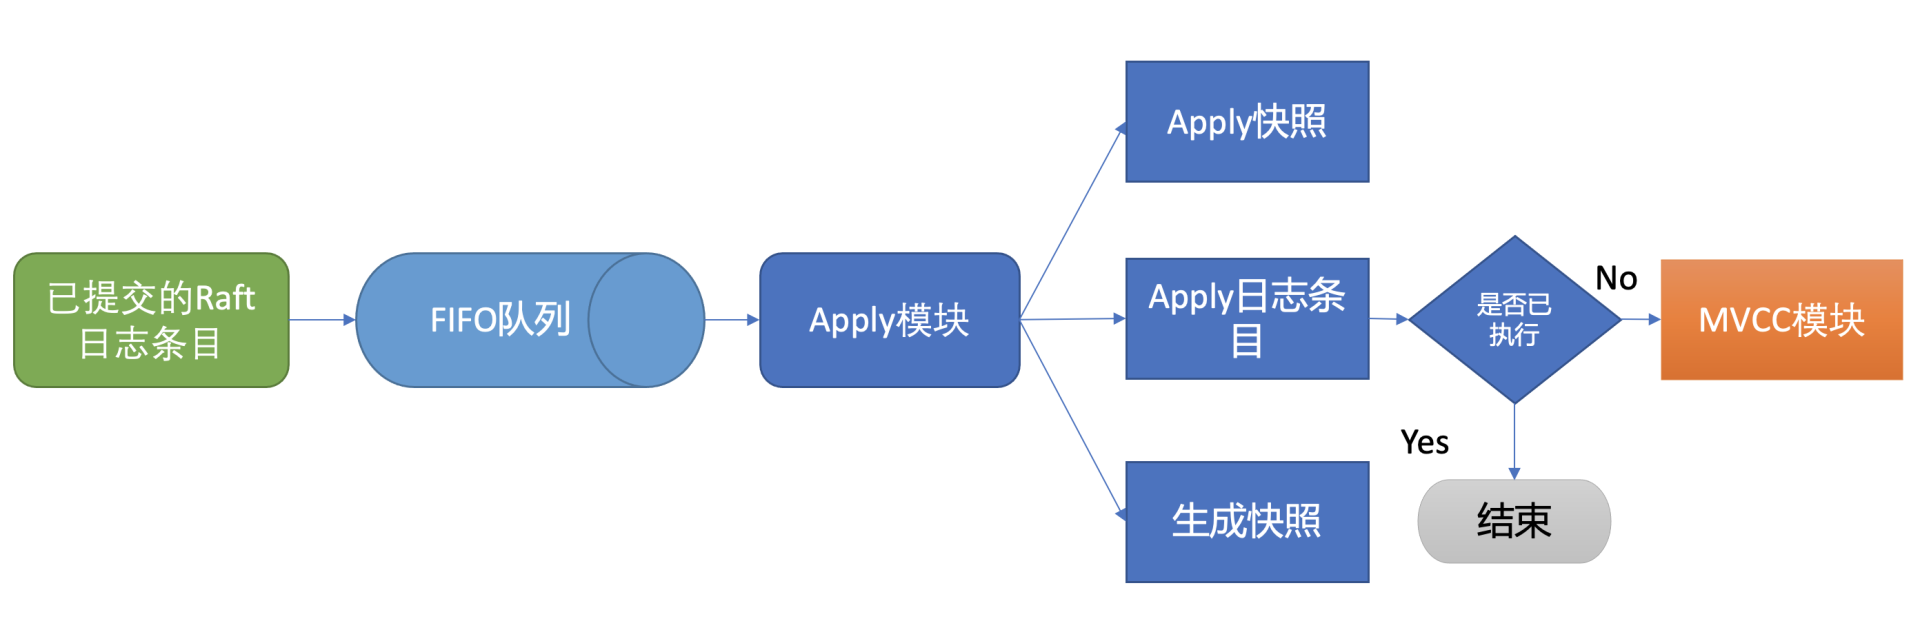
于是进入流程6,etcdserver 模块从 channel 取出提案内容,添加到先进先出(FIFO)调度队列,随后通过 Apply 模块按入队顺序,异步、依次执行提案内容。
Apply 模块
- 执行 put 提案内容对应架构图中的流程7,其细节图如下。那么 Apply 模块是如何执行 put 请求的呢?若 put 请求提案在执行流程7的时候 etcd 突然 crash 了,重启恢复的时候,etcd 是如何找回异常提案,再次执行的呢?
-
核心就是上面介绍的 WAL 日志,因为提交给 Apply 模块执行的提案已获得多数节点确认、持久化,etcd 重启时,会从 WAL 中解析出 Raft 日志条目内容,追加到 Raft 日志的存储中,并重放已提交的日志提案给 Apply 模块执行。
-
然而这又引发了另外一个问题,如何确保幂等性,防止提案重复执行导致数据混乱呢?
-
etcd 是个 MVCC 数据库,每次更新都会生成新的版本号。如果没有幂等性保护,同样的命令,一部分节点执行一次,一部分节点遭遇异常故障后执行多次,则系统的各节点一致性状态无法得到保证,导致数据混乱,这是严重故障。因此 etcd 必须要确保幂等性。怎么做呢?Apply 模块从 Raft 模块获得的日志条目信息里,是否有唯一的字段能标识这个提案?
-
答案就是上面介绍 Raft 日志条目中的索引(index)字段。日志条目索引是全局单调递增的,每个日志条目索引对应一个提案,如果一个命令执行后,在 db 里面也记录下当前已经执行过的日志条目索引,是不是就可以解决幂等性问题呢?是的。但是这还不够安全,如果执行命令的请求更新成功了,更新 index 的请求却失败了,是不是一样会导致异常?因此在实现上,还需要将两个操作作为原子性事务提交,才能实现幂等。
-
正如上面的讨论的这样,etcd 通过引入一个 consistent index 的字段,来存储系统当前已经执行过的日志条目索引,实现幂等性。
-
Apply 模块在执行提案内容前,首先会判断当前提案是否已经执行过了,如果执行了则直接返回,若未执行同时无 db 配额满告警,则进入到 MVCC 模块,开始与持久化存储模块打交道。
MVCC
- Apply 模块判断此提案未执行后,就会调用 MVCC 模块来执行提案内容。MVCC 主要由两部分组成,一个是内存索引模块 treeIndex,保存 key 的历史版本号信息,另一个是 boltdb 模块,用来持久化存储 key-value 数据。那么 MVCC 模块执行 put hello 为 world 命令时,它是如何构建内存索引和保存哪些数据到 db 呢?
treeIndex
-
首先来看 MVCC 的索引模块 treeIndex,当收到更新 key hello 为 world 的时候,此 key 的索引版本号信息是怎么生成的呢?需要维护、持久化存储一个全局版本号吗?
-
版本号(revision)在 etcd 里面发挥着重大作用,它是 etcd 的逻辑时钟。etcd 启动的时候默认版本号是 1,随着对 key 的增、删、改操作而全局单调递增。
-
因为 boltdb 中的 key 就包含此信息,所以 etcd 并不需要再去持久化一个全局版本号。只需要在启动的时候,从最小值 1 开始枚举到最大值,未读到数据的时候则结束,最后读出来的版本号即是当前 etcd 的最大版本号 currentRevision。
-
MVCC 写事务在执行 put hello 为 world 的请求时,会基于 currentRevision 自增生成新的 revision 如{2,0},然后从 treeIndex 模块中查询 key 的创建版本号、修改次数信息。这些信息将填充到 boltdb 的 value 中,同时将用户的 hello key 和 revision 等信息存储到 B-tree,也就是下面简易写事务图的流程1,整体架构图中的流程8。
boltdb
-
MVCC 写事务自增全局版本号后生成的 revision{2,0},它就是 boltdb 的 key,通过它就可以往 boltdb 写数据了,进入了整体架构图中的流程9。
-
boltdb 它是一个基于 B+tree 实现的 key-value 嵌入式 db,它通过提供桶(bucket)机制实现类似 MySQL 表的逻辑隔离。
-
在 etcd 里面通过 put/txn 等 KV API 操作的数据,全部保存在一个名为 key 的桶里面,这个 key 桶在启动 etcd 的时候会自动创建。
-
除了保存用户 KV 数据的 key 桶,etcd 本身及其它功能需要持久化存储的话,都会创建对应的桶。比如上面提到的 etcd 为了保证日志的幂等性,保存了一个名为 consistent index 的变量在 db 里面,它实际上就存储在元数据(meta)桶里面。
- 那么写入 boltdb 的 value 含有哪些信息呢?写入 boltdb 的 value,并不是简单的 “world”,如果只存一个用户 value,索引又是保存在易失的内存上,那重启 etcd 后,就丢失了用户的 key 名,无法构建 treeIndex 模块了。因此为了构建索引和支持 Lease 等特性,etcd 会持久化以下信息:
- key 名称;
- key 创建时的版本号(create_revision)、最后一次修改时的版本号(mod_revision)、key 自身修改的次数(version);
- value 值;
- 租约信息(后面介绍)。
-
boltdb value 的值就是将含以上信息的结构体序列化成的二进制数据,然后通过 boltdb 提供的 put 接口,etcd 就快速完成了将数据写入 boltdb,对应上面简易写事务图的流程2。
-
但是 put 调用成功,就能够代表数据已经持久化到 db 文件了吗?这里需要注意的是,在以上流程中,etcd 并未提交事务(commit),因此数据只更新在 boltdb 所管理的内存数据结构中。
- 事务提交的过程,包含 B+tree 的平衡、分裂,将 boltdb 的脏数据(dirty page)、元数据信息刷新到磁盘,因此事务提交的开销是昂贵的。如果每次更新都提交事务,etcd 写性能就会较差。那么解决的办法是什么呢?etcd 的解决方案是合并再合并。
- 首先 boltdb key 是版本号,put/delete 操作时,都会基于当前版本号递增生成新的版本号,因此属于顺序写入,可以调整 boltdb 的 bucket.FillPercent 参数,使每个 page 填充更多数据,减少 page 的分裂次数并降低 db 空间。
- 其次 etcd 通过合并多个写事务请求,通常情况下,是异步机制定时(默认每隔 100ms)将批量事务一次性提交(pending 事务过多才会触发同步提交),从而大大提高吞吐量,对应上面简易写事务图的流程3。
- 但是这优化又引发了另外的一个问题,因为事务未提交,读请求可能无法从 boltdb 获取到最新数据。
- 为了解决这个问题,etcd 引入了一个 bucket buffer 来保存暂未提交的事务数据。在更新 boltdb 的时候,etcd 也会同步数据到 bucket buffer。因此 etcd 处理读请求的时候会优先从 bucket buffer 里面读取,其次再从 boltdb 读,通过 bucket buffer 实现读写性能提升,同时保证数据一致性。
Q&A
expensive read 请求(如 Kubernetes 场景中查询大量 pod)会影响写请求的性能吗?
在 etcd 3.0 中,线性读请求需要走一遍 Raft 协议持久化到 WAL 日志中,因此读性能非常差,写请求肯定也会被影响。
在 etcd 3.1 中,引入了 ReadIndex 机制提升读性能,读请求无需再持久化到 WAL 中。
在 etcd 3.2 中, 优化思路转移到了 MVCC/boltdb 模块,boltdb 的事务锁由粗粒度的互斥锁,优化成读写锁,实现 “N reads or 1 write” 的并行,同时引入了 buffer 来提升吞吐量。问题就出在这个 buffer,读事务会加读锁,写事务结束时要升级锁更新 buffer,但是 expensive request 导致读事务长时间持有锁,最终导致写请求超时。
在 etcd 3.4 中,实现了全并发读,创建读事务的时候会全量拷贝 buffer, 读写事务不再因为 buffer 阻塞,大大缓解了 expensive request 对 etcd 性能的影响。尤其是 Kubernetes List Pod 等资源场景来说,etcd 稳定性显著提升。
Raft 协议:etcd 如何实现高可用、数据强一致的
如何避免单点故障
-
首先回想下,早期使用的数据存储服务,它们往往是部署在单节点上的。但是单节点存在单点故障,一宕机就整个服务不可用,对业务影响非常大。
-
随后,为了解决单点问题,软件系统工程师引入了数据复制技术,实现多副本。通过数据复制方案,一方面可以提高服务可用性,避免单点故障。另一方面,多副本可以提升读吞吐量、甚至就近部署在业务所在的地理位置,降低访问延迟。
多副本复制是如何实现的呢
-
多副本常用的技术方案主要有主从复制和去中心化复制。
- 主从复制,又分为全同步复制、异步复制、半同步复制,比如 MySQL/Redis 单机主备版就基于主从复制实现的。
- 全同步复制,是指主收到一个写请求后,必须等待全部从节点确认返回后,才能返回给客户端成功。因此如果一个从节点故障,整个系统就会不可用。这种方案为了保证多副本的一致性,而牺牲了可用性,一般使用不多。
- 异步复制,是指主收到一个写请求后,可及时返回给 client,异步将请求转发给各个副本,若还未将请求转发到副本前就故障了,则可能导致数据丢失,但是可用性是最高的。
- 半同步复制,介于全同步复制、异步复制之间,它是指主收到一个写请求后,至少有一个副本接收数据后,就可以返回给客户端成功,在数据一致性、可用性上实现了平衡和取舍。
- 去中心化复制,是指在一个 n 副本节点集群中,任意节点都可接受写请求,但一个成功的写入需要 w 个节点确认,读取也必须查询至少 r 个节点。
- 可以根据实际业务场景对数据一致性的敏感度,设置合适 w/r 参数。比如希望每次写入后,任意 client 都能读取到新值,如果 n 是 3 个副本,可以将 w 和 r 设置为 2,这样当读两个节点时候,必有一个节点含有最近写入的新值,这种读称之为法定票数读(quorum read)。
- AWS 的 Dynamo 系统就是基于去中心化的复制算法实现的。它的优点是节点角色都是平等的,降低运维复杂度,可用性更高。但是缺陷是去中心化复制,势必会导致各种写入冲突,业务需要关注冲突处理。
如何解决以上复制算法的困境呢
答案就是共识算法,它最早是基于复制状态机背景下提出来的。 下图是复制状态机的结构(引用自 Raft paper), 它由共识模块、日志模块、状态机组成。通过共识模块保证各个节点日志的一致性,然后各个节点基于同样的日志、顺序执行指令,最终各个复制状态机的结果实现一致。
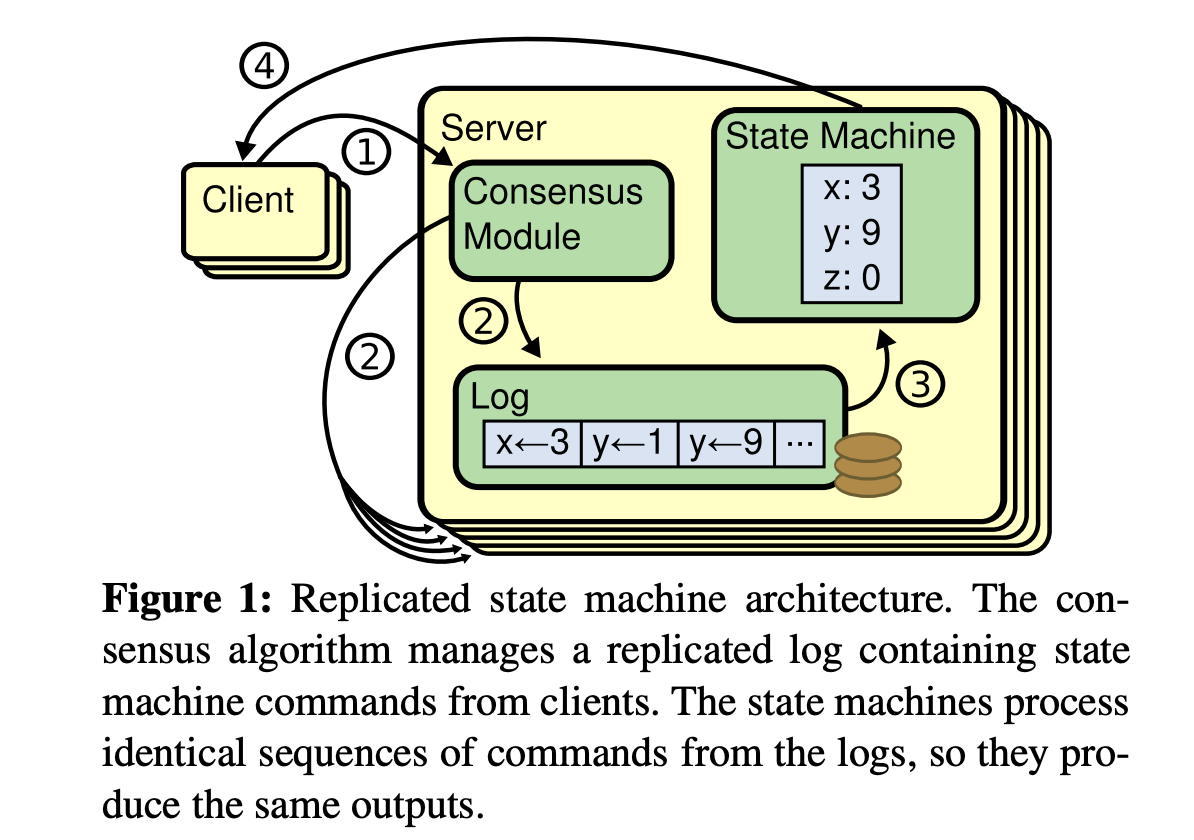
- 共识算法的祖师爷是 Paxos, 但是由于它过于复杂,难于理解,工程实践上也较难落地,导致在工程界落地较慢。standford 大学的 Diego 提出的 Raft 算法正是为了可理解性、易实现而诞生的,它通过问题分解,将复杂的共识问题拆分成三个子问题,分别是:
- Leader 选举,Leader 故障后集群能快速选出新 Leader
- 日志复制,集群只有 Leader 能写入日志,Leader 负责复制日志到 Follower 节点,并强制 Follower 节点与自己保持相同
- 安全性,一个任期内集群只能产生一个 Leader、已提交的日志条目在发生 Leader 选举时,一定会存在更高任期的新 Leader 日志中、各个节点的状态机应用的任意位置的日志条目内容应一样等。
Leader 选举
-
当 etcd server 收到 client 发起的 put hello 写请求后,KV 模块会向 Raft 模块提交一个 put 提案,只有集群 Leader 才能处理写提案,如果此时集群中无 Leader, 整个请求就会超时。
-
那么 Leader 是怎么诞生的呢?Leader crash 之后其他节点如何竞选呢?首先在 Raft 协议中它定义了集群中的如下节点状态,任何时刻,每个节点肯定处于其中一个状态:
- Follower,跟随者,同步从 Leader 收到的日志,etcd 启动的时候默认为此状态
- Candidate,竞选者,可以发起 Leader 选举
- Leader,集群领导者,唯一性,拥有同步日志的特权,需定时广播心跳给 Follower 节点,以维持领导者身份
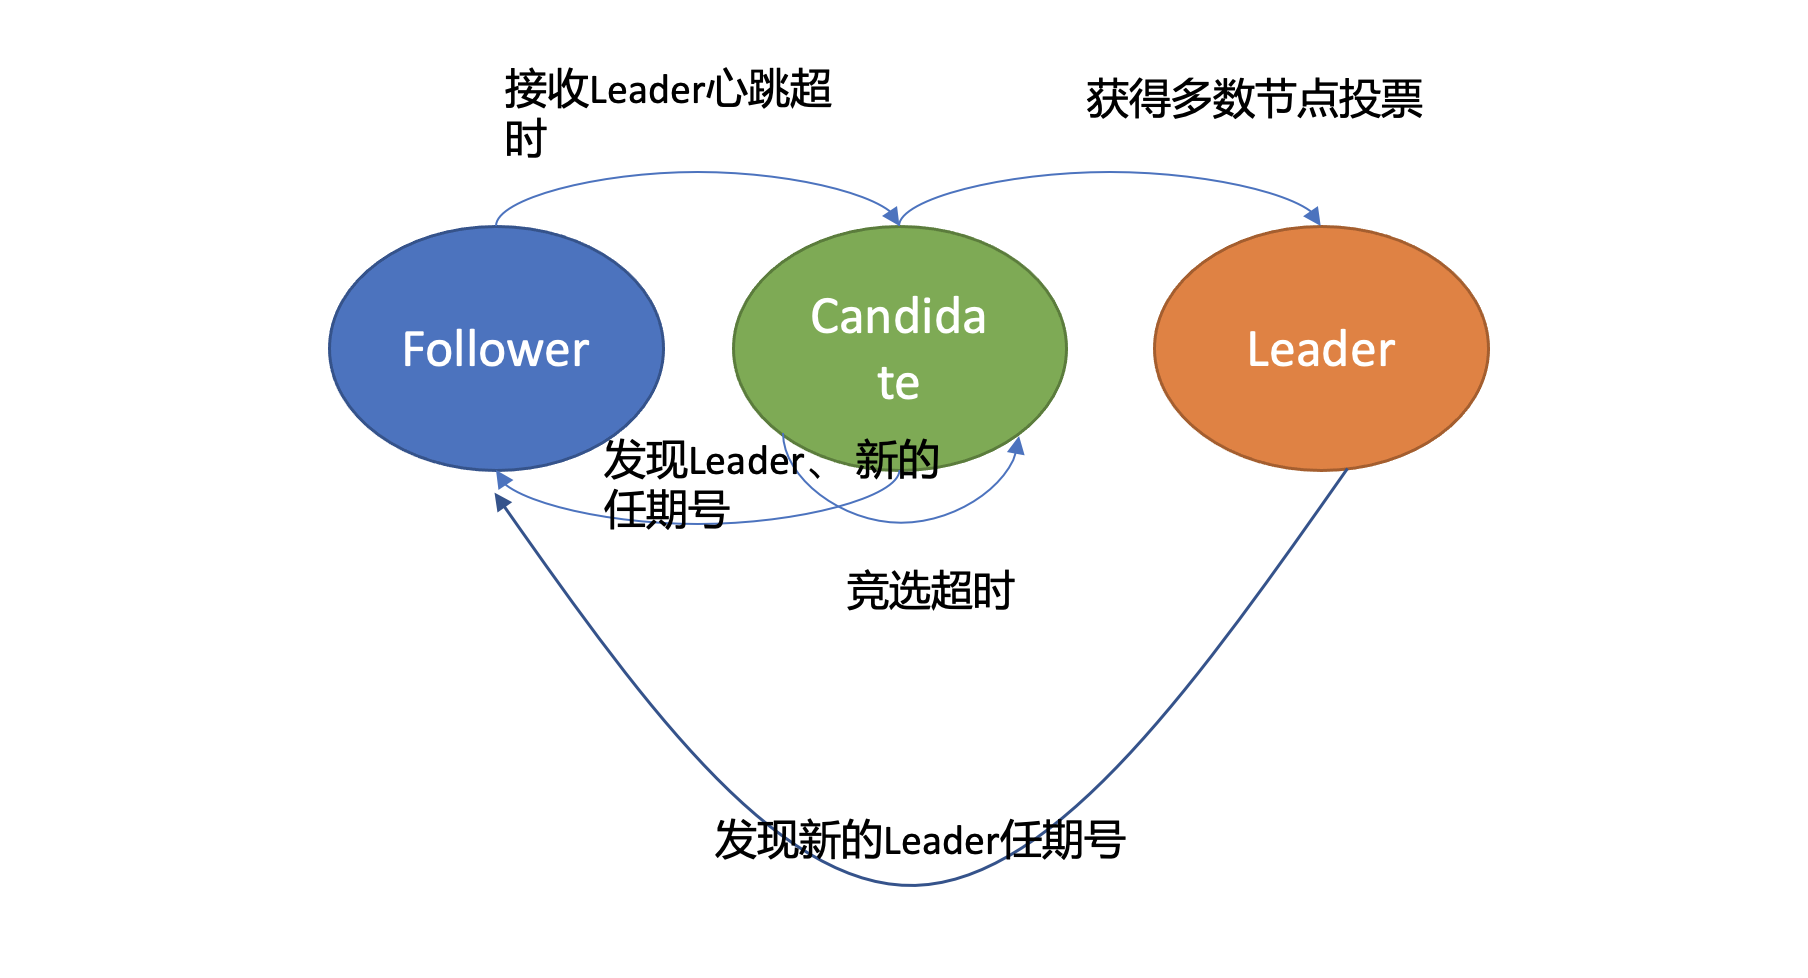
-
上图是节点状态变化关系图,当 Follower 节点接收 Leader 节点心跳消息超时后,它会转变成 Candidate 节点,并可发起竞选 Leader 投票,若获得集群多数节点的支持后,它就可转变成 Leader 节点。
-
下面以 Leader crash 场景为案例,详细介绍一下 etcd Leader 选举原理。
-
假设集群总共 3 个节点,A 节点为 Leader,B、C 节点为 Follower。
-
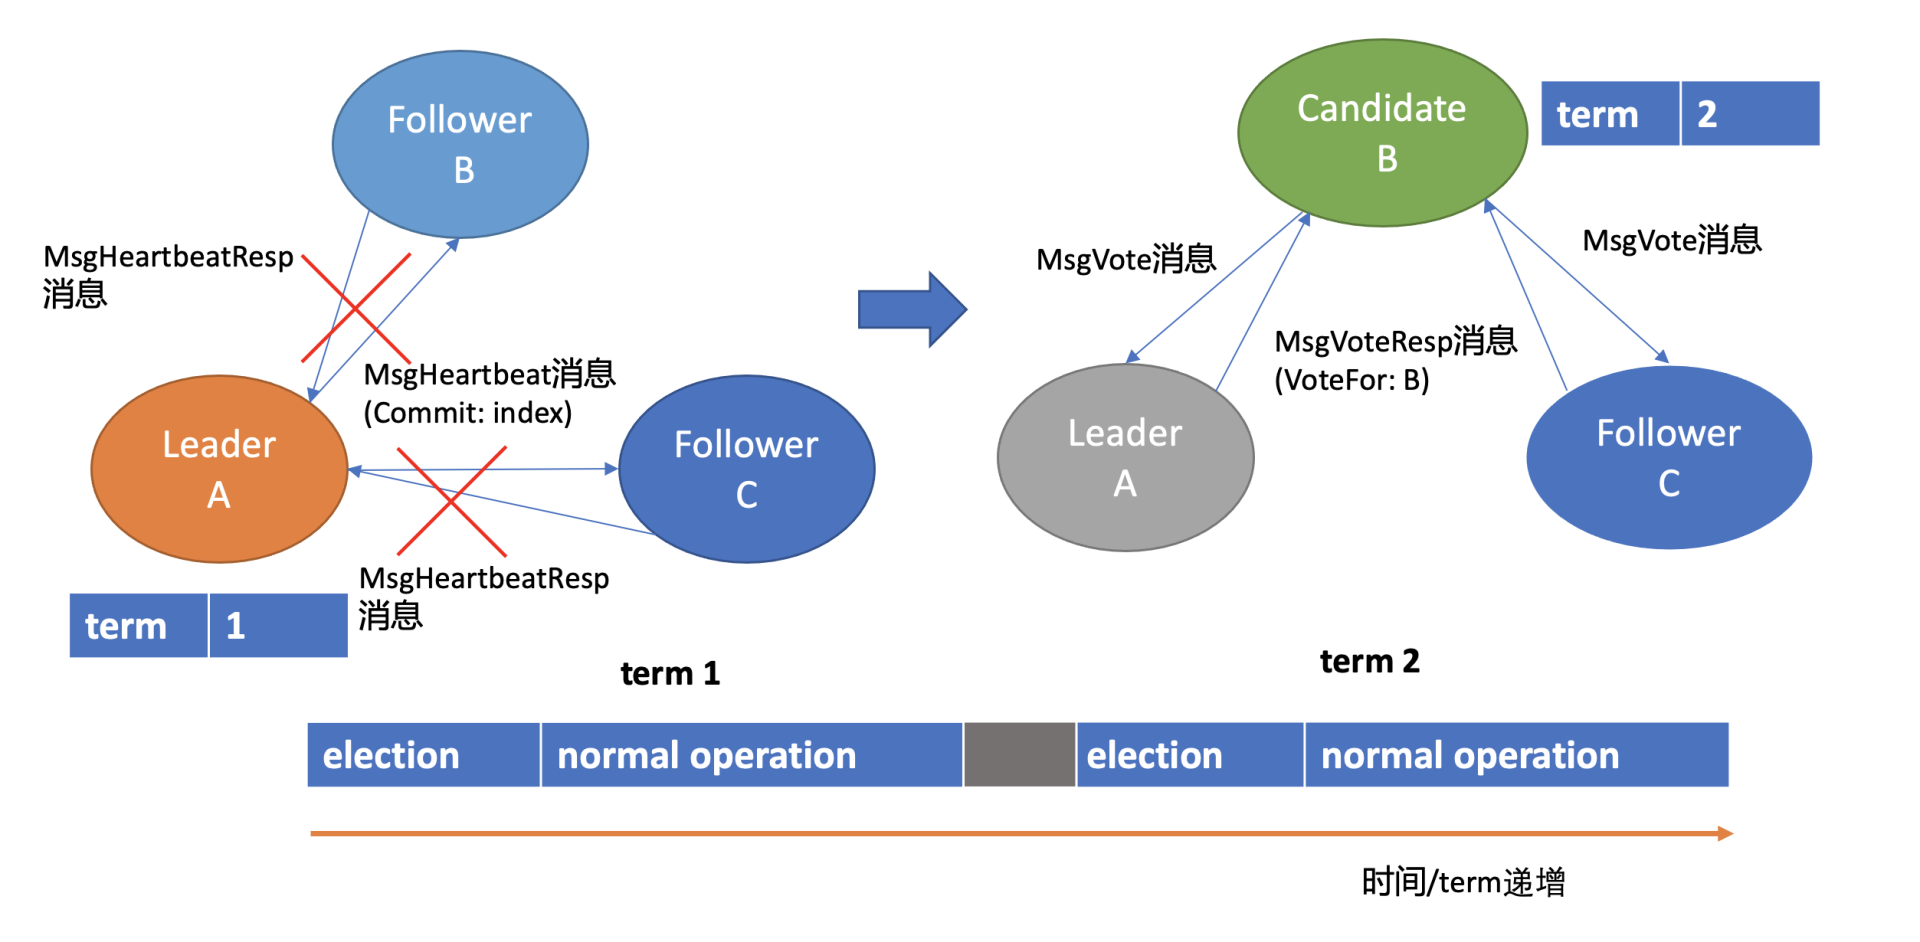
如上 Leader 选举图左边部分所示, 正常情况下,Leader 节点会按照心跳间隔时间,定时广播心跳消息(MsgHeartbeat 消息)给 Follower 节点,以维持 Leader 身份。 Follower 收到后回复心跳应答包消息(MsgHeartbeatResp 消息)给 Leader。
-
你可能注意到上图中的 Leader 节点下方有一个任期号(term),它具有什么样的作用呢?这是因为 Raft 将时间划分成一个个任期,任期用连续的整数表示,每个任期从一次选举开始,赢得选举的节点在该任期内充当 Leader 的职责,随着时间的消逝,集群可能会发生新的选举,任期号也会单调递增。通过任期号,可以比较各个节点的数据新旧、识别过期的 Leader 等,它在 Raft 算法中充当逻辑时钟,发挥着重要作用。
-
了解完正常情况下 Leader 维持身份的原理后,再看异常情况下,也就 Leader crash 后,etcd 是如何自愈的呢?
-
如上 Leader 选举图右边部分所示,当 Leader 节点异常后,Follower 节点会接收 Leader 的心跳消息超时,当超时时间大于竞选超时时间后,它们会进入 Candidate 状态。
-
这里要提醒下你,etcd 默认心跳间隔时间(heartbeat-interval)是
100ms, 默认竞选超时时间(election timeout)是1000ms, 你需要根据实际部署环境、业务场景适当调优,否则就很可能会频繁发生 Leader 选举切换,导致服务稳定性下降。 -
进入 Candidate 状态的节点,会立即发起选举流程,自增任期号,投票给自己,并向其他节点发送竞选 Leader 投票消息(MsgVote)。
- C 节点收到 Follower B 节点竞选 Leader 消息后,这时候可能会出现如下两种情况:
- 第一种情况是 C 节点判断 B 节点的数据至少和自己一样新、B 节点任期号大于 C 当前任期号、并且 C 未投票给其他候选者,就可投票给 B。这时 B 节点获得了集群多数节点支持,于是成为了新的 Leader。
- 第二种情况是,恰好 C 也心跳超时超过竞选时间了,它也发起了选举,并投票给了自己,那么它将拒绝投票给 B,这时谁也无法获取集群多数派支持,只能等待竞选超时,开启新一轮选举。Raft 为了优化选票被瓜分导致选举失败的问题,引入了随机数,每个节点等待发起选举的时间点不一致,优雅的解决了潜在的竞选活锁,同时易于理解。
-
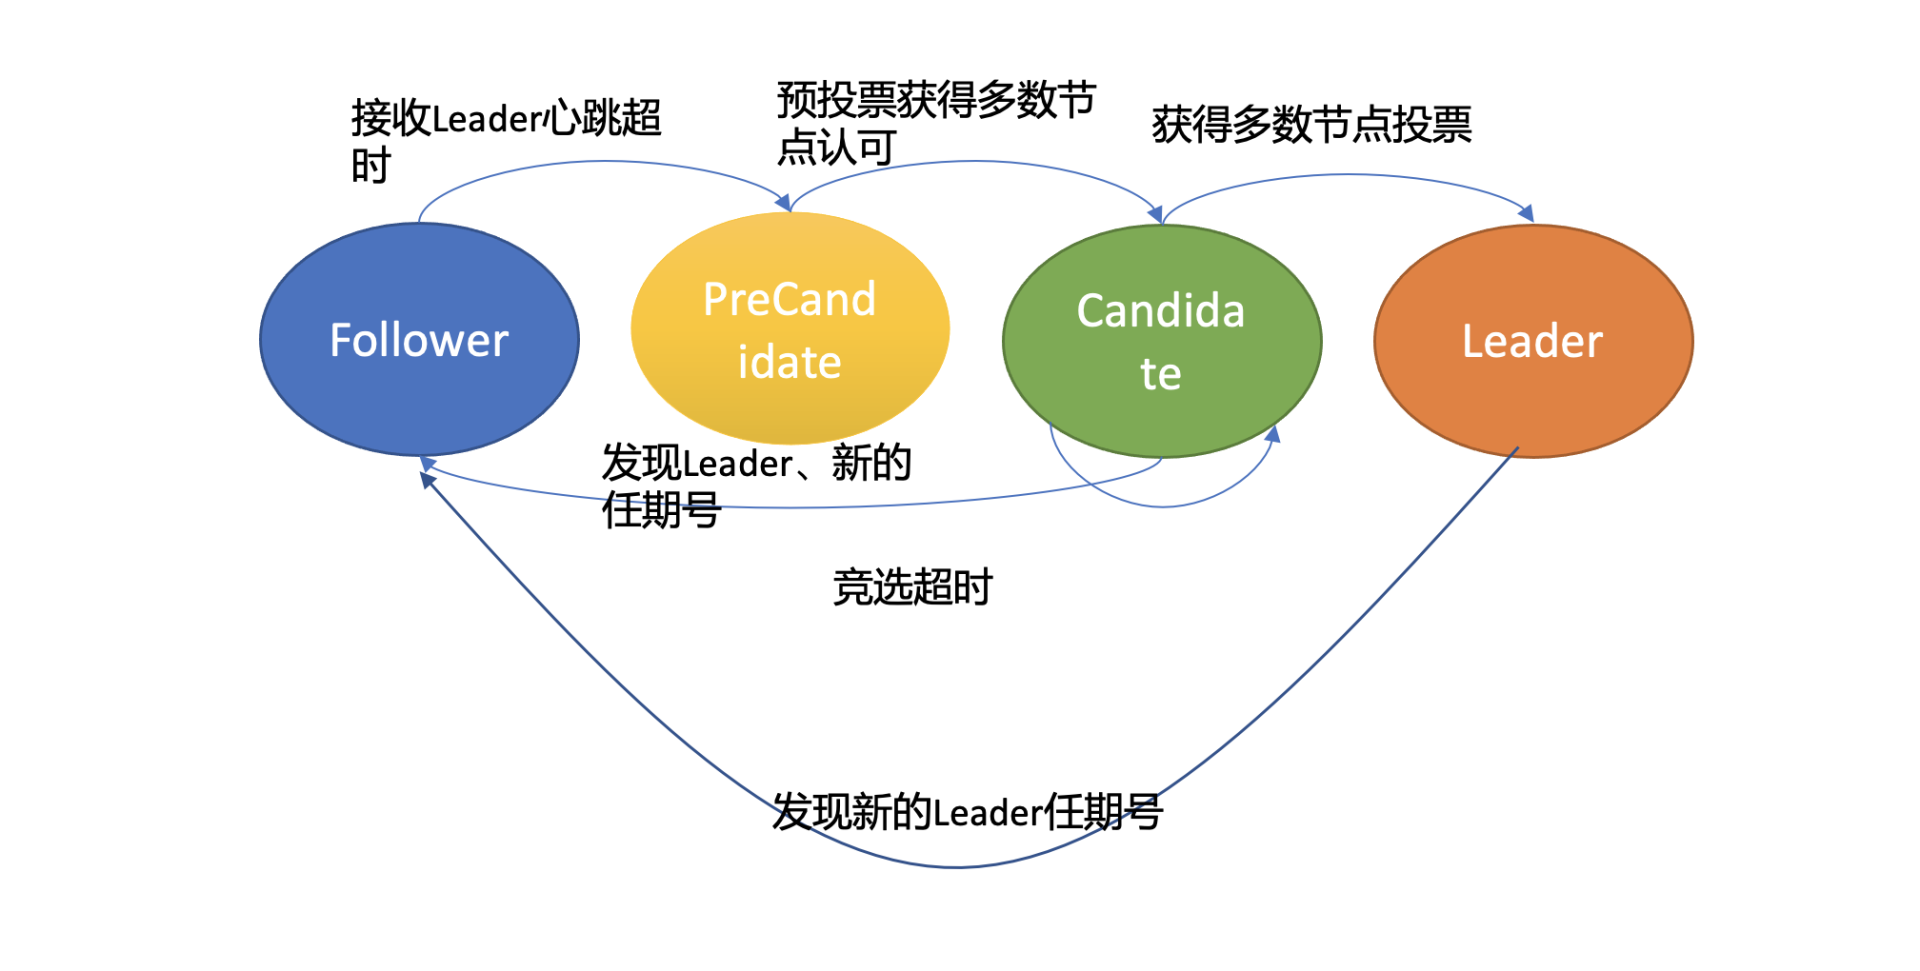
Leader 选出来后,它什么时候又会变成 Follower 状态呢?从上面的状态转换关系图中可以看到,如果现有 Leader 发现了新的 Leader 任期号,那么它就需要转换到 Follower 节点。A 节点 crash 后,再次启动成为 Follower,假设因为网络问题无法连通 B、C 节点,这时候根据状态图,我们知道它将不停自增任期号,发起选举。等 A 节点网络异常恢复后,那么现有 Leader 收到了新的任期号,就会触发新一轮 Leader 选举,影响服务的可用性。
-
然而 A 节点的数据是远远落后 B、C 的,是无法获得集群 Leader 地位的,发起的选举无效且对集群稳定性有伤害。那如何避免以上场景中的无效的选举呢?
- 在 etcd 3.4 中,etcd 引入了一个 PreVote 参数(默认 false),可以用来启用 PreCandidate 状态解决此问题,如下图所示。Follower 在转换成 Candidate 状态前,先进入 PreCandidate 状态,不自增任期号,发起预投票。若获得集群多数节点认可,确定有概率成为 Leader 才能进入 Candidate 状态,发起选举流程。
-
因 A 节点数据落后较多,预投票请求无法获得多数节点认可,因此它就不会进入 Candidate 状态,导致集群重新选举。
-
这就是 Raft Leader 选举核心原理,使用心跳机制维持 Leader 身份、触发 Leader 选举,etcd 基于它实现了高可用,只要集群一半以上节点存活、可相互通信,Leader 宕机后,就能快速选举出新的 Leader,继续对外提供服务。
日志复制
-
假设在上面的 Leader 选举流程中,B 成为了新的 Leader,它收到 put 提案后,它是如何将日志同步给 Follower 节点的呢? 什么时候它可以确定一个日志条目为已提交,通知 etcdserver 模块应用日志条目指令到状态机呢?
-
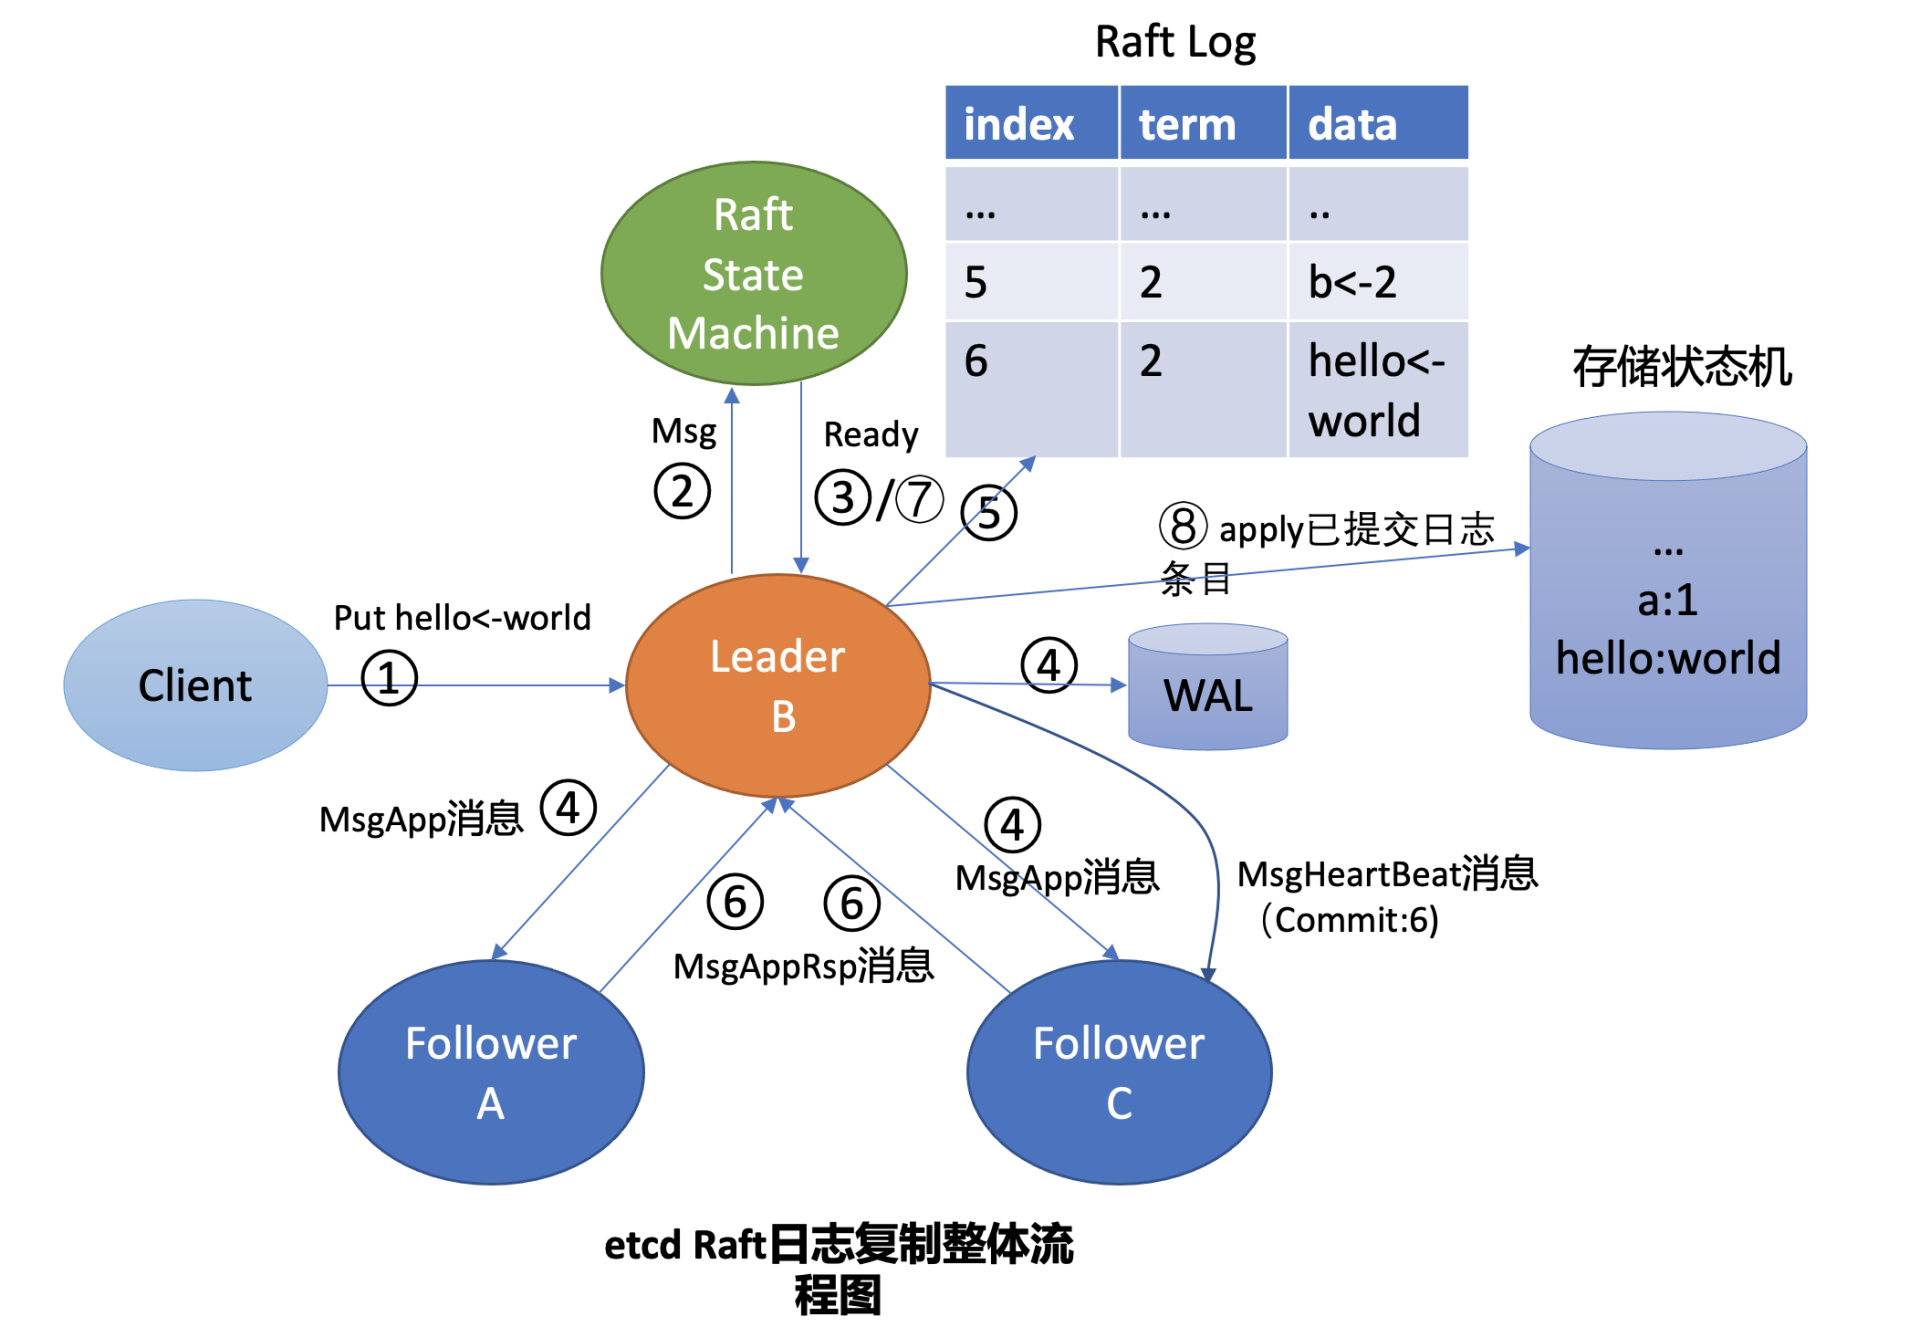
这就涉及到 Raft 日志复制原理,为了帮助理解日志复制的原理,下面画了一幅 Leader 收到 put 请求后,向 Follower 节点复制日志的整体流程图,简称流程图,在图中用序号给标识了核心流程。结合流程图、后面的 Raft 的日志图,来简要分析 Leader B 收到 put hello 为 world 的请求后,是如何将此请求同步给其他 Follower 节点的。
-
首先 Leader 收到 client 的请求后,etcdserver 的 KV 模块会向 Raft 模块提交一个 put hello 为 world 提案消息(流程图中的序号 2 流程),它的消息类型是 MsgProp。
-
Leader 的 Raft 模块获取到 MsgProp 提案消息后,为此提案生成一个日志条目,追加到未持久化、不稳定的 Raft 日志中,随后会遍历集群 Follower 列表和进度信息,为每个 Follower 生成追加(MsgApp)类型的 RPC 消息,此消息中包含待复制给 Follower 的日志条目。
-
这里就出现两个疑问了。第一,Leader 是如何知道从哪个索引位置发送日志条目给 Follower,以及 Follower 已复制的日志最大索引是多少呢?第二,日志条目什么时候才会追加到稳定的 Raft 日志中呢?Raft 模块负责持久化吗?
-
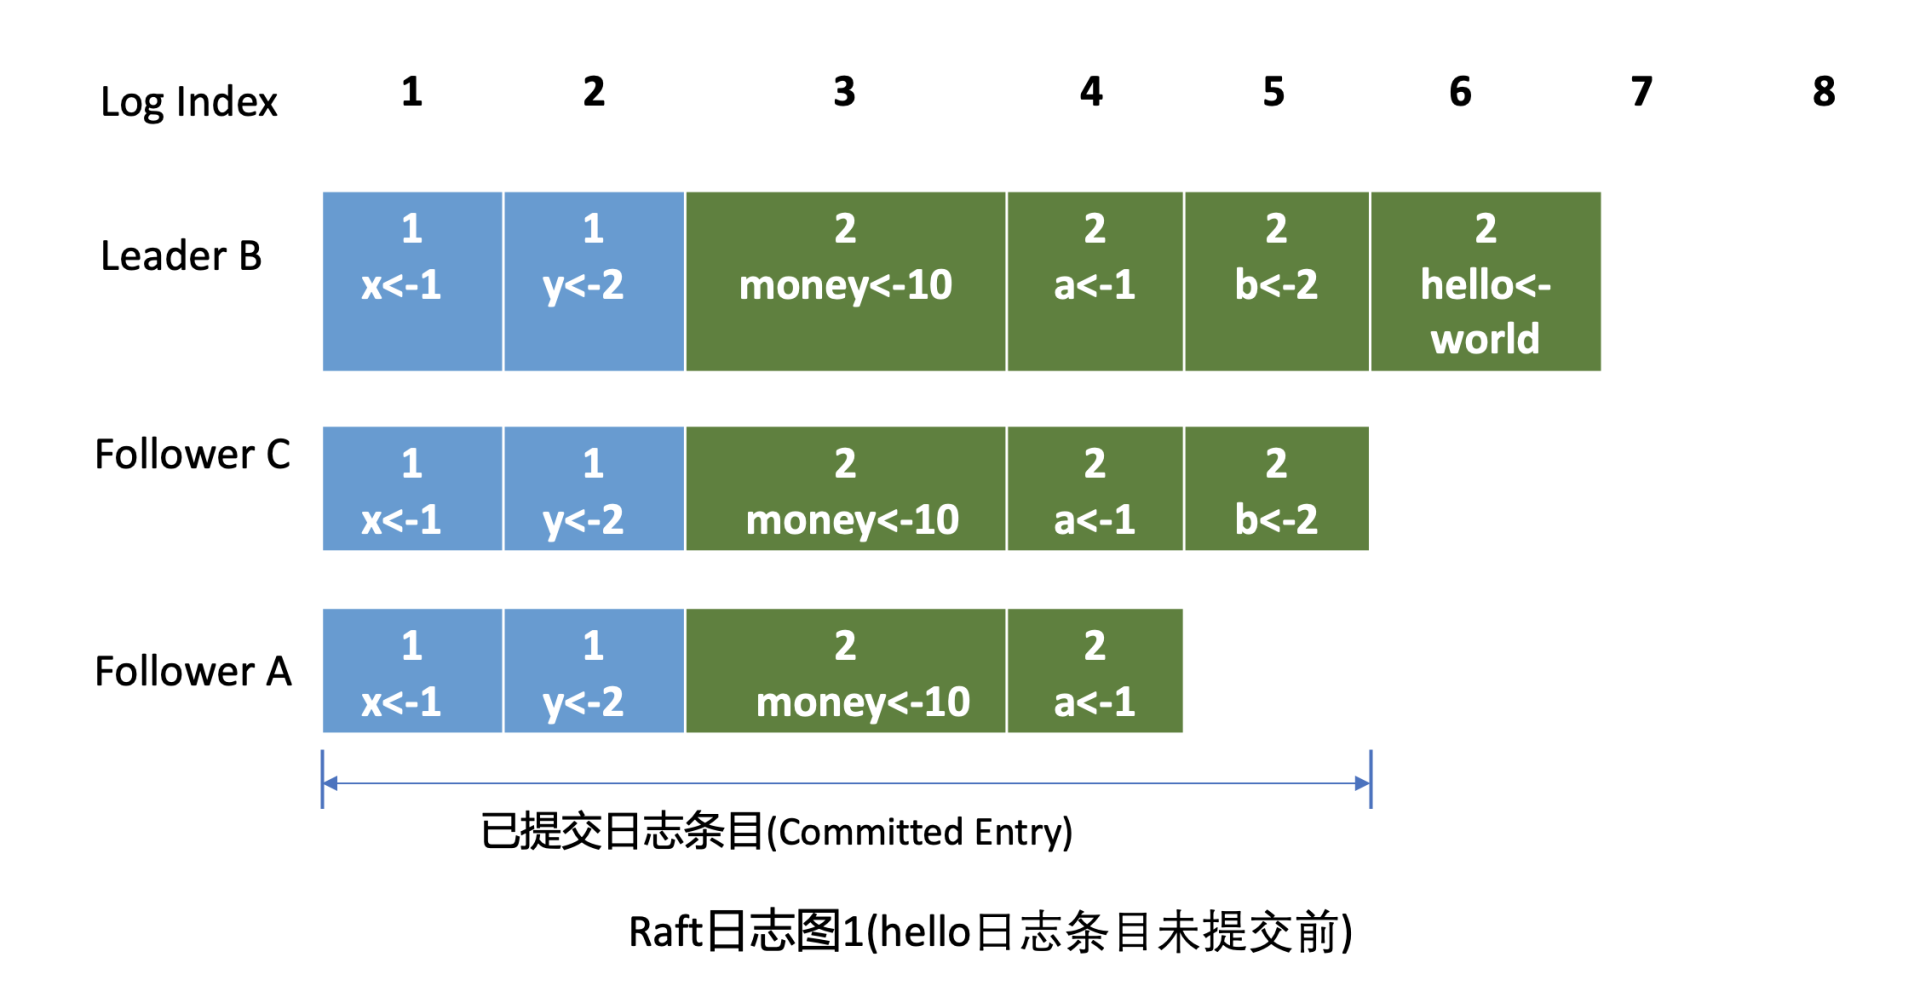
首先介绍下什么是 Raft 日志。下图是 Raft 日志复制过程中的日志细节图,简称日志图 1。在日志图中,最上方的是日志条目序号 / 索引,日志由有序号标识的一个个条目组成,每个日志条目内容保存了 Leader 任期号和提案内容。最开始的时候,A 节点是 Leader,任期号为 1,A 节点 crash 后,B 节点通过选举成为新的 Leader, 任期号为 2。日志图 1 描述的是 hello 日志条目未提交前的各节点 Raft 日志状态。
-
回答第一个疑问。Leader 会维护两个核心字段来追踪各个 Follower 的进度信息,一个字段是
NextIndex,它表示 Leader 发送给 Follower 节点的下一个日志条目索引。一个字段是MatchIndex,它表示 Follower 节点已复制的最大日志条目的索引,比如上面的日志图 1 中 C 节点的已复制最大日志条目索引为 5,A 节点为 4。 -
第二个疑问。etcd Raft 模块设计实现上抽象了网络、存储、日志等模块,它本身并不会进行网络、存储相关的操作,上层应用需结合自己业务场景选择内置的模块或自定义实现网络、存储、日志等模块。
-
上层应用通过 Raft 模块的输出接口(如 Ready 结构),获取到待持久化的日志条目和待发送给 Peer 节点的消息后(如上面的 MsgApp 日志消息),需持久化日志条目到自定义的 WAL 模块,通过自定义的网络模块将消息发送给 Peer 节点。
-
日志条目持久化到稳定存储中后,这时候就可以将日志条目追加到稳定的 Raft 日志中。即便这个日志是内存存储,节点重启时也不会丢失任何日志条目,因为 WAL 模块已持久化此日志条目,可通过它重建 Raft 日志。etcd Raft 模块提供了一个内置的内存存储(MemoryStorage)模块实现,etcd 使用的就是它,Raft 日志条目保存在内存中。网络模块并未提供内置的实现,etcd 基于 HTTP 协议实现了 peer 节点间的网络通信,并根据消息类型,支持选择 pipeline、stream 等模式发送,显著提高了网络吞吐量、降低了延时。
-
解答完以上两个疑问后,我们继续分析 etcd 是如何与 Raft 模块交互,获取待持久化的日志条目和发送给 peer 节点的消息。
-
正如刚刚讲到的,Raft 模块输入是
Msg消息,输出是一个Ready结构,它包含待持久化的日志条目、发送给 peer 节点的消息、已提交的日志条目内容、线性查询结果等 Raft 输出核心信息。 -
etcdserver 模块通过 channel 从 Raft 模块获取到 Ready 结构后(流程图中的序号 3 流程),因 B 节点是 Leader,它首先会通过基于 HTTP 协议的网络模块将追加日志条目消息(MsgApp)广播给 Follower,并同时将待持久化的日志条目持久化到 WAL 文件中(流程图中的序号 4 流程),最后将日志条目追加到稳定的 Raft 日志存储中(流程图中的序号 5 流程)。
-
各个 Follower 收到追加日志条目(MsgApp)消息,并通过安全检查后,它会持久化消息到 WAL 日志中,并将消息追加到 Raft 日志存储,随后会向 Leader 回复一个应答追加日志条目(MsgAppResp)的消息,告知 Leader 当前已复制的日志最大索引(流程图中的序号 6 流程)。
-
Leader 收到应答追加日志条目(MsgAppResp)消息后,会将 Follower 回复的已复制日志最大索引更新到跟踪 Follower 进展的
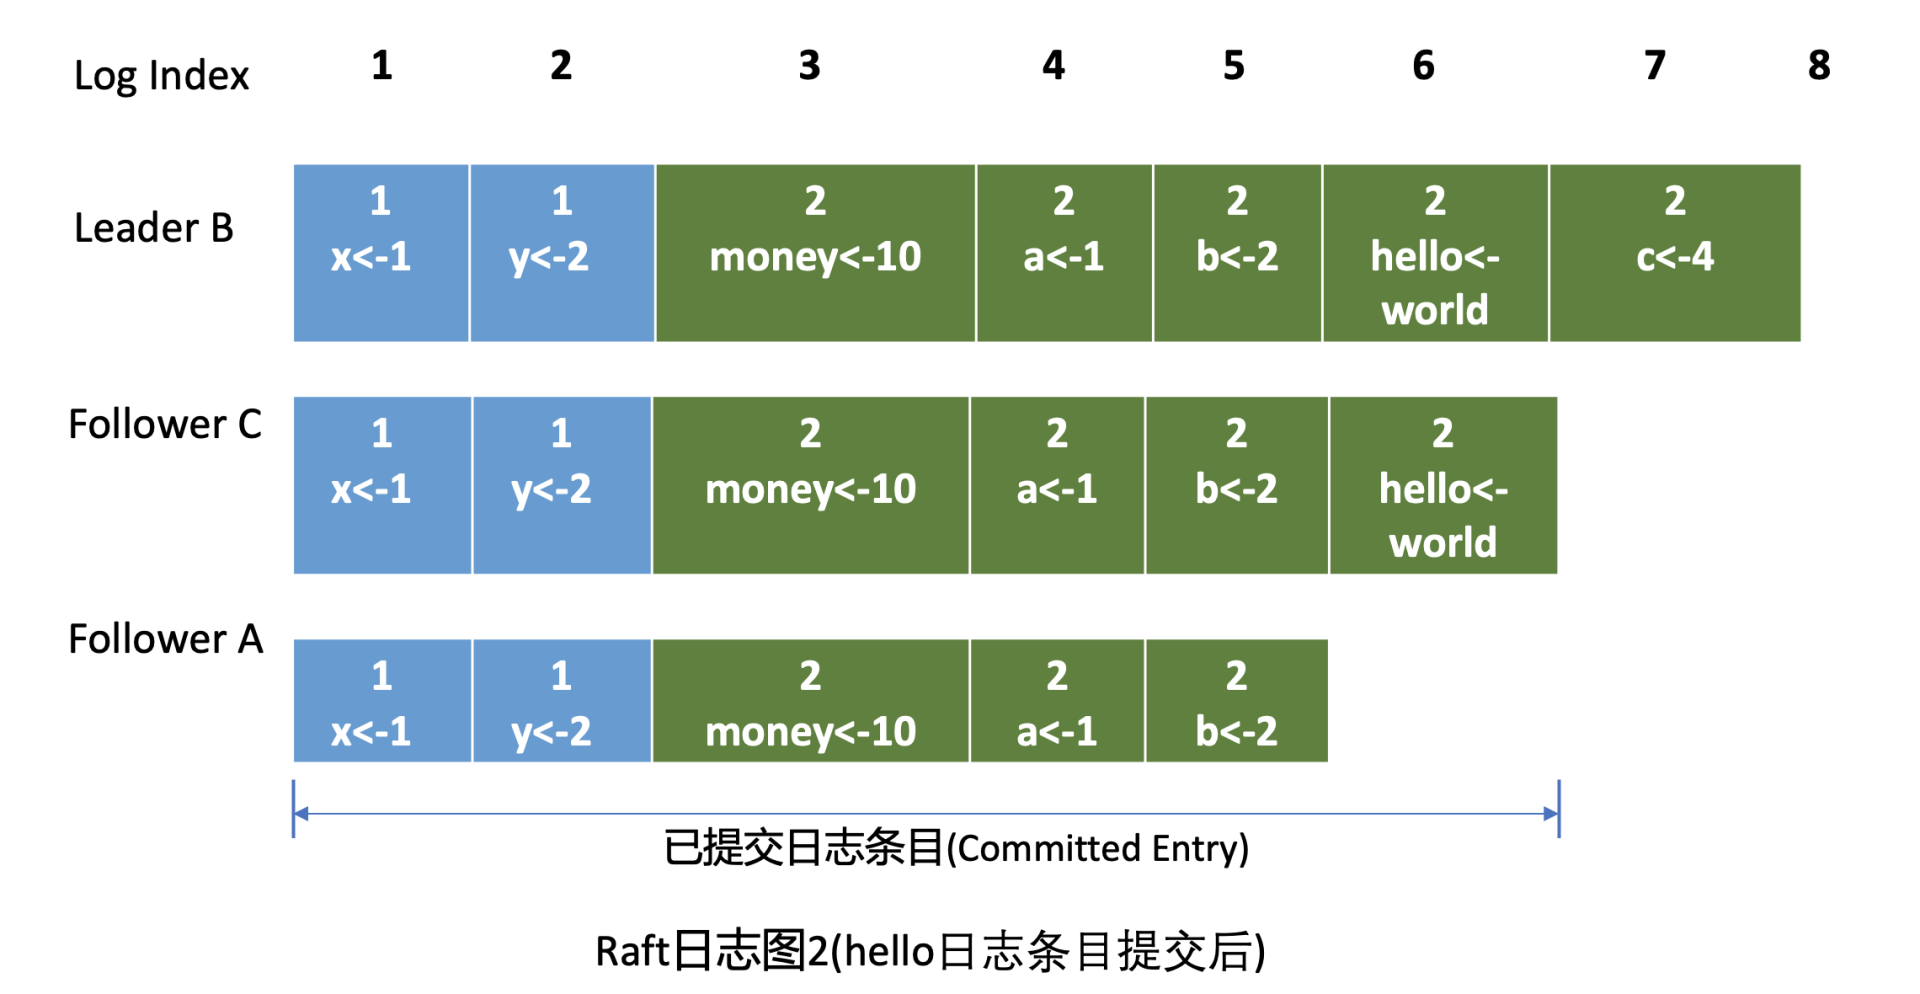
MatchIndex字段,如下面的日志图 2 中的 Follower CMatchIndex为 6,Follower A 为 5,日志图 2 描述的是 hello 日志条目提交后的各节点 Raft 日志状态。
-
最后 Leader 根据 Follower 的
MatchIndex信息,计算出一个位置,如果这个位置已经被一半以上节点持久化,那么这个位置之前的日志条目都可以被标记为已提交。 -
在这个案例中日志图 2 里 6 号索引位置之前的日志条目已被多数节点复制,那么他们状态都可被设置为已提交。Leader 可通过在发送心跳消息(MsgHeartbeat)给 Follower 节点时,告知它已经提交的日志索引位置。
-
最后各个节点的 etcdserver 模块,可通过 channel 从 Raft 模块获取到已提交的日志条目(流程图中的序号 7 流程),应用日志条目内容到存储状态机(流程图中的序号 8 流程),返回结果给 client。
-
通过以上流程,Leader 就完成了同步日志条目给 Follower 的任务,一个日志条目被确定为已提交的前提是,它需要被 Leader 同步到一半以上节点上。以上就是 etcd Raft 日志复制的核心原理。
安全性
-
介绍完 Leader 选举和日志复制后,最后再来看看 Raft 是如何保证安全性的。
-
如果在上面的日志图 2 中,Leader B 在应用日志指令 put hello 为 world 到状态机,并返回给 client 成功后,突然 crash 了,那么 Follower A 和 C 是否都有资格选举成为 Leader 呢?
-
从日志图 2 中我们可以看到,如果 A 成为了 Leader 那么就会导致数据丢失,因为它并未含有刚刚 client 已经写入成功的 put hello 为 world 指令。
-
Raft 算法如何确保面对这类问题时不丢数据和各节点数据一致性呢?
-
这就是 Raft 的第三个子问题需要解决的。Raft 通过给选举和日志复制增加一系列规则,来实现 Raft 算法的安全性。
选举规则
-
当节点收到选举投票的时候,需检查候选者的最后一条日志中的任期号,若小于自己则拒绝投票。如果任期号相同,日志却比自己短,也拒绝为其投票。
-
比如在日志图 2 中,Folllower A 和 C 任期号相同,但是 Follower C 的数据比 Follower A 要长,那么在选举的时候,Follower C 将拒绝投票给 A, 因为它的数据不是最新的。
-
同时,对于一个给定的任期号,最多只会有一个 leader 被选举出来,leader 的诞生需获得集群一半以上的节点支持。每个节点在同一个任期内只能为一个节点投票,节点需要将投票信息持久化,防止异常重启后再投票给其他节点。
-
通过以上规则就可防止日志图 2 中的 Follower A 节点成为 Leader。
日志复制规则
-
在日志图 2 中,Leader B 返回给 client 成功后若突然 crash 了,此时可能还并未将 6 号日志条目已提交的消息通知到 Follower A 和 C,那么如何确保 6 号日志条目不被新 Leader 删除呢? 同时在 etcd 集群运行过程中,Leader 节点若频繁发生 crash 后,可能会导致 Follower 节点与 Leader 节点日志条目冲突,如何保证各个节点的同 Raft 日志位置含有同样的日志条目?
- 以上各类异常场景的安全性是通过 Raft 算法中的 Leader 完全特性和只附加原则、日志匹配等安全机制来保证的。
- Leader 完全特性,是指如果某个日志条目在某个任期号中已经被提交,那么这个条目必然出现在更大任期号的所有 Leader 中。
- Leader 只能追加日志条目,不能删除已持久化的日志条目(只附加原则),因此 Follower C 成为新 Leader 后,会将前任的 6 号日志条目复制到 A 节点。
- 为了保证各个节点日志一致性,Raft 算法在追加日志的时候,引入了一致性检查。Leader 在发送追加日志 RPC 消息时,会把新的日志条目紧接着之前的条目的索引位置和任期号包含在里面。
- Follower 节点会检查相同索引位置的任期号是否与 Leader 一致,一致才能追加,这就是日志匹配特性。它本质上是一种归纳法,一开始日志空满足匹配特性,随后每增加一个日志条目时,都要求上一个日志条目信息与 Leader 一致,那么最终整个日志集肯定是一致的。
- 通过以上的 Leader 选举限制、Leader 完全特性、只附加原则、日志匹配等安全特性,Raft 就实现了一个可严格通过数学反证法、归纳法证明的高可用、一致性算法,为 etcd 的安全性保驾护航。
Q&A
哪些场景会出现 Follower 日志与 Leader 冲突,etcd WAL 模块只能持续追加日志条目,那冲突后 Follower 是如何删除无效的日志条目呢?
- 哪些场景会出现 Follower 日志与 Leader 冲突?
leader 崩溃的情况下可能 (如老的 leader 可能还没有完全复制所有的日志条目),如果 leader 和 follower 出现持续崩溃会加剧这个现象。follower 可能会丢失一些在新的 leader 中有的日志条目,它也可能拥有一些 leader 没有的日志条目,或者两者都发生。
- follower 如何删除无效日志?
leader 处理不一致是通过强制 follower 直接复制自己的日志来解决。因此在 follower 中的冲突的日志条目会被 leader 的日志覆盖。leader 会记录 follower 的日志复制进度 nextIndex,如果 follower 在追加日志时一致性检查失败,就会拒绝请求,此时 leader 就会减小 nextIndex 值并进行重试,最终在某个位置让 follower 跟 leader 一致。
这里补充下为什么 WAL 日志模块只通过追加,也能删除已持久化冲突的日志条目呢? 其实这里 etcd 在实现上采用了一些比较有技巧的方法,在 WAL 日志中的确没删除废弃的日志条目,你可以在其中搜索到冲突的日志条目。只是 etcd 加载 WAL 日志时,发现一个 raft log index 位置上有多个日志条目的时候,会通过覆盖的方式,将最后写入的日志条目追加到 raft log 中,实现了删除冲突日志条目效果,你如果感兴趣可以参考下我和 Google ptabor 关于这个问题的讨论。
Raft 日志和 WAL 日志的区别
WAL 日志是用来持久化 raft 日志条目和相关集群元数据信息的,可防止节点发生重启、crash 后,对应的已提交日志条目丢失等异常情况,一般情况下,它是将数据持久化到磁盘中。
Raft 日志记录了节点过去一段时间内收到的写请求,如 put/del/txn 操作等,一般是通过一个内存数组来存储最近一系列日志条目。当 Follower 节点落后Leader较小时,就可以通过 Leader 内存中维护的日志条目信息, 将落后的日志条目发送给它,最终各个节点应用一样的日志条目内容,来确保各个节点数据一致性。
etcd 节点重启后,可通过 WAL 日志来重建部分 raft 日志条目。
鉴权控制
当使用 etcd 存储业务敏感数据、多租户共享使用同 etcd 集群的时候,应该如何防止匿名用户访问 etcd 数据呢?多租户场景又如何最小化用户权限分配,防止越权访问的?那么 etcd 是如何实现多种鉴权机制和细粒度的权限控制的?在实现鉴权模块的过程中最核心的挑战是什么?又该如何确保鉴权的安全性以及提升鉴权性能呢?
整体架构
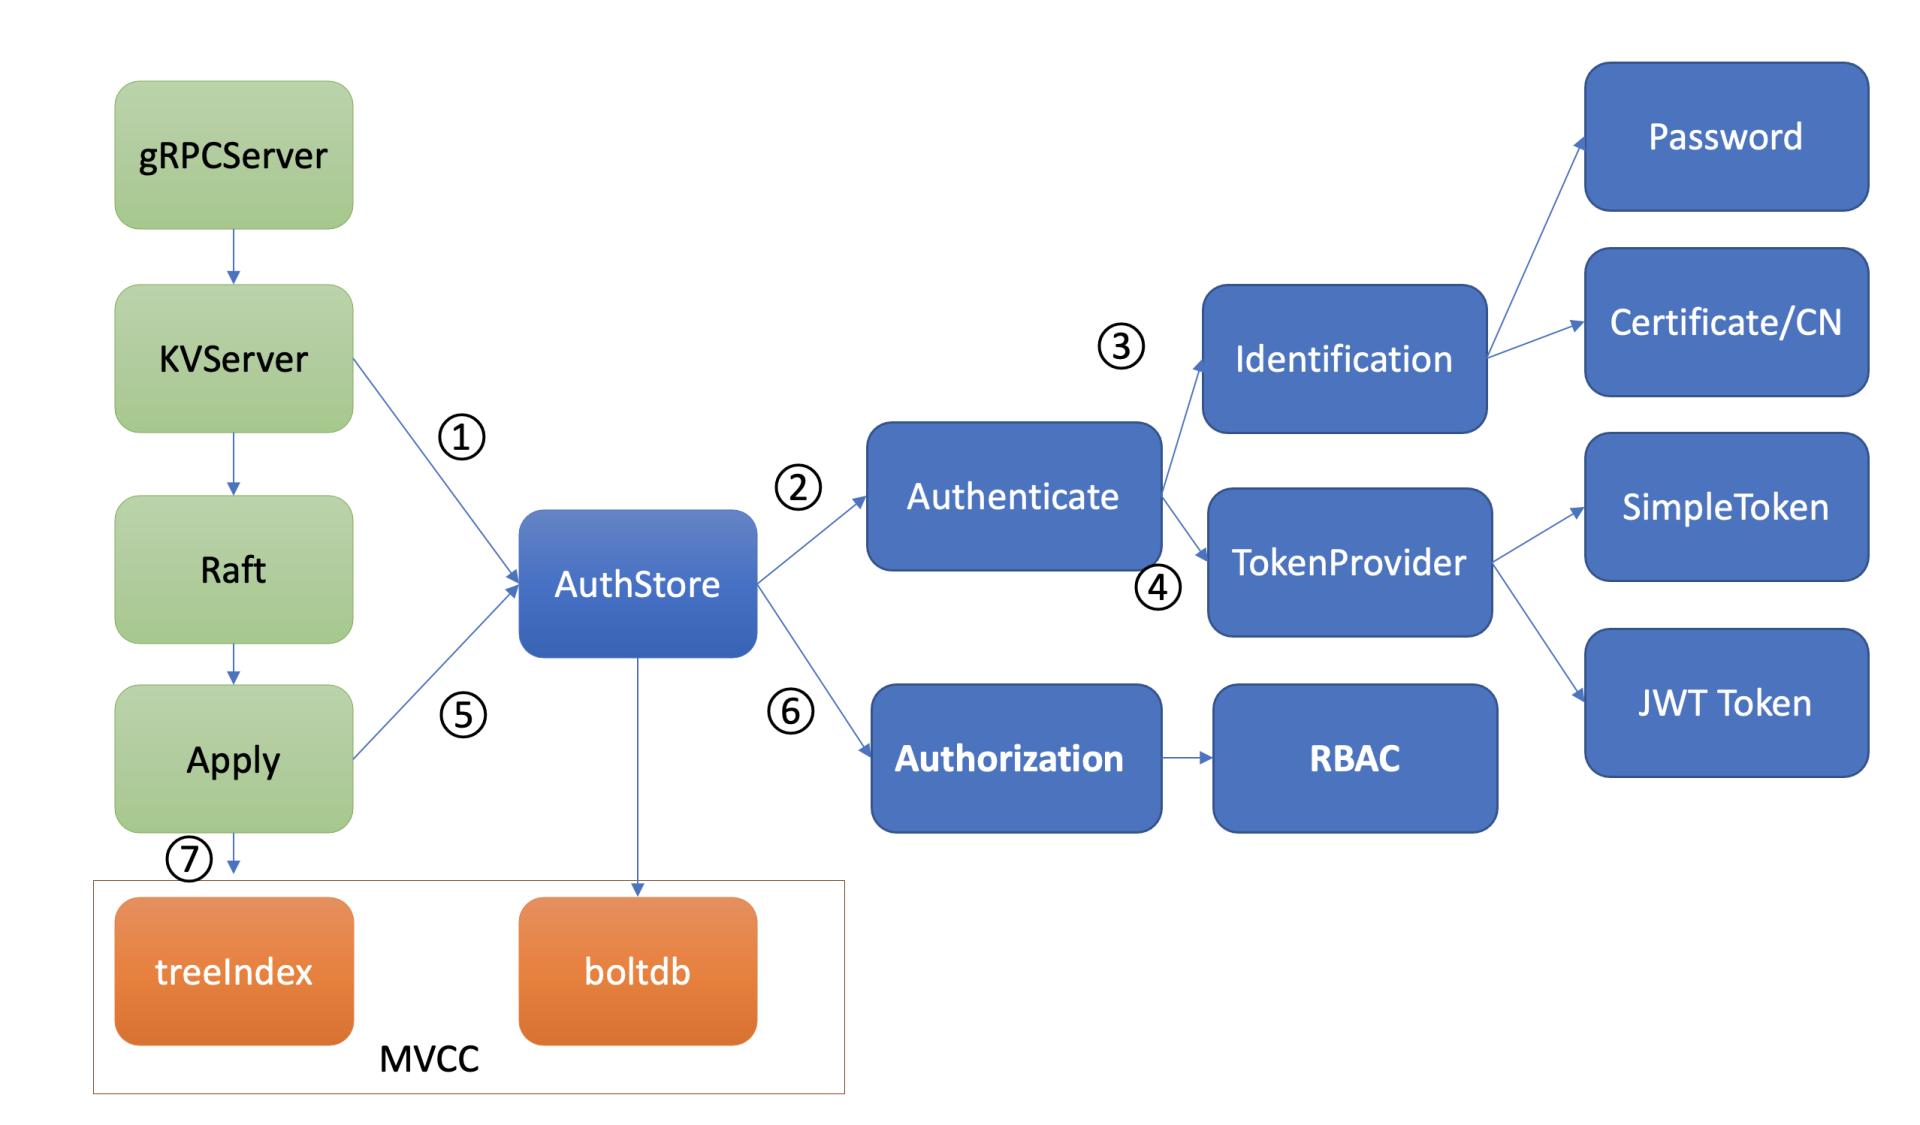
etcd 鉴权体系架构由控制面和数据面组成。
-
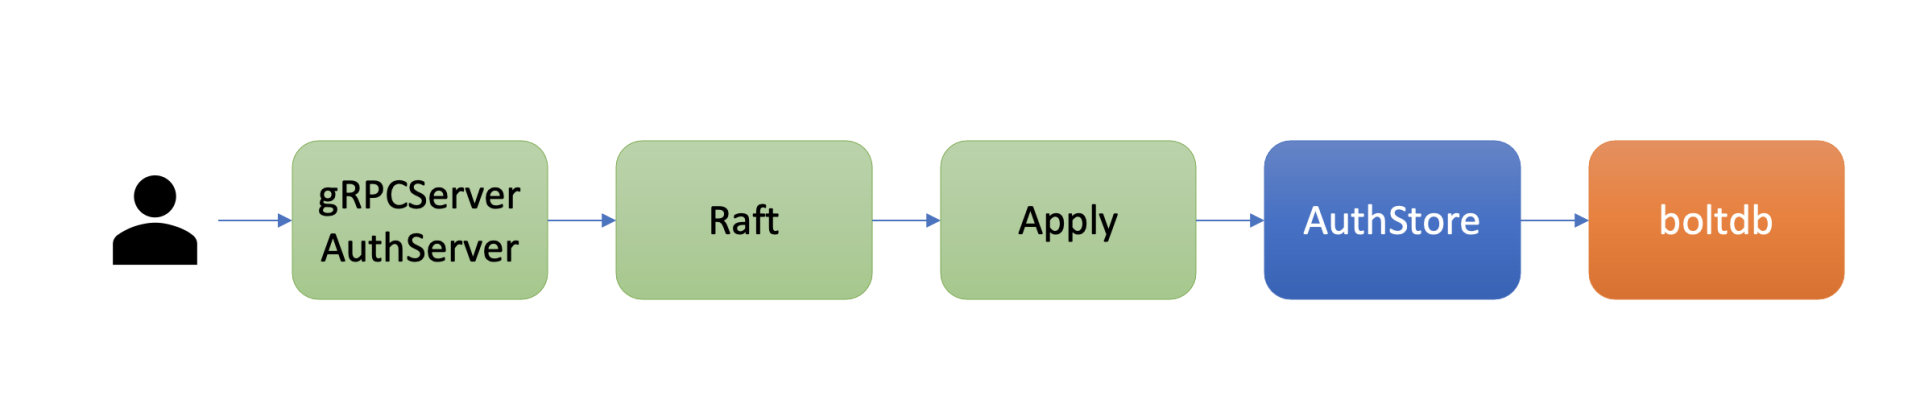
上图是 etcd 鉴权体系控制面,可以通过客户端工具 etcdctl 和鉴权 API 动态调整认证、鉴权规则,AuthServer 收到请求后,为了确保各节点间鉴权元数据一致性,会通过 Raft 模块进行数据同步。
-
当对应的 Raft 日志条目被集群半数以上节点确认后,Apply 模块通过鉴权存储 (AuthStore) 模块,执行日志条目的内容,将规则存储到 boltdb 的一系列“鉴权表”里面。
-
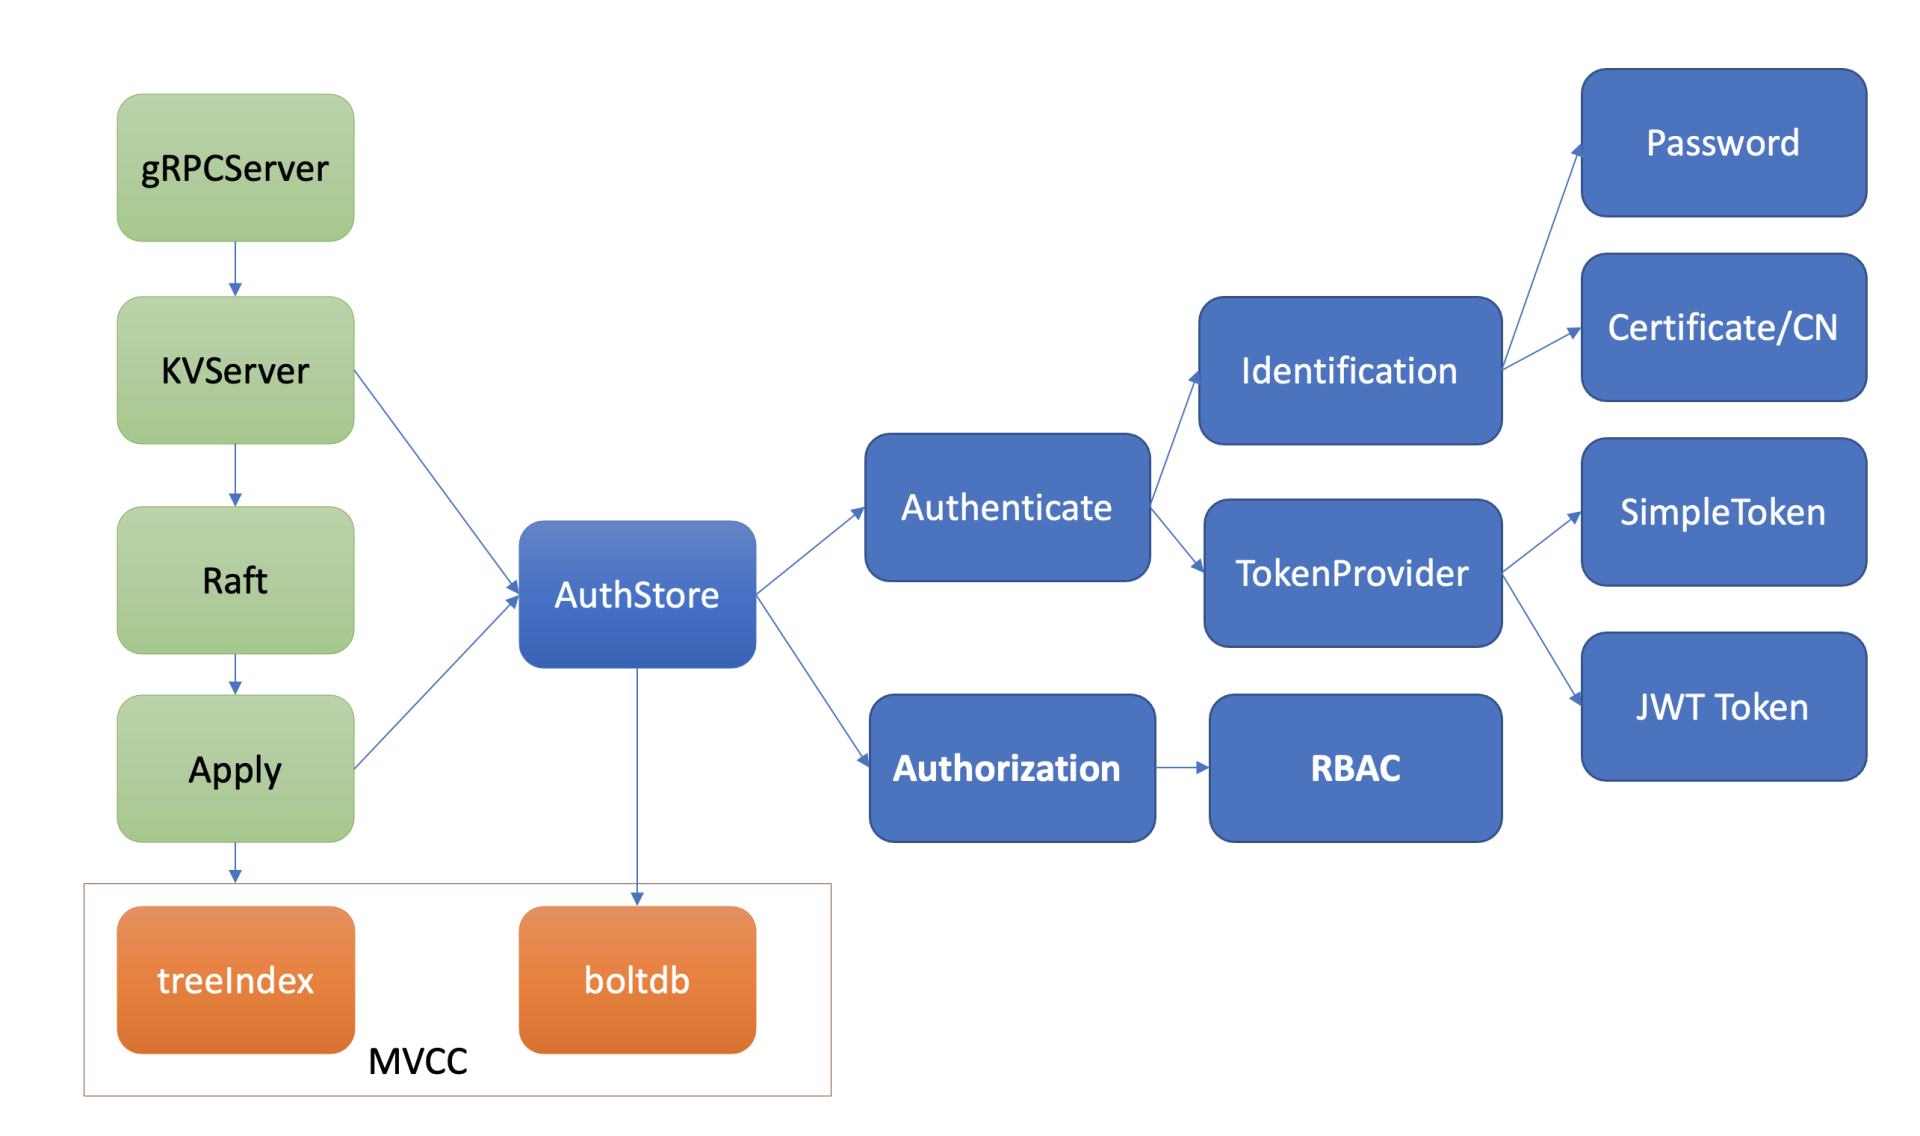
下图是数据面鉴权流程,由认证和授权流程组成。认证的目的是检查 client 的身份是否合法、防止匿名用户访问等。目前 etcd 实现了两种认证机制,分别是密码认证和证书认证。
-
认证通过后,为了提高密码认证性能,会分配一个 Token(类似我们生活中的门票、通信证)给 client,client 后续其他请求携带此 Token,server 就可快速完成 client 的身份校验工作。
-
实现分配 Token 的服务也有多种,这是 TokenProvider 所负责的,目前支持 SimpleToken 和 JWT 两种。
-
通过认证后,在访问 MVCC 模块之前,还需要通过授权流程。授权的目的是检查 client 是否有权限操作你请求的数据路径,etcd 实现了 RBAC 机制,支持为每个用户分配一个角色,为每个角色授予最小化的权限。
下面就以 put hello 命令为例,深入分析以上鉴权体系是如何进行身份认证来防止匿名访问的,又是如何实现细粒度的权限控制以防止越权访问的。
认证
-
如何防止匿名用户访问你的 etcd 数据呢?解决方案当然是认证用户身份。那 etcd 提供了哪些机制来验证 client 身份呢?etcd 目前实现了两种机制,分别是用户密码认证和证书认证,下面分别介绍这两种机制在 etcd 中如何实现,以及这两种机制各自的优缺点。
-
密码认证
- etcd 支持为每个用户分配一个账号名称、密码。密码认证在我们生活中无处不在,从银行卡取款到微信、微博 app 登录,再到核武器发射,密码认证应用及其广泛,是最基础的鉴权的方式。
- 但密码认证存在两大难点,它们分别是如何保障密码安全性和提升密码认证性能。
etcd 的鉴权模块如何安全存储用户密码
-
etcd 的用户密码存储正是融合了以上讨论的高安全性 hash 函数(Blowfish encryption algorithm)、随机的加盐 salt、可自定义的 hash 值计算迭代次数 cost。
-
下面通过几个简单 etcd 鉴权 API,介绍密码认证的原理。
-
首先可以通过如下的 auth enable 命令开启鉴权,注意 etcd 会先要求你创建一个
root账号,它拥有集群的最高读写权限。
$ etcdctl user add root:root
User root created
$ etcdctl auth enable
Authentication Enabled
- 启用鉴权后,这时 client 发起如下 put hello 操作时, etcd server 会返回 “user name is empty” 错误给 client,就初步达到了防止匿名用户访问你的 etcd 数据目的。那么 etcd server 是在哪里做的鉴权的呢?
$ etcdctl put hello world
Error: etcdserver: user name is empty
-
etcd server 收到 put hello 请求的时候,在提交到 Raft 模块前,它会从你请求的上下文中获取你的用户身份信息。如果你未通过认证,那么在状态机应用 put 命令的时候,检查身份权限的时候发现是空,就会返回此错误给 client。
-
下面通过鉴权模块的 user 命令,给 etcd 增加一个 alice 账号。一起来看看 etcd 鉴权模块是如何基于上面介绍的技术方案,来安全存储 alice 账号信息。
$ etcdctl user add alice:alice --user root:root
User alice created
-
鉴权模块收到此命令后,它会使用 bcrpt 库的 blowfish 算法,基于明文密码、随机分配的 salt、自定义的 cost、迭代多次计算得到一个 hash 值,并将加密算法版本、salt 值、cost、hash 值组成一个字符串,作为加密后的密码。
-
最后,鉴权模块将用户名 alice 作为 key,用户名、加密后的密码作为 value,存储到 boltdb 的 authUsers bucket 里面,完成一个账号创建。
-
当使用 alice 账号访问 etcd 的时候,需要先调用鉴权模块的 Authenticate 接口,它会验证你的身份合法性。
-
那么 etcd 如何验证你密码正确性的呢?鉴权模块首先会根据请求的用户名 alice,从 boltdb 获取加密后的密码,因此 hash 值包含了算法版本、salt、cost 等信息,因此可以根据请求中的明文密码,计算出最终的 hash 值,若计算结果与存储一致,那么身份校验通过。
如何提升密码认证性能
-
通过以上的鉴权安全性的深入分析,知道身份验证这个过程开销极其昂贵,那么问题来了,如何避免频繁、昂贵的密码计算匹配,提升密码认证的性能呢?这就是密码认证的第二个难点,如何保证性能。
-
想想我们办理港澳通行证的时候,流程特别复杂,需要各种身份证明、照片、指纹信息,办理成功后,下发通信证,每次过关你只需要刷下通信证即可,高效而便捷。
-
那么,在软件系统领域如果身份验证通过了后,我们是否也可以返回一个类似通信证的凭据给 client,后续请求携带通信证,只要通行证合法且在有效期内,就无需再次鉴权了呢?
-
是的,etcd 也有类似这样的凭据。当 etcd server 验证用户密码成功后,它就会返回一个 Token 字符串给 client,用于表示用户的身份。后续请求携带此 Token,就无需再次进行密码校验,实现了通信证的效果。
-
etcd 目前支持两种 Token,分别为 Simple Token 和 JWT Token。
授权
- 当使用如上创建的 alice 账号执行 put hello 操作的时候,etcd 却会返回如下的 “etcdserver: permission denied” 无权限错误,这是为什么呢?
$ etcdctl put hello world --user alice:alice
Error: etcdserver: permission denied
- 这是因为开启鉴权后,put 请求命令在应用到状态机前,etcd 还会对发出此请求的用户进行权限检查,判断其是否有权限操作请求的数据。常用的权限控制方法有
ACL(Access Control List)、ABAC(Attribute-based access control)、RBAC(Role-based access control),etcd 实现的是RBAC机制。
RBAC 基于角色权限的控制系统
它由下图中的三部分组成,User、Role、Permission。
- User 表示用户,如 alice。
- Role 表示角色,它是权限的赋予对象。
- Permission 表示具体权限明细,比如赋予 Role 对 key 范围在
[key,KeyEnd]数据拥有什么权限。目前支持三种权限,分别是 READ、WRITE、READWRITE。
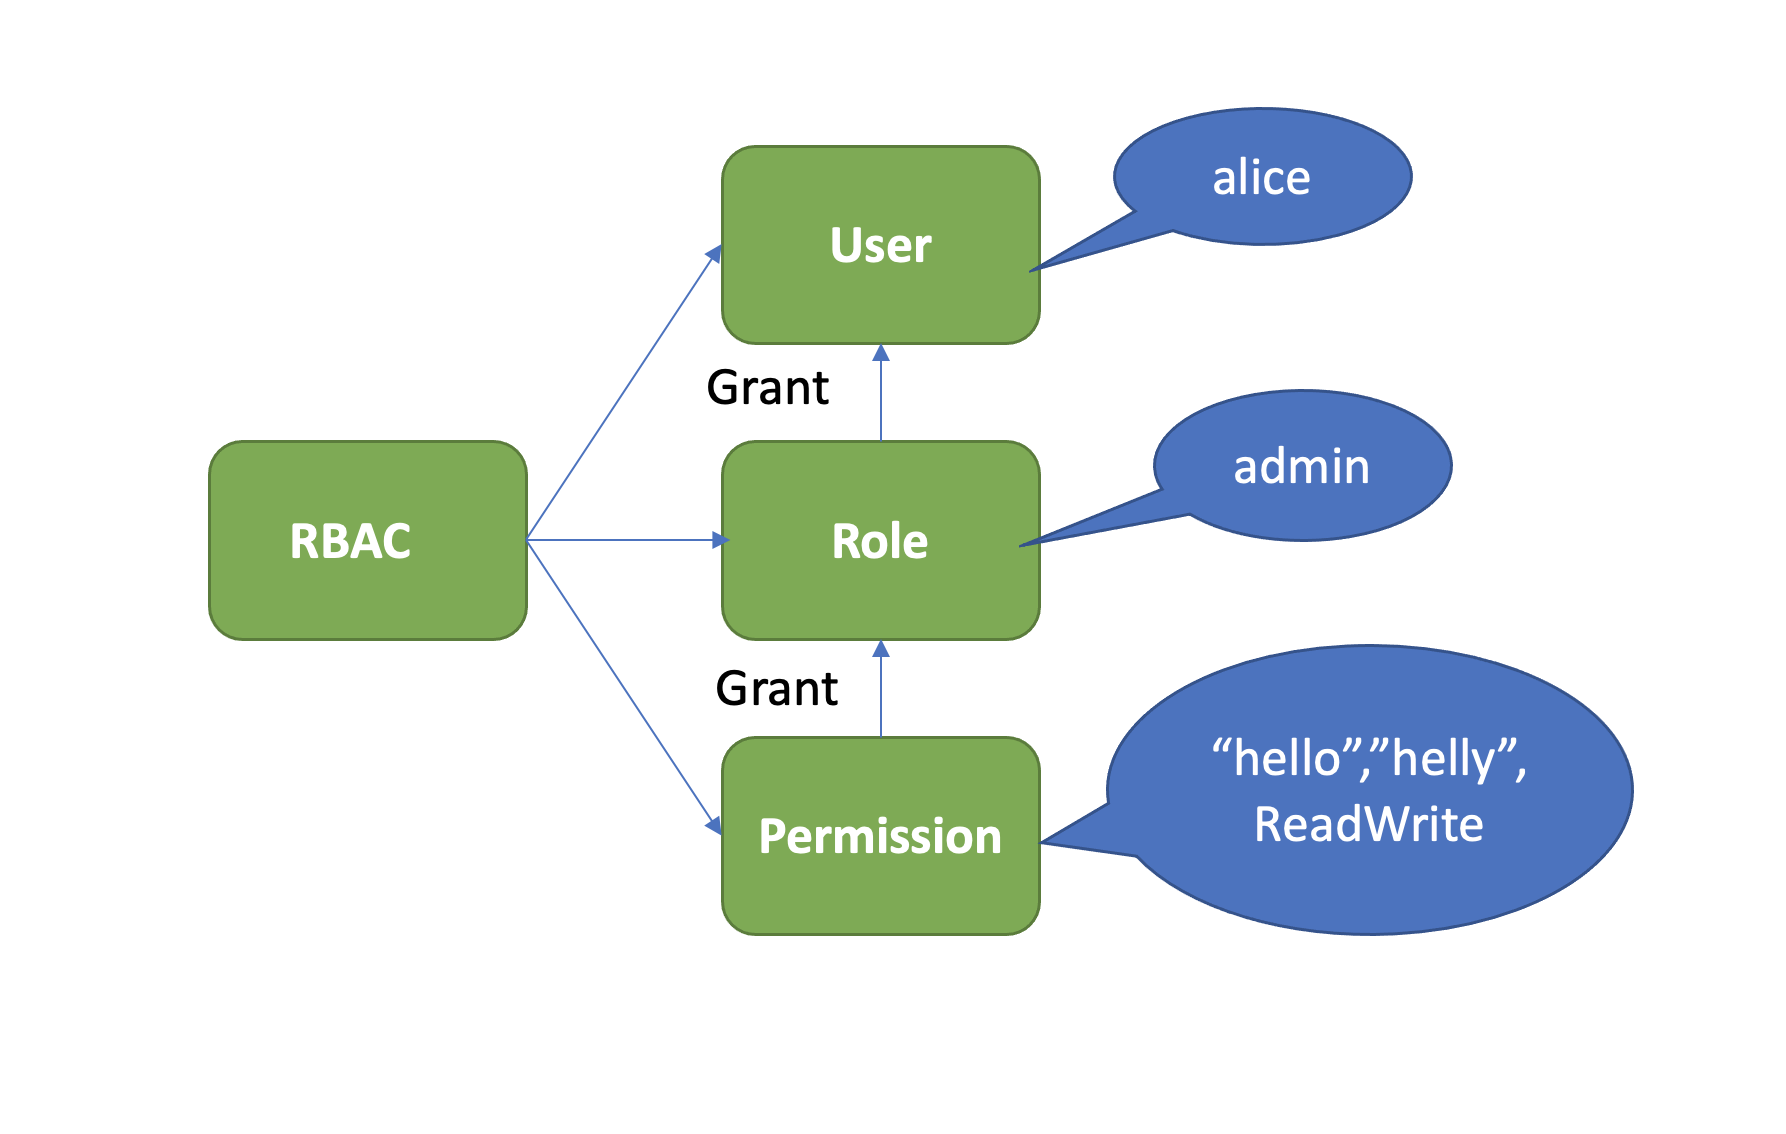
- 下面我们通过 etcd 的 RBAC 机制,给 alice 用户赋予一个可读写
[hello,helly]数据范围的读写权限,如何操作呢?按照上面介绍的 RBAC 原理,首先需要创建一个 role,这里命名为 admin,然后新增了一个可读写[hello,helly]数据范围的权限给 admin 角色,并将 admin 的角色的权限授予了用户 alice。详细如下:
$ #创建一个admin role
etcdctl role add admin  --user root:root
Role admin created
# #分配一个可读写[hello,helly]范围数据的权限给admin role
$ etcdctl role grant-permission admin readwrite hello helly --user root:root
Role admin updated
# 将用户alice和admin role关联起来,赋予admin权限给user
$ etcdctl user grant-role alice admin --user root:root
Role admin is granted to user alice
-
然后当你再次使用 etcdctl 执行 put hello 命令时,鉴权模块会从 boltdb 查询 alice 用户对应的权限列表。因为有可能一个用户拥有成百上千个权限列表,etcd 为了提升权限检查的性能,引入了区间树,检查用户操作的 key 是否在已授权的区间,时间复杂度仅为
O(logN)。 -
在这个案例中,很明显 hello 在 admin 角色可读写的
[hello,helly)数据范围内,因此它有权限更新 key hello,执行成功。你也可以尝试更新 key hey,因为此 key 未在鉴权的数据区间内,因此 etcd server 会返回 “etcdserver: permission denied” 错误给 client,如下所示。
$ etcdctl put hello world --user alice:alice
OK
$ etcdctl put hey hey --user alice:alice
Error: etcdserver: permission denied
测试
$ etcdctl user add root:root
User root created

$ etcdctl auth enable
{"level":"warn","ts":"2025-01-21T17:04:38.470215+0800","logger":"etcd-client","caller":"v3@v3.5.17/retry_interceptor.go:63","msg":"retrying of unary invoker failed","target":"etcd-endpoints://0xc0004483c0/127.0.0.1:2379","attempt":0,"error":"rpc error: code = FailedPrecondition desc = etcdserver: root user does not have root role"}
Authentication Enabled

 etcdctl put hello world --endpoints http://127.0.0.1:2379
{"level":"warn","ts":"2025-01-21T17:05:03.187828+0800","logger":"etcd-client","caller":"v3@v3.5.17/retry_interceptor.go:63","msg":"retrying of unary invoker failed","target":"etcd-endpoints://0xc000242000/127.0.0.1:2379","attempt":0,"error":"rpc error: code = InvalidArgument desc = etcdserver: user name is empty"}
Error: etcdserver: user name is empty

$ etcdctl user add gerry:gerry --user root:root
User gerry created

$ etcdctl put hello world --endpoints http://127.0.0.1:2379 --user gerry:gerry
{"level":"warn","ts":"2025-01-21T17:08:36.060296+0800","logger":"etcd-client","caller":"v3@v3.5.17/retry_interceptor.go:63","msg":"retrying of unary invoker failed","target":"etcd-endpoints://0xc0004b83c0/127.0.0.1:2379","attempt":0,"error":"rpc error: code = PermissionDenied desc = etcdserver: permission denied"}
Error: etcdserver: permission denied

$ etcdctl role add damin
{"level":"warn","ts":"2025-01-21T17:13:26.112285+0800","logger":"etcd-client","caller":"v3@v3.5.17/retry_interceptor.go:63","msg":"retrying of unary invoker failed","target":"etcd-endpoints://0xc0005a41e0/127.0.0.1:2379","attempt":0,"error":"rpc error: code = InvalidArgument desc = etcdserver: user name is empty"}
Error: etcdserver: user name is empty

$ etcdctl role add admin --user root:root
Role admin created

$ etcdctl role grant-permission admin readwrite hello world --user root:root
Role admin updated

$ etcdctl user grant-role gerry admin --user root:root
Role admin is granted to user gerry

$ etcdctl put hello world --endpoints http://127.0.0.1:2379 --user gerry:gerry
OK
建议:重要业务不建议使用多租户模式,多租户场景不同租户可能会相互影响,导致各种稳定性问题,除非各个租户的行为是可控的,可信赖的。
租约 (Lease):如何检测你的客户端存活
什么是 Lease
-
在实际业务场景中,我们常常会遇到类似 Kubernetes 的调度器、控制器组件同一时刻只能存在一个副本对外提供服务的情况。然而单副本部署的组件,是无法保证其高可用性的。
- 那为了解决单副本的可用性问题,就需要多副本部署。同时,为了保证同一时刻只有一个能对外提供服务,需要引入 Leader 选举机制。那么 Leader 选举本质是要解决什么问题呢?
- 首先当然是要保证 Leader 的唯一性,确保集群不出现多个 Leader,才能保证业务逻辑准确性,也就是安全性(Safety)、互斥性。
- 其次是主节点故障后,备节点应可快速感知到其异常,也就是活性(liveness)检测。实现活性检测主要有两种方案。
- 方案1:被动型检测,可以通过探测节点定时拨测 Leader 节点,看是否健康,比如 Redis Sentinel (哨兵)。
- 方案2:主动型上报,Leader 节点可定期向协调服务发送”特殊心跳”汇报健康状态,若其未正常发送心跳,并超过和协调服务约定的最大存活时间后,就会被协调服务移除 Leader 身份标识。同时其他节点可通过协调服务,快速感知到 Leader 故障了,进而发起新的选举。
-
Lease,正是基于主动型上报模式,提供的一种活性检测机制。Lease 顾名思义,client 和 etcd server 之间存在一个约定,内容是 etcd server 保证在约定的有效期内(TTL),不会删除你关联到此 Lease 上的 key-value。若你未在有效期内续租,那么 etcd server 就会删除 Lease 和其关联的 key-value。
-
可以基于 Lease 的 TTL 特性,解决类似 Leader 选举、Kubernetes Event 自动淘汰、服务发现场景中故障节点自动剔除等问题。
- 为了帮助理解 Lease 的核心特性原理,以一个实际场景中的经常遇到的异常节点自动剔除为案例,围绕这个问题深入介绍 Lease 特性的实现。
Lease 整体架构
-
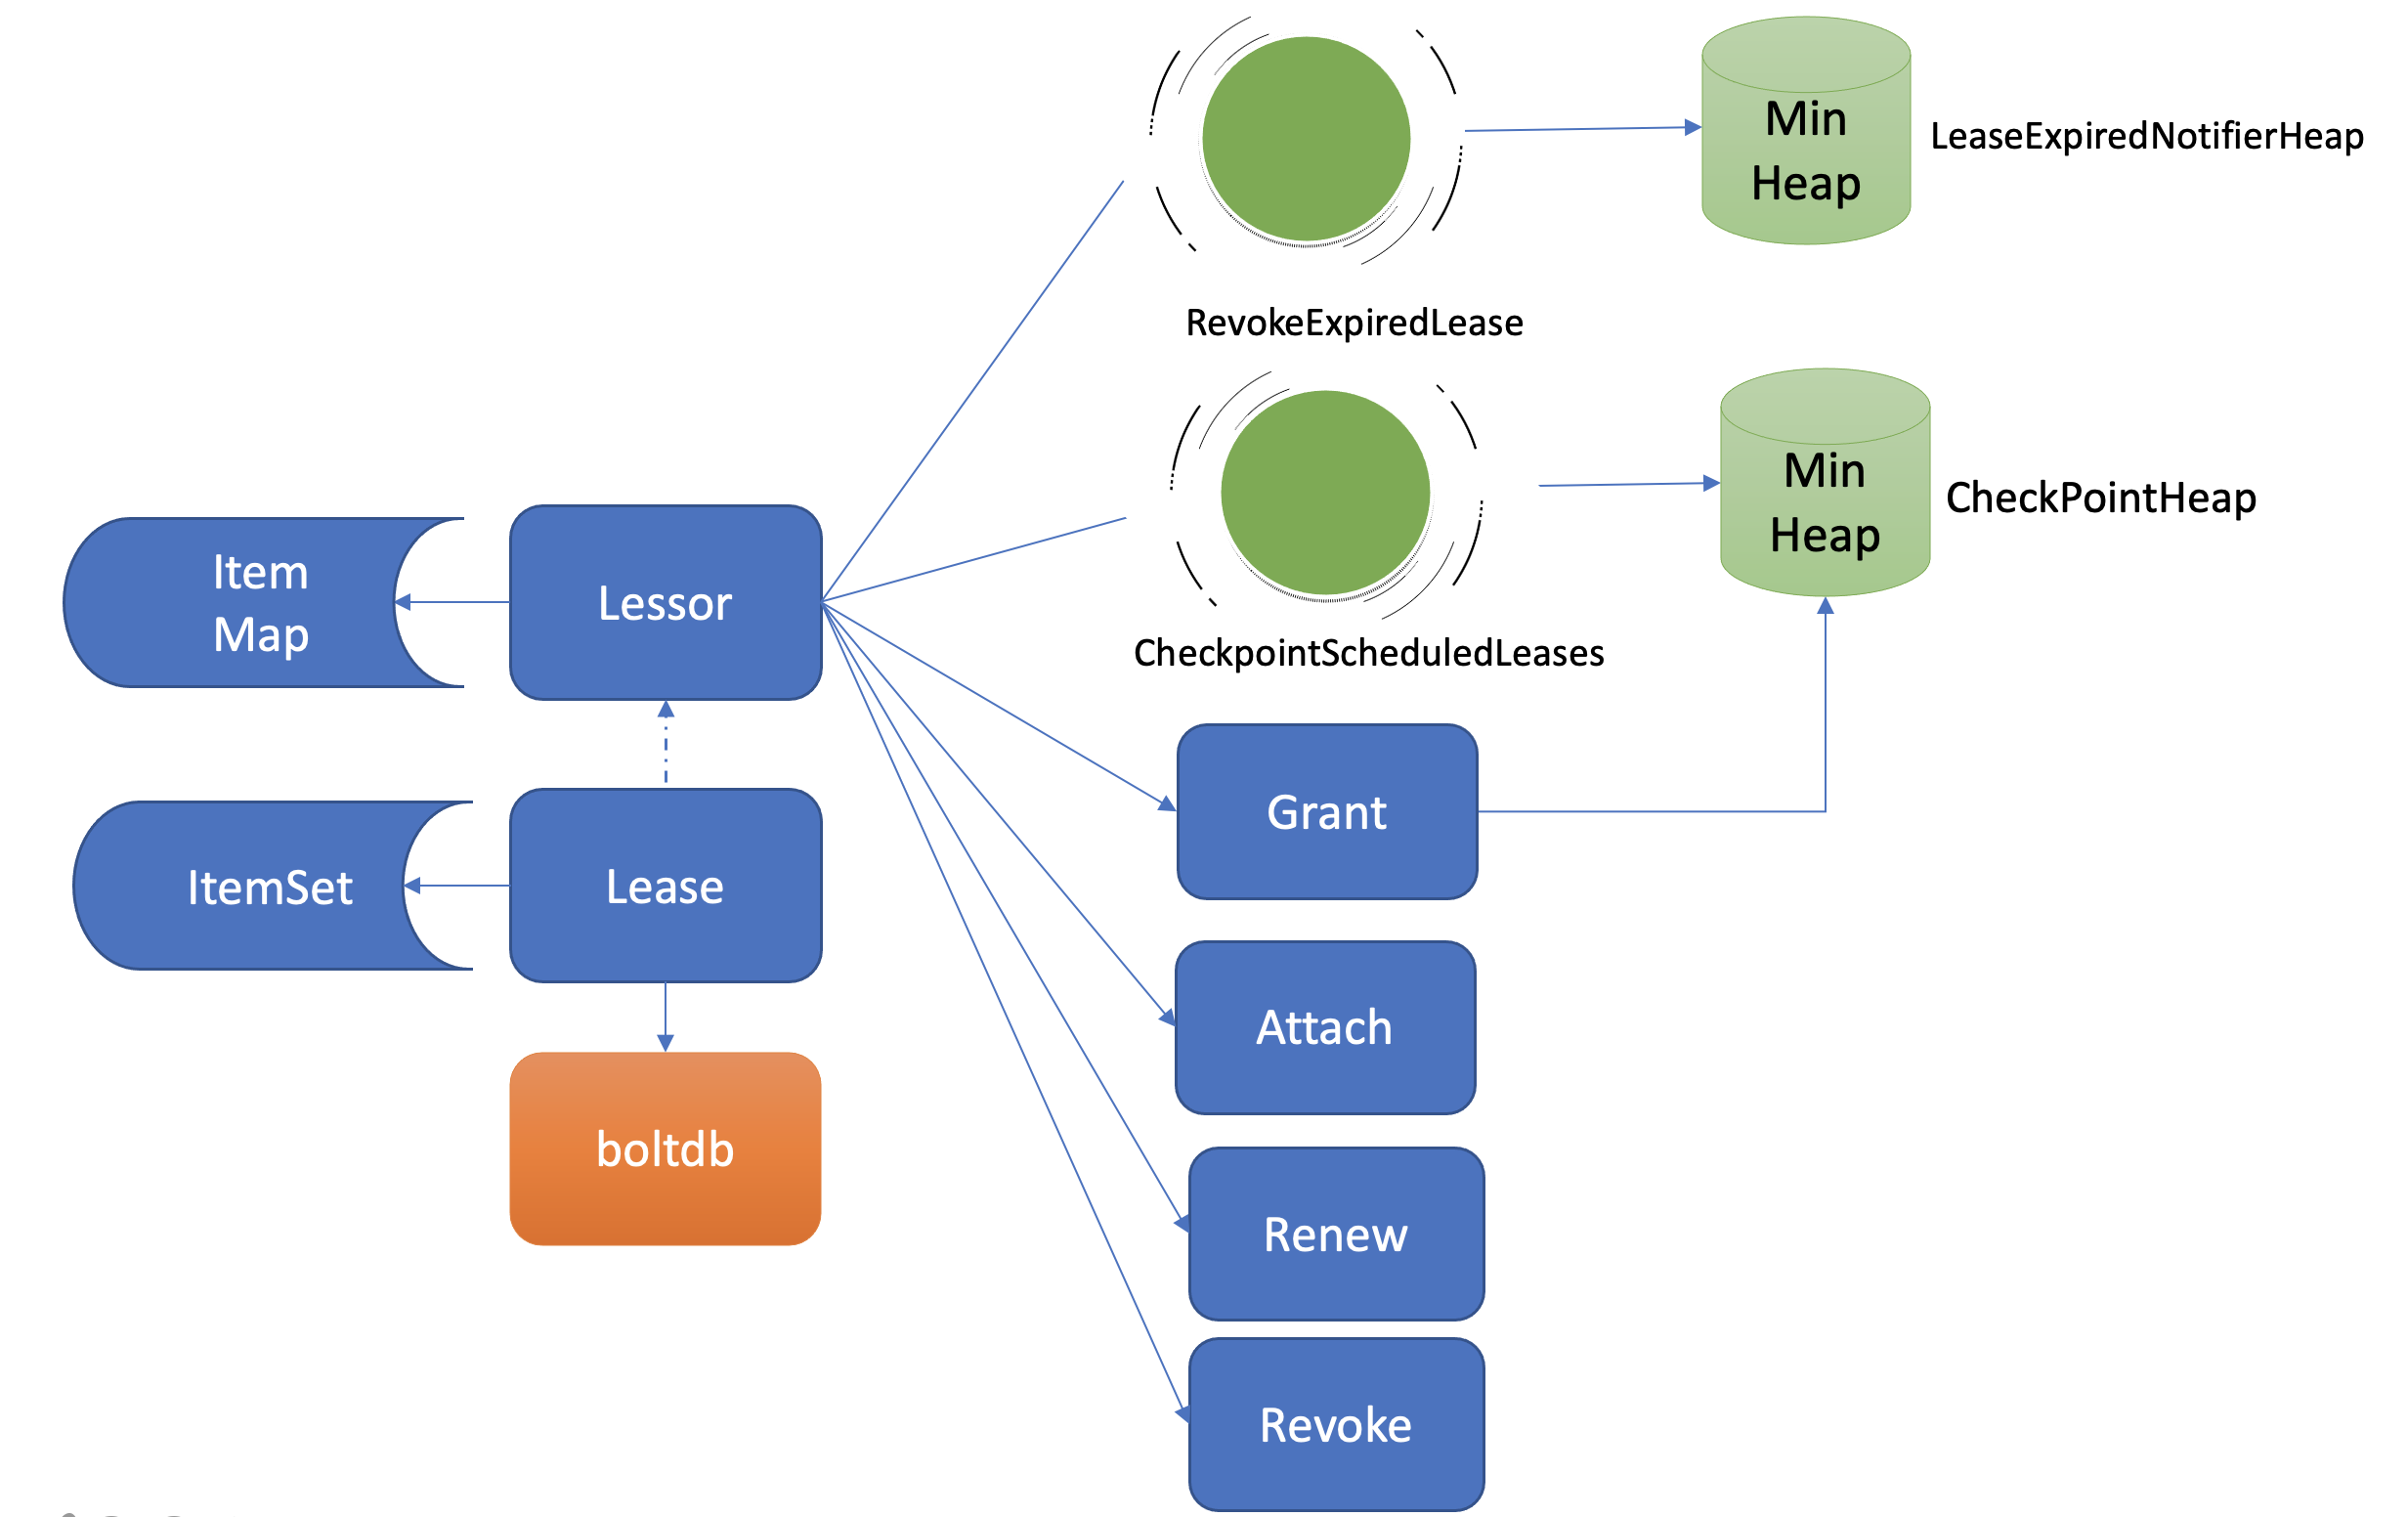
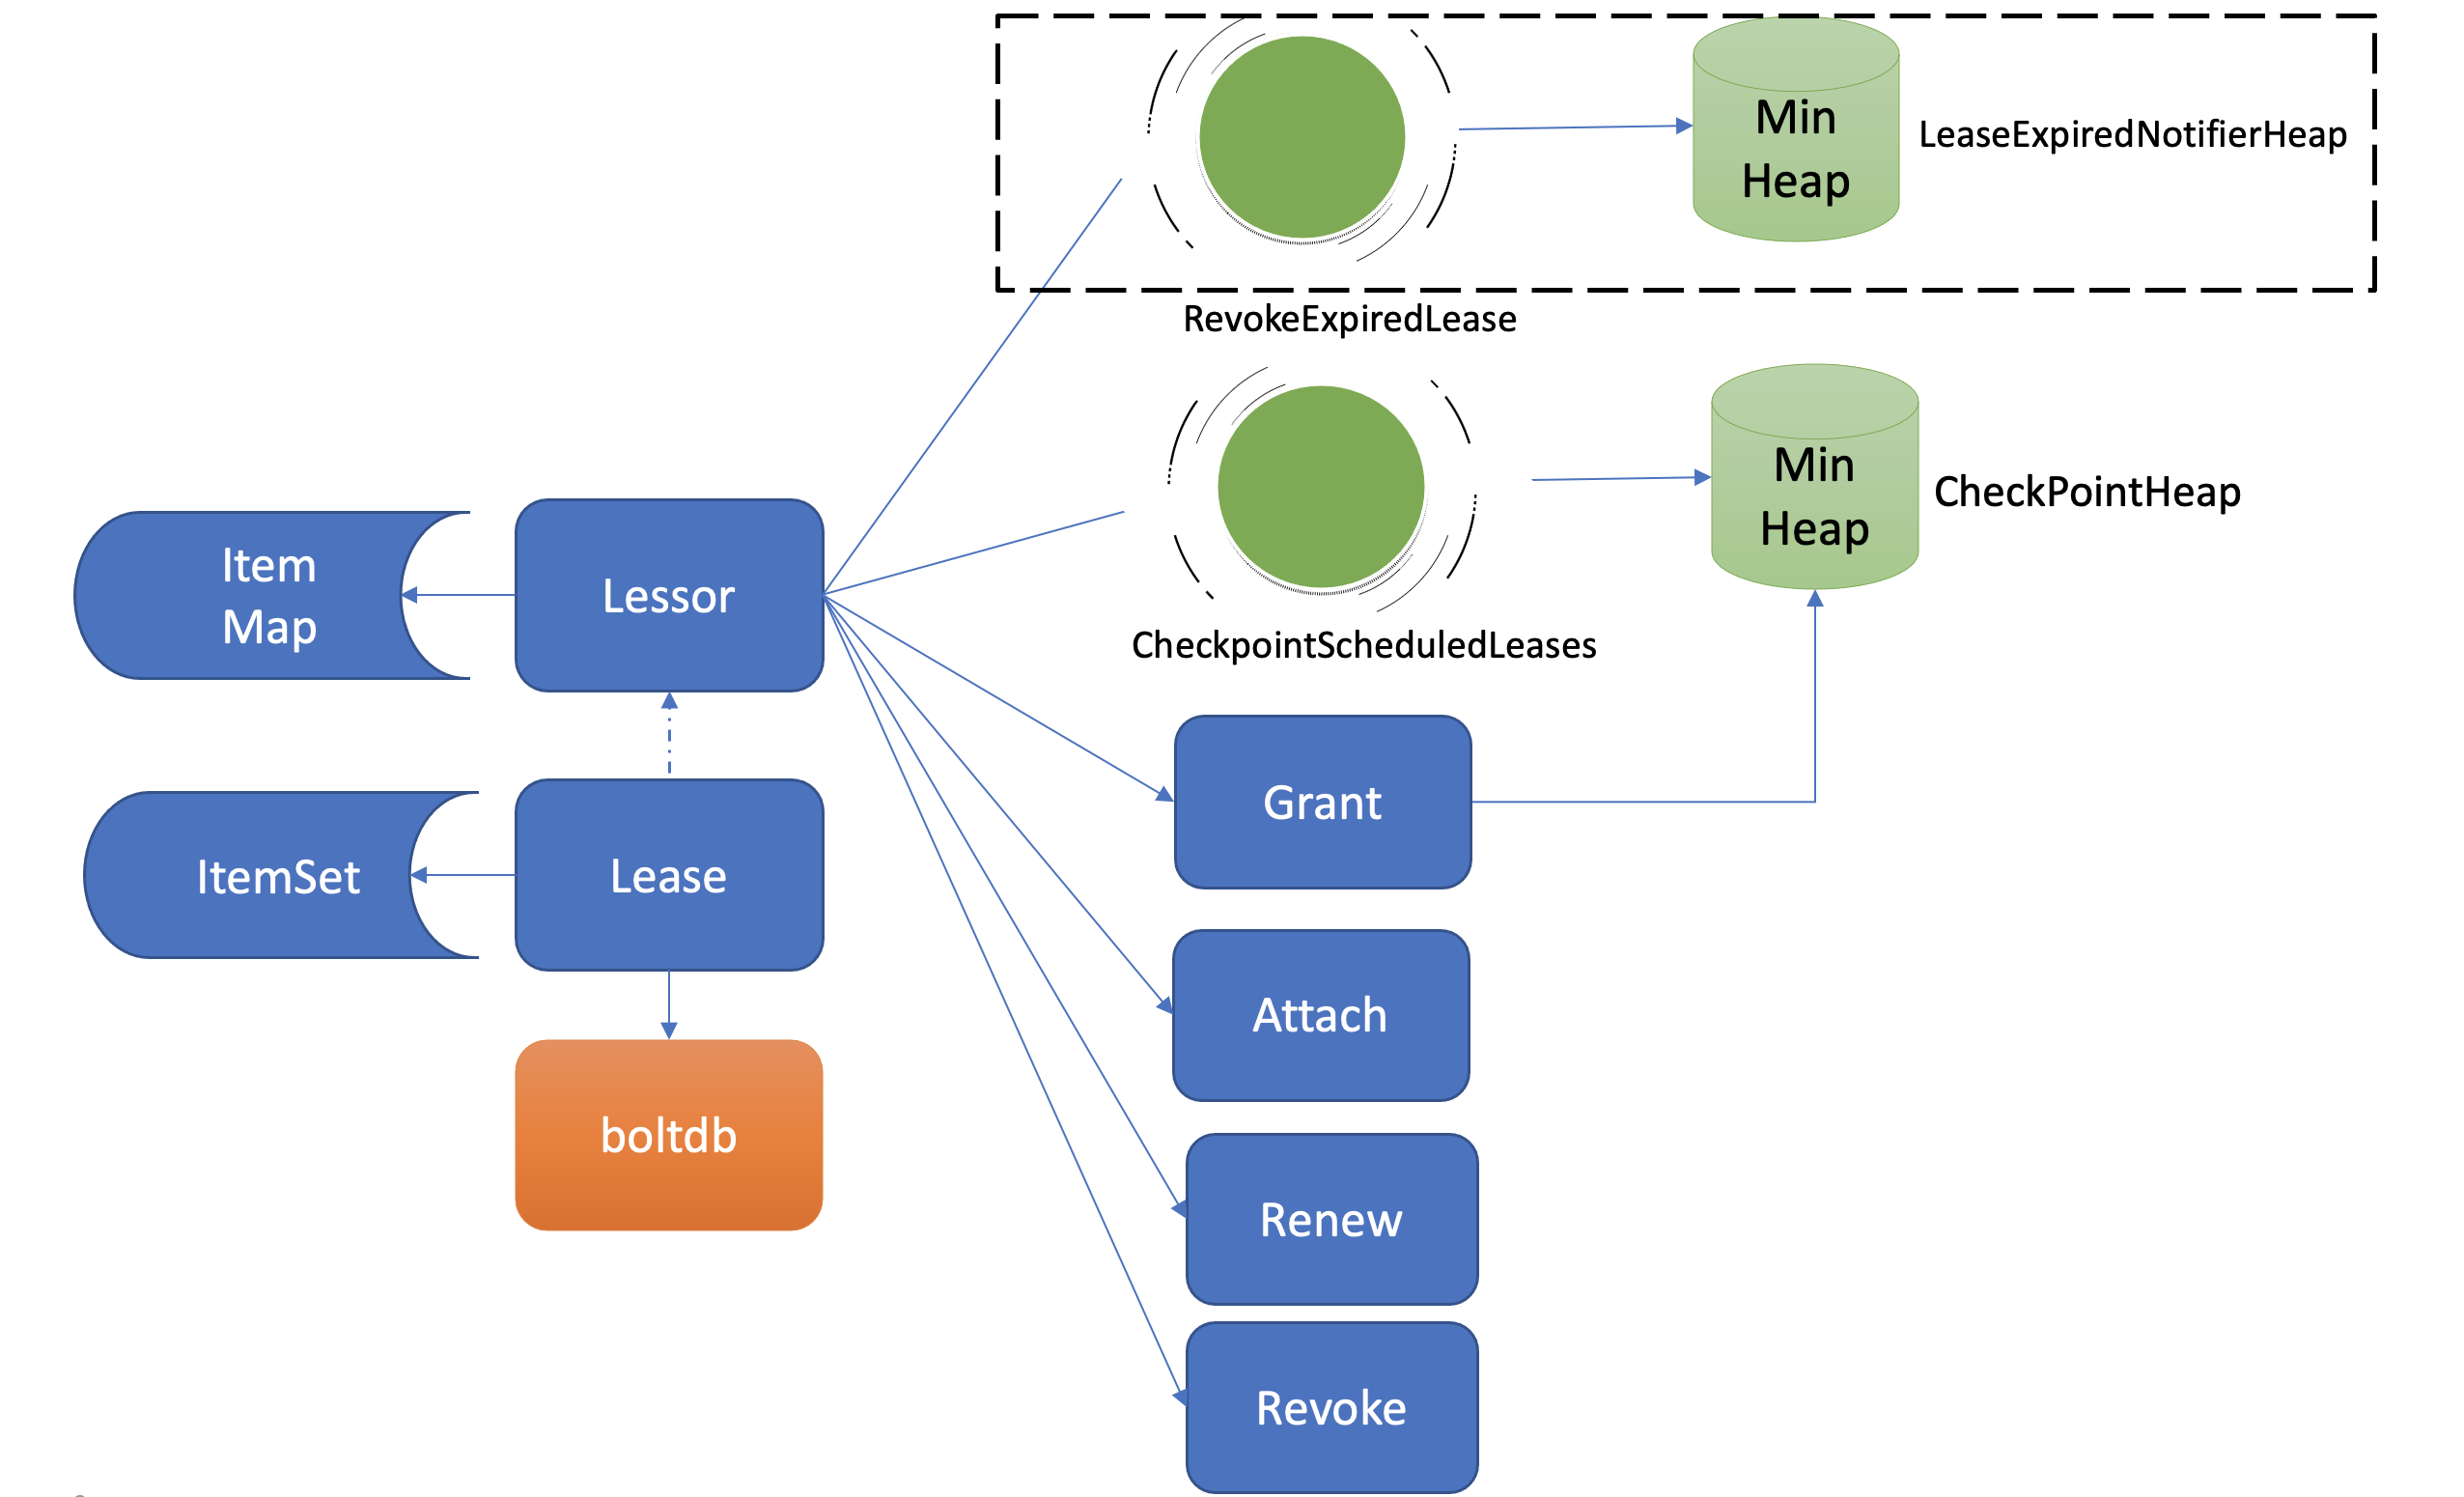
etcd 在启动的时候,创建
Lessor(出租人) 模块的时候,它会启动两个常驻 goroutine,如上图所示,一个是RevokeExpiredLease任务,定时检查是否有过期 Lease,发起撤销过期的 Lease 操作。一个是CheckpointScheduledLease,定时触发更新 Lease 的剩余到期时间的操作。 -
Lessor模块提供了 Grant、Revoke、LeaseTimeToLive、LeaseKeepAlive API 给 client 使用,各接口作用如下:- Grant 表示创建一个 TTL 为指定秒数的 Lease,Lessor 会将 Lease 信息持久化存储在 boltdb 中
- Revoke 表示撤销 Lease 并删除其关联的数据
- LeaseTimeToLive 表示获取一个 Lease 的有效期、剩余时间
- LeaseKeepAlive 表示为 Lease 续期
key 如何关联 Lease
- 了解完整体架构后,再看如何基于 Lease 特性实现检测一个节点存活。首先如何为节点健康指标创建一个租约、并与节点健康指标 key 关联呢? 如 KV 模块的一样,client 可通过 clientv3 库的 Lease API 发起 RPC 调用,可以使用如下的 etcdctl 命令为 node 的健康状态指标,创建一个 Lease,有效期为 600 秒。然后通过
timetolive命令,查看 Lease 的有效期、剩余时间。
# 创建一个 TTL 为 600 秒的 lease,etcd server 返回 LeaseID
$ etcdctl lease grant 600
lease 326975935f48f814 granted with TTL(600s)

# 查看 lease 的 TTL 剩余时间
$ etcdctl lease timetolive 326975935f48f814
lease 326975935f48f814 granted with TTL(600s),remaining(590s)
-
当 Lease server 收到 client 的创建一个有效期 600 秒的 Lease 请求后,会通过 Raft 模块完成日志同步,随后 Apply 模块通过 Lessor 模块的 Grant 接口执行日志条目内容。
-
首先 Lessor 的 Grant 接口会把 Lease 保存到内存的 ItemMap 数据结构中,然后它需要持久化 Lease,将 Lease 数据保存到 boltdb 的 Lease bucket 中,返回一个唯一的 LeaseID 给 client。通过这样一个流程,就基本完成了 Lease 的创建。那么节点的健康指标数据如何关联到此 Lease 上呢?很简单,KV 模块的 API 接口提供了一个
--lease参数,可以通过如下命令,将 keynode关联到对应的 LeaseID 上。然后查询的时候增加-w参数输出格式为 json,就可查看到 key 关联的 LeaseID。
$ etcdctl put node healthy --lease 326975935f48f818
OK
$ etcdctl get node -w=json | python -m json.tool
输出:
{
    "kvs":[
        {
            "create_revision":24,
            "key":"bm9kZQ==",
            "Lease":3632563850270275608,
            "mod_revision":24,
            "value":"aGVhbHRoeQ==",
            "version":1
        }
    ]
}
- 以上流程原理如下图所示,它描述了用户的 key 是如何与指定 Lease 关联的。当通过 put 等命令新增一个指定了
--lease的 key 时,MVCC 模块它会通过 Lessor 模块的 Attach 方法,将 key 关联到 Lease 的 key 内存集合 ItemSet 中。
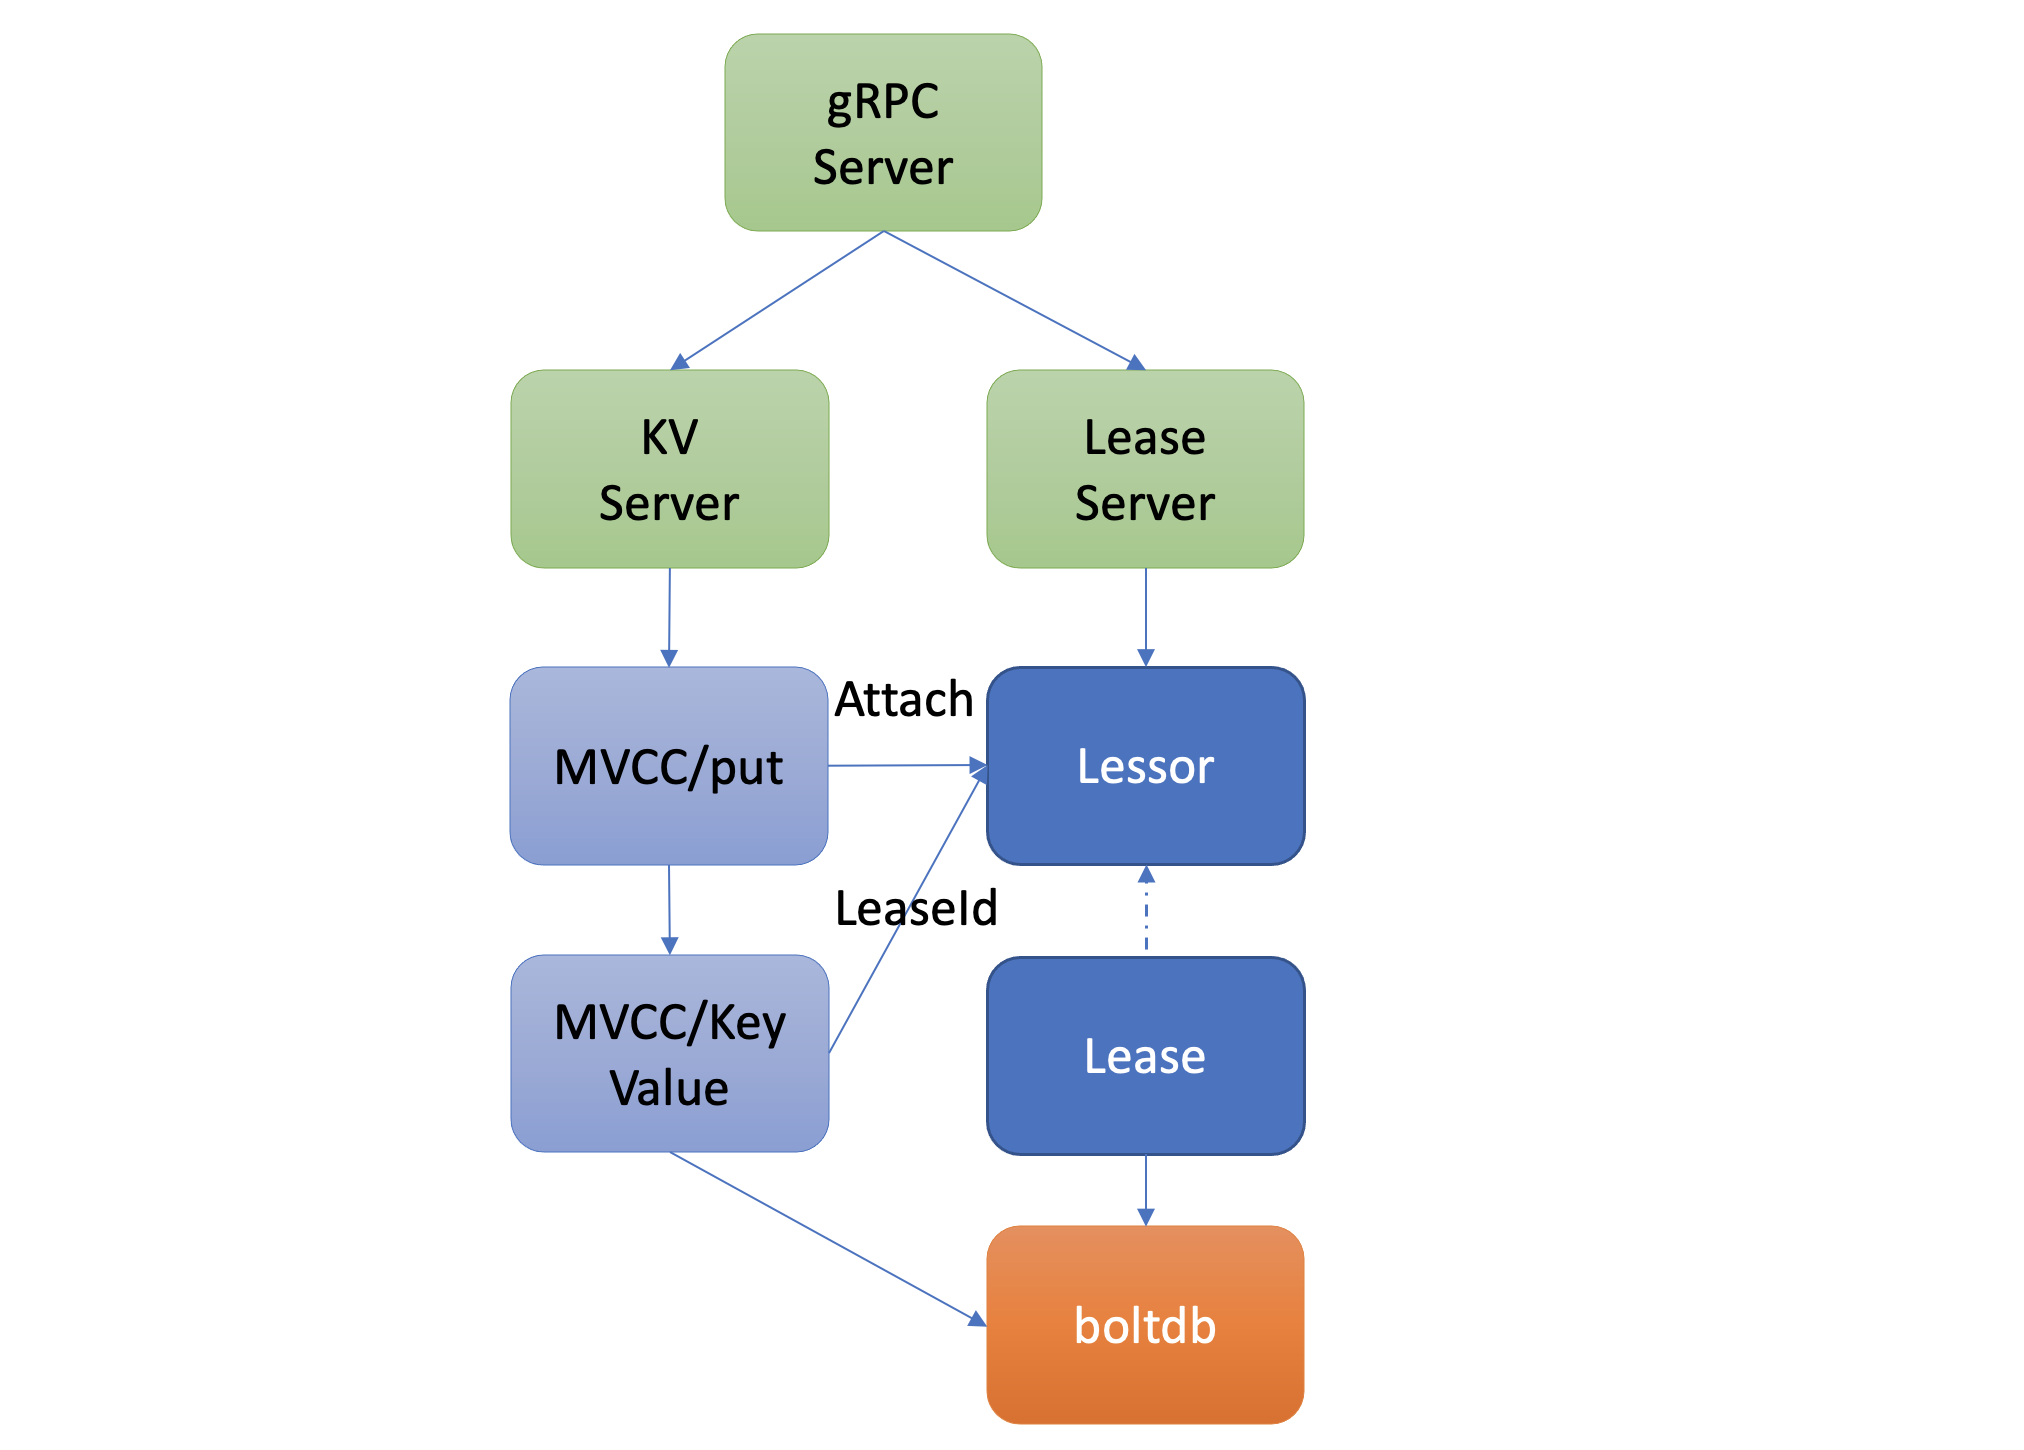
- 一个 Lease 关联的 key 集合是保存在内存中的,那么 etcd 重启时,是如何知道每个 Lease 上关联了哪些 key 呢?答案是 etcd 的 MVCC 模块在持久化存储 key-value 的时候,保存到 boltdb 的 value 是个结构体(mvccpb.KeyValue),它不仅包含你的 key-value 数据,还包含了关联的 LeaseID 等信息。因此当 etcd 重启时,可根据此信息,重建关联各个 Lease 的 key 集合列表。
如何优化 Lease 续期性能
-
通过以上流程,完成了 Lease 创建和数据关联操作。在正常情况下,节点存活时,需要定期发送 KeepAlive 请求给 etcd 续期健康状态的 Lease,否则 Lease 和关联的数据就会被删除。
-
那么 Lease 是如何续期的? 作为一个高频率的请求 API,etcd 如何优化 Lease 续期的性能呢?Lease 续期其实很简单,核心是将 Lease 的过期时间更新为当前系统时间加其 TTL。关键问题在于续期的性能能否满足业务诉求。然而影响续期性能因素又是源自多方面的。首先是 TTL,TTL 过长会导致节点异常后,无法及时从 etcd 中删除,影响服务可用性,而过短,则要求 client 频繁发送续期请求。其次是 Lease 数,如果 Lease 成千上万个,那么 etcd 可能无法支撑如此大规模的 Lease 数,导致高负载。如何解决呢?
- 首先回顾下早期 etcd v2 版本是如何实现 TTL 特性的。在早期 v2 版本中,没有 Lease 概念,TTL 属性是在 key 上面,为了保证 key 不删除,即便你的 TTL 相同,client 也需要为每个 TTL、key 创建一个 HTTP/1.x 连接,定时发送续期请求给 etcd server。很显然,v2 老版本这种设计,因不支持连接多路复用、相同 TTL 无法复用导致性能较差,无法支撑较大规模的 Lease 场景。
- etcd v3 版本为了解决以上问题,提出了 Lease 特性,TTL 属性转移到了 Lease 上, 同时协议从 HTTP/1.x 优化成 gRPC 协议。一方面不同 key 若 TTL 相同,可复用同一个 Lease,显著减少了 Lease 数。另一方面,通过 gRPC HTTP/2 实现了多路复用,流式传输,同一连接可支持为多个 Lease 续期,大大减少了连接数。通过以上两个优化,实现 Lease 性能大幅提升,满足了各个业务场景诉求。
如何高效淘汰过期 Lease
-
在了解完节点正常情况下的 Lease 续期特性后,再看看节点异常时,未正常续期后,etcd 又是如何淘汰过期 Lease、删除节点健康指标 key 的。
-
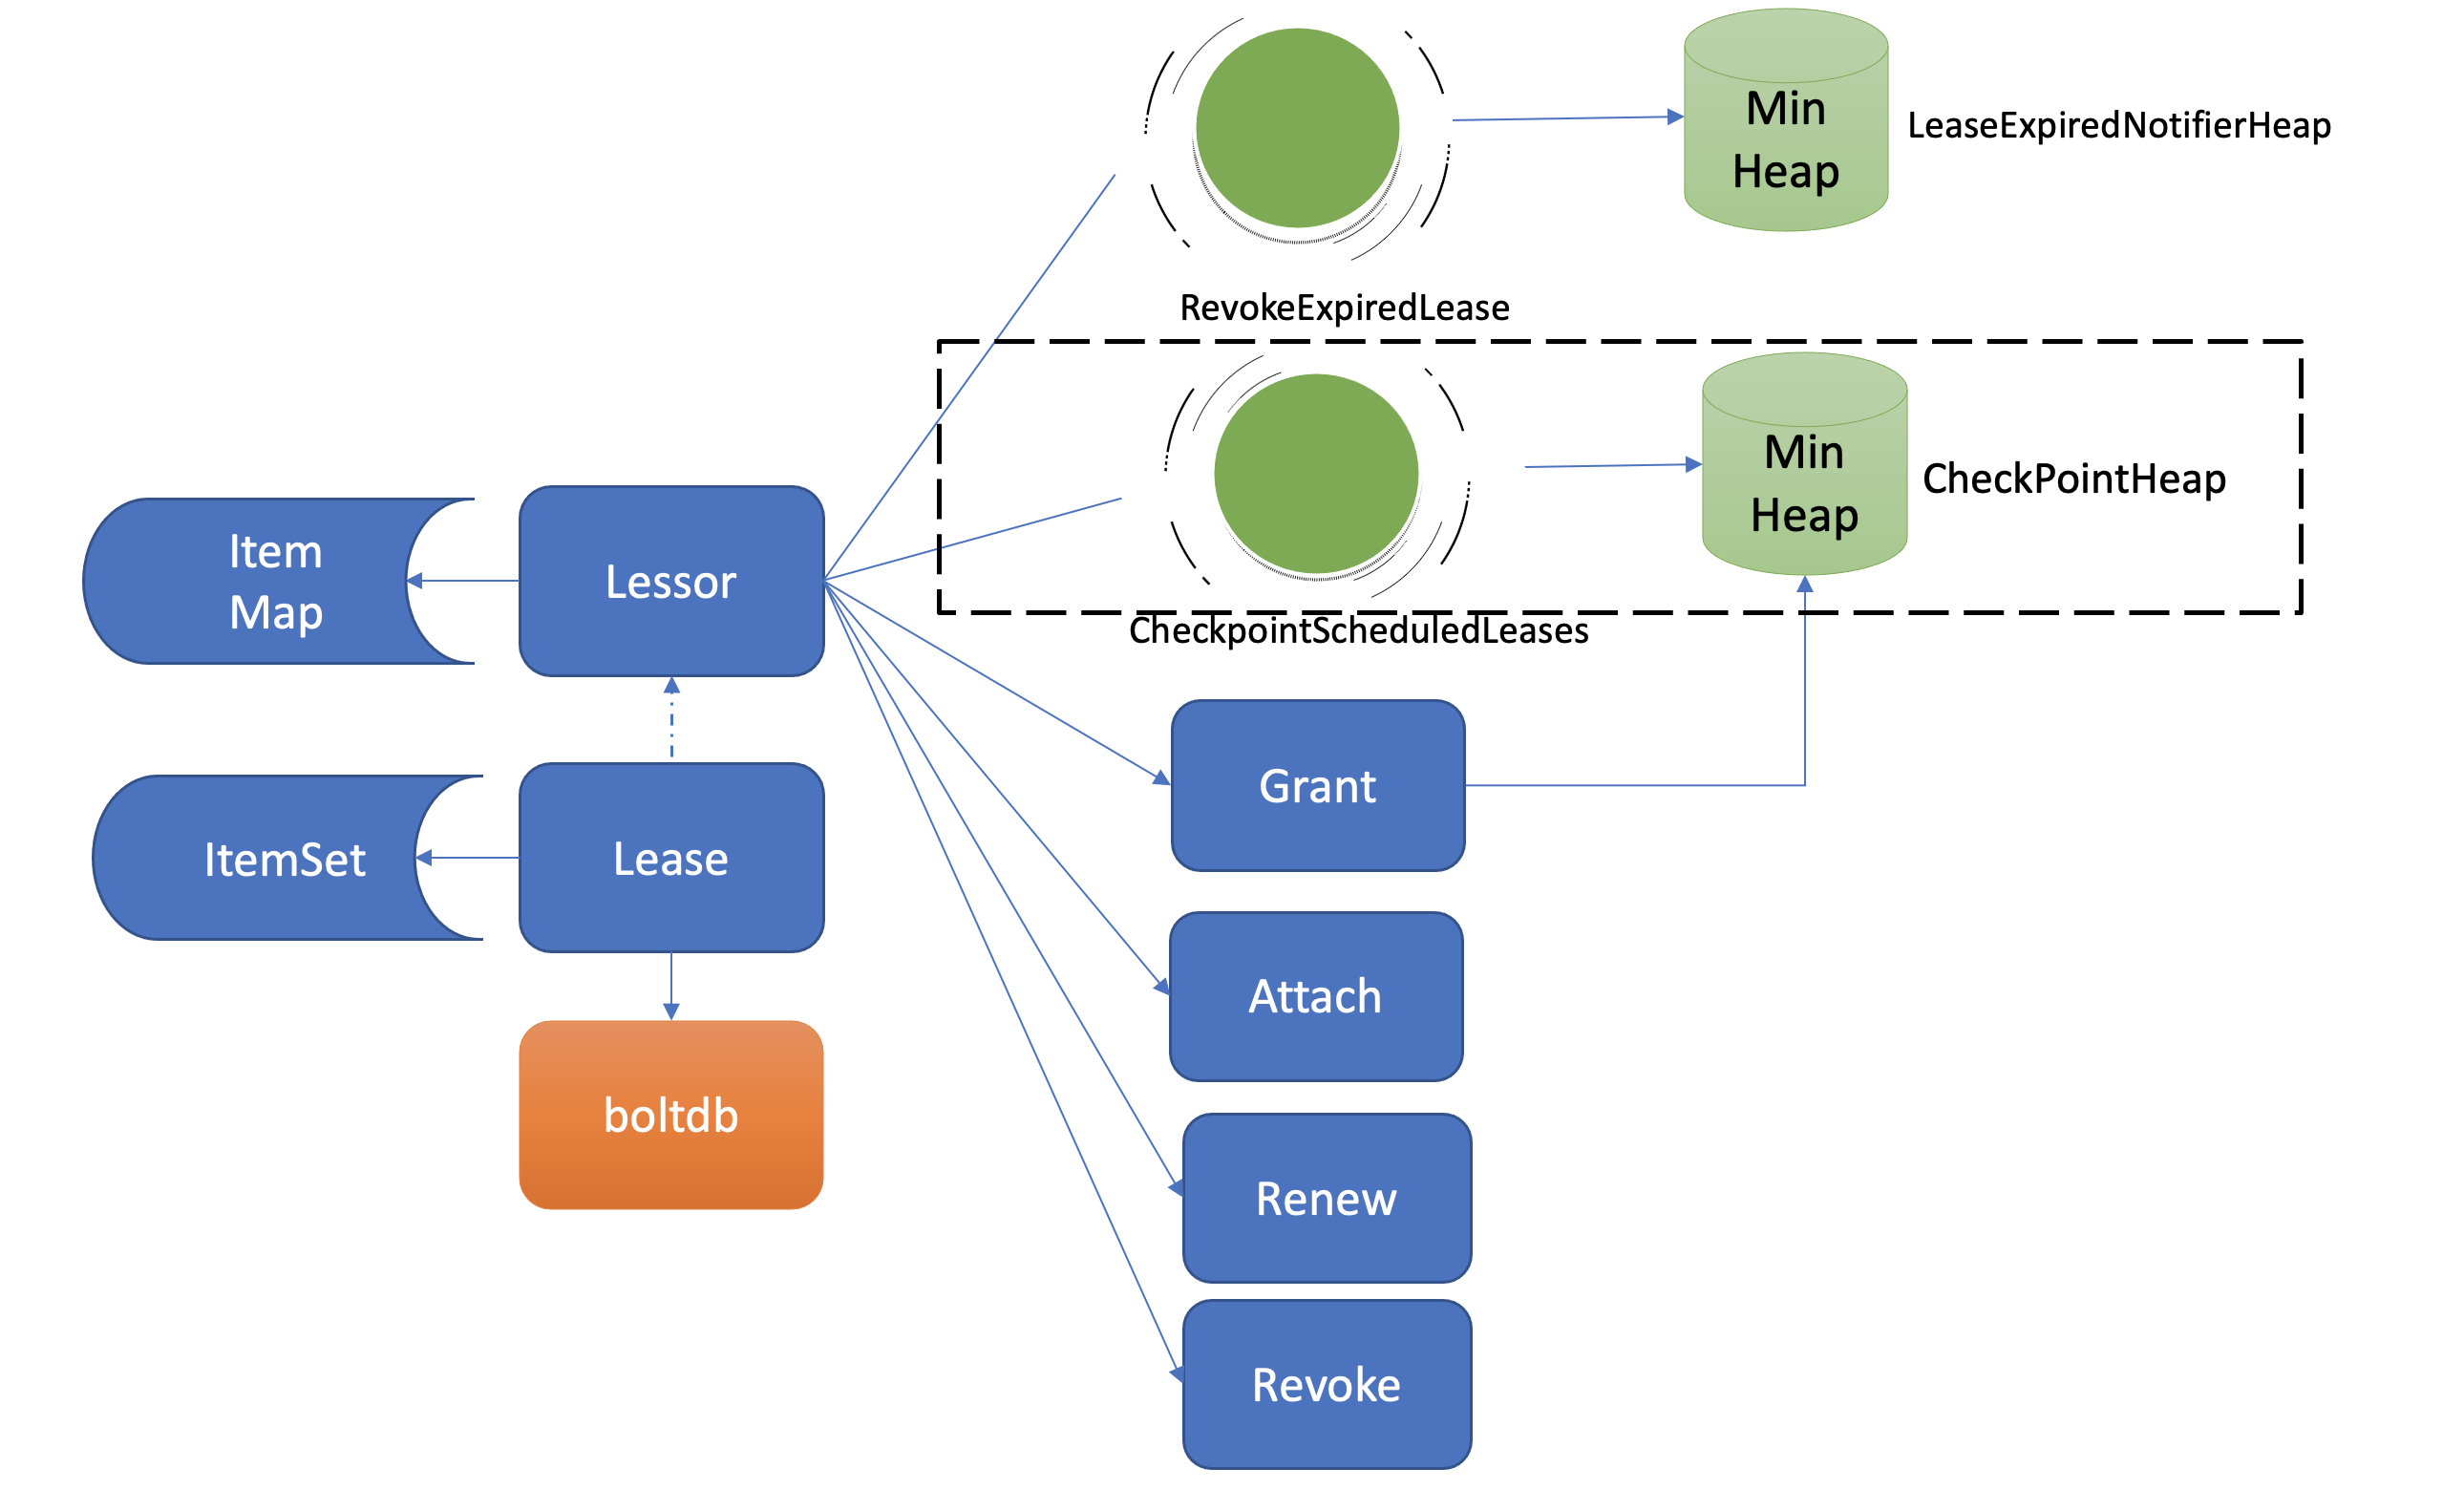
淘汰过期 Lease 的工作由 Lessor 模块的一个异步 goroutine 负责。如下面架构图虚线框所示,它会定时从最小堆中取出已过期的 Lease,执行删除 Lease 和其关联的 key 列表数据的
RevokeExpiredLease任务。
- 从图中可以看到,目前 etcd 是基于最小堆来管理 Lease,实现快速淘汰过期的 Lease。
- etcd 早期的时候,淘汰 Lease 非常暴力。etcd 会直接遍历所有 Lease,逐个检查 Lease 是否过期,过期则从 Lease 关联的 key 集合中,取出 key 列表,删除它们,时间复杂度是
O(N)。然而这种方案随着 Lease 数增大,毫无疑问它的性能会变得越来越差。我们能否按过期时间排序呢?这样每次只需轮询、检查排在前面的 Lease 过期时间,一旦轮询到未过期的 Lease, 则可结束本轮检查。 - 刚刚说的就是 etcd Lease 高效淘汰方案最小堆的实现方法。每次新增 Lease、续期的时候,它会插入、更新一个对象到最小堆中,对象含有 LeaseID 和其到期时间 unixnano,对象之间按到期时间升序排序。etcd Lessor 主循环每隔
500ms执行一次撤销 Lease 检查(RevokeExpiredLease),每次轮询堆顶的元素,若已过期则加入到待淘汰列表,直到堆顶的 Lease 过期时间大于当前,则结束本轮轮询。 - 相比早期
O(N)的遍历时间复杂度,使用堆后,插入、更新、删除,它的时间复杂度是O(LogN),查询堆顶对象是否过期时间复杂度仅为O(1),性能大大提升,可支撑大规模场景下 Lease 的高效淘汰。
- etcd 早期的时候,淘汰 Lease 非常暴力。etcd 会直接遍历所有 Lease,逐个检查 Lease 是否过期,过期则从 Lease 关联的 key 集合中,取出 key 列表,删除它们,时间复杂度是
- 获取到待过期的 LeaseID 后,Leader 是如何通知其他 Follower 节点淘汰它们呢?
- Lessor 模块会将已确认过期的 LeaseID,保存在一个名为 expiredC 的 channel 中,而 etcd server 的主循环会定期从 channel 中获取 LeaseID,发起 revoke 请求,通过 Raft Log 传递给 Follower 节点。
- 各个节点收到 revoke Lease 请求后,获取关联到此 Lease 上的 key 列表,从 boltdb 中删除 key,从 Lessor 的 Lease map 内存中删除此 Lease 对象,最后还需要从 boltdb 的 Lease bucket 中删除这个 Lease。
- 以上就是 Lease 的过期自动淘汰逻辑。Leader 节点按过期时间维护了一个最小堆,若你的节点异常未正常续期,那么随着时间消逝,对应的 Lease 则会过期,Lessor 主循环定时轮询过期的 Lease。获取到 ID 后,Leader 发起 revoke 操作,通知整个集群删除 Lease 和关联的数据。
为什么需要 checkpoint 机制
-
了解完 Lease 的创建、续期、自动淘汰机制后,你可能已经发现,检查 Lease 是否过期、维护最小堆、针对过期的 Lease 发起 revoke 操作,都是 Leader 节点负责的,它类似于 Lease 的仲裁者,通过以上清晰的权责划分,降低了 Lease 特性的实现复杂度。
-
那么当 Leader 因重启、crash、磁盘 IO 等异常不可用时,Follower 节点就会发起 Leader 选举,新 Leader 要完成以上职责,必须重建 Lease 过期最小堆等管理数据结构,那么以上重建可能会触发什么问题呢?
-
当集群发生 Leader 切换后,新的 Leader 基于 Lease map 信息,按 Lease 过期时间构建一个最小堆时,etcd 早期版本为了优化性能,并未持久化存储 Lease 剩余 TTL 信息,因此重建的时候就会自动给所有 Lease 自动续期了。然而若较频繁出现 Leader 切换,切换时间小于 Lease 的 TTL,这会导致 Lease 永远无法删除,大量 key 堆积,db 大小超过配额等异常。为了解决这个问题,etcd 引入了检查点机制,也就是下面架构图中黑色虚线框所示的
CheckPointScheduledLeases的任务。
-
一方面,etcd 启动的时候,Leader 节点后台会运行此异步任务,定期批量地将 Lease 剩余的 TTL 基于 Raft Log 同步给 Follower 节点,Follower 节点收到 CheckPoint 请求后,更新内存数据结构 LeaseMap 的剩余 TTL 信息。(即,Leader 节点定时批量同步 TTL 信息给 Follower 节点)
-
另一方面,当 Leader 节点收到 KeepAlive 请求的时候,它也会通过 checkpoint 机制把此 Lease 的剩余 TTL 重置,并同步给 Follower 节点,尽量确保续期后集群各个节点的 Lease 剩余 TTL 一致性。(即,通过 KeepAlive 消息同步 TTL 信息)
Q&A
etcd lease 最小的 TTL 时间是多少?它跟什么因素有关?
TODO
对于 Lease 操作,请求是否必须由 Leader 接收处理。这种写请求路由是通过 client3 客户端直接发到 Leader 还是通过可以通过 Follower 转发?
非常好的问题,从原理上我们知道 Lease 是 Leader 在内存中维护过期最小堆的,因此续期操作 client 是必须要直接发送给 Leader 的,如果 Follower 节点收到了 KeepAlive 请求,会转发给 Leader 节点。续期操作不经过 Raft 协议处理同步,而 leaseGrant/Revoke 请求会经过 Raft 协议同步给各个节点,因此任意节点都可以处理它。
MVCC (Multiversion concurrency control):如何实现多版本并发控制
-
etcd v2 版本存在若干局限,如仅保留最新版本 key-value 数据、丢弃历史版本。而 etcd 核心特性 watch 又依赖历史版本,因此 etcd v2 为了缓解这个问题,会在内存中维护一个较短的全局事件滑动窗口,保留最近的 1000 条变更事件。但是在集群写请求较多等场景下,它依然无法提供可靠的 Watch 机制。那么不可靠的 etcd v2 事件机制,在 etcd v3 中是如何解决的呢?MVCC(Multiversion concurrency control)机制,正是为解决这个问题而诞生的。
-
MVCC 机制的核心思想是保存一个 key-value 数据的多个历史版本,etcd 基于它不仅实现了可靠的 Watch 机制,避免了 client 频繁发起 List Pod 等 expensive request 操作,保障 etcd 集群稳定性。而且 MVCC 还能以较低的并发控制开销,实现各类隔离级别的事务,保障事务的安全性,是事务特性的基础。
什么是 MVCC
-
它是一个基于多版本技术实现的一种并发控制机制。那常见的并发机制有哪些?MVCC 的优点在哪里呢?
-
提到并发控制机制你可能就没那么陌生了,比如数据库中的悲观锁,也就是通过锁机制确保同一时刻只能有一个事务对数据进行修改操作,常见的实现方案有读写锁、互斥锁、两阶段锁等。悲观锁是一种事先预防机制,它悲观地认为多个并发事务可能会发生冲突,因此它要求事务必须先获得锁,才能进行修改数据操作。但是悲观锁粒度过大、高并发场景下大量事务会阻塞等,会导致服务性能较差。
-
MVCC 机制正是基于多版本技术实现的一种乐观锁机制,它乐观地认为数据不会发生冲突,但是当事务提交时,具备检测数据是否冲突的能力。
-
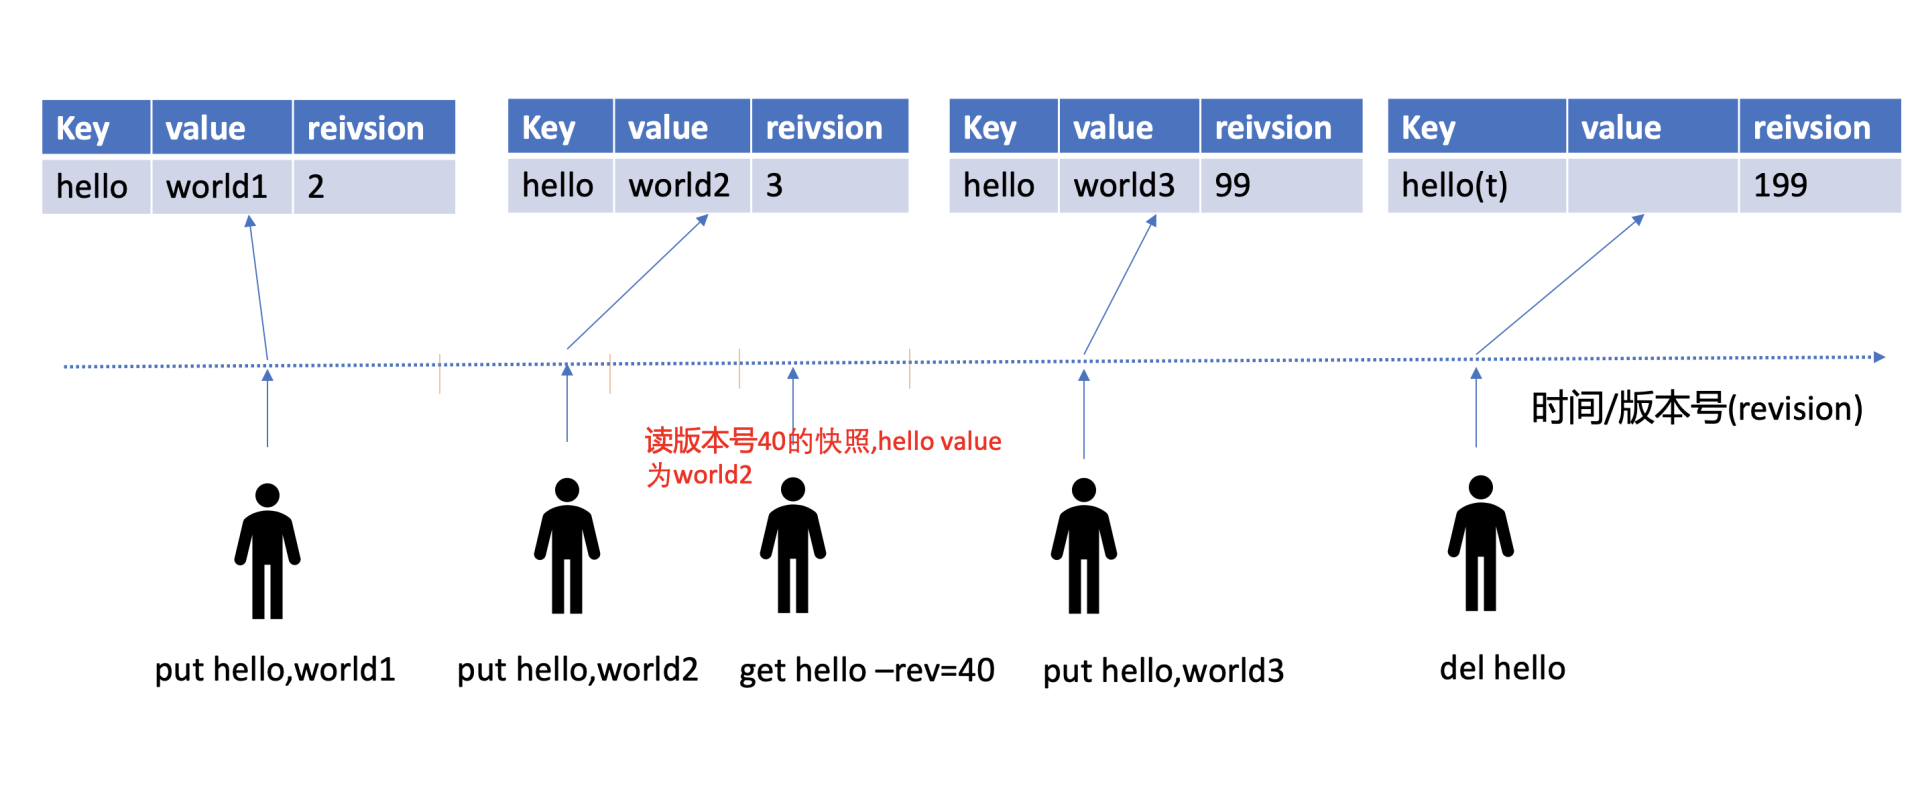
在 MVCC 数据库中,更新一个 key-value 数据的时候,它并不会直接覆盖原数据,而是新增一个版本来存储新的数据,每个数据都有一个版本号。版本号它是一个逻辑时间,为了方便深入理解版本号意义,在下面画了一个 etcd MVCC 版本号时间序列图。从图中可以看到,随着时间增长,每次修改操作,版本号都会递增。每修改一次,生成一条新的数据记录。当指定版本号读取数据时,它实际上访问的是版本号生成那个时间点的快照数据。当删除数据的时候,它实际也是新增一条带删除标识的数据记录。
MVCC 特性初体验
-
过几个简单命令,初体验下 MVCC 特性,看看它是如何帮助你查询历史修改记录,以及找回不小心删除的 key 的。
-
启动一个空集群,更新两次 key hello 后,如何获取 key hello 的上一个版本值呢? 删除 key hello 后,还能读到历史版本吗?
-
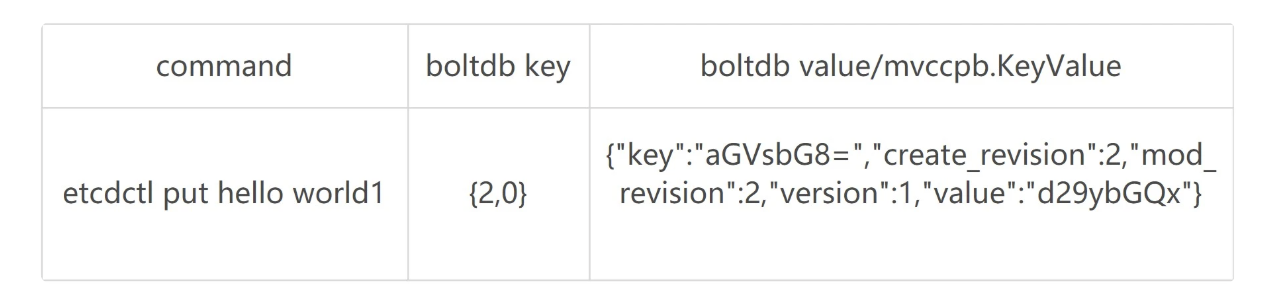
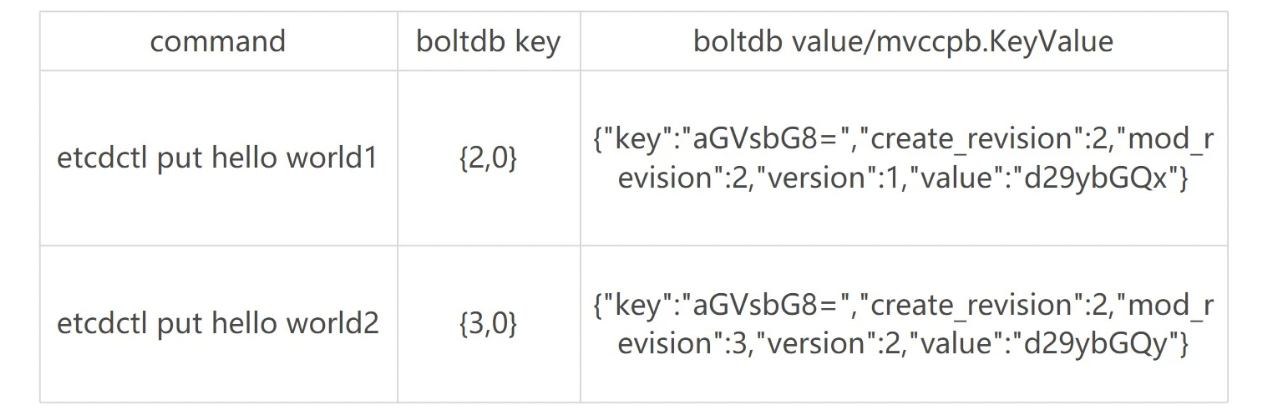
如下面的命令所示,第一次 key hello 更新完后,通过 get 命令获取下它的 key-value 详细信息。正如所看到的,除了 key、value 信息,还有各类版本号。这里重点关注
mod_revision,它表示 key 最后一次修改时的 etcd 版本号。当再次更新 key hello 为 world2 后,然后通过查询时指定 key 第一次更新后的版本号,会发现查询到了第一次更新的值,甚至执行删除 key hello 后,依然可以获得到这个值。那么 etcd 是如何实现的呢?
# 更新 key hello 为 world1
$ etcdctl put hello world1
OK
# 通过指定输出模式为 json,查看 key hello 更新后的详细信息
$ etcdctl get hello -w=json
{
    "kvs":[
        {
            "key":"aGVsbG8=",
            "create_revision":2,
            "mod_revision":2,
            "version":1,
            "value":"d29ybGQx"
        }
    ],
    "count":1
}
# 再次修改 key hello 为 world2
$ etcdctl put hello world2
OK
# 确认修改成功,最新值为 wolrd2
$ etcdctl get hello
hello
world2
# 指定查询版本号,获得了 hello 上一次修改的值
$ etcdctl get hello --rev=2
hello
world1
# 删除 key hello
$ etcdctl del  hello
1
# 删除后指定查询版本号 3 获得了 hello 删除前的值
$ etcdctl get hello --rev=3
hello
world2
整体架构
- 在详细介绍 etcd 如何实现 MVCC 特性前,先从整体上介绍下 MVCC 模块。下图是 MVCC 模块的一个整体架构图,整个 MVCC 特性由 treeIndex、Backend/boltdb 组成。当执行 MVCC 特性初体验中的 put 命令后,请求经过 gRPC KV Server、Raft 模块流转,对应的日志条目被提交后,Apply 模块开始执行此日志内容。
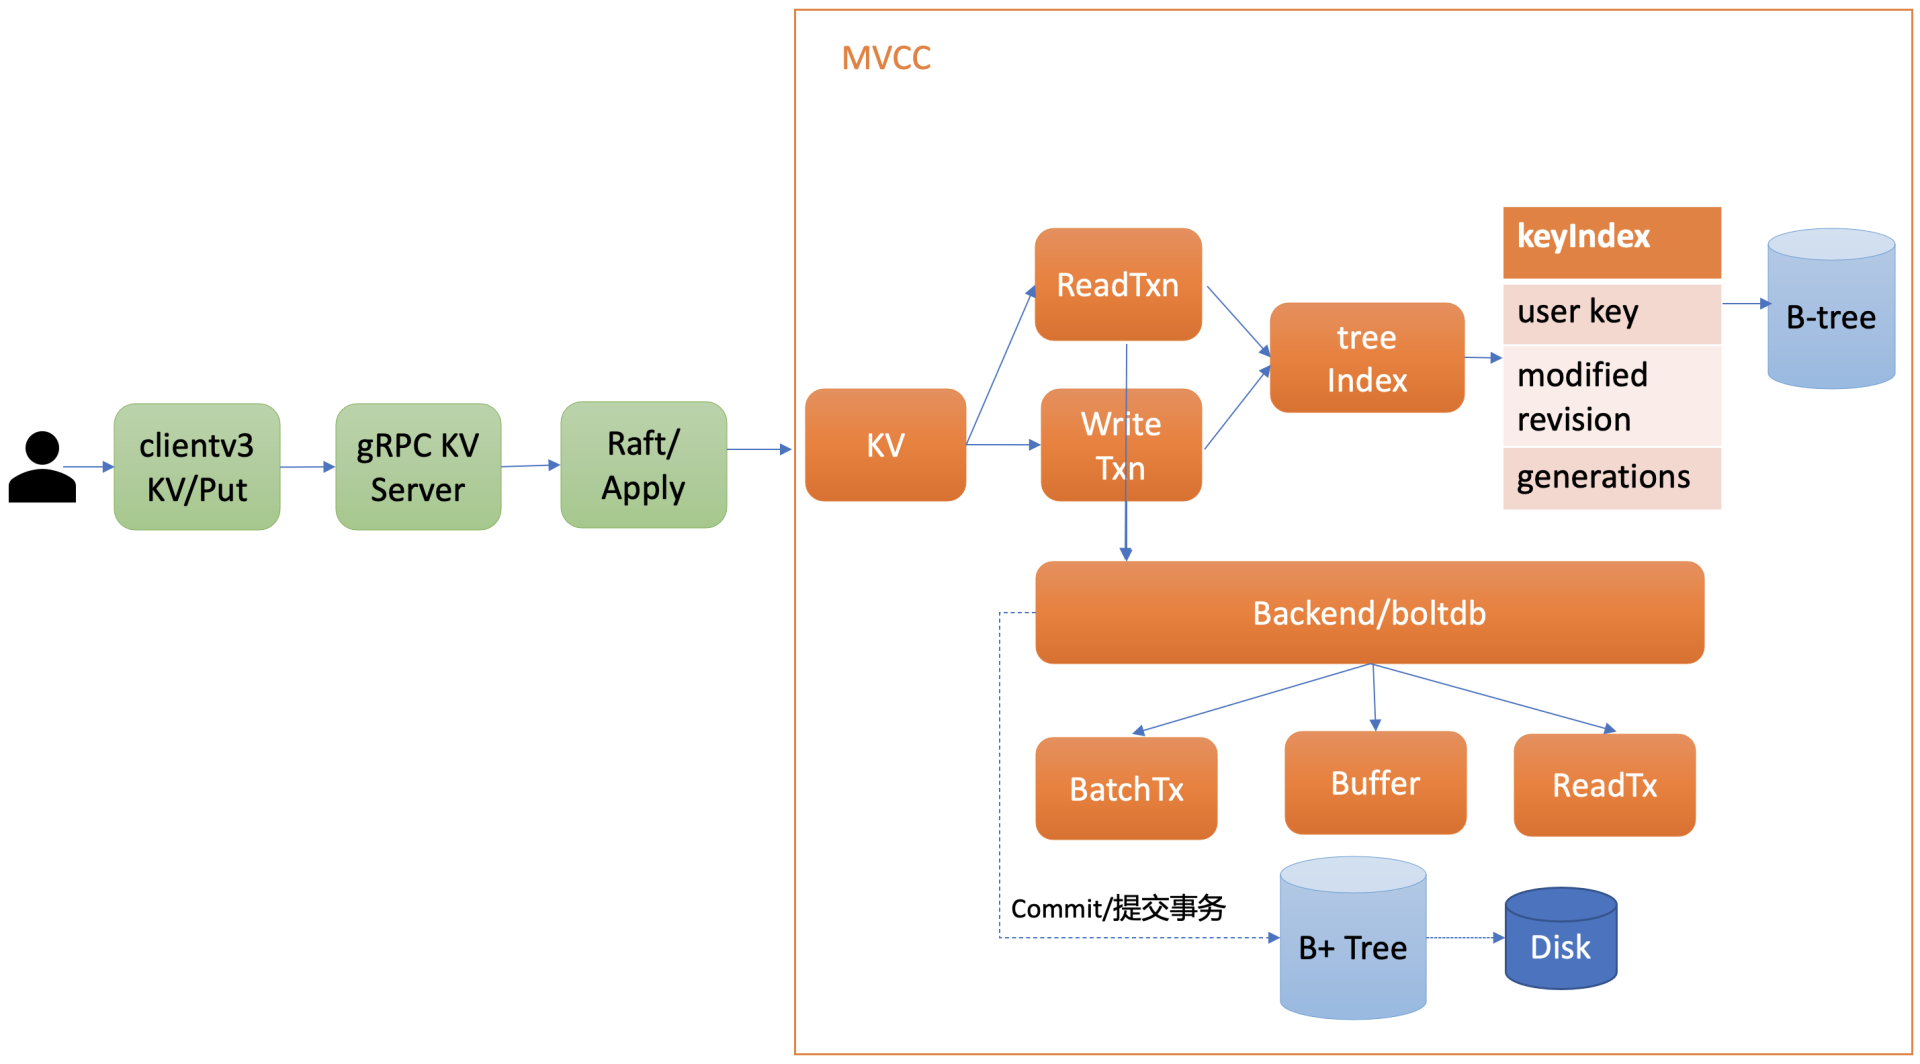
- Apply 模块通过 MVCC 模块来执行 put 请求,持久化 key-value 数据。MVCC 模块将请求请划分成两个类别,分别是读事务(ReadTxn)和写事务(WriteTxn)。
- 读事务负责处理 range 请求
- 写事务负责 put/delete 操作
- 读写事务基于 treeIndex、Backend/boltdb 提供的能力,实现对 key-value 的增删改查功能。
-
treeIndex模块基于内存版 B-tree 实现了 key 索引管理,它保存了用户 key 与版本号(revision)的映射关系等信息。 -
Backend 模块负责 etcd 的 key-value 持久化存储,主要由 ReadTx、BatchTx、Buffer 组成,ReadTx 定义了抽象的读事务接口,BatchTx 在 ReadTx 之上定义了抽象的写事务接口,Buffer 是数据缓存区。
-
etcd 设计上支持多种 Backend 实现,目前实现的 Backend 是
boltdb。boltdb 是一个基于 B+ tree 实现的、支持事务的 key-value 嵌入式数据库。 - treeIndex 与 boltdb 关系可参考下图。当发起一个 get hello 命令时,从 treeIndex 中获取 key 的版本号,然后再通过这个版本号,从 boltdb 获取 value 信息。boltdb 的 value 是包含用户 key-value、各种版本号、lease 信息的结构体。

treeIndex 原理
-
为什么需要 treeIndex 模块呢?对于 etcd v2 来说,当通过 etcdctl 发起一个 put hello 操作时,etcd v2 直接更新内存树,这就导致历史版本直接被覆盖,无法支持保存 key 的历史版本。在 etcd v3 中引入 treeIndex 模块正是为了解决这个问题,支持保存 key 的历史版本,提供稳定的 Watch 机制和事务隔离等能力。
-
那 etcd v3 又是如何基于 treeIndex 模块,实现保存 key 的历史版本的呢?etcd 在每次修改 key 时会生成一个全局递增的版本号(revision),然后通过数据结构 B-tree 保存用户 key 与版本号之间的关系,再以版本号作为 boltdb key,以用户的 key-value 等信息作为 boltdb value,保存到 boltdb。
-
etcd 保存用户 key 与版本号映射关系的数据结构 B-tree,为什么 etcd 使用它而不使用哈希表、平衡二叉树 (AVL 树)?从 etcd 的功能特性上分析,因 etcd 支持范围查询,因此保存索引的数据结构也必须支持范围查询才行。所以哈希表不适合,而 B-tree 支持范围查询。从性能上分析,平横二叉树每个节点只能容纳一个数据、导致树的高度较高,而 B-tree 每个节点可以容纳多个数据,树的高度更低,更扁平,涉及的查找次数更少,具有优越的增、删、改、查性能。Google 的开源项目 btree,使用 Go 语言实现了一个内存版的 B-tree,对外提供了简单易用的接口。etcd 正是基于 btree 库实现了一个名为 treeIndex 的索引模块,通过它来查询、保存用户 key 与版本号之间的关系。
-
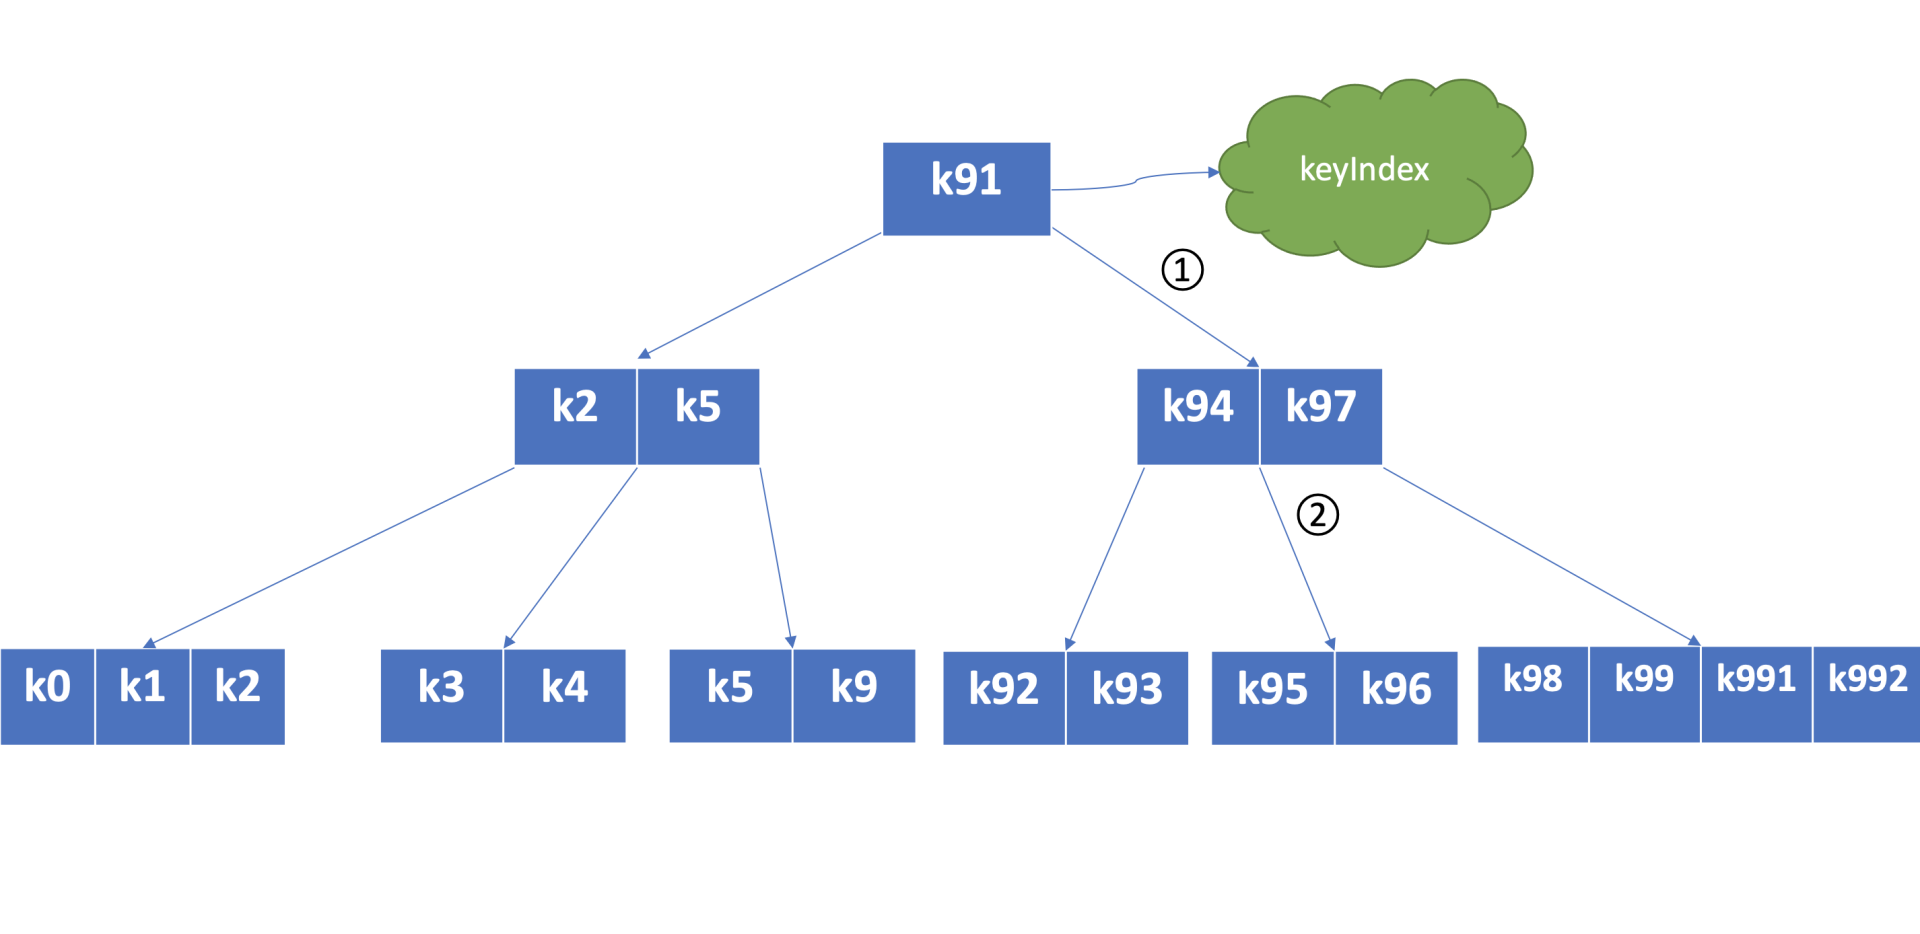
下图是个最大度(degree > 1,简称 d)为 5 的 B-tree,度是 B-tree 中的一个核心参数,它决定了每个节点上的数据量多少、节点的“胖”、“瘦”程度。从图中可以看到,节点越胖,意味着一个节点可以存储更多数据,树的高度越低。在一个度为 d 的 B-tree 中,节点保存的最大 key 数为 2d - 1,否则需要进行平衡、分裂操作。这里注意的是在 etcd treeIndex 模块中,创建的是最大度 32 的 B-tree,也就是一个叶子节点最多可以保存 63 个 key。
-
从图中可以看到,通过 put/txn 命令写入的一系列 key,treeIndex 模块基于 B-tree 将其组织起来,节点之间基于用户 key 比较大小。当查找一个 key k95 时,通过 B-tree 的特性,仅需通过图中流程 1 和 2 两次快速比较,就可快速找到 k95 所在的节点。
-
在 treeIndex 中,每个节点的 key 是一个 keyIndex 结构,etcd 就是通过它保存了用户的 key 与版本号的映射关系。那么 keyIndex 结构包含哪些信息呢?下面是字段说明。
type keyIndex struct {
   key         []byte          // 用户的 key 名称,比如示例中的 "hello"
   modified    revision        // 最后一次修改 key 时的 etcd 版本号,比如示例中的刚写入 hello 为 world1 时的版本号为 2
   generations []generation    // generation 保存了一个 key 若干代版本号信息,每代中包含对 key 的多次修改的版本号列表
}
- keyIndex 中包含用户的 key、最后一次修改 key 时的 etcd 版本号、key 的若干代(generation)版本号信息,每代中包含对 key 的多次修改的版本号列表。那要如何理解 generations?为什么它是个数组呢?generations 表示一个 key 从创建到删除的过程,每代对应 key 的一个生命周期的开始与结束。当第一次创建一个 key 时,会生成第 0 代,后续的修改操作都是在往第 0 代中追加修改版本号。当把 key 删除后,它就会生成新的第 1 代,一个 key 不断经历创建、删除的过程,它就会生成多个代。generation 结构详细信息如下:generation 结构中包含此 key 的修改次数、generation 创建时的版本号、对此 key 的修改版本号记录列表。
type generation struct {
   ver     int64            // 表示此 key 的修改次数
   created revision         // 表示 generation 结构创建时的版本号
   revs    []revision       // 每次修改 key 时的 revision 追加到此数组
}
- 需要注意的是版本号(revision)并不是一个简单的整数,而是一个结构体。revision 结构及含义如下:revision 包含 main 和 sub 两个字段,main 是全局递增的版本号,它是个 etcd 逻辑时钟,随着 put/txn/delete 等事务递增。sub 是一个事务内的子版本号,从 0 开始随事务内的 put/delete 操作递增。
解释:通过引入事务的子版本号 sub,实现了同一事务的操作可见,不同事务的操作不可见,满足了不同事务间的隔离性。
type revision struct {
   main int64    // 一个全局递增的主版本号,随 put/txn/delete 事务递增,一个事务内的 key main 版本号是一致的
   sub int64     // 一个事务内的子版本号,从 0 开始随事务内 put/delete 操作递增
}
- 比如启动一个空集群,全局版本号默认为 1,执行下面的 txn 事务,它包含两次 put、一次 get 操作,那么按照上面介绍的原理,全局版本号随读写事务自增,因此是 main 为 2,sub 随事务内的 put/delete 操作递增,因此 key hello 的 revison 为 {2,0},key world 的 revision 为 {2,1}。
解释:初始 main 为 1 事务 main++ 为 2 操作 put hello,使用初始事务内子版本号,sub 为 0 操作 get hello,读操作不影响事务内子版本号。操作 put world,sub++,事务内子版本号增加,sub 为 1
$ etcdctl txn -i
compares:


success requests (get,put,del):
put hello 1
get hello
put world 2
- 介绍完 treeIndex 基本原理、核心数据结构后,再看看在 MVCC 特性初体验中的更新、查询、删除 key 案例里,treeIndex 与 boltdb 是如何协作,完成以上 key-value 操作的?
MVCC 更新 key 原理
-
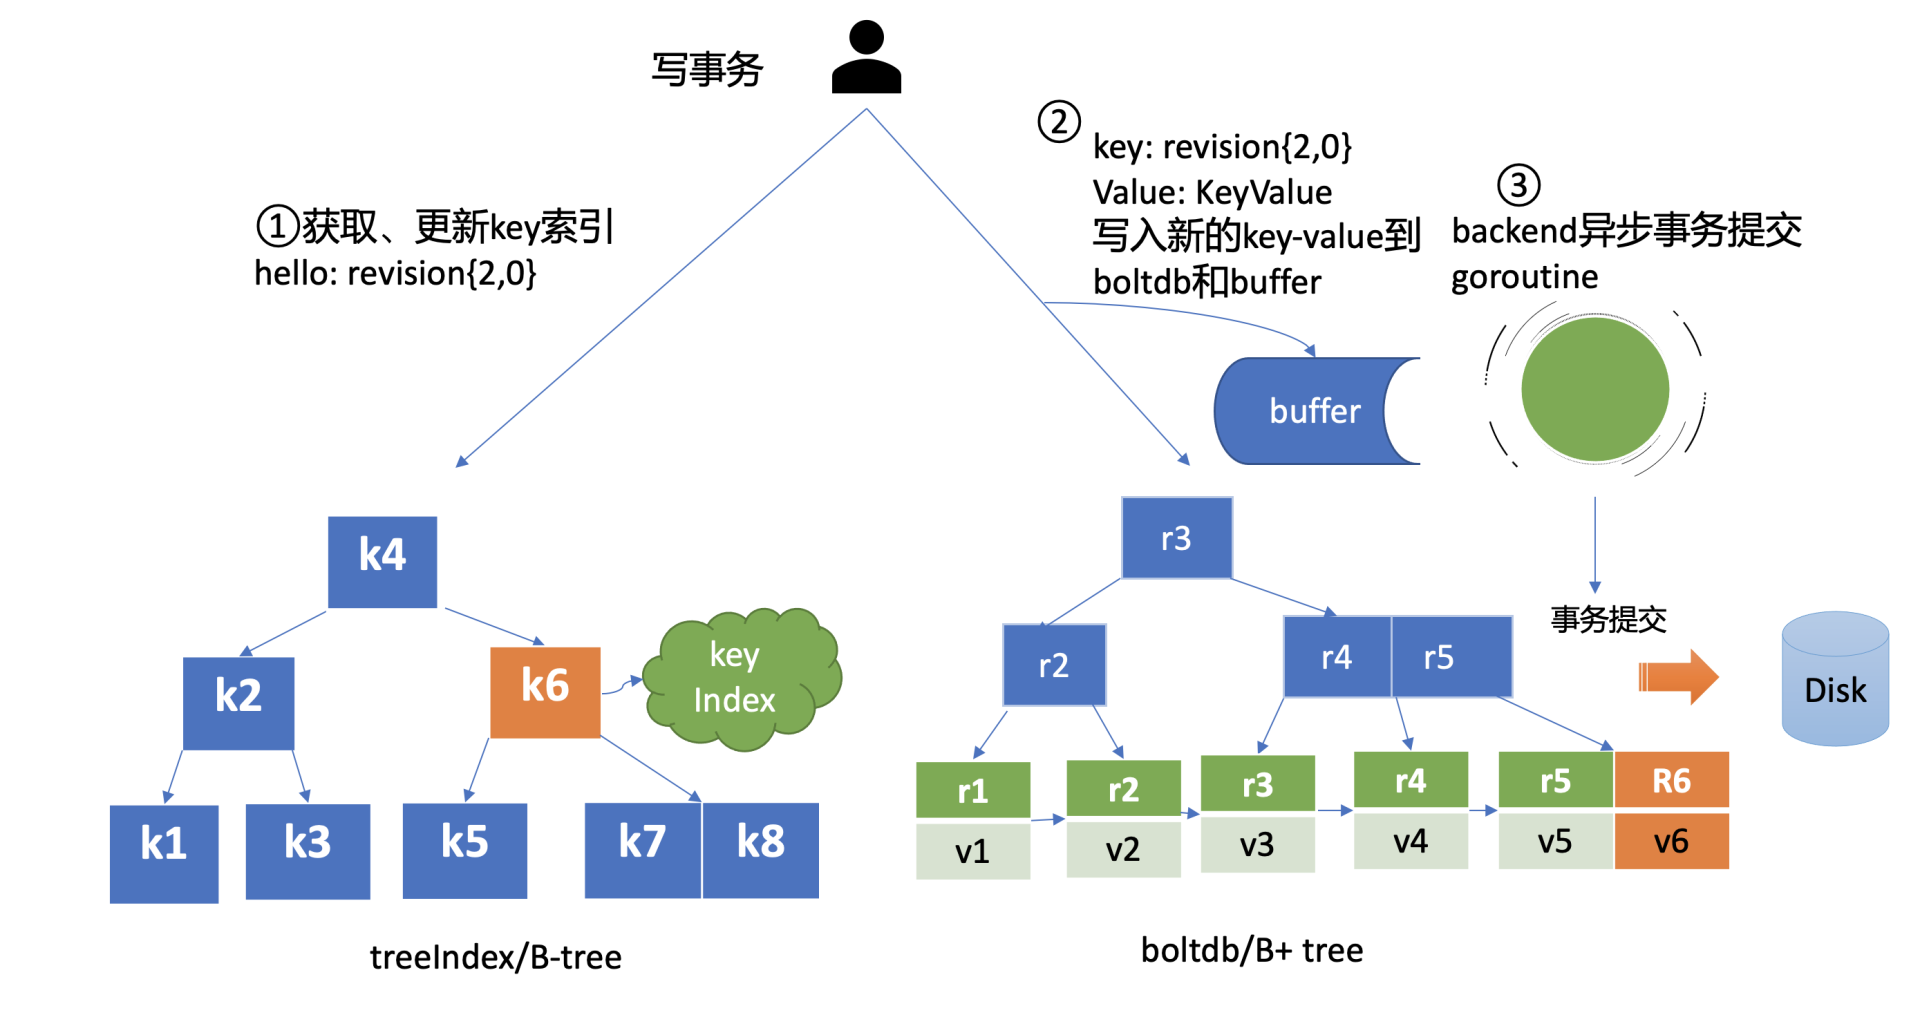
当通过 etcdctl 发起一个 put hello 操作时,如下面的 put 事务流程图流程一所示,在 put 写事务中,首先它需要从 treeIndex 模块中查询 key 的 keyIndex 索引信息,keyIndex 中存储了 key 的创建版本号、修改的次数等信息,这些信息在事务中发挥着重要作用,因此会存储在 boltdb 的 value 中。
-
在示例中,因为是第一次创建 hello key,此时 keyIndex 索引为空。其次 etcd 会根据当前的全局版本号(空集群启动时默认为 1)自增,生成 put hello 操作对应的版本号 revision {2,0},这就是 boltdb 的 key。boltdb 的 value 是 mvccpb.KeyValue 结构体,它是由用户 key、value、create_revision、mod_revision、version、lease 组成。它们的含义分别如下:
create_revision表示此 key 创建时的版本号。在我们的示例中,key hello 是第一次创建,那么值就是 2。当再次修改 key hello 的时候,写事务会从 treeIndex 模块查询 hello 第一次创建的版本号,也就是 keyIndex.generations[i].created 字段,赋值给 create_revision 字段mod_revision表示 key 最后一次修改时的版本号,即 put 操作发生时的全局版本号加 1;version表示此 key 的修改次数。每次修改的时候,写事务会从 treeIndex 模块查询 hello 已经历过的修改次数,也就是 keyIndex.generations[i].ver 字段,将 ver 字段值加 1 后,赋值给 version 字段。
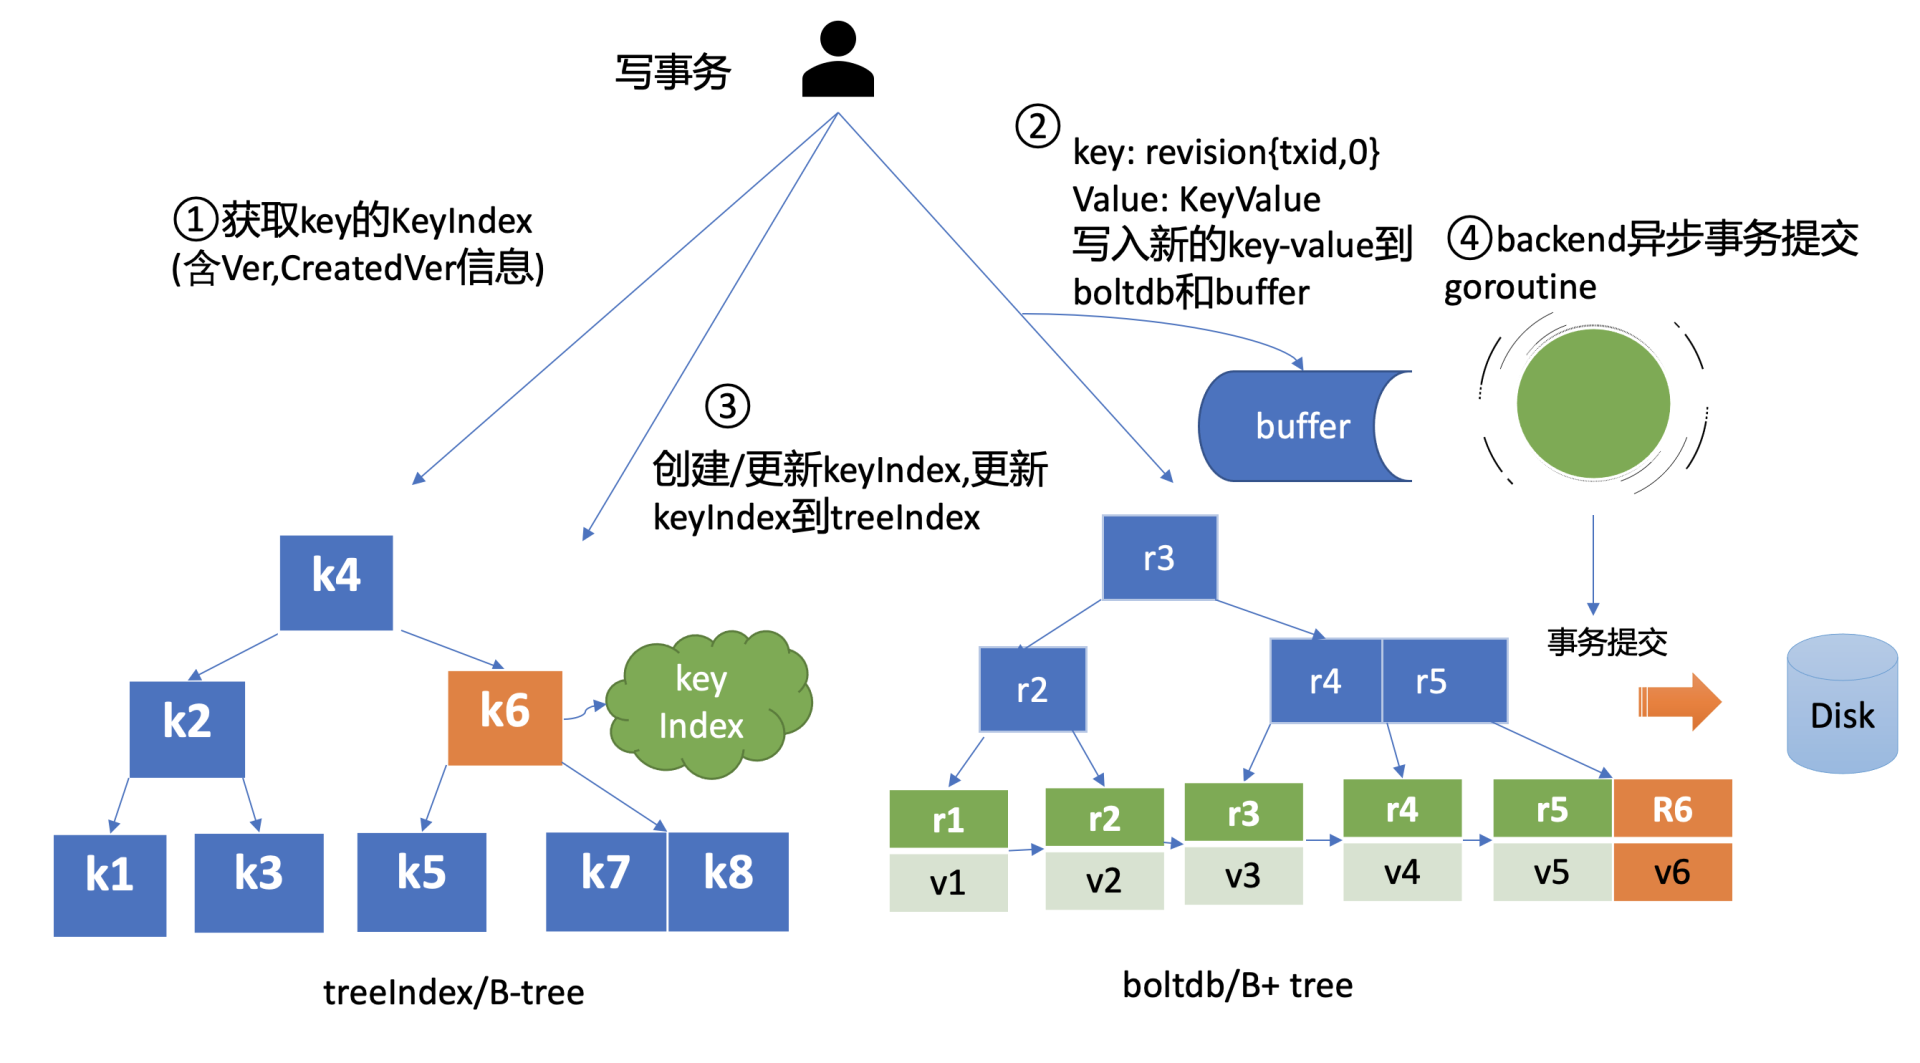
- 填充好 boltdb 的 KeyValue 结构体后,这时就可以通过 Backend 的写事务 batchTx 接口将 key{2,0},value 为 mvccpb.KeyValue 保存到 boltdb 的缓存中,并同步更新 buffer,如上图中的流程2所示。此时存储到 boltdb 中的 key、value 数据如下:
- 然后 put 事务需将本次修改的版本号与用户 key 的映射关系保存到 treeIndex 模块中,也就是上图中的流程3。因为 key hello 是首次创建,treeIndex 模块它会生成 key hello 对应的 keyIndex 对象,并填充相关数据结构。keyIndex 填充后的结果如下所示:
key hello 的 keyIndex:

key:         "hello"
modified:    <2,0>
generations: [ { ver:1, created:<2,0>, revisions:[ <2,0> ] } ]
- key 为 hello,modified 为最后一次修改版本号 <2,0>,key hello 是首次创建的,因此新增一个 generation 代跟踪它的生命周期、修改记录
- generation 的 ver 表示修改次数,首次创建为 1,后续随着修改操作递增
- generation.created 表示创建 generation 时的版本号为 <2,0>
- revision 数组保存对此 key 修改的版本号列表,每次修改都会将将相应的版本号追加到 revisions 数组中
- 通过以上流程,一个 put 操作终于完成。但是此时数据还并未持久化,为了提升 etcd 的写吞吐量、性能,一般情况下(默认堆积的写事务数大于 1 万才在写事务结束时同步持久化),数据持久化由 Backend 的异步 goroutine 完成,它通过事务批量提交,定时将 boltdb 页缓存中的脏数据提交到持久化存储磁盘中,也就是下图中的黑色虚线框住的流程4。
解释:etcd 提供了如下两个参数可以控制事务提交的行为。–backend-batch-interval 和 –backend-batch-limit。在 etcd v3.4.9 中,–backend-batch-interval 如果你没指定,默认是 100ms,对应的异步 goroutine 将批量每隔 100ms 将 boltdb 事务进行提交。–backend-batch-limit 默认是 10000,当堆积的 put/del 等操作若超过 10000 个,则会同步触发 boltdb 事务提交。

MVCC 查询 key 原理
-
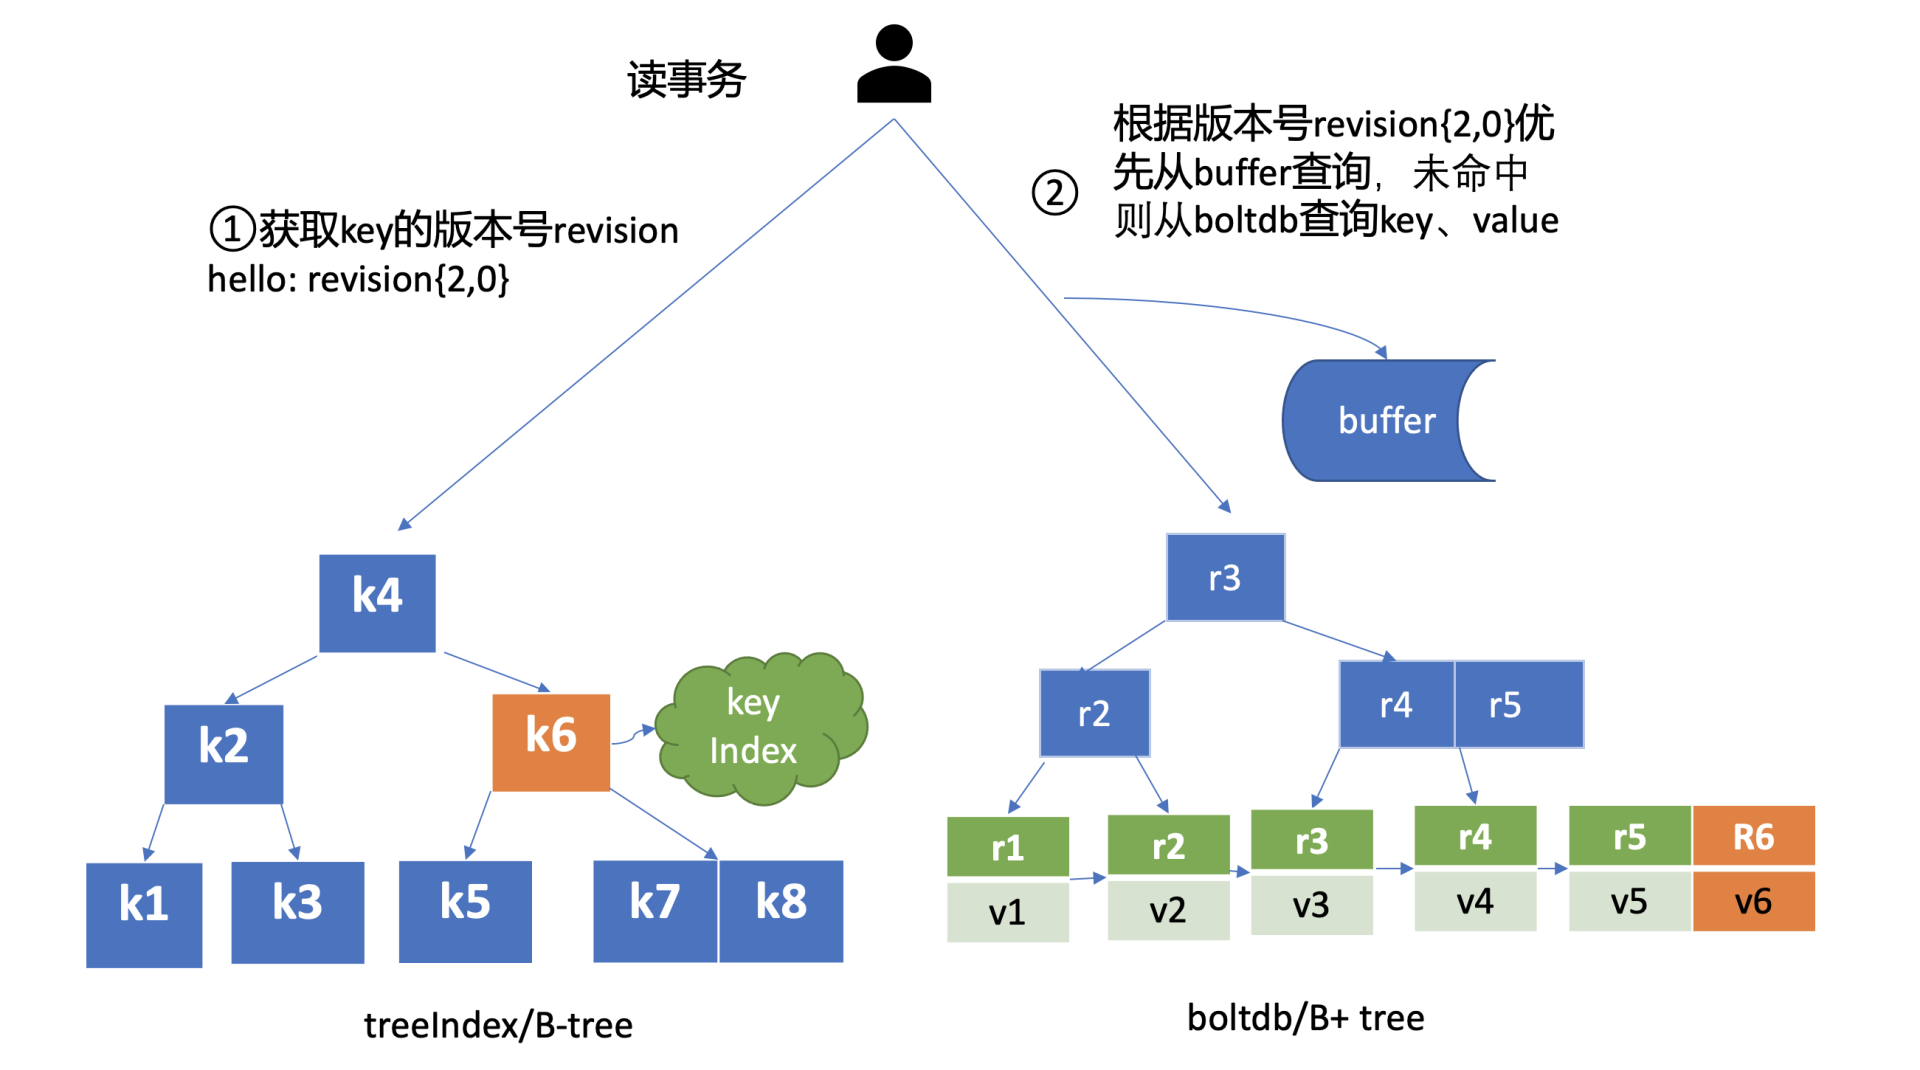
完成 put hello 为 world1 操作后,这时通过 etcdctl 发起一个 get hello 操作,MVCC 模块首先会创建一个读事务对象(TxnRead),在 etcd 3.4 中 Backend 实现了 ConcurrentReadTx,也就是并发读特性。
-
并发读特性的核心原理是,创建读事务对象时,它会全量拷贝当前写事务未提交的 buffer 数据,并发的读写事务不再阻塞在一个 buffer 资源锁上,实现了全并发读。
-
如上图所示,在读事务中,它首先需要根据 key 从 treeIndex 模块获取版本号,因我们未带版本号读,默认是读取最新的数据。treeIndex 模块从 B-tree 中,根据 key 查找到 keyIndex 对象后,匹配有效的 generation,返回 generation 的 revisions 数组中最后一个版本号 {2,0} 给读事务对象。
-
读事务对象根据此版本号为 key,通过 Backend 的并发读事务(ConcurrentReadTx)接口,优先从 buffer 中查询,命中则直接返回,否则从 boltdb 中查询此 key 的 value 信息。
-
那指定版本号读取历史记录又是怎么实现的呢?当你再次发起一个 put hello 为 world2 修改操作时,key hello 对应的 keyIndex 的结果如下面所示,keyIndex.modified 字段更新为 <3,0>,generation 的 revision 数组追加最新的版本号 <3,0>,ver 修改为 2。
key hello 的 keyIndex:

key:            "hello"
modified:       <3,0>
generations:    [ { ver:2, created:<2,0>, revisions:[ <2,0>, <3,0> ] } ]
- boltdb 插入一个新的 key revision {3,0},此时存储到 boltdb 中的 key-value 数据如下:
- 这时你再发起一个指定历史版本号为 2 的读请求时,实际是读版本号为 2 的时间点的快照数据。treeIndex 模块会遍历 generation 内的历史版本号,返回小于等于 2 的最大历史版本号,在这个示例中,也就是 revision{2,0},以它作为 boltdb 的 key,从 boltdb 中查询出 value 即可。
MVCC 删除 key 原理
-
介绍完 MVCC 更新、查询 key 的原理后,我们接着往下看。当你执行 etcdctl del hello 命令时,etcd 会立刻从 treeIndex 和 boltdb 中删除此数据吗?还是增加一个标记实现延迟删除(lazy delete)呢?答案为 etcd 实现的是延期删除模式,原理与 key 更新类似。
-
与更新 key 不一样之处在于,一方面,生成的 boltdb key 版本号 {4,0,t} 追加了删除标识(
tombstone, 简写t),boltdb value 变成只含用户 key 的 KeyValue 结构体。另一方面 treeIndex 模块也会给此 key hello 对应的 keyIndex 对象,追加一个空的 generation 对象,表示此索引对应的 key 被删除了。 -
当再次查询 hello 的时候,treeIndex 模块根据 key hello 查找到 keyindex 对象后,若发现其存在空的 generation 对象,并且查询的版本号大于等于被删除时的版本号,则会返回空。
-
etcdctl hello 操作后的 keyIndex 的结果如下面所示:
key hello 的 keyIndex:

key:            "hello"
modified:       <4,0>
generations:
[
{ver:3,created:<2,0>,revisions: [<2,0>,<3,0>,<4,0>(t)]},{empty}
]
- boltdb 此时会插入一个新的 key revision{4,0,t},此时存储到 boltdb 中的 key-value 数据如下:

- 那么 key 打上删除标记后有哪些用途呢?什么时候会真正删除它呢?
- 一方面删除 key 时会生成 events,Watch 模块根据 key 的删除标识,会生成对应的 Delete 事件。
- 另一方面,当重启 etcd,遍历 boltdb 中的 key 构建 treeIndex 内存树时,需要知道哪些 key 是已经被删除的,并为对应的 key 索引生成 tombstone 标识。而真正删除 treeIndex 中的索引对象、boltdb 中的 key 是通过压缩 (compactor) 组件异步完成。
- 正因为 etcd 的删除 key 操作是基于以上延期删除原理实现的,因此只要压缩组件未回收历史版本,我们就能从 etcd 中找回误删的数据。
Q&A
你认为 etcd 为什么删除使用 lazy delete 方式呢? 相比同步 delete, 各有什么优缺点?当你突然删除大量 key 后,db 大小是立刻增加还是减少呢?
- 为了保证 key 对应的 watcher 能够获取到 key 的所有状态信息,留给 watcher 时间做相应的处理
- 实时从 boltdb 删除 key,会可能触发树的不平衡,影响其他读写请求的性能
Watch:如何高效获取数据变化通知
- 在 Kubernetes 中,各种各样的控制器实现了 Deployment、StatefulSet、Job 等功能强大的 Workload。控制器的核心思想是监听、比较资源实际状态与期望状态是否一致,若不一致则进行协调工作,使其最终一致。那么当你修改一个 Deployment 的镜像时,Deployment 控制器是如何高效的感知到期望状态发生了变化呢?要回答这个问题,得从 etcd 的 Watch 特性说起,它是 Kubernetes 控制器的工作基础。
Watch 特性初体验
-
启动一个空集群,更新两次 key hello 后,使用 Watch 特性如何获取 key hello 的历史修改记录呢?可以通过下面的 watch 命令,带版本号监听 key hello,集群版本号可通过 endpoint status 命令获取,空集群启动后的版本号为 1。
-
执行后输出如下代码所示,两个事件记录分别对应上面的两次的修改,事件中含有 key、value、各类版本号等信息,你还可以通过比较 create_revision 和 mod_revision 区分此事件是 add 还是 update 事件。watch 命令执行后,你后续执行的增量 put hello 修改操作,它同样可持续输出最新的变更事件给你。
$ etcdctl put hello world1
$ etcdctl put hello world2
$ etcdctl watch hello -w=json --rev=1
{
    "Events":[
        {
            "kv":{
                "key":"aGVsbG8=",
                "create_revision":2,
                "mod_revision":2,
                "version":1,
                "value":"d29ybGQx"
            }
        },
        {
            "kv":{
                "key":"aGVsbG8=",
                "create_revision":2,
                "mod_revision":3,
                "version":2,
                "value":"d29ybGQy"
            }
        }
    ],
    "CompactRevision":0,
    "Canceled":false,
    "Created":false
}
- 从以上初体验中,你可以看到,基于 Watch 特性,可以快速获取到感兴趣的数据变化事件,这也是 Kubernetes 控制器工作的核心基础。在这过程中,其实有以下四大核心问题:
- client 获取事件的机制,etcd 是使用轮询模式还是推送模式呢?两者各有什么优缺点?
- 事件是如何存储的? 会保留多久?watch 命令中的版本号具有什么作用?
- 当 client 和 server 端出现短暂网络波动等异常因素后,导致事件堆积时,server 端会丢弃事件吗?若你监听的历史版本号 server 端不存在了,你的代码该如何处理?
- 如果你创建了上万个 watcher 监听 key 变化,当 server 端收到一个写请求后,etcd 是如何根据变化的 key 快速找到监听它的 watcher 呢?
轮询 vs 流式推送
- 首先第一个问题是 client 获取事件机制,etcd 是使用轮询模式还是推送模式呢?两者各有什么优缺点?答案是两种机制 etcd 都使用过。
- 在 etcd v2 Watch 机制实现中,使用的是 HTTP/1.x 协议,实现简单、兼容性好,每个 watcher 对应一个 TCP 连接。client 通过 HTTP/1.1 协议长连接定时轮询 server,获取最新的数据变化事件。然而当你的 watcher 成千上万的时,即使集群空负载,大量轮询也会产生一定的 QPS,server 端会消耗大量的 socket、内存等资源,导致 etcd 的扩展性、稳定性无法满足 Kubernetes 等业务场景诉求。
- etcd v3 的 Watch 机制的设计实现并非凭空出现,它正是吸取了 etcd v2 的经验、教训而重构诞生的。在 etcd v3 中,为了解决 etcd v2 的以上缺陷,使用的是基于 HTTP/2 的 gRPC 协议,双向流的 Watch API 设计,实现了连接多路复用。
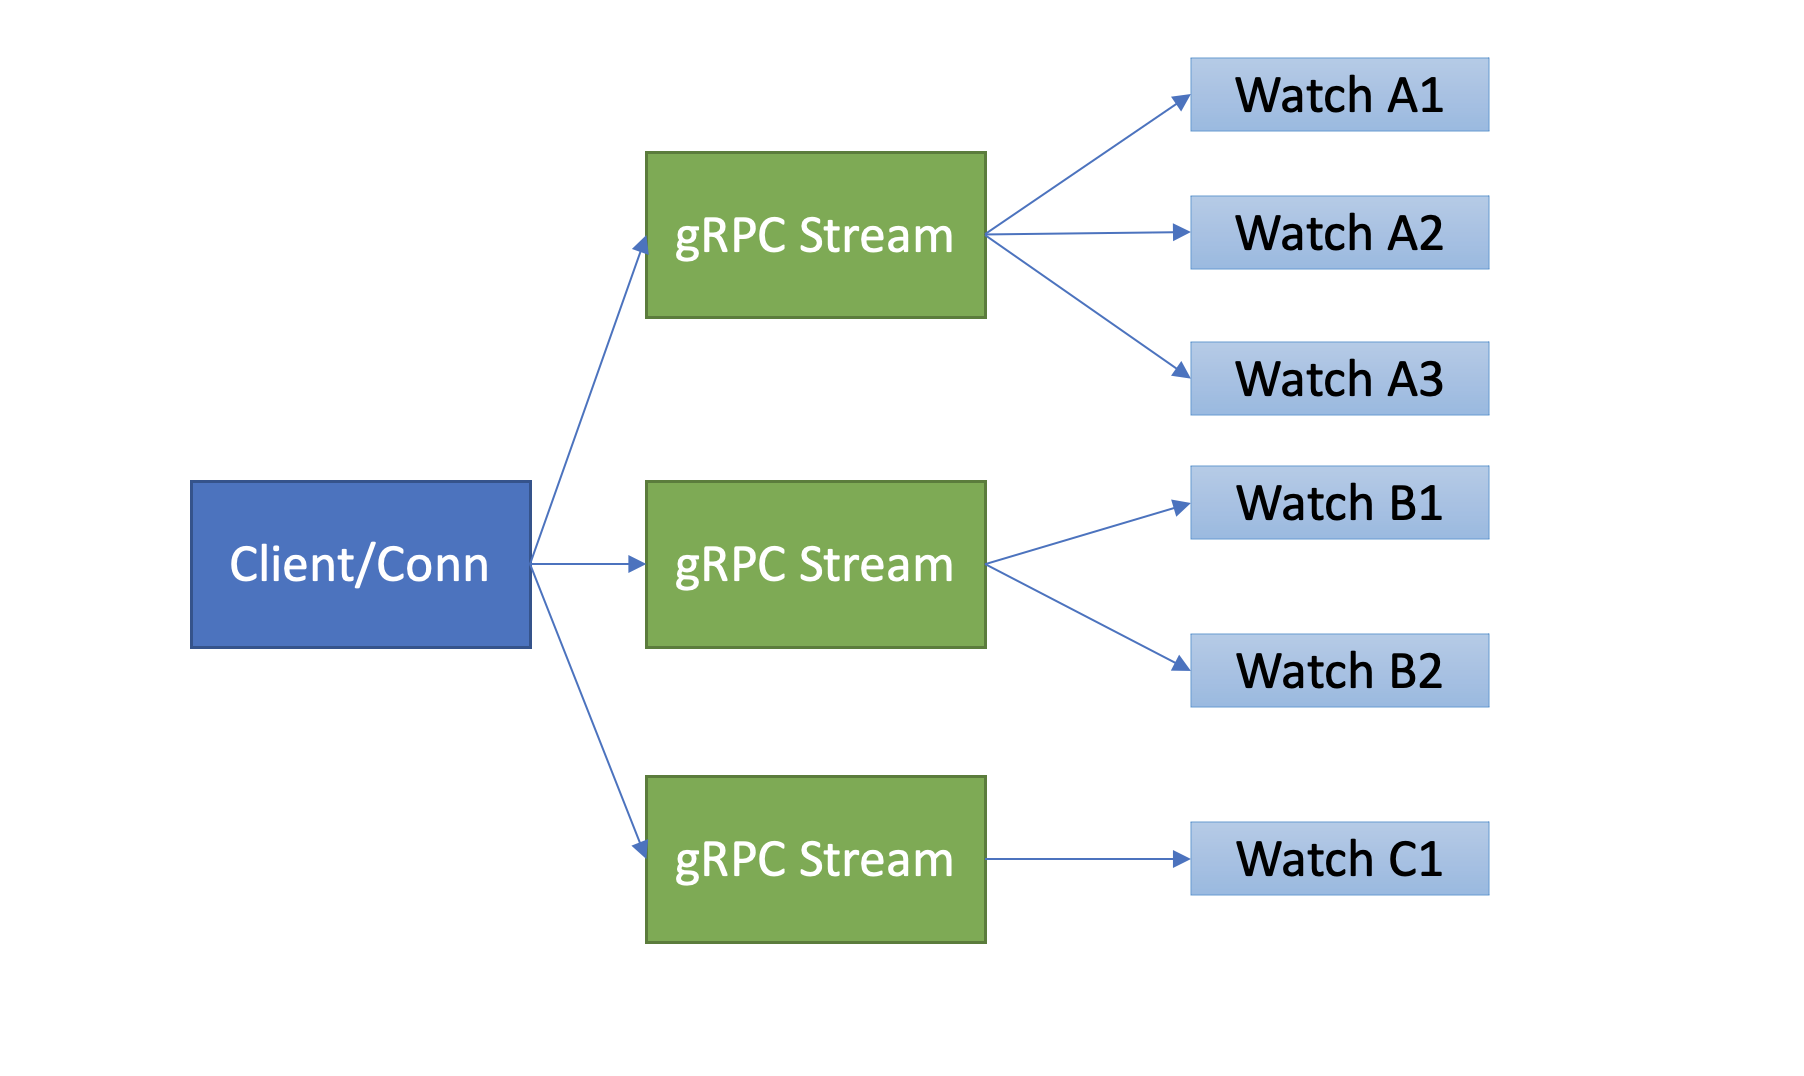
- etcd 基于 HTTP/2 协议的多路复用等机制,实现了一个 client/TCP 连接支持多 gRPC Stream, 一个 gRPC Stream 又支持多个 watcher,如下图所示。同时事件通知模式也从 client 轮询优化成 server 流式推送,极大降低了 server 端 socket、内存等资源。
-
在 clientv3 库中,Watch 特性被抽象成 Watch、Close、RequestProgress 三个简单 API 提供给开发者使用,屏蔽了 client 与 gRPC WatchServer 交互的复杂细节,实现了一个 client 支持多个 gRPC Stream,一个 gRPC Stream 支持多个 watcher,显著降低了开发复杂度。
-
同时当 watch 连接的节点故障,clientv3 库支持自动重连到健康节点,并使用之前已接收的最大版本号创建新的 watcher,避免旧事件回放等。
滑动窗口 vs MVCC
-
再看第二个问题,事件是如何存储的?会保留多久呢?watch 命令中的版本号具有什么作用?
-
第二个问题的本质是历史版本存储,etcd 经历了从滑动窗口到 MVCC 机制的演变,滑动窗口是仅保存有限的最近历史版本到内存中,而 MVCC 机制则将历史版本保存在磁盘中,避免了历史版本的丢失,极大的提升了 Watch 机制的可靠性。
-
etcd v2 滑动窗口是如何实现的?它有什么缺点呢?它使用的是如下一个简单的环形数组来存储历史事件版本,当 key 被修改后,相关事件就会被添加到数组中来。若超过 eventQueue 的容量,则淘汰最旧的事件。在 etcd v2 中,eventQueue 的容量是固定的 1000,因此它最多只会保存 1000 条事件记录,不会占用大量 etcd 内存导致 etcd OOM。但是它的缺陷显而易见的,固定的事件窗口只能保存有限的历史事件版本,是不可靠的。当写请求较多的时候、client 与 server 网络出现波动等异常时,很容易导致事件丢失,client 不得不触发大量的 expensive 查询操作,以获取最新的数据及版本号,才能持续监听数据。特别是对于重度依赖 Watch 机制的 Kubernetes 来说,显然是无法接受的。因为这会导致控制器等组件频繁的发起 expensive List Pod 等资源操作,导致 APIServer/etcd 出现高负载、OOM 等,对稳定性造成极大的伤害。
type EventHistory struct {
   Queue      eventQueue
   StartIndex uint64
   LastIndex  uint64
   rwl        sync.RWMutex
}
-
etcd v3 的 MVCC 机制,就是为解决 etcd v2 Watch 机制不可靠而诞生。相比 etcd v2 直接保存事件到内存的环形数组中,etcd v3 则是将一个 key 的历史修改版本保存在 boltdb 里面。boltdb 是一个基于磁盘文件的持久化存储,因此它重启后历史事件不像 etcd v2 一样会丢失,同时可通过配置压缩策略,来控制保存的历史版本数。
-
最后 watch 命令中的版本号具有什么作用呢?版本号是 etcd 逻辑时钟,当 client 因网络等异常出现连接闪断后,通过版本号,它就可从 server 端的 boltdb 中获取错过的历史事件,而无需全量同步,它是 etcd Watch 机制数据增量同步的核心。
可靠的事件推送机制
- 当 client 和 server 端出现短暂网络波动等异常因素后,导致事件堆积时,server 端会丢弃事件吗?若你监听的历史版本号 server 端不存在了,你的代码该如何处理?这个问题的本质是可靠事件推送机制,要搞懂它,我们就得弄懂 etcd Watch 特性的整体架构、核心流程,下图是 Watch 特性整体架构图。
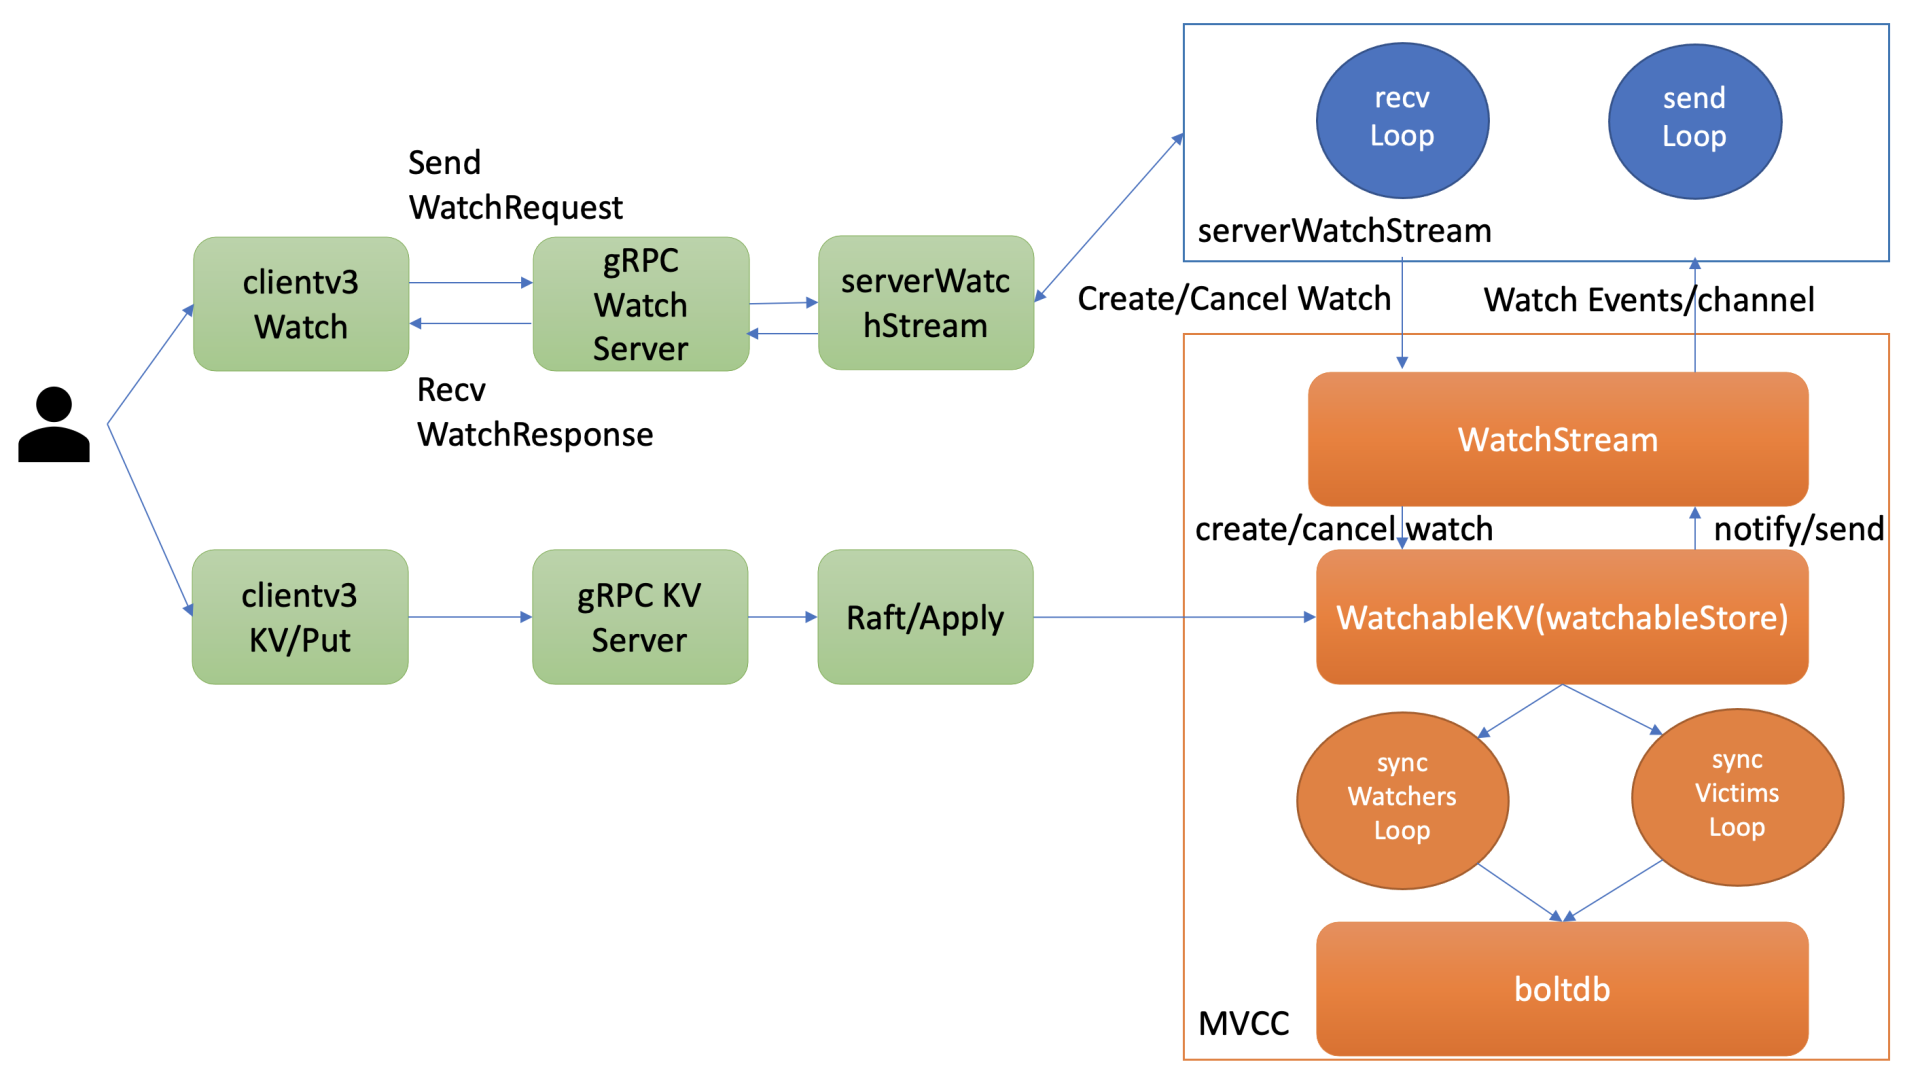
- 当通过 etcdctl 或 API 发起一个 watch key 请求的时候,etcd 的 gRPCWatchServer 收到 watch 请求后,会创建一个 serverWatchStream, 它负责接收 client 的 gRPC Stream 的 create/cancel watcher 请求 (recvLoop goroutine),并将从 MVCC 模块接收的 Watch 事件转发给 client(sendLoop goroutine)。
- 当 serverWatchStream 收到 create watcher 请求后,serverWatchStream 会调用 MVCC 模块的 WatchStream 子模块分配一个 watcher id,并将 watcher 注册到 MVCC 的 WatchableKV 模块。
- 在 etcd 启动的时候,WatchableKV 模块会运行 syncWatchersLoop 和 syncVictimsLoop goroutine,分别负责不同场景下的事件推送,它们也是 Watch 特性可靠性的核心之一。
-
从架构图中可以看到 Watch 特性的核心实现是 WatchableKV 模块,下面看看 “etcdctl watch hello -w=json –rev=1” 命令在 WatchableKV 模块是如何处理的?面对各类异常,它如何实现可靠事件推送?
- etcd 核心解决方案是复杂度管理,问题拆分。etcd 根据不同场景,对问题进行了分解,将 watcher 按场景分类,实现了轻重分离、低耦合。首先介绍下 synced watcher、unsynced watcher 它们各自的含义。
- synced watcher,顾名思义,表示此类 watcher 监听的数据都已经同步完毕,在等待新的变更。如果你创建的 watcher 未指定版本号 (默认 0)、或指定的版本号大于 etcd sever 当前最新的版本号 (currentRev),那么它就会保存到 synced watcherGroup 中。watcherGroup 负责管理多个 watcher,能够根据 key 快速找到监听该 key 的一个或多个 watcher。
- unsynced watcher,表示此类 watcher 监听的数据还未同步完成,落后于当前最新数据变更,正在努力追赶。如果你创建的 watcher 指定版本号小于 etcd server 当前最新版本号,那么它就会保存到 unsynced watcherGroup 中。
- 从以上介绍中,可以将可靠的事件推送机制拆分成最新事件推送、异常场景重试、历史事件推送机制三个子问题来进行分析。
Watch 特性的核心实现模块是 watchableStore,它通过将 watcher 划分为 synced/unsynced/victim 三类,将问题进行了分解,并通过多个后台异步循环 goroutine 负责不同场景下的事件推送,提供了各类异常等场景下的 Watch 事件重试机制,尽力确保变更事件不丢失、按逻辑时钟版本号顺序推送给 client。
高效的事件匹配
-
如果你创建了上万个 watcher 监听 key 变化,当 server 端收到一个写请求后,etcd 是如何根据变化的 key 快速找到监听它的 watcher 呢?一个个遍历 watcher 吗?显然一个个遍历 watcher 是最简单的方法,但是它的时间复杂度是
O(N),在 watcher 数较多的场景下,会导致性能出现瓶颈。更何况 etcd 是在执行一个写事务结束时,同步触发事件通知流程的,若匹配 watcher 开销较大,将严重影响 etcd 性能。那使用什么数据结构来快速查找哪些 watcher 监听了一个事件中的 key 呢? -
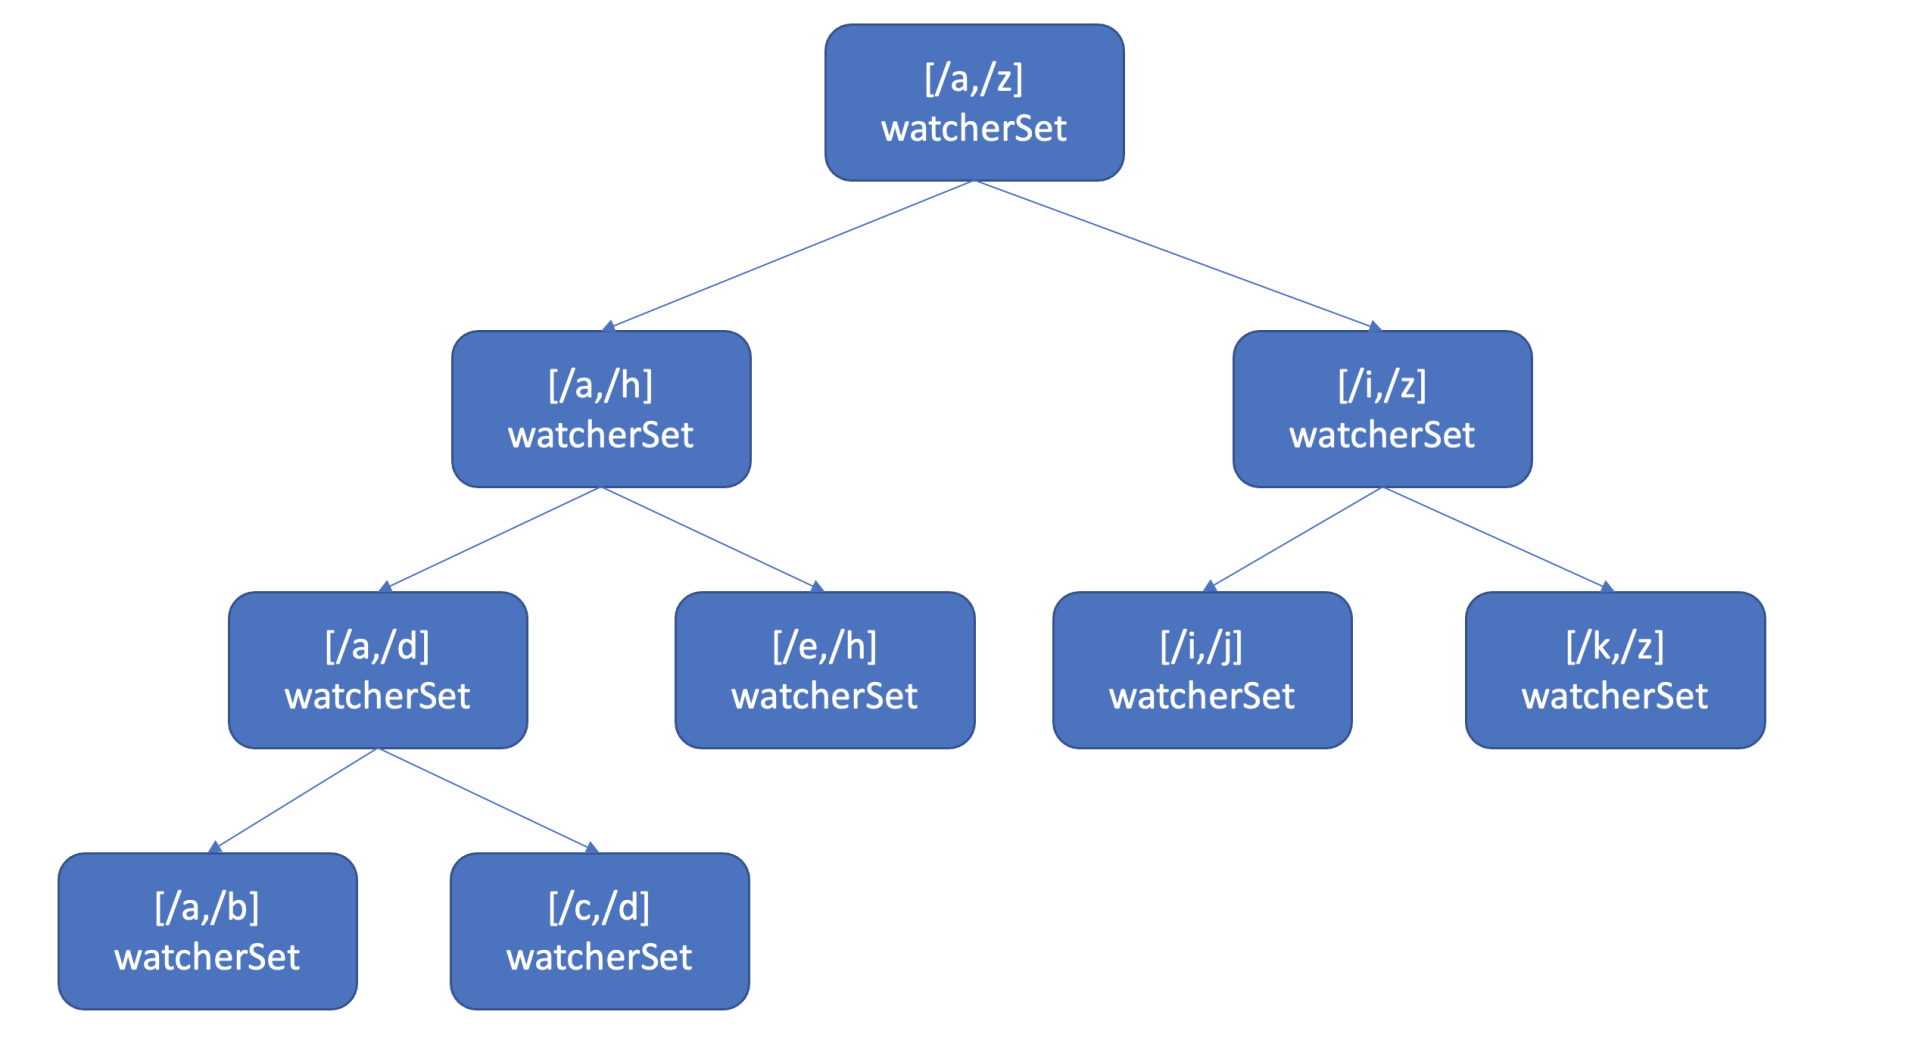
也许你会说使用 map 记录下哪些 watcher 监听了什么 key 不就可以了吗? etcd 的确使用 map 记录了监听单个 key 的 watcher,但是你要注意的是 Watch 特性不仅仅可以监听单 key,它还可以指定监听 key 范围、key 前缀,因此 etcd 还使用了如下的区间树。
-
当收到创建 watcher 请求的时候,它会把 watcher 监听的 key 范围插入到上面的区间树中,区间的值保存了监听同样 key 范围的 watcher 集合 watcherSet。
-
当产生一个事件时,etcd 首先需要从 map 查找是否有 watcher 监听了单 key,其次它还需要从区间树找出与此 key 相交的所有区间,然后从区间的值获取监听的 watcher 集合。
-
区间树支持快速查找一个 key 是否在某个区间内,时间复杂度
O(LogN),因此 etcd 基于 map 和区间树实现了 watcher 与事件快速匹配,具备良好的扩展性。
事务:如何安全地实现多 key 操作
-
在软件开发过程中,我们经常会遇到需要批量执行多个 key 操作的业务场景,比如转账案例中,Alice 给 Bob 转账 100 元,Alice 账号减少 100,Bob 账号增加 100,这涉及到多个 key 的原子更新。无论发生任何故障,我们应用层期望的结果是,要么两个操作一起成功,要么两个一起失败。我们无法容忍出现一个成功,一个失败的情况。那么 etcd 是如何解决多 key 原子更新问题呢?
-
事务,它就是为了简化应用层的编程模型而诞生的。将通过转账案例来剖析 etcd 事务实现,了解 etcd 如何实现事务 ACID 特性的,以及 MVCC 版本号在事务中的重要作用。
事务特性初体验及 API
-
如何使用 etcd 实现 Alice 向 Bob 转账功能呢?
-
在 etcd v2 的时候, etcd 提供了 CAS(Compare and swap),然而其只支持单 key,不支持多 key,因此无法满足类似转账场景的需求。严格意义上说 CAS 称不上事务,无法实现事务的各个隔离级别。
-
etcd v3 为了解决多 key 的原子操作问题,提供了全新迷你事务 API,同时基于 MVCC 版本号,它可以实现各种隔离级别的事务。它的基本结构如下:
client.Txn(ctx).If(cmp1, cmp2, ...).Then(op1, op2, ...,).Else(op1, op2, …)
-
从上面结构中可以看到,事务 API 由 If 语句、Then 语句、Else 语句组成,这与平时常见的 MySQL 事务完全不一样。它的基本原理是,在 If 语句中,可以添加一系列的条件表达式,若条件表达式全部通过检查,则执行 Then 语句的 get/put/delete 等操作,否则执行 Else 的 get/put/delete 等操作。
- 那么 If 语句支持哪些检查项呢?
- 首先是 key 的最近一次修改版本号 mod_revision,简称 mod。你可以通过它检查 key 最近一次被修改时的版本号是否符合你的预期。比如当你查询到 Alice 账号资金为 100 元时,它的 mod_revision 是 v1,当你发起转账操作时,你得确保 Alice 账号上的 100 元未被挪用,这就可以通过 mod(“Alice”) = “v1” 条件表达式来保障转账安全性。
- 其次是 key 的创建版本号 create_revision,简称 create。你可以通过它检查 key 是否已存在。比如在分布式锁场景里,只有分布式锁 key(lock) 不存在的时候,你才能发起 put 操作创建锁,这时你可以通过 create(“lock”) = “0”来判断,因为一个 key 不存在的话它的 create_revision 版本号就是 0。
- 接着是 key 的修改次数 version。你可以通过它检查 key 的修改次数是否符合预期。比如你期望 key 在修改次数小于 3 时,才能发起某些操作时,可以通过 version(“key”) < “3”来判断。
- 最后是 key 的 value 值。你可以通过检查 key 的 value 值是否符合预期,然后发起某些操作。比如期望 Alice 的账号资金为 200, value(“Alice”) = “200”。
-
If 语句通过以上 MVCC 版本号、value 值、各种比较运算符 (等于、大于、小于、不等于),实现了灵活的比较的功能,满足你各类业务场景诉求。
- 下面给出了一个使用 etcdctl 的
txn事务命令,基于以上介绍的特性,初步实现的一个 Alice 向 Bob 转账 100 元的事务。Alice 和 Bob 初始账上资金分别都为 200 元,事务首先判断 Alice 账号资金是否为 200,若是则执行转账操作,不是则返回最新资金。etcd 是如何执行这个事务的呢?这个事务实现上有哪些问题呢?
$ etcdctl txn -i
compares:                   // 对应 If 语句
value("Alice") = "200"      // 判断 Alice 账号资金是否为 200


success requests (get, put, del):              // 对应 Then 语句
put Alice 100                                  // Alice 账号初始资金 200 减 100
put Bob 300                                    // Bob 账号初始资金 200 加 100


failure requests (get, put, del):   // 对应 Else 语句
get Alice
get Bob


SUCCESS


OK

OK
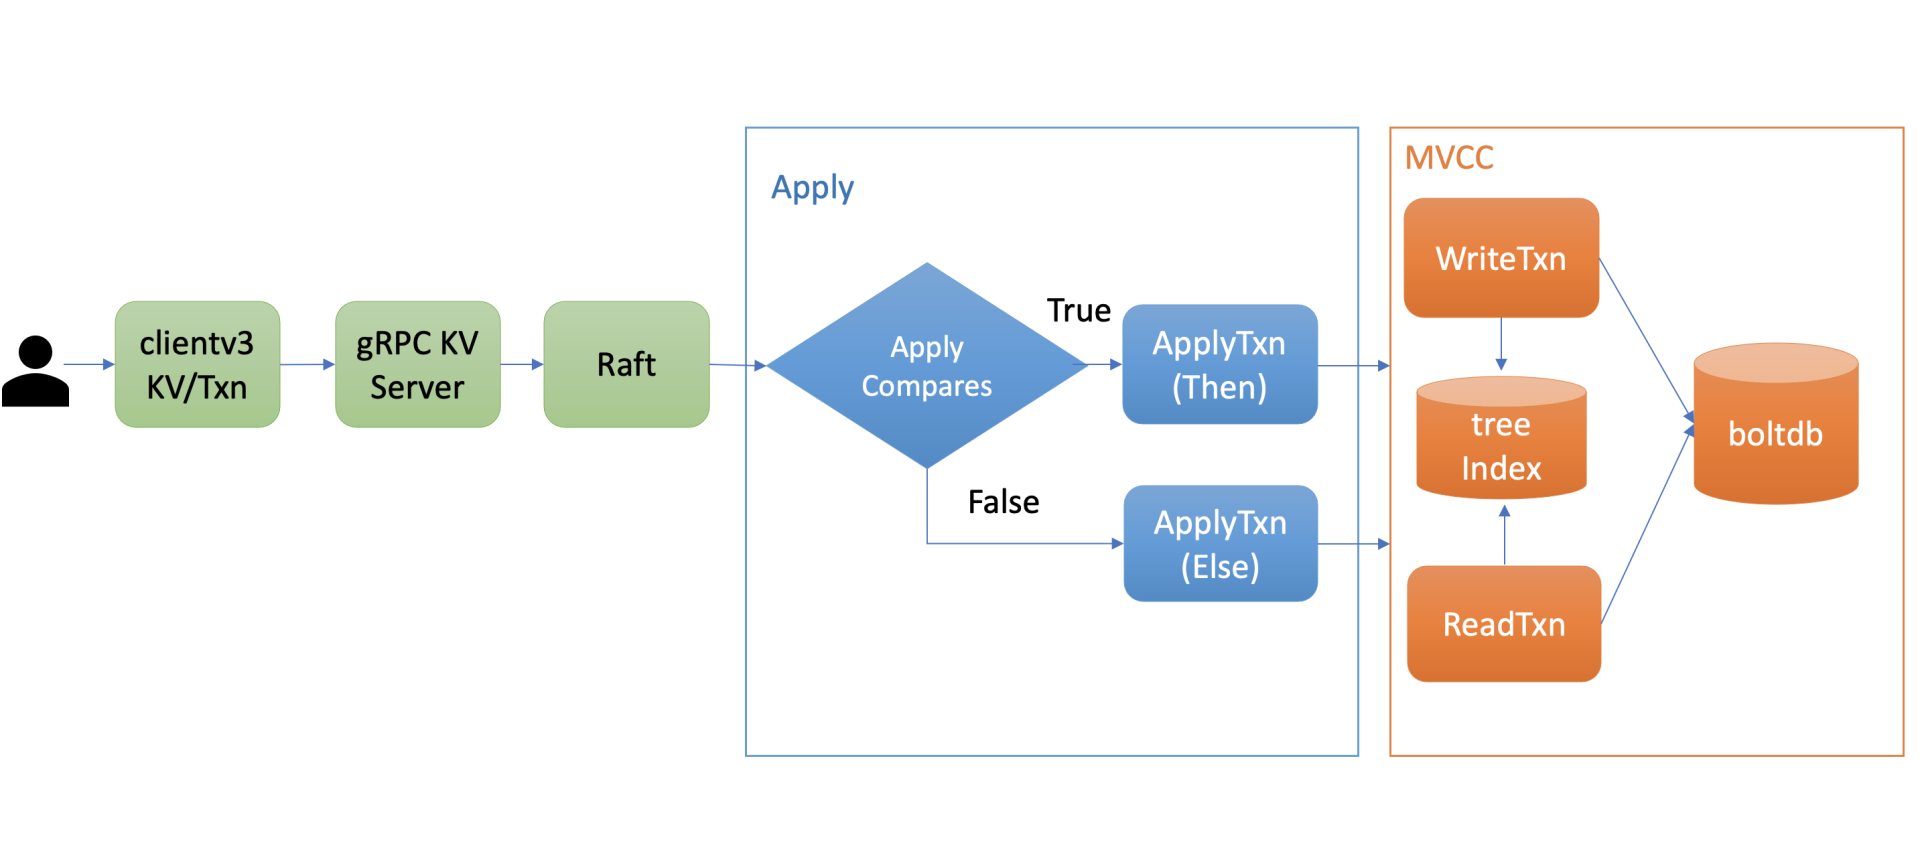
-
上图是 etcd 事务的执行流程,当通过 client 发起一个 txn 转账事务操作时,通过 gRPC KV Server、Raft 模块处理后,在 Apply 模块执行此事务的时候,它首先对你的事务的 If 语句进行检查,也就是 ApplyCompares 操作,如果通过此操作,则执行 ApplyTxn/Then 语句,否则执行 ApplyTxn/Else 语句。
-
在执行以上操作过程中,它会根据事务是否只读、可写,通过 MVCC 层的读写事务对象,执行事务中的 get/put/delete 各操作,也就是之前介绍的 MVCC 对 key 的读写原理。
事务 ACID 特性
ACID 是衡量事务的四个特性,由原子性(Atomicity)、一致性(Consistency)、隔离性(Isolation)、持久性(Durability)组成。
- 原子性,是指一个事务要么全部成功要么全部失败,etcd 基于 WAL 日志、consistent index、boltdb 的事务能力提供支持。
- 一致性,是指事务转账前后的,数据库和应用程序期望的恒等状态应该保持不变,这通过数据库和业务应用程序相互协作完成。
- 持久性,是指事务提交后,数据不丢失
- 隔离性,是指事务提交过程中的可见性,etcd 不存在脏读,基于 MVCC 机制、boltdb 事务你可以实现可重复读、串行化快照隔离级别的事务,保障并发事务场景中你的数据安全性。
boltdb:如何持久化存储 key-value 数据
- 通过一个写请求在 boltdb 中执行的简要流程,分析其背后的 boltdb 的磁盘文件布局,帮助了解 page、node、bucket 等核心数据结构的原理与作用,搞懂 boltdb 基于 B+ tree、各类 page 实现查找、更新、事务提交的原理,让你明白 etcd 为什么适合读多写少的场景。
boltdb 磁盘布局
- boltdb 文件指的是你 etcd 数据目录下的
member/snap/db的文件,etcd 的 key-value、lease、meta、member、cluster、auth 等所有数据存储在其中。etcd 启动的时候,会通过 mmap 机制将 db 文件映射到内存,后续可从内存中快速读取文件中的数据。写请求通过 fwrite 和 fdatasync 来写入、持久化数据到磁盘。
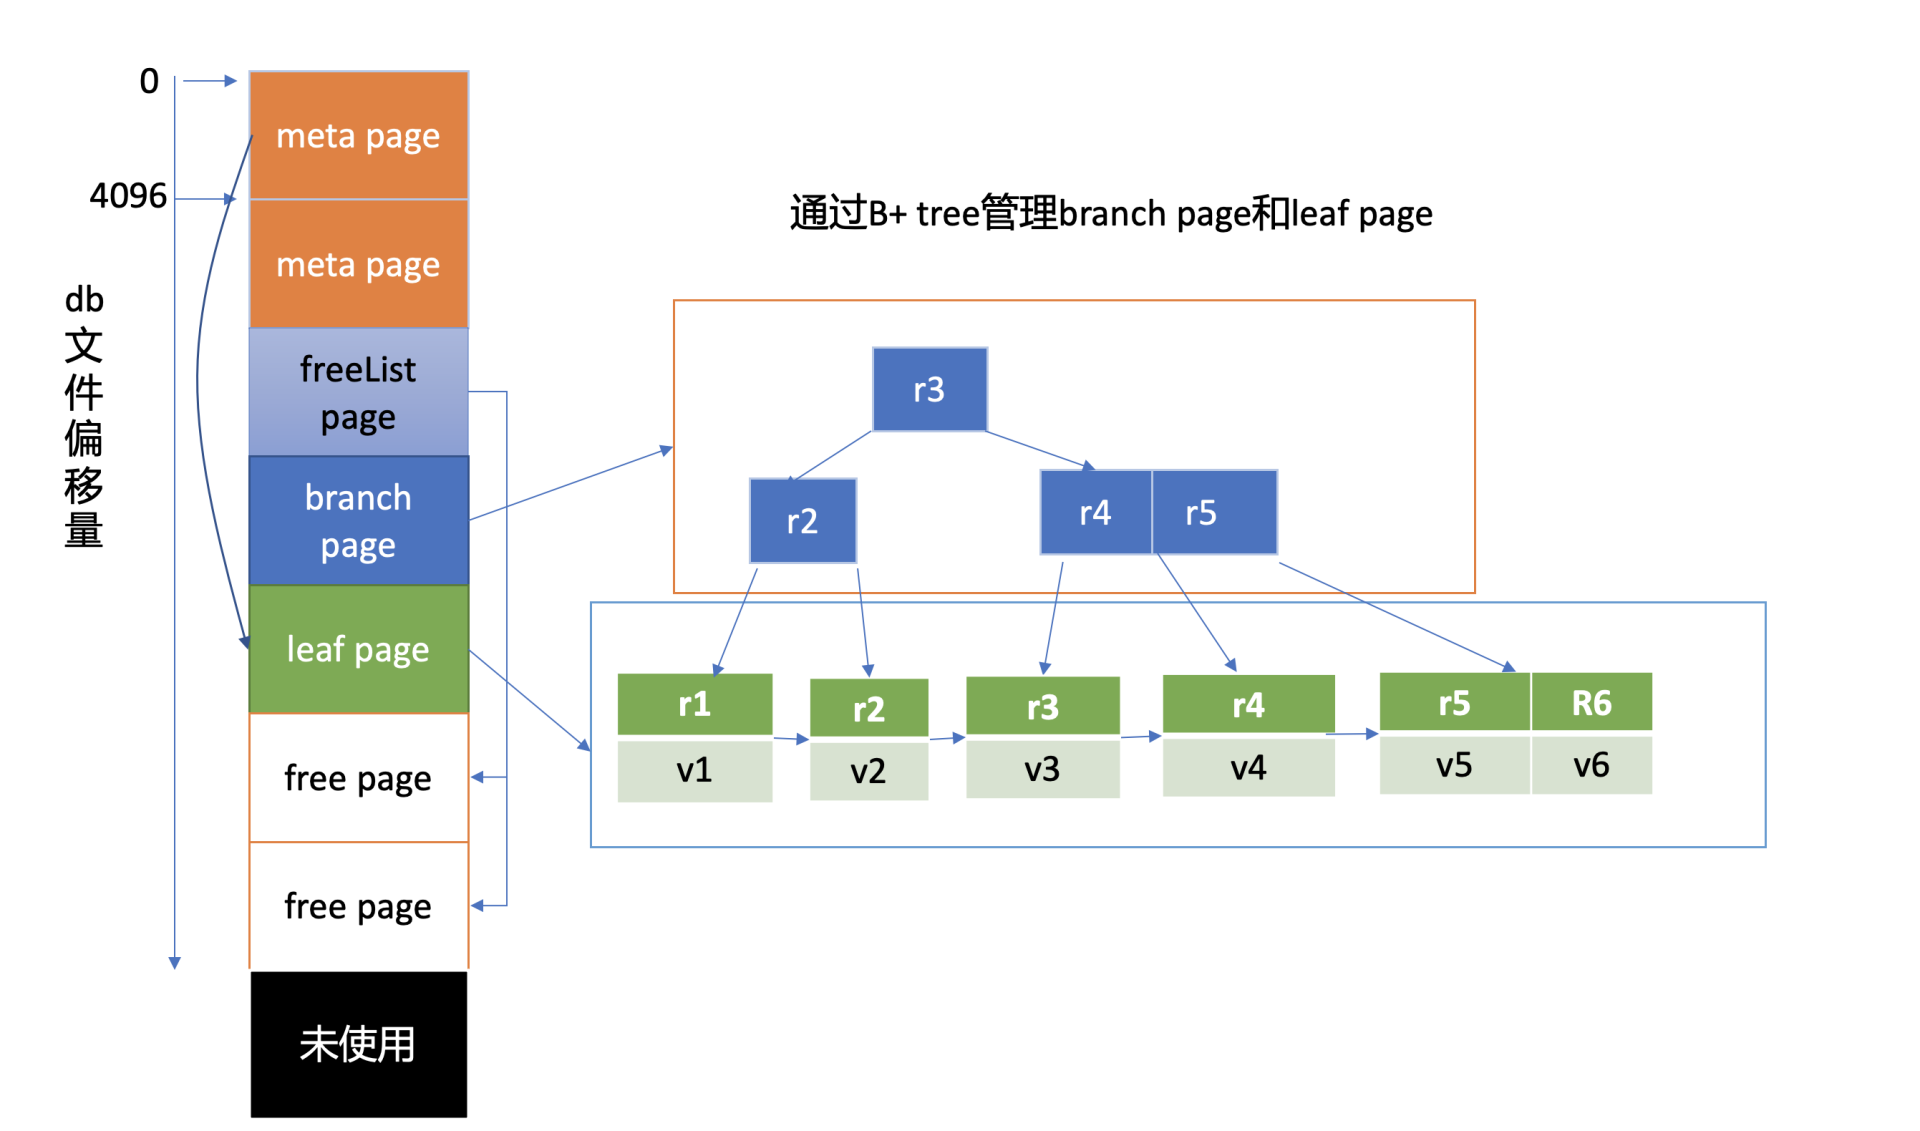
- 上图是db 文件磁盘布局,从图中的左边部分可以看到,文件的内容由若干个 page 组成,一般情况下 page size 为 4KB。
- page 按照功能可分为元数据页 (meta page)、B+ tree 索引节点页 (branch page)、B+ tree 叶子节点页 (leaf page)、空闲页管理页 (freelist page)、空闲页 (free page)。
- 文件最开头的两个 page 是固定的 db 元数据 meta page,空闲页管理页记录了 db 中哪些页是空闲、可使用的。索引节点页保存了 B+ tree 的内部节点,如图中的右边部分所示,它们记录了 key 值,叶子节点页记录了 B+ tree 中的 key-value 和 bucket 数据。
-
boltdb 逻辑上通过 B+ tree 来管理 branch/leaf page, 实现快速查找、写入 key-value 数据。
-
boltdb 本身自带了一个工具 bbolt,它可以按页打印出 db 文件的十六进制的内容。
- 下图左边的十六进制是执行如下 bbolt dump 命令,所打印的 boltdb 第 0 页的数据,图的右边是对应的 page 磁盘页结构和 meta page 的数据结构。
$ bbolt dump ./infra1.etcd/member/snap/db 0
page 磁盘页结构
-
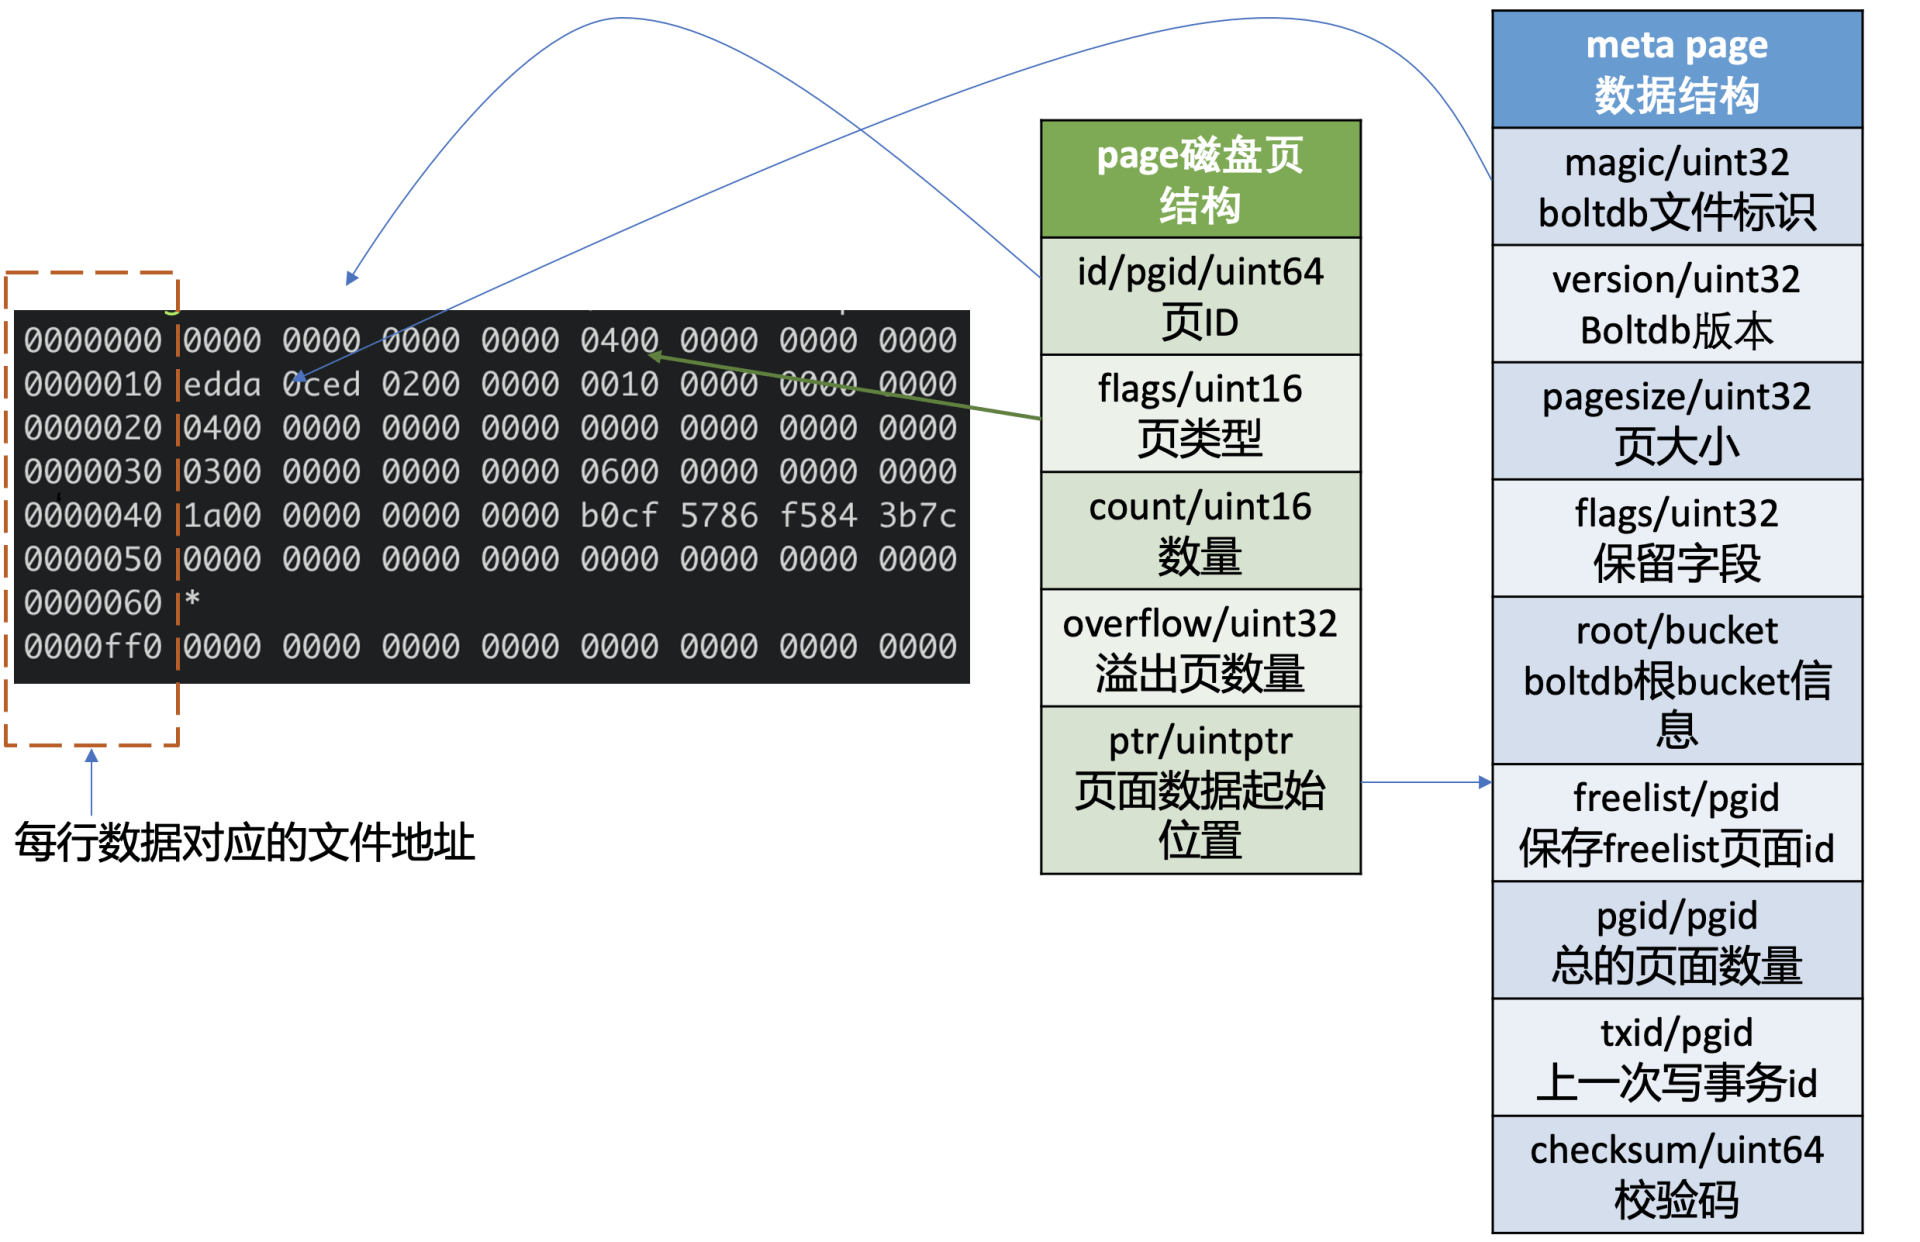
如上图所示,它由页 ID(id)、页类型 (flags)、数量 (count)、溢出页数量 (overflow)、页面数据起始位置 (ptr) 字段组成。
-
页类型目前有如下四种:0x01 表示 branch page,0x02 表示 leaf page,0x04 表示 meta page,0x10 表示 freelist page。
-
数量字段仅在页类型为 leaf 和 branch 时生效,溢出页数量是指当前页面数据存放不下,需要向后再申请 overflow 个连续页面使用,页面数据起始位置指向 page 的载体数据,比如 meta page、branch/leaf 等 page 的内容。
meta page 数据结构
-
第 0、1 页我们知道它是固定存储 db 元数据的页 (meta page),那么 meta page 它为了管理整个 boltdb 含有哪些信息呢?
-
如上图中的 meta page 数据结构所示,可以看到它由 boltdb 的文件标识 (magic)、版本号 (version)、页大小 (pagesize)、boltdb 的根 bucket 信息 (root bucket)、freelist 页面 ID(freelist)、总的页面数量 (pgid)、上一次写事务 ID(txid)、校验码 (checksum) 组成。
meta page 十六进制分析
-
了解完 page 磁盘页结构和 meta page 数据结构后,再结合图左边的十六进数据简要分析下其含义。
-
上图中十六进制输出的是 db 文件的 page 0 页结构,左边第一列表示此行十六进制内容对应的文件起始地址,每行 16 个字节。
-
结合 page 磁盘页和 meta page 数据结构可知,第一行前 8 个字节描述 pgid(忽略第一列) 是 0。接下来 2 个字节描述的页类型, 其值为 0x04 表示 meta page, 说明此页的数据存储的是 meta page 内容,因此 ptr 开始的数据存储的是 meta page 内容。
-
正如下图中所看到的,第二行首先含有一个 4 字节的 magic number(
0xED0CDAED),通过它来识别当前文件是否 boltdb,接下来是两个字节描述 boltdb 的版本号0x2, 然后是四个字节的 page size 大小,0x1000表示 4096 个字节,四个字节的 flags 为 0。 -
第三行对应的就是 meta page 的 root bucket 结构(16 个字节),它描述了 boltdb 的 root bucket 信息,比如一个 db 中有哪些 bucket, bucket 里面的数据存储在哪里。
-
第四行中前面的 8 个字节,0x3 表示 freelist 页面 ID,此页面记录了 db 当前哪些页面是空闲的。后面 8 个字节,0x6 表示当前 db 总的页面数。
-
第五行前面的 8 个字节,0x1a 表示上一次的写事务 ID,后面的 8 个字节表示校验码,用于检测文件是否损坏。
压缩:如何回收旧版本数据
-
我们知道 etcd 中的每一次更新、删除 key 操作,treeIndex 的 keyIndex 索引中都会追加一个版本号,在 boltdb 中会生成一个新版本 boltdb key 和 value。也就是随着你不停更新、删除,你的 etcd 进程内存占用和 db 文件就会越来越大。很显然,这会导致 etcd OOM 和 db 大小增长到最大 db 配额,最终不可写。
-
那么 etcd 是通过什么机制来回收历史版本数据,控制索引内存占用和 db 大小的呢?

-
从图中可知,可以通过 client API 发起人工的压缩 (Compact) 操作,也可以配置自动压缩策略。在自动压缩策略中,可以根据你的业务场景选择合适的压缩模式。目前 etcd 支持两种压缩模式,分别是时间周期性压缩和版本号压缩。
-
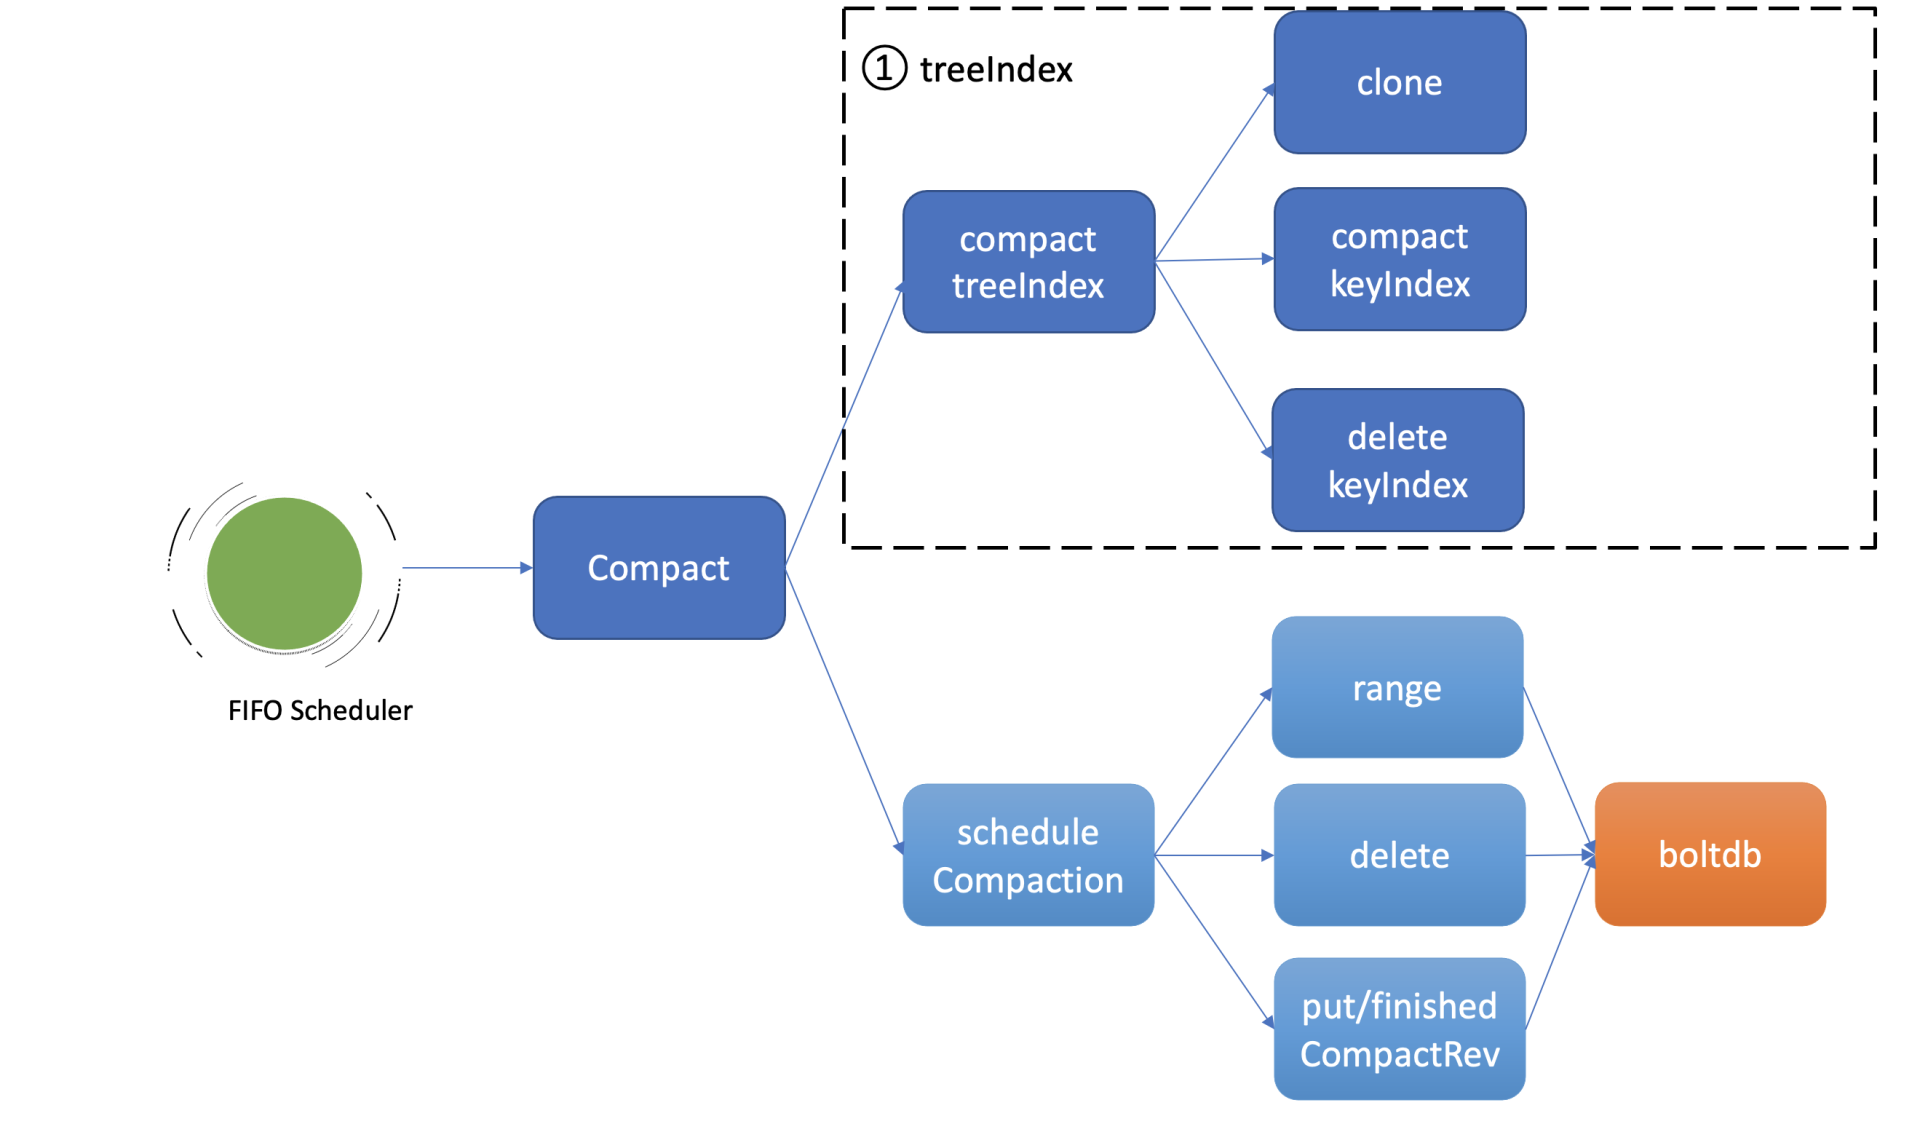
当通过 API 发起一个 Compact 请求后,KV Server 收到 Compact 请求提交到 Raft 模块处理,在 Raft 模块中提交后,Apply 模块就会通过 MVCC 模块的 Compact 接口执行此压缩任务。
-
Compact 接口首先会更新当前 server 已压缩的版本号,并将耗时昂贵的压缩任务保存到 FIFO 队列中异步执行。压缩任务执行时,它首先会压缩 treeIndex 模块中的 keyIndex 索引,其次会遍历 boltdb 中的 key,删除已废弃的 key。
压缩特性初体验
-
在使用 etcd 过程中,当遇到 “etcdserver: mvcc: database space exceeded” 错误时,若是未开启压缩策略导致 db 大小达到配额,这时可以使用 etcdctl compact 命令,主动触发压缩操作,回收历史版本。
-
如下所示,可以先通过 endpoint status 命令获取 etcd 当前版本号,然后再通过 etcdctl compact 命令发起压缩操作即可。
# 获取 etcd 当前版本号
$ rev=$(etcdctl endpoint status --write-out="json" | egrep -o '"revision":[0-9]*' | egrep -o '[0-9].*')
$ echo $rev
9
# 执行压缩操作,指定压缩的版本号为当前版本号
$ etcdctl compact $rev
Compacted revision 9
# 压缩一个已经压缩的版本号
$ etcdctl compact $rev
Error: etcdserver: mvcc: required revision has been compacted
# 压缩一个比当前最大版号大的版本号
$ etcdctl compact 12
Error: etcdserver: mvcc: required revision is a future revision
-
请注意,如果压缩命令传递的版本号小于等于当前 etcd server 记录的压缩版本号,etcd server 会返回已压缩错误 (“mvcc: required revision has been compacted”) 给 client。如果版本号大于当前 etcd server 最新的版本号,etcd server 则返回一个未来的版本号错误给 client(“mvcc: required revision is a future revision”)。
-
执行压缩命令的时候,不少初学者有一个常见的误区,就是担心压缩会不会把我最新版本数据给删除?
-
压缩的本质是回收历史版本,目标对象仅是历史版本,不包括一个 key-value 数据的最新版本,因此可以放心执行压缩命令,不会删除最新版本数据。不过在介绍 Watch 机制时提到,Watch 特性中的历史版本数据同步,依赖于 MVCC 中是否还保存了相关数据,因此建议不要每次简单粗暴地回收所有历史版本。
- 在生产环境中,建议精细化的控制历史版本数,那如何实现精细化控制呢?主要有两种方案:
- 一种是使用 etcd server 的自带的自动压缩机制,根据业务场景配置合适的压缩策略即可。
- 另外一种方案是如果觉得 etcd server 的自带压缩机制无法满足你的诉求,想更精细化的控制 etcd 保留的历史版本记录,你就可以基于 etcd 的 Compact API,在业务逻辑代码中、或定时任务中主动触发压缩操作。你需要确保发起 Compact 操作的程序高可用,压缩的频率、保留的历史版本在合理范围内,并最终能使 etcd 的 db 大小保持平稳,否则会导致 db 大小不断增长,直至 db 配额满,无法写入。
- 在一般情况下,建议使用 etcd 自带的压缩机制。它支持两种模式,分别是按时间周期性压缩和保留版本号的压缩,配置相应策略后,etcd 节点会自动化的发起 Compact 操作。
周期性压缩
-
当你希望 etcd 只保留最近一段时间写入的历史版本时,就可以选择配置 etcd 的压缩模式为 periodic,保留时间为自定义的 1h 等。
-
如何给 etcd server 配置压缩模式和保留时间呢?如下所示,etcd server 提供了配置压缩模式和保留时间的参数:
--auto-compaction-retention '0'
Auto compaction retention length. 0 means disable auto Compaction.

--auto-compaction-mode 'periodic'
Interpret 'auto-Compaction-retention' one of: periodic|revision.
-
--auto-compaction-mode为 periodic 时,它表示启用时间周期性压缩,--auto-compaction-retention为保留的时间的周期,比如 1h。 -
--auto-compaction-mode为 revision 时,它表示启用版本号压缩模式,--auto-compaction-retention为保留的历史版本号数,比如 10000。
注意,etcd server 的 –auto-compaction-retention 为 0 时,将关闭自动压缩策略。
- 那么周期性压缩模式的原理是怎样的呢? etcd 是如何知道配置的 1h 前的 etcd server 版本号呢?其实非常简单,etcd server 启动后,根据你的配置的模式 periodic,会创建 periodic Compactor,它会异步的获取、记录过去一段时间的版本号。periodic Compactor 组件获取你设置的压缩间隔参数 1h, 并将其划分成 10 个区间,也就是每个区间 6 分钟。每隔 6 分钟,它会通过 etcd MVCC 模块的接口获取当前的 server 版本号,追加到 rev 数组中。因为你只需要保留过去 1 个小时的历史版本,periodic Compactor 组件会通过当前时间减去上一次成功执行 Compact 操作的时间,如果间隔大于一个小时,它会取出 rev 数组的首元素,通过 etcd server 的 Compact 接口,发起压缩操作。
版本号压缩
-
当你写请求比较多,可能产生比较多的历史版本导致 db 增长时,或者不确定配置 periodic 周期为多少才是最佳的时候,你可以通过设置压缩模式为 revision,指定保留的历史版本号数。比如你希望 etcd 尽量只保存 1 万个历史版本,那么你可以指定 compaction-mode 为 revision,auto-compaction-retention 为 10000。
-
它的实现原理又是怎样的呢?也很简单,etcd 启动后会根据你的压缩模式 revision,创建 revision Compactor。revision Compactor 会根据你设置的保留版本号数,每隔 5 分钟定时获取当前 server 的最大版本号,减去你想保留的历史版本数,然后通过 etcd server 的 Compact 接口发起如下的压缩操作即可。
压缩原理
-
介绍完两种自动化的压缩模式原理后,接下来就深入分析下压缩的本质。当 etcd server 收到 Compact 请求后,它是如何执行的呢? 核心原理是什么?如前面的整体架构图所述,Compact 请求经过 Raft 日志同步给多数节点后,etcd 会从 Raft 日志取出 Compact 请求,应用此请求到状态机执行。
-
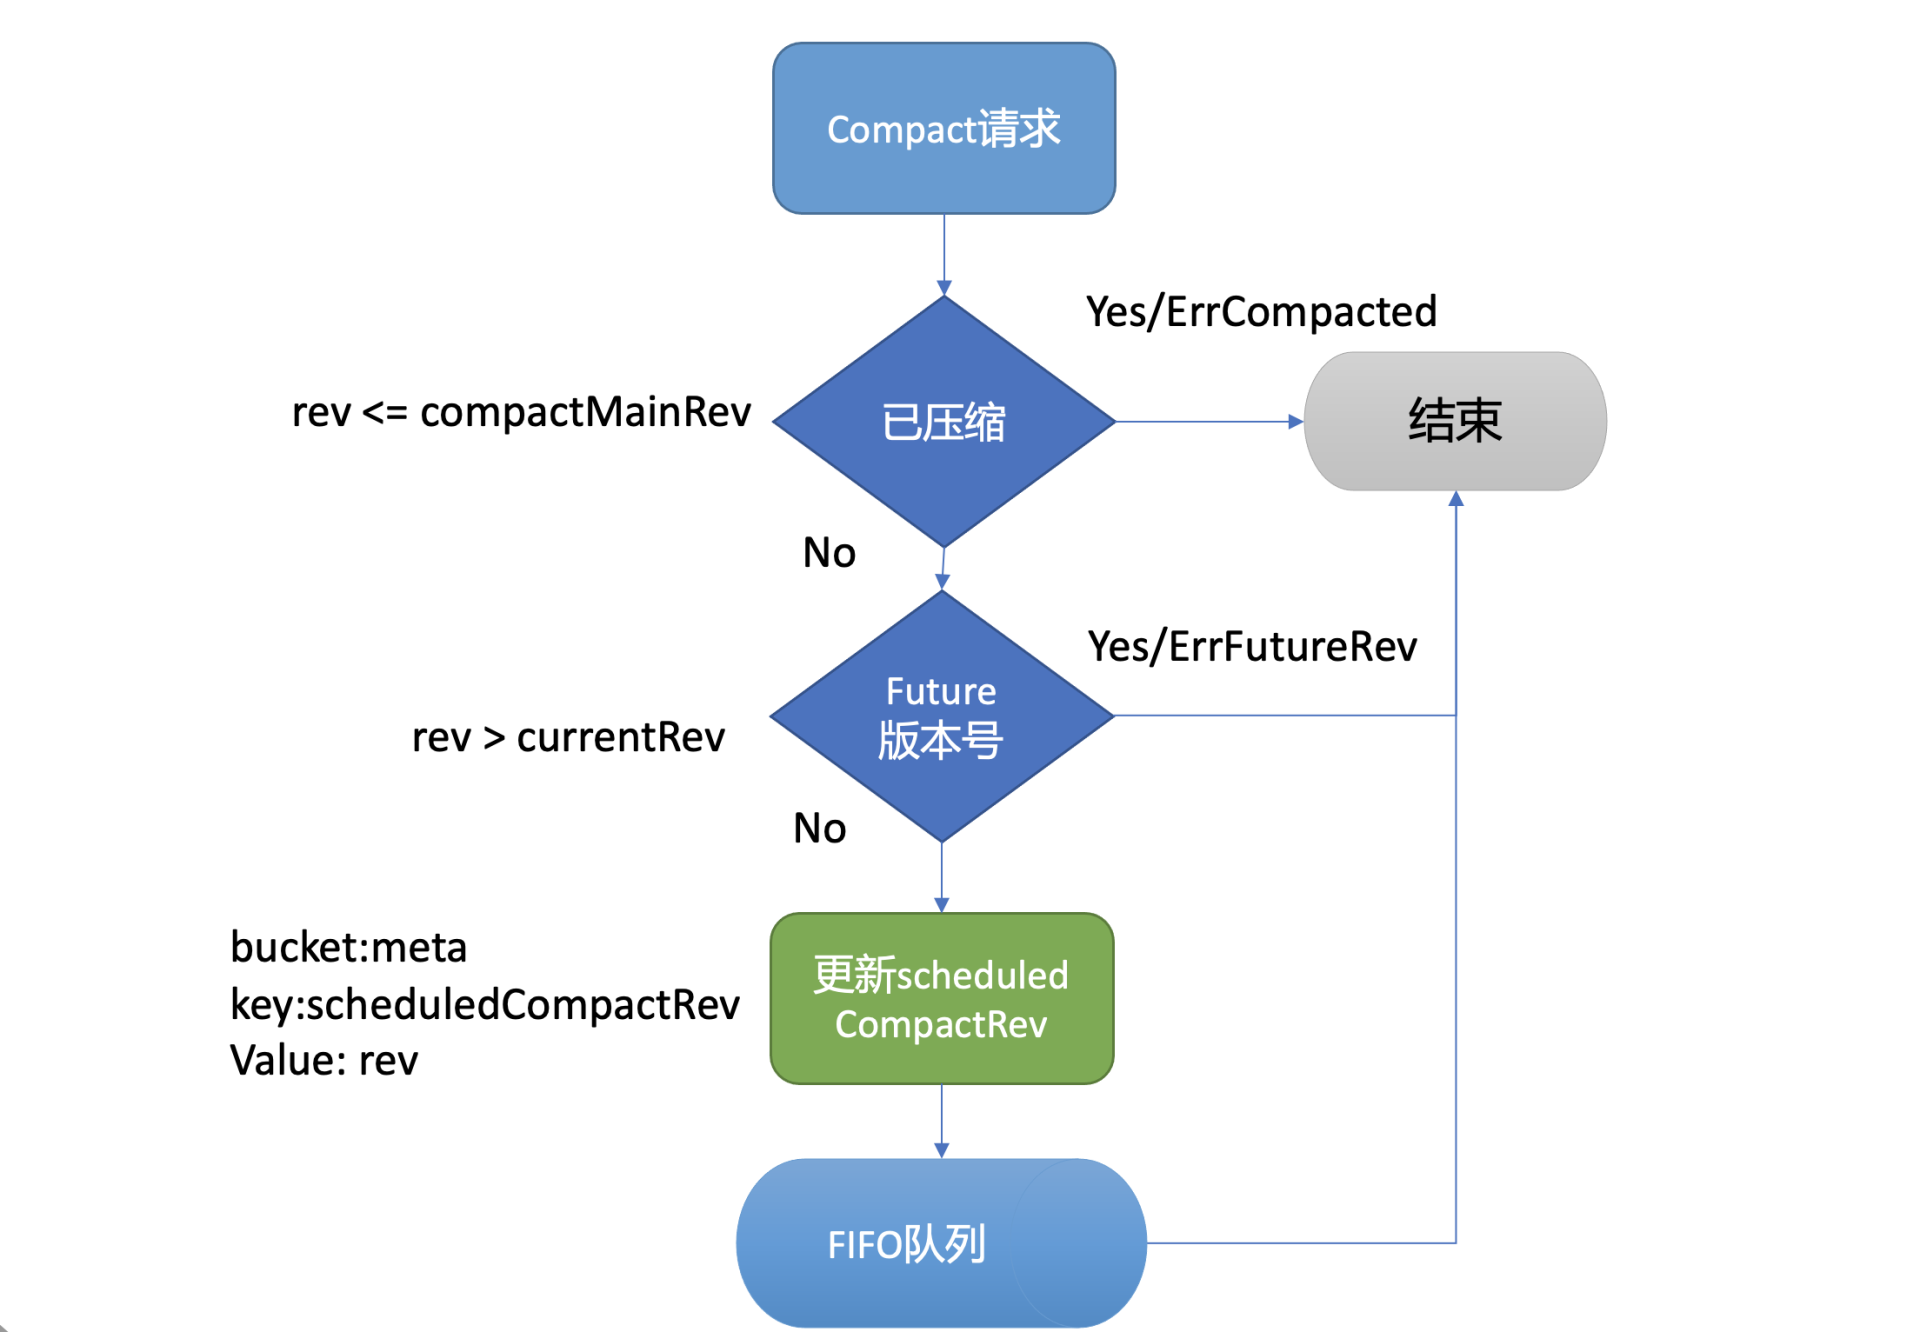
执行流程如下图所示,MVCC 模块的 Compact 接口首先会检查 Compact 请求的版本号 rev 是否已被压缩过,若是则返回 ErrCompacted 错误给 client。其次会检查 rev 是否大于当前 etcd server 的最大版本号,若是则返回 ErrFutureRev 给 client,这就是我们上面执行 etcdctl compact 命令所看到的那两个错误原理。
-
通过检查后,Compact 接口会通过 boltdb 的 API 在 meta bucket 中更新当前已调度的压缩版本号 (scheduledCompactedRev) 号,然后将压缩任务追加到 FIFO Scheduled 中,异步调度执行。
-
为什么 Compact 接口需要持久化存储当前已调度的压缩版本号到 boltdb 中呢?试想下如果不保存这个版本号,etcd 在异步执行的 Compact 任务过程中 crash 了,那么异常节点重启后,各个节点数据就会不一致。因此 etcd 通过持久化存储 scheduledCompactedRev,节点 crash 重启后,会重新向 FIFO Scheduled 中添加压缩任务,已保证各个节点间的数据一致性。
-
异步的执行压缩任务会做哪些工作呢?
-
首先 treeIndex 索引模块,它是 etcd 支持保存历史版本的核心模块,每个 key 在 treeIndex 模块中都有一个 keyIndex 数据结构,记录其历史版本号信息。
-
如上图所示,因此异步压缩任务的第一项工作,就是压缩 treeIndex 模块中的各 key 的历史版本、已删除的版本。为了避免压缩工作影响读写性能,首先会克隆一个 B-tree,然后通过克隆后的 B-tree 遍历每一个 keyIndex 对象,压缩历史版本号、清理已删除的版本。
-
假设当前压缩的版本号是 CompactedRev, 它会保留 keyIndex 中最大的版本号,移除小于等于 CompactedRev 的版本号,并通过一个 map 记录 treeIndex 中有效的版本号返回给 boltdb 模块使用。
-
为什么要保留最大版本号呢?因为最大版本号是这个 key 的最新版本,移除了会导致 key 丢失。而 Compact 的目的是回收旧版本。当然如果 keyIndex 中的最大版本号被打了删除标记 (tombstone),就会从 treeIndex 中删除这个 keyIndex,否则会出现内存泄露。
-
Compact 任务执行完索引压缩后,它通过遍历 B-tree、keyIndex 中的所有 generation 获得当前内存索引模块中有效的版本号,这些信息将帮助 etcd 清理 boltdb 中的废弃历史版本。
-
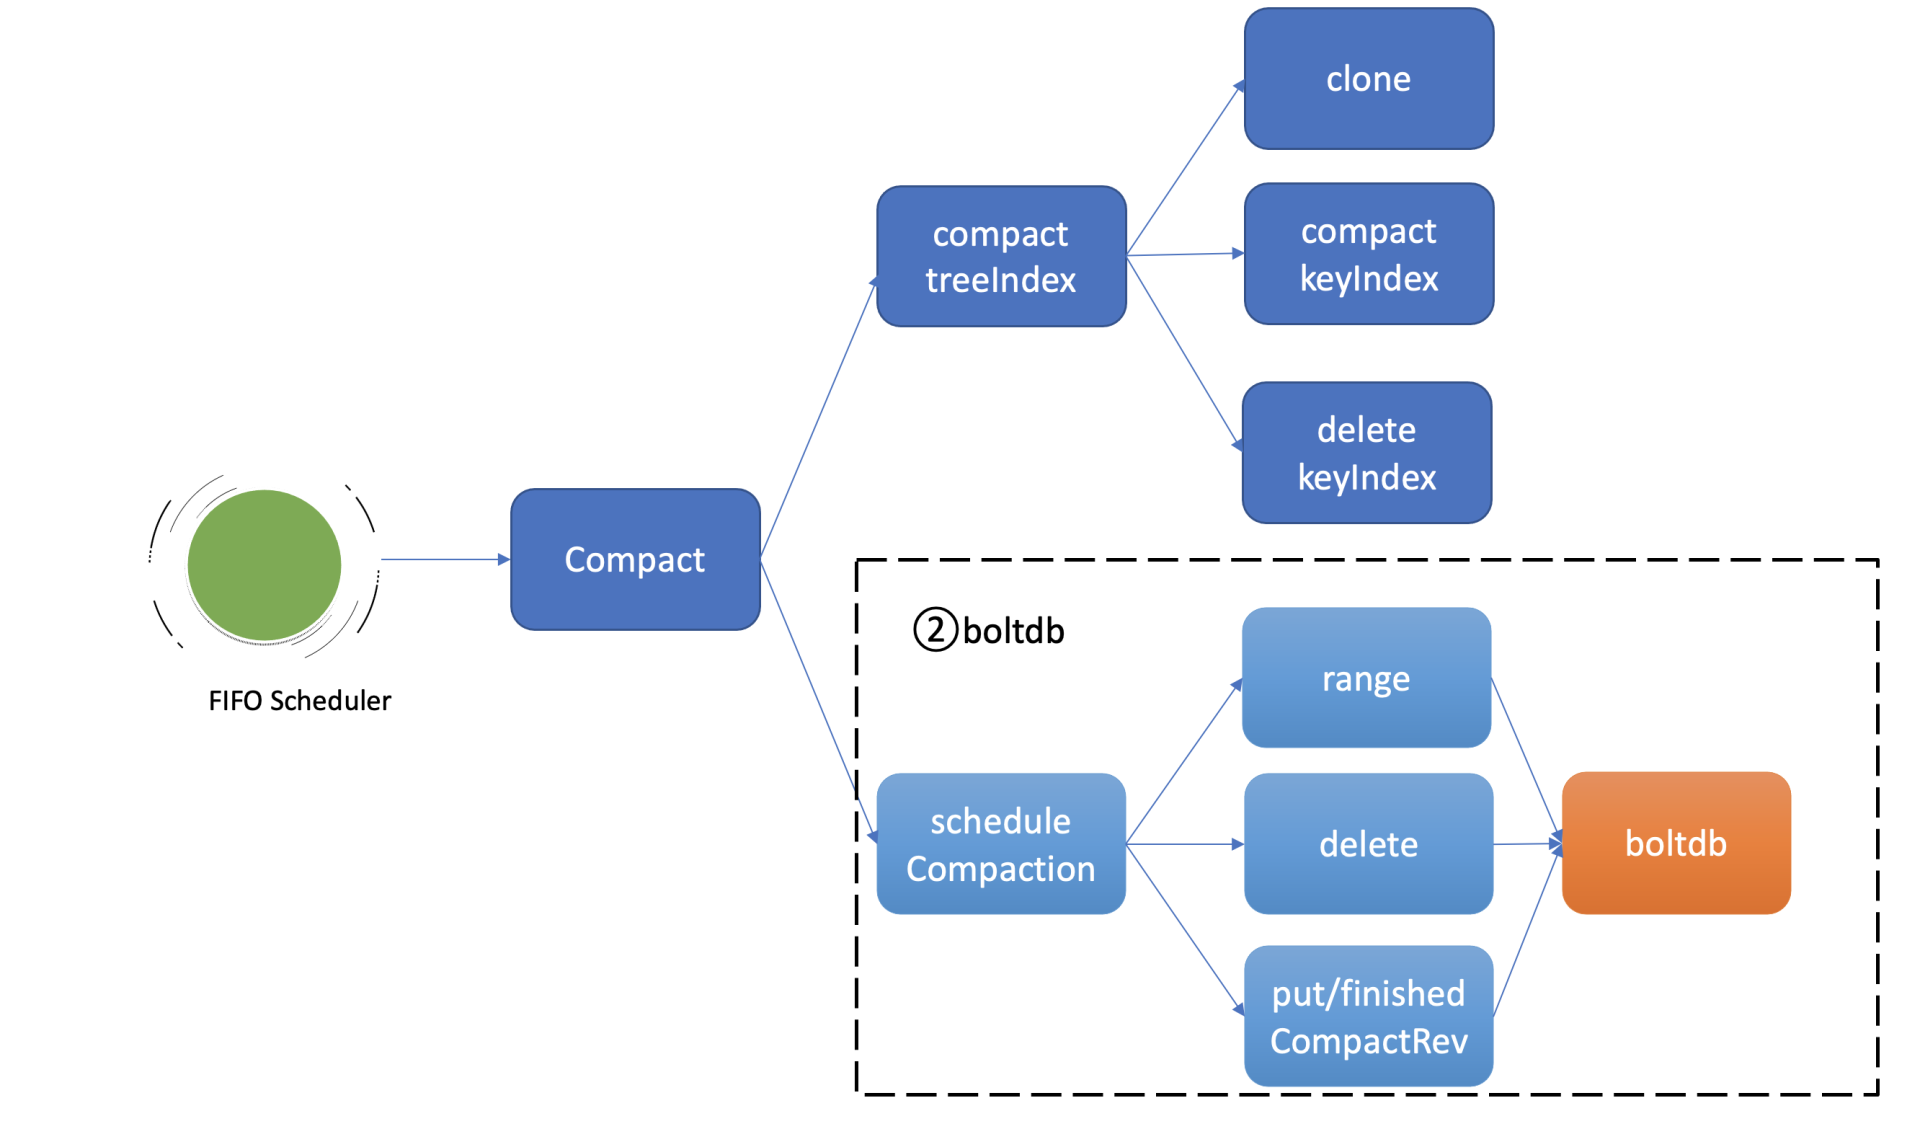
压缩任务的第二项工作就是删除 boltdb 中废弃的历史版本数据。如上图所示,它通过 etcd 一个名为 scheduleCompaction 任务来完成。
-
scheduleCompaction 任务会根据 key 区间,从 0 到 CompactedRev 遍历 boltdb 中的所有 key,通过 treeIndex 模块返回的有效索引信息,判断这个 key 是否有效,无效则调用 boltdb 的 delete 接口将 key-value 数据删除。
-
在这过程中,scheduleCompaction 任务还会更新当前 etcd 已经完成的压缩版本号 (finishedCompactRev),将其保存到 boltdb 的 meta bucket 中。
-
scheduleCompaction 任务遍历、删除 key 的过程可能会对 boltdb 造成压力,为了不影响正常读写请求,它在执行过程中会通过参数控制每次遍历、删除的 key 数(默认为 100,每批间隔 10ms),分批完成 boltdb key 的删除操作。
为什么压缩后 db 大小不减少呢?
-
当执行完压缩任务后,db 大小减少了吗? 事实是并没有减少。那为什么都通过 boltdb API 删除了 key,db 大小还不减少呢?
-
boltdb 将 db 文件划分成若干个 page 页,page 页又有四种类型,分别是 meta page、branch page、leaf page 以及 freelist page。branch page 保存 B+ tree 的非叶子节点 key 数据,leaf page 保存 bucket 和 key-value 数据,freelist 会记录哪些页是空闲的。
-
当我们通过 boltdb 删除大量的 key,在事务提交后 B+ tree 经过分裂、平衡,会释放出若干 branch/leaf page 页面,然而 boltdb 并不会将其释放给磁盘,调整 db 大小操作是昂贵的,会对性能有较大的损害。
-
boltdb 是通过 freelist page 记录这些空闲页的分布位置,当收到新的写请求时,优先从空闲页数组中申请若干连续页使用,实现高性能的读写(而不是直接扩大 db 大小)。当连续空闲页申请无法得到满足的时候,boltdb 才会通过增大 db 大小来补充空闲页。
-
一般情况下,压缩操作释放的空闲页就能满足后续新增写请求的空闲页需求,db 大小会趋于整体稳定。
Tools
WAL 工具 etcd-dump-logs
etcd-dump-logs dumps the log from data directory.
Install the tool by running the following command from the etcd source directory.
$ go install -v ./tools/etcd-dump-logs
The installation will place executables in the $GOPATH/bin. If $GOPATH environment variable is not set, the tool will be installed into the $HOME/go/bin. You can also find out the installed location by running the following command from the etcd source directory. Make sure that $PATH is set accordingly in your environment.
$ go list -f "{{.Target}}" ./tools/etcd-dump-logs
Alternatively, instead of installing the tool, you can use it by simply running the following command from the etcd source directory.
$ go run ./tools/etcd-dump-logs
测试:
$ etcd-dump-logs /var/lib/etcd/VM-129-173-tencentos.etcd | grep foo
   2             9      norm    header:<ID:16477145849607075335 > put:<key:"foo" value:"bar" >
   2            10      norm    header:<ID:16477145849607075337 > put:<key:"foo" value:"bar2" >
进程管理工具 goreman
go install github.com/mattn/goreman@latest
goreman Procfile 文件:https://github.com/etcd-io/etcd/blob/v3.5.17/Procfile
- 它描述了 etcd 进程名、节点数、参数等信息。
- 通过
goreman -f Procfile start命令就可以快速启动一个 3 节点的本地集群了。 - 通过
goreman -f Procfile run stop-all命令停止集群
# Use goreman to run `go get github.com/mattn/goreman`

etcd1: /usr/local/bin/etcd --name infra1 --listen-client-urls http://127.0.0.1:2379 --advertise-client-urls http://127.0.0.1:2379 --listen-peer-urls http://127.0.0.1:12380 --initial-advertise-peer-urls http://127.0.0.1:12380 --initial-cluster-token etcd-cluster-1 --initial-cluster 'infra1=http://127.0.0.1:12380,infra2=http://127.0.0.1:22380,infra3=http://127.0.0.1:32380' --initial-cluster-state new --enable-pprof --logger=zap --log-outputs=stderr
etcd2: /usr/local/bin/etcd --name infra2 --listen-client-urls http://127.0.0.1:22379 --advertise-client-urls http://127.0.0.1:22379 --listen-peer-urls http://127.0.0.1:22380 --initial-advertise-peer-urls http://127.0.0.1:22380 --initial-cluster-token etcd-cluster-1 --initial-cluster 'infra1=http://127.0.0.1:12380,infra2=http://127.0.0.1:22380,infra3=http://127.0.0.1:32380' --initial-cluster-state new --enable-pprof --logger=zap --log-outputs=stderr
etcd3: /usr/local/bin/etcd --name infra3 --listen-client-urls http://127.0.0.1:32379 --advertise-client-urls http://127.0.0.1:32379 --listen-peer-urls http://127.0.0.1:32380 --initial-advertise-peer-urls http://127.0.0.1:32380 --initial-cluster-token etcd-cluster-1 --initial-cluster 'infra1=http://127.0.0.1:12380,infra2=http://127.0.0.1:22380,infra3=http://127.0.0.1:32380' --initial-cluster-state new --enable-pprof --logger=zap --log-outputs=stderr

#proxy: /usr/local/bin/etcd grpc-proxy start --endpoints=127.0.0.1:2379,127.0.0.1:22379,127.0.0.1:32379 --listen-addr=127.0.0.1:23790 --advertise-client-url=127.0.0.1:23790 --enable-pprof

# A learner node can be started using Procfile.learner
使用 goreman 启动 etcd 输出日志信息:
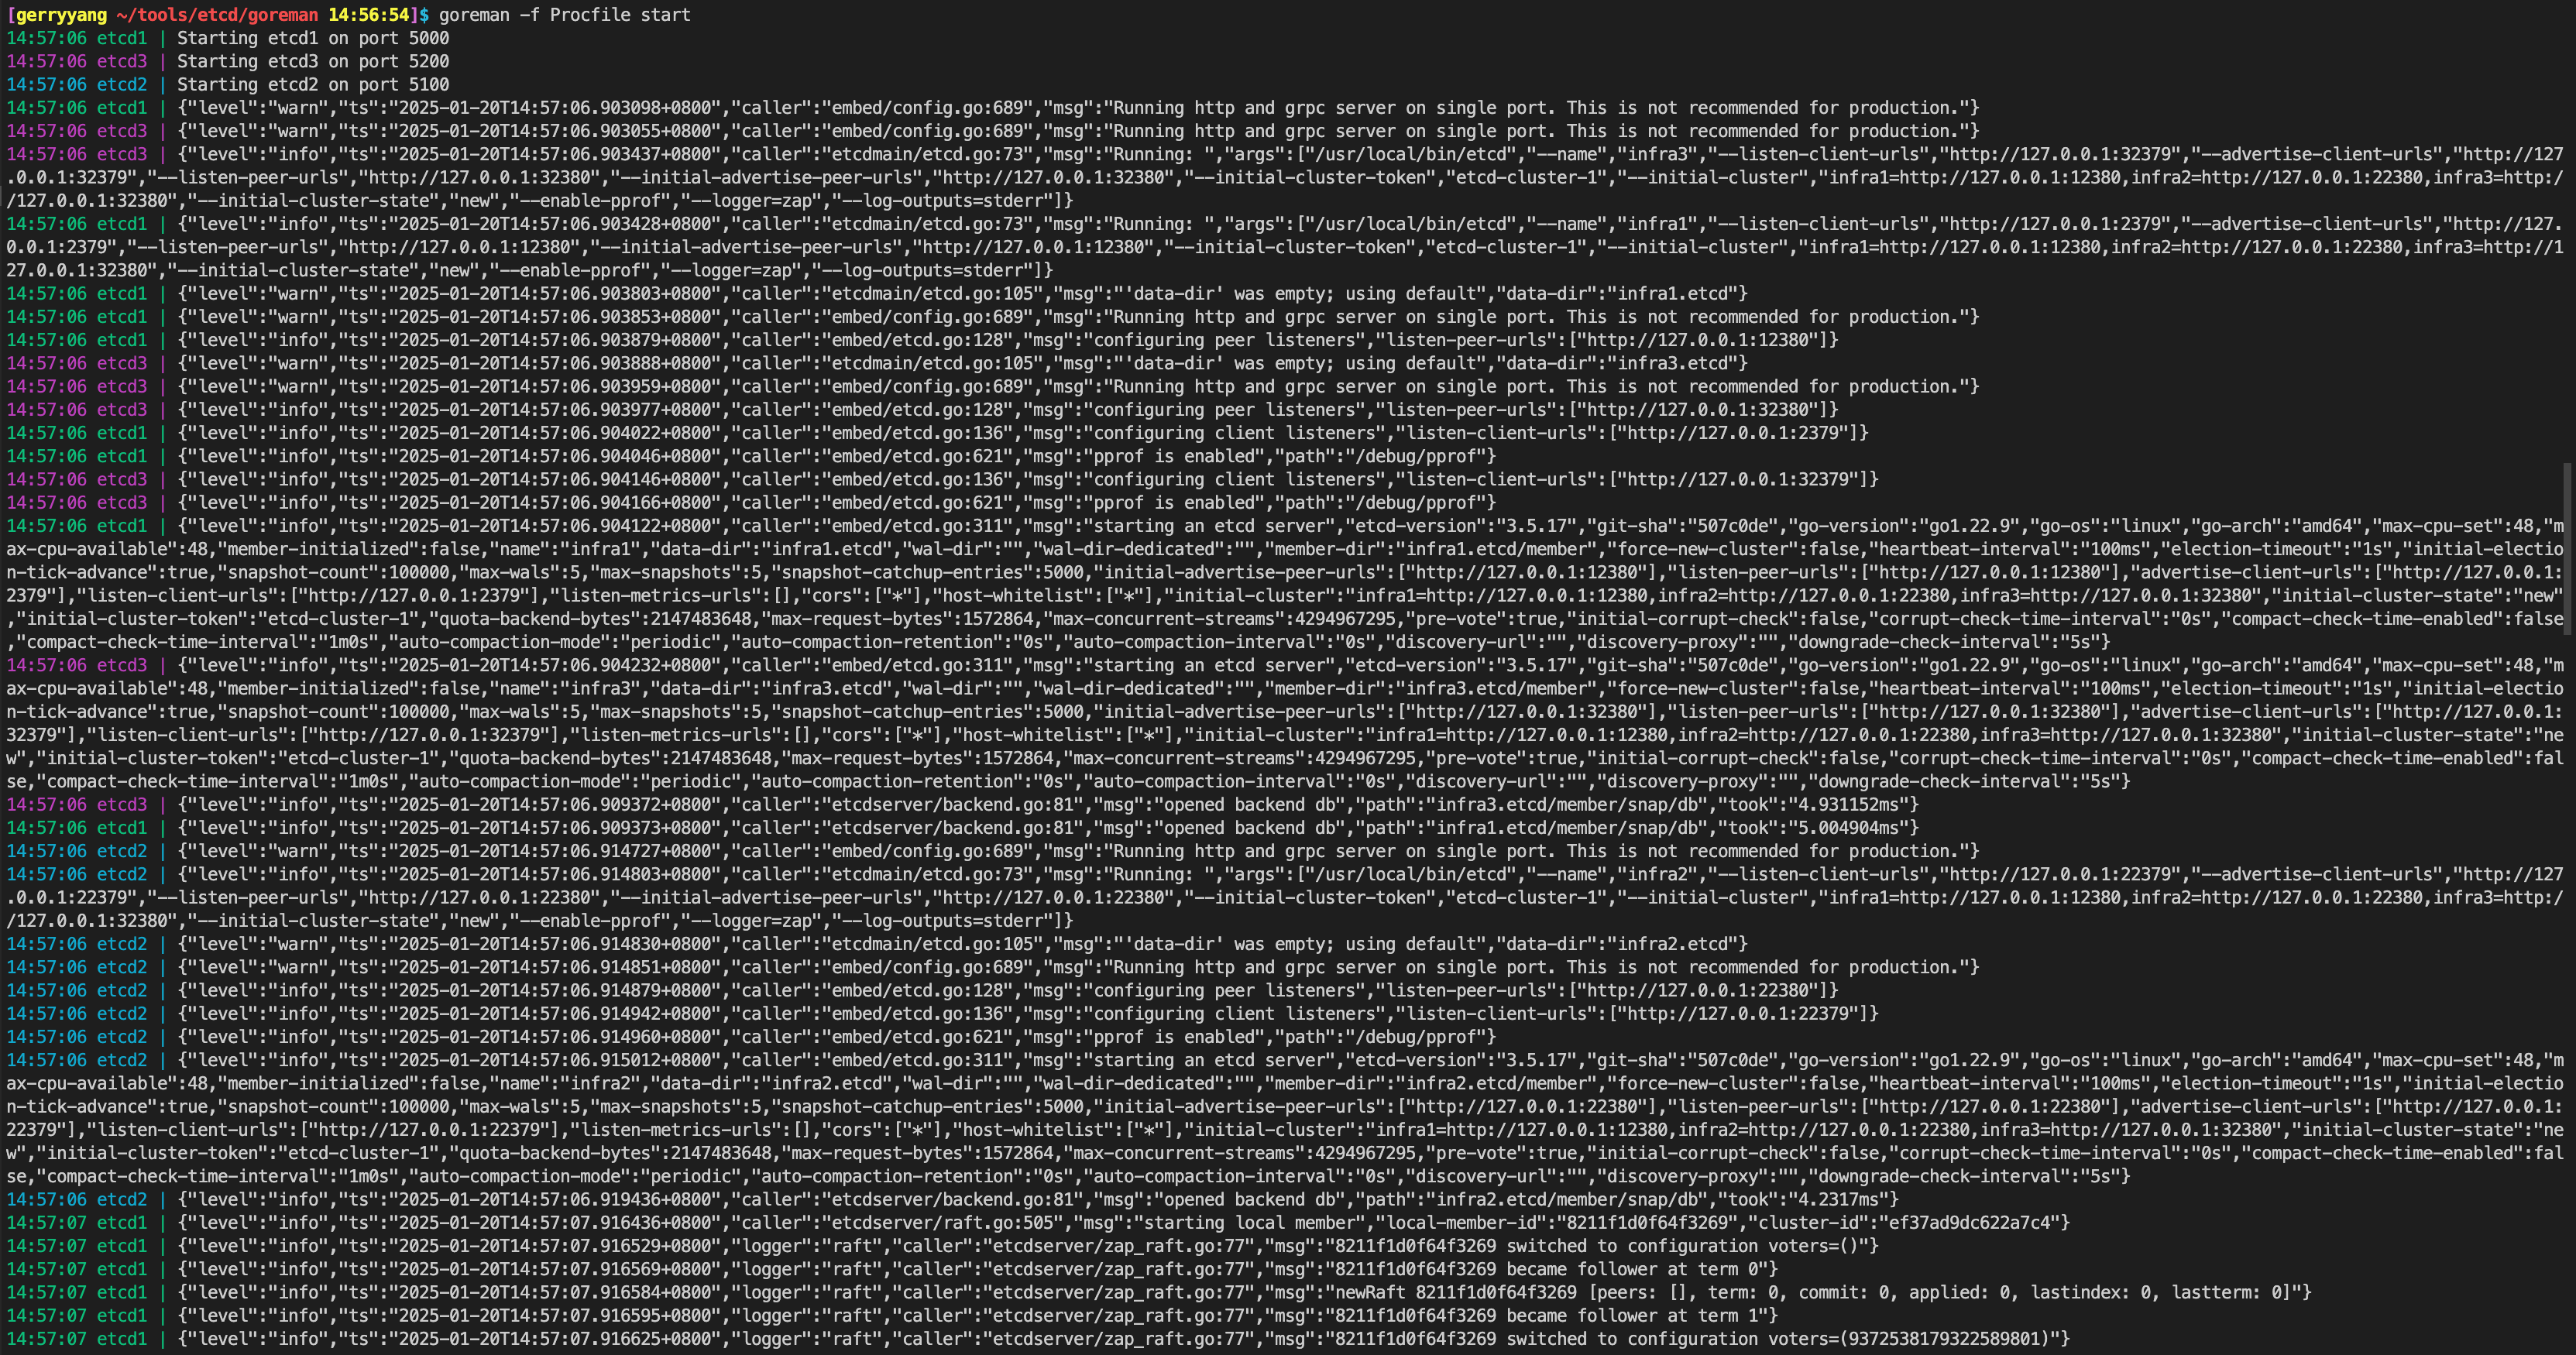
查看进程信息:
$ ps ux | grep etcd | grep -v grep
gerryya+ 1865815  0.9  0.0 11738844 30340 pts/0  Sl   14:57   0:00 /usr/local/bin/etcd --name infra1 --listen-client-urls http://127.0.0.1:2379 --advertise-client-urls http://127.0.0.1:2379 --listen-peer-urls http://127.0.0.1:12380 --initial-advertise-peer-urls http://127.0.0.1:12380 --initial-cluster-token etcd-cluster-1 --initial-cluster infra1=http://127.0.0.1:12380,infra2=http://127.0.0.1:22380,infra3=http://127.0.0.1:32380 --initial-cluster-state new --enable-pprof --logger=zap --log-outputs=stderr
gerryya+ 1865816  0.8  0.0 11738844 29556 pts/0  Sl   14:57   0:00 /usr/local/bin/etcd --name infra3 --listen-client-urls http://127.0.0.1:32379 --advertise-client-urls http://127.0.0.1:32379 --listen-peer-urls http://127.0.0.1:32380 --initial-advertise-peer-urls http://127.0.0.1:32380 --initial-cluster-token etcd-cluster-1 --initial-cluster infra1=http://127.0.0.1:12380,infra2=http://127.0.0.1:22380,infra3=http://127.0.0.1:32380 --initial-cluster-state new --enable-pprof --logger=zap --log-outputs=stderr
gerryya+ 1865817  0.7  0.0 11739100 31676 pts/0  Sl   14:57   0:00 /usr/local/bin/etcd --name infra2 --listen-client-urls http://127.0.0.1:22379 --advertise-client-urls http://127.0.0.1:22379 --listen-peer-urls http://127.0.0.1:22380 --initial-advertise-peer-urls http://127.0.0.1:22380 --initial-cluster-token etcd-cluster-1 --initial-cluster infra1=http://127.0.0.1:12380,infra2=http://127.0.0.1:22380,infra3=http://127.0.0.1:32380 --initial-cluster-state new --enable-pprof --logger=zap --log-outputs=stderr
bbolt
bbolt provides a command line utility for inspecting and manipulating bbolt database files. To install bbolt command-line please refer here
Run go install to install the bbolt command line utility into your $GOBIN path, which defaults to $GOPATH/bin or $HOME/go/bin if the GOPATH environment variable is not set.
go install go.etcd.io/bbolt/cmd/bbolt@latest
$ bbolt --help
Bbolt is a tool for inspecting bbolt databases.

Usage:

        bbolt command [arguments]

The commands are:

    bench       run synthetic benchmark against bbolt
    buckets     print a list of buckets
    check       verifies integrity of bbolt database
    compact     copies a bbolt database, compacting it in the process
    dump        print a hexadecimal dump of a single page
    get         print the value of a key in a bucket
    info        print basic info
    keys        print a list of keys in a bucket
    help        print this screen
    page        print one or more pages in human readable format
    pages       print list of pages with their types
    page-item   print the key and value of a page item.
    stats       iterate over all pages and generate usage stats
    surgery     perform surgery on bbolt database

Use "bbolt [command] -h" for more information about a command.
Kstone
Kstone 是一个针对 etcd 的全方位运维解决方案,提供集群管理 (关联已有集群、创建新集群等)、监控、备份、巡检、数据迁移、数据可视化、智能诊断等一系列特性。Kstone 将帮助你高效管理 etcd 集群,显著降低运维成本、及时发现潜在隐患、提升 k8s etcd 存储的稳定性和用户体验。
Kstone is an etcd management platform, providing cluster management, monitoring, backup, inspection, data migration, visual viewing of etcd data, and intelligent diagnosis.
Kstone will help you efficiently manage etcd clusters, significantly reduce operation and maintenance costs, discover potential hazards in time, and improve the stability and user experience of k8s etcd storage.
Features
- Supports registration of existing clusters and creation of new etcd clusters.
- Support prometheus monitoring, built-in rich etcd grafana panel diagram.
- Support multiple data backup methods (minute-level backup to object storage, real-time backup by deploying learner).
- Support multiple inspection strategies (data consistency, health, hot write requests, number of resource objects, etc.).
- Built-in web console and visual view etcd data.
- Lightweight, easy to install.
- Support data migration(to do list).
- Support intelligent diagnosis(to do list).
k3s
Lightweight Kubernetes. Production ready, easy to install, half the memory, all in a binary less than 100 MB.
kine
Kine as a datastore shim that allows etcd to be replaced with other databases.
The Raft Consensus Algorithm
Quick Links
What is Raft?
Raft is a consensus algorithm that is designed to be easy to understand. It’s equivalent to Paxos in fault-tolerance and performance. The difference is that it’s decomposed into relatively independent subproblems, and it cleanly addresses all major pieces needed for practical systems. We hope Raft will make consensus available to a wider audience, and that this wider audience will be able to develop a variety of higher quality consensus-based systems than are available today.
Hold on—what is consensus?

Raft Visualization
https://raft.github.io/raftscope/index.html
Here’s a Raft cluster running in your browser. You can interact with it to see Raft in action. Five servers are shown on the left, and their logs are shown on the right. We hope to create a screencast soon to explain what’s going on. This visualization (RaftScope) is still pretty rough around the edges; pull requests would be very welcome.
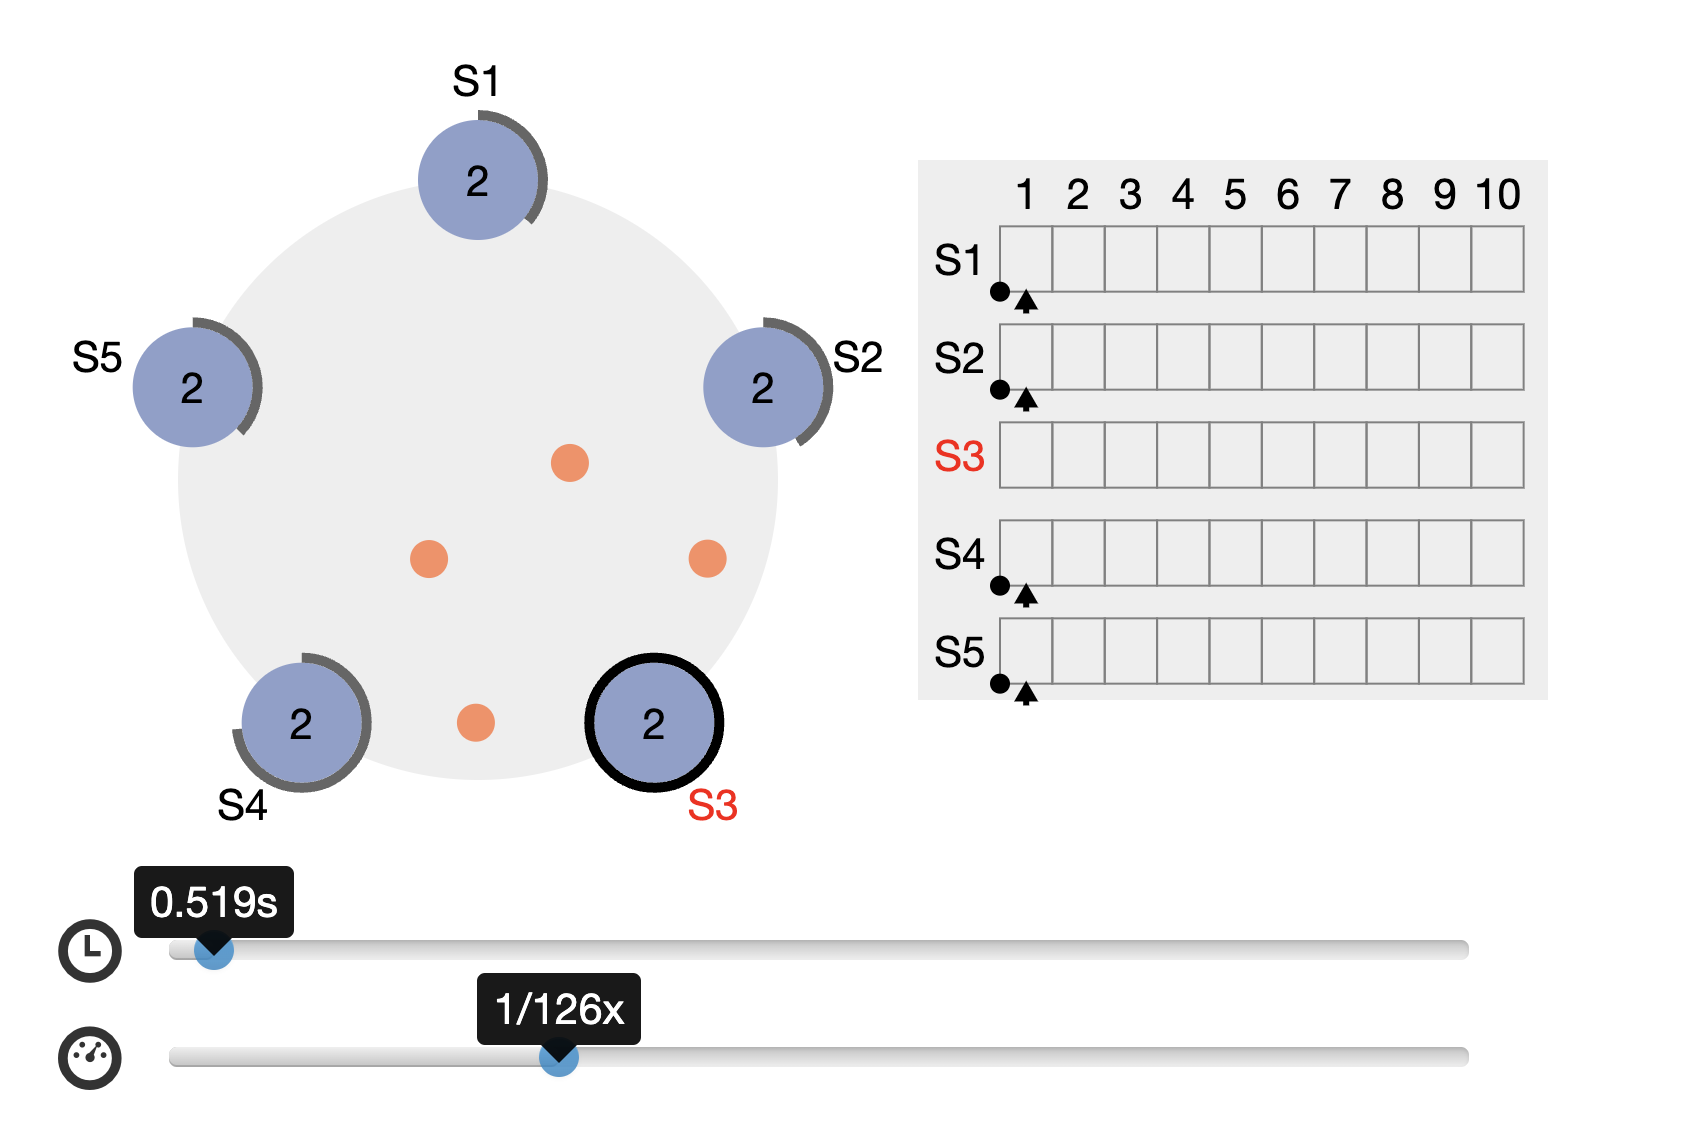
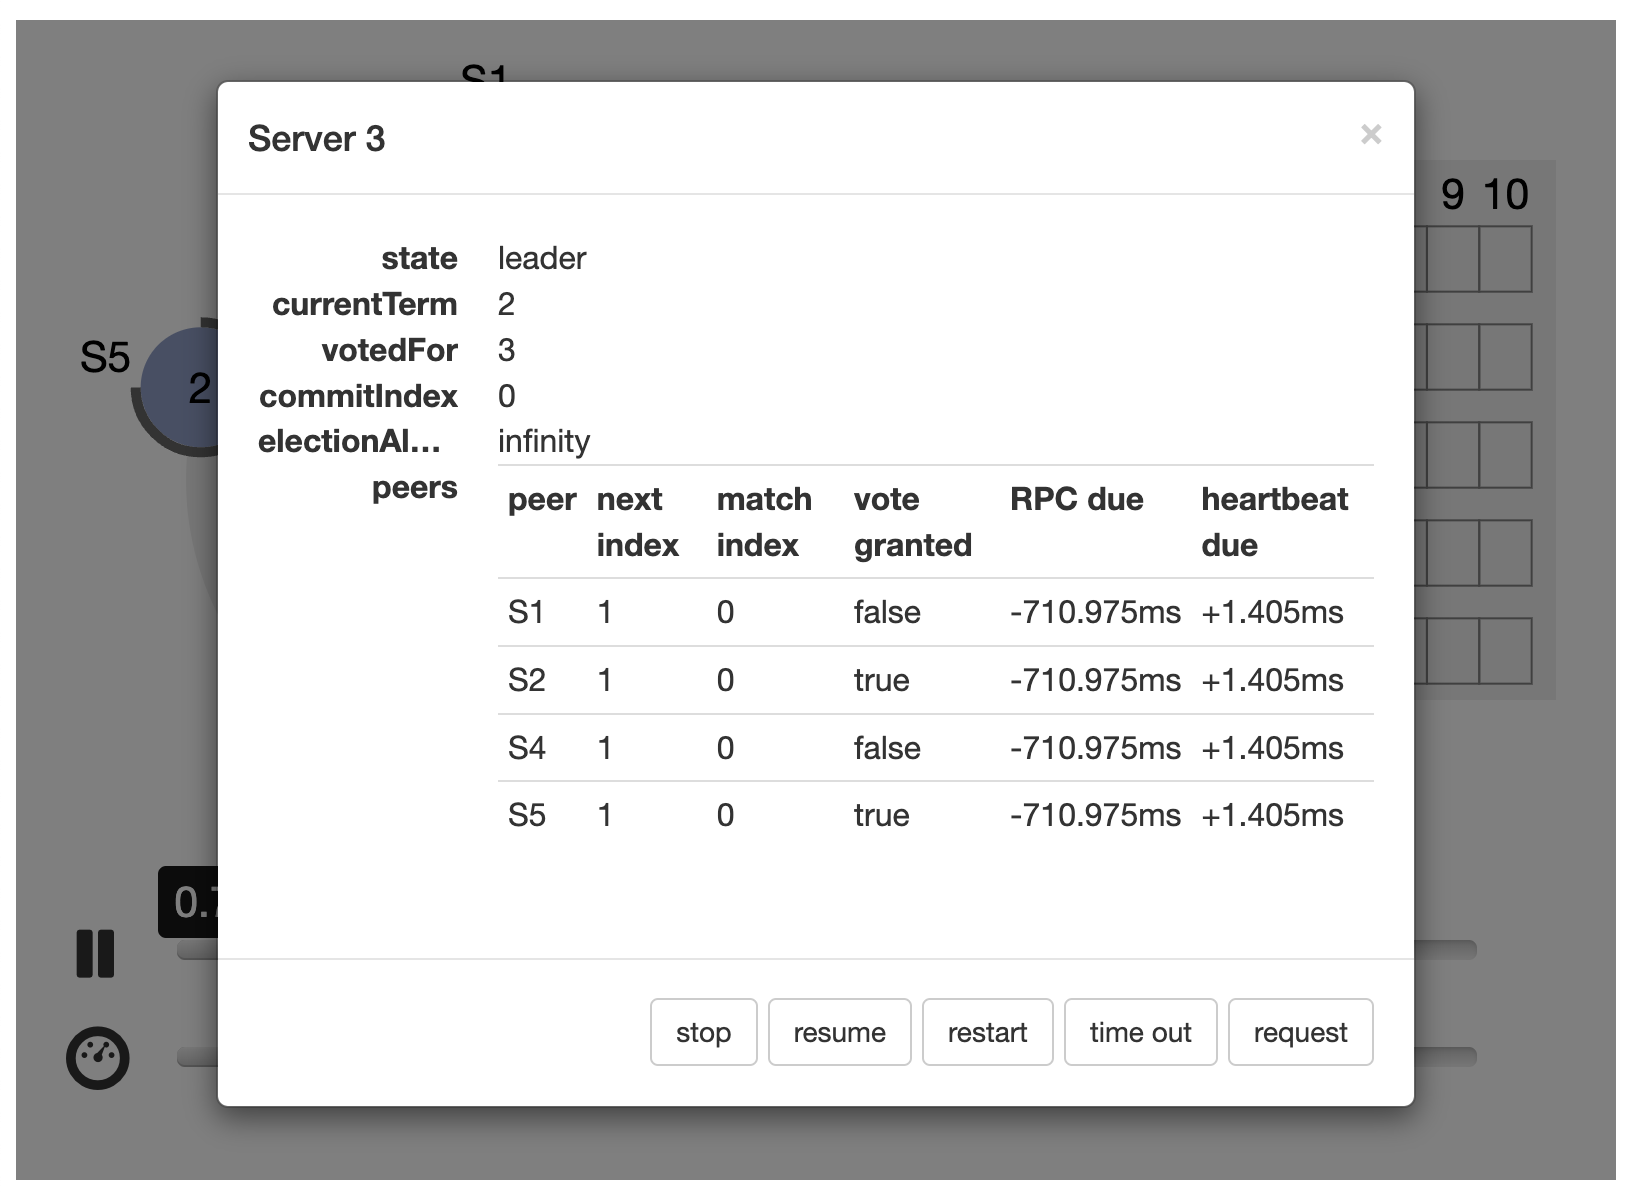
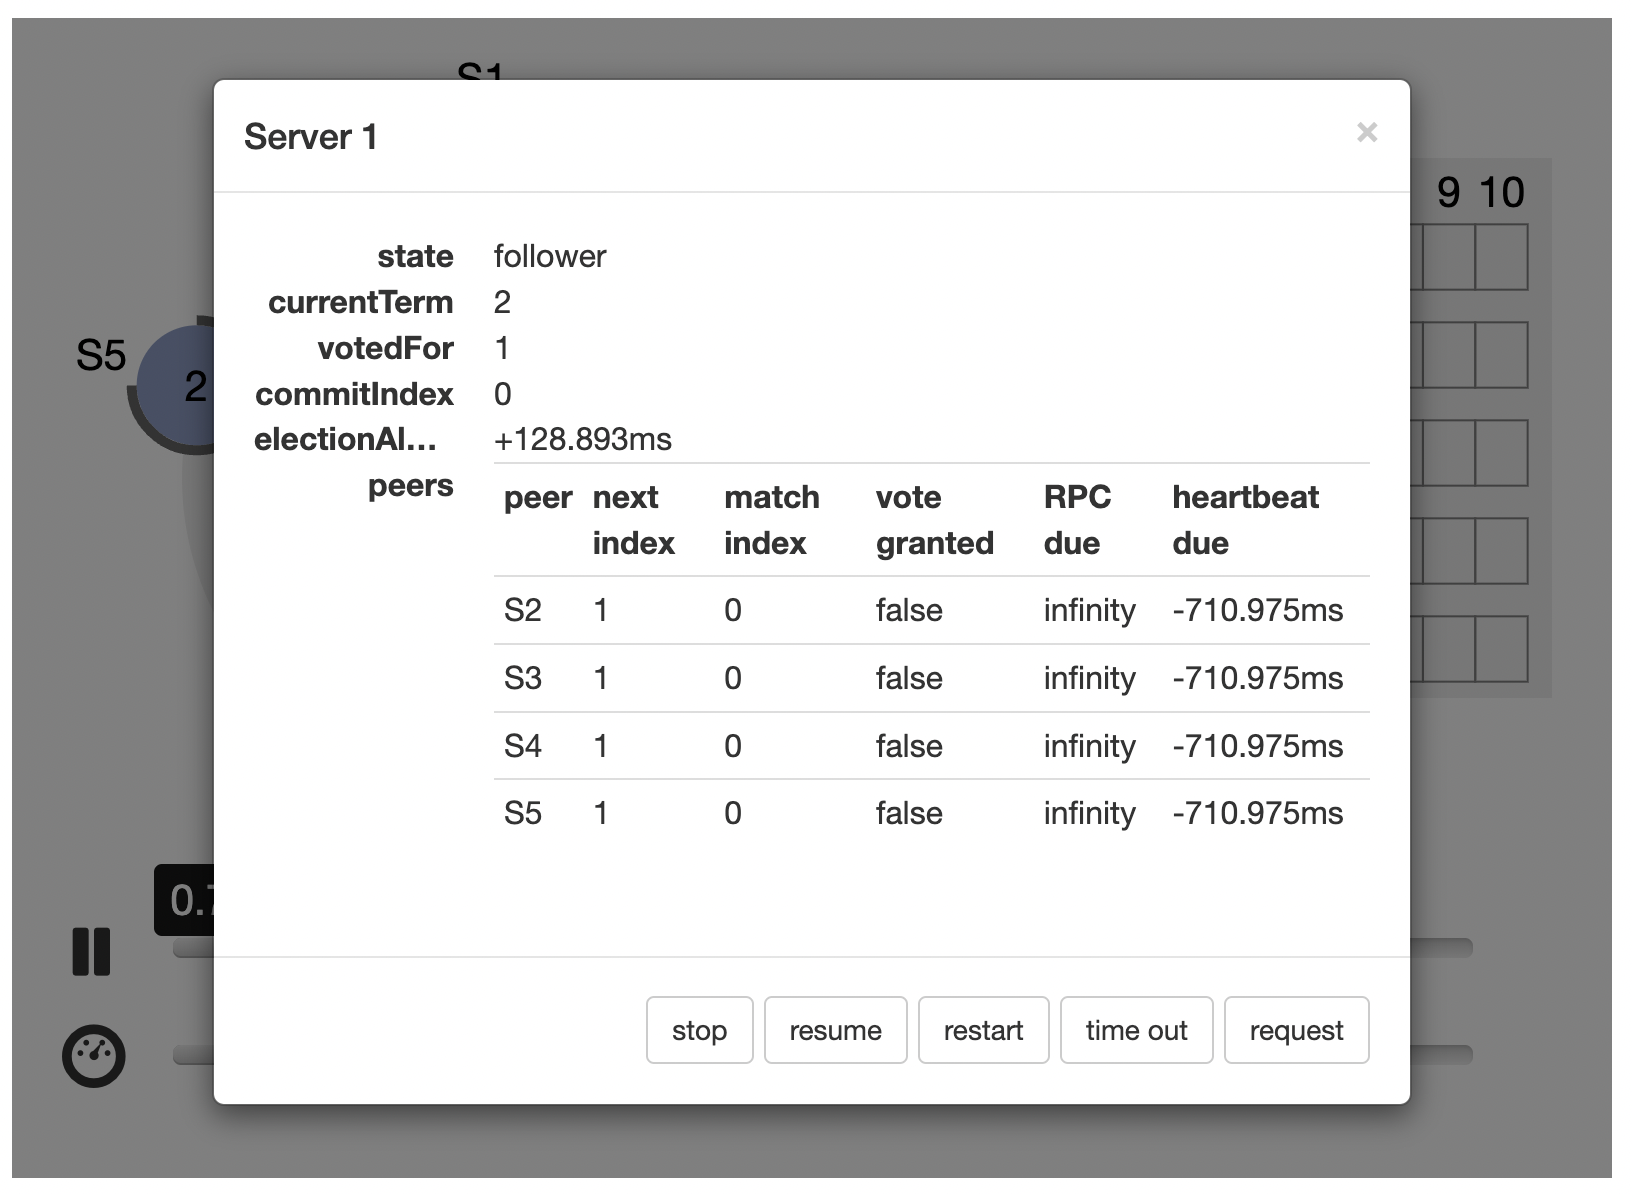
Publications
This is “the Raft paper”, which describes Raft in detail: In Search of an Understandable Consensus Algorithm (Extended Version) by Diego Ongaro and John Ousterhout. A slightly shorter version of this paper received a Best Paper Award at the 2014 USENIX Annual Technical Conference.
Diego Ongaro’s Ph.D. dissertation expands on the content of the paper in much more detail, and it includes a simpler cluster membership change algorithm. The dissertation also includes a formal specification of Raft written in TLA+; a slightly updated version of that specification is here.
Talks
These talks serve as good introductions to Raft:
-
Talk on Raft at CS@Illinois Distinguished Lecture Series by John Ousterhout, August 2016: Video YouTube Slides PDF with RaftScope visualization
-
Talk on Raft at Build Stuff 2015 by Diego Ongaro, November 2015: Video InfoQ Slides HTML PDF with RaftScope visualization
Where can I get Raft?
There are many implementations of Raft available in various stages of development. This table lists the implementations we know about with source code available. The most popular and/or recently updated implementations are towards the top. This information will inevitably get out of date; please submit a pull request or an issue to update it.
Raft 协议论文 In Search of an Understandable Consensus Algorithm
Raft is a consensus algorithm for managing a replicated log. It produces a result equivalent to (multi-)Paxos, and it is as efficient as Paxos, but its structure is different from Paxos; this makes Raft more understandable than Paxos and also provides a better foundation for building practical systems.
In order to enhance understandability (易懂), Raft separates the key elements of consensus, such as leader election, log replication, and safety, and it enforces a stronger degree of coherency to reduce the number of states that must be considered.
Results from a user study demonstrate that Raft is easier for students to learn than Paxos. Raft also includes a new mechanism for changing the cluster membership, which uses overlapping majorities to guarantee safety.
Raft is similar in many ways to existing consensus algorithms, but it has several novel features:
- Strong leader: Raft uses a stronger form of leadership than other consensus algorithms. For example, log entries only flow from the leader to other servers. This simplifies the management of the replicated log and makes Raft easier to understand.
- Leader election: Raft uses randomized timers to elect leaders. This adds only a small amount of mechanism to the heartbeats already required for any consensus algorithm, while resolving conflicts simply and rapidly.
- Membership changes: Raft’s mechanism for changing the set of servers in the cluster uses a new joint consensus approach where the majorities of two different configurations overlap during transitions. This allows the cluster to continue operating normally during configuration changes.
Raft 协议的 “Membership changes” 特性是指 Raft 协议如何处理集群中服务器成员的变化。这是一个非常重要的特性,因为在一个分布式系统中,服务器可能会因为各种原因(比如故障、升级、扩容等)而加入或离开集群。
在 Raft 协议中,当集群需要改变配置(比如添加或删除服务器)时,会使用一种称为 “joint consensus” 的方法。这个方法的关键在于,它会在旧配置和新配置之间创建一个过渡状态,这个过渡状态的服务器集合是旧配置和新配置的并集。在这个过渡状态中,任何决策(比如选举领导者或者提交日志条目)都需要旧配置和新配置的大多数服务器的同意。这样,即使在配置变化的过程中,集群也能够继续正常运行。
这种方法的优点是,它可以在不中断服务的情况下进行配置变化。此外,它还可以防止在配置变化过程中出现分裂脑(split-brain)问题,这是一个在分布式系统中常见的问题,可能导致数据不一致。
We believe that Raft is superior to Paxos and other consensus algorithms, both for educational purposes and as a foundation for implementation. It is simpler and more understandable than other algorithms; it is described completely enough to meet the needs of a practical system; it has several open-source implementations and is used by several companies; its safety properties have been formally specified and proven; and its efficiency is comparable to other algorithms.
Replicated state machines
Consensus algorithms typically arise in the context of replicated state machines. In this approach, state machines on a collection of servers compute identical copies of the same state and can continue operating even if some of the servers are down. Replicated state machines are used to solve a variety of fault tolerance problems in distributed systems.
Replicated state machines are typically implemented using a replicated log, as shown in Figure 1. Each server stores a log containing a series of commands, which its state machine executes in order. Each log contains the same commands in the same order, so each state machine processes the same sequence of commands. Since the state machines are deterministic, each computes the same state and the same sequence of outputs.
Figure 1:
Keeping the replicated log consistent is the job of the consensus algorithm. The consensus module on a server receives commands from clients and adds them to its log. It communicates with the consensus modules on other servers to ensure that every log eventually contains the same requests in the same order, even if some servers fail. Once commands are properly replicated, each server’s state machine processes them in log order, and the outputs are returned to clients. As a result, the servers appear to form a single, highly reliable state machine.
Consensus algorithms for practical systems typically have the following properties:
- They ensure safety (never returning an incorrect result) under all non-Byzantine conditions (非拜占庭问题), including network delays, partitions, and packet loss, duplication, and reordering.
- They are fully functional (available) as long as any majority of the servers are operational and can communicate with each other and with clients. Thus, a typical cluster of five servers can tolerate the failure of any two servers. Servers are assumed to fail by stopping; they may later recover from state on stable storage and rejoin the cluster.
- They do not depend on timing to ensure the consistency of the logs: faulty clocks and extreme message delays can, at worst, cause availability problems.
- In the common case, a command can complete as soon as a majority of the cluster has responded to a single round of remote procedure calls; a minority of slow servers need not impact overall system performance.
Byzantine and non-Byzantine distributed systems
The problem was originally posed by Lamport in the Byzantine Generals paper. You have a group of generals that needs to agree on a particular time to attack a city. They can only communicate by (unreliable) messenger, and one or more of them are traitors. The paper itself is interesting to read and the problem is pervasive enough that we now divide distributed systems to Byzantine and non-Byzantine systems. We now have pervasive cryptography deployed, to the point where you read this post over an encrypted channel, verified using public key infrastructure to validate that it indeed came from me. You can solve the Byzantine generals problem easily now.
Today, the terminology changed. We now refer to Byzantine networks as systems where some of the nodes are malicious and non-Byzantine as systems where we trust that other nodes will do their task. For example, Raft or Paxos are both distributed consensus algorithms that assumes a non-Byzantine system. Oh, the network communication gores through hostile environment, but that is why we have TLS for. Authentication and encryption over the wire are mostly a solved problem at this point. It isn’t a simple problem, but it is a solved one.
Raft consensus algorithm
Figure 2 summarizes the algorithm in condensed (概要) form for reference, and Figure 3 lists key properties of the algorithm; the elements of these figures are discussed piecewise over the rest of this section.
Raft implements consensus by first electing a distinguished leader, then giving the leader complete responsibility for managing the replicated log. The leader accepts log entries from clients, replicates them on other servers, and tells servers when it is safe to apply log entries to their state machines.
Having a leader simplifies the management of the replicated log. For example, the leader can decide where to place new entries in the log without consulting other servers, and data flows in a simple fashion from the leader to other servers. A leader can fail or become disconnected from the other servers, in which case a new leader is elected.
Given the leader approach, Raft decomposes the consensus problem into three relatively independent subproblems, which are discussed in the subsections that follow:
- Leader election: a new leader must be chosen when an existing leader fails.
- Log replication: the leader must accept log entries from clients and replicate them across the cluster, forcing the other logs to agree with its own.
- Safety: the key safety property for Raft is the State Machine Safety Property in Figure 3: if any server has applied a particular log entry to its state machine, then no other server may apply a different command for the same log index.
Figure 2:

Figure 3:
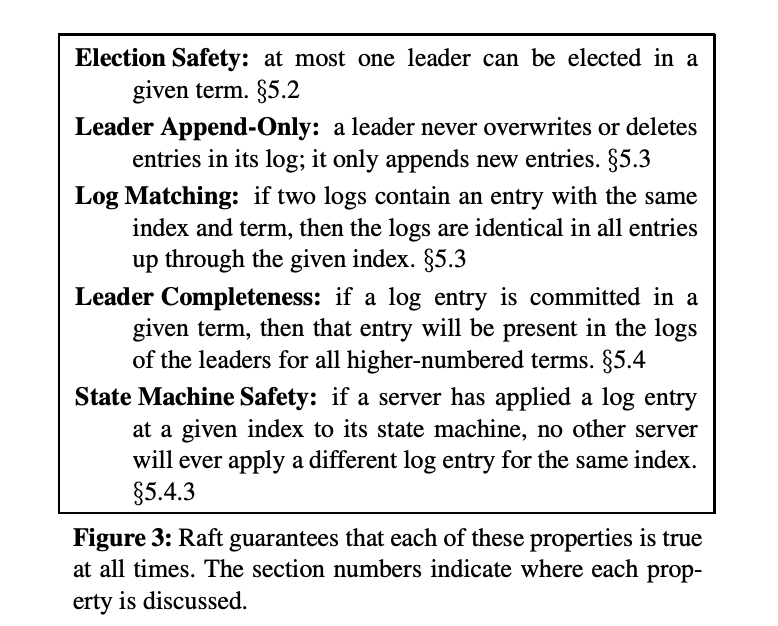
Raft basics
A Raft cluster contains several servers; five is a typical number, which allows the system to tolerate two failures. At any given time each server is in one of three states: leader, follower, or candidate. In normal operation there is exactly one leader and all of the other servers are followers. Followers are passive: they issue no requests on their own but simply respond to requests from leaders and candidates. The leader handles all client requests (if
a client contacts a follower, the follower redirects it to the leader). The third state, candidate, is used to elect a new leader as described in Section 5.2. Figure 4 shows the states and their transitions; the transitions are discussed below.
Figure 4:
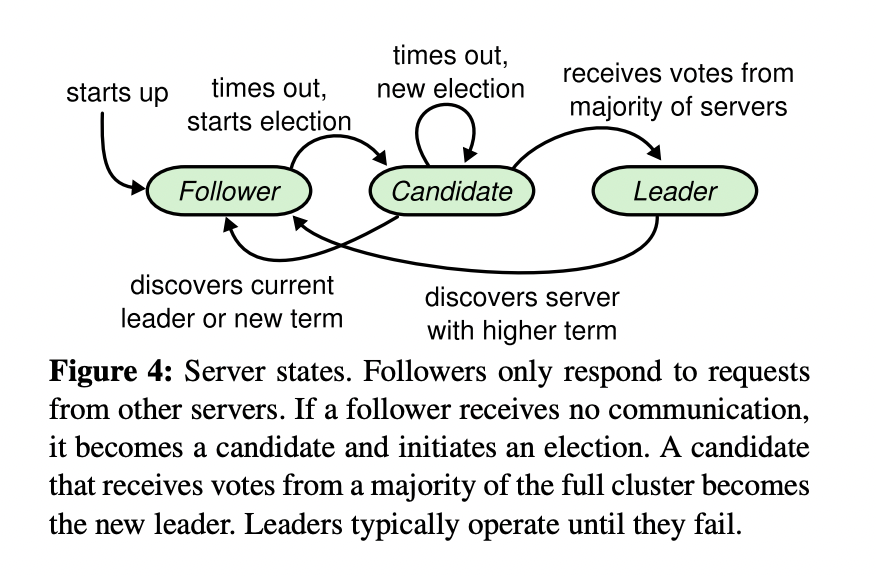
Raft divides time into terms of arbitrary length, as shown in Figure 5. Terms are numbered with consecutive integers. Each term begins with an election, in which one or more candidates attempt to become leader as described in Section 5.2. If a candidate wins the election, then it serves as leader for the rest of the term. In some situations an election will result in a split vote. In this case the term will end with no leader; a new term (with a new election) will begin shortly. Raft ensures that there is at most one leader in a given term.
Figure 5:
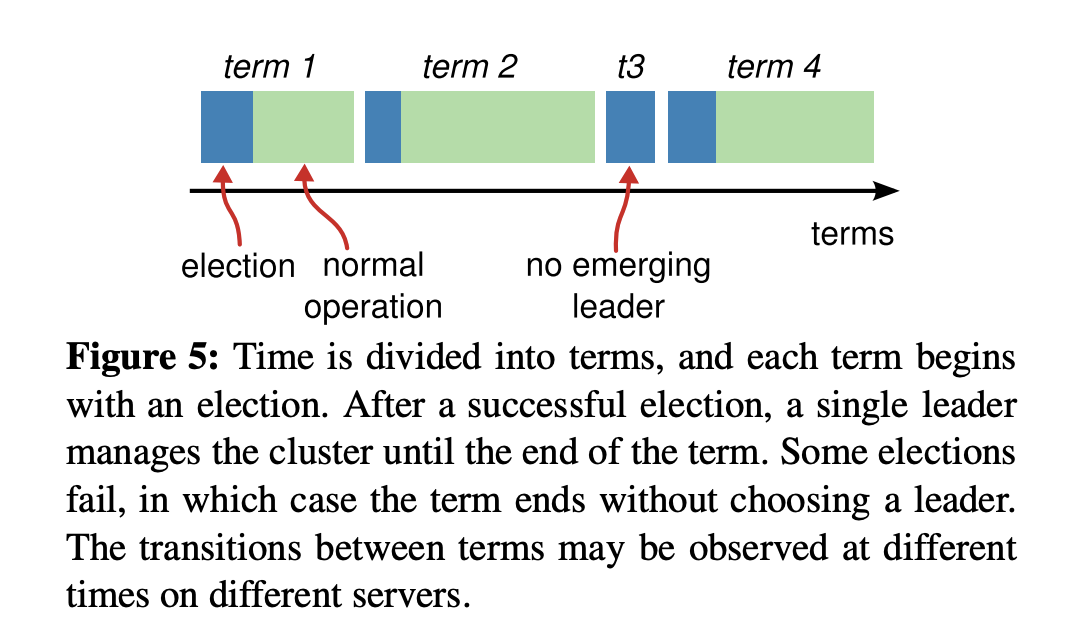
Different servers may observe the transitions between terms at different times, and in some situations a server may not observe an election or even entire terms. Terms act as a logical clock in Raft, and they allow servers to detect obsolete (过时的) information such as stale leaders. Each server stores a current term number, which increases monotonically over time. Current terms are exchanged whenever servers communicate; if one server’s current term is smaller than the other’s, then it updates its current term to the larger value. If a candidate or leader discovers that its term is out of date, it immediately reverts to follower state. If a server receives a request with a stale term number, it rejects the request.
在 Raft 协议中,”Term” 是一个非常重要的概念。每个 Term 代表一个选举周期,它可以被视为一个逻辑时钟,帮助服务器检测过时的信息,如陈旧的领导者。每个服务器都存储一个当前的 Term 数字,这个数字随着时间单调递增。每当服务器之间进行通信时,都会交换当前的 Term。如果一个服务器发现自己的当前 Term 小于另一个服务器的 Term,那么它会更新自己的当前 Term 为较大的值。
这种机制有几个重要的效果:
如果一个候选人或领导者发现自己的 Term 已经过时(即,存在一个更大的 Term),那么它会立即变回 Follower 状态。这是因为一个更大的 Term 意味着已经有一个新的选举开始,而这个服务器没有参与。为了保持一致性,它必须放弃当前的候选人或领导者角色,变回 Follower。如果一个服务器收到一个请求,但是这个请求的 Term 小于它自己的当前 Term,那么它会拒绝这个请求。这是因为一个较小的 Term 意味着这个请求是在一个过去的选举周期中产生的,因此是过时的。通过这种方式,Raft 协议能够确保集群中的所有服务器都能够在选举过程中保持一致性,即使在网络延迟或者服务器故障的情况下。
Raft servers communicate using remote procedure calls (RPCs), and the basic consensus algorithm requires only two types of RPCs. RequestVote RPCs are initiated by candidates during elections (Section 5.2), and AppendEntries RPCs are initiated by leaders to replicate log entries and to provide a form of heartbeat (Section 5.3). Section 7 adds a third RPC for transferring snapshots between servers. Servers retry RPCs if they do not receive a response in a timely manner, and they issue RPCs in parallel for best performance.
Performance (举领导者和复制日志条目等关键操作上的性能)
Raft’s performance is similar to other consensus algorithms such as Paxos.
The most important case for performance is when an established leader is replicating new log entries. Raft achieves this using the minimal number of messages (a single round-trip from the leader to half the cluster). It is also possible to further improve Raft’s performance. For example, it easily supports batching and pipelining requests for higher throughput and lower latency. Various optimizations have been proposed in the literature for other algorithms; many of these could be applied to Raft, but we leave this to future work.
We used our Raft implementation to measure the performance of Raft’s leader election algorithm and answer two questions. First, does the election process converge quickly? Second, what is the minimum downtime that can be achieved after leader crashes?
To measure leader election, we repeatedly crashed the leader of a cluster of five servers and timed how long it took to detect the crash and elect a new leader (see Figure 16). To generate a worst-case scenario, the servers in each trial had different log lengths, so some candidates were not eligible to become leader. Furthermore, to encourage split votes, our test script triggered a synchronized broadcast of heartbeat RPCs from the leader before terminating its process (this approximates the behavior of the leader replicating a new log entry prior to crashing). The leader was crashed uniformly randomly within its heartbeat interval, which was half of the minimum election timeout for all tests. Thus, the smallest possible downtime was about half of the minimum election timeout.
The top graph in Figure 16 shows that a small amount of randomization in the election timeout is enough to avoid split votes in elections. In the absence of randomness, leader election consistently took longer than 10 seconds in our tests due to many split votes. Adding just 5ms of randomness helps significantly, resulting in a median downtime of 287ms. Using more randomness improves worst-case behavior: with 50ms of randomness the worstcase completion time (over 1000 trials) was 513ms.
The bottom graph in Figure 16 shows that downtime can be reduced by reducing the election timeout. With an election timeout of 12–24ms, it takes only 35ms on average to elect a leader (the longest trial took 152ms). However, lowering the timeouts beyond this point violates Raft’s timing requirement: leaders have difficulty broadcasting heartbeats before other servers start new elections. This can cause unnecessary leader changes and lower overall system availability. We recommend using a conservative election timeout such as 150–300ms; such timeouts are unlikely to cause unnecessary leader changes and will still provide good availability.
Figure 6:
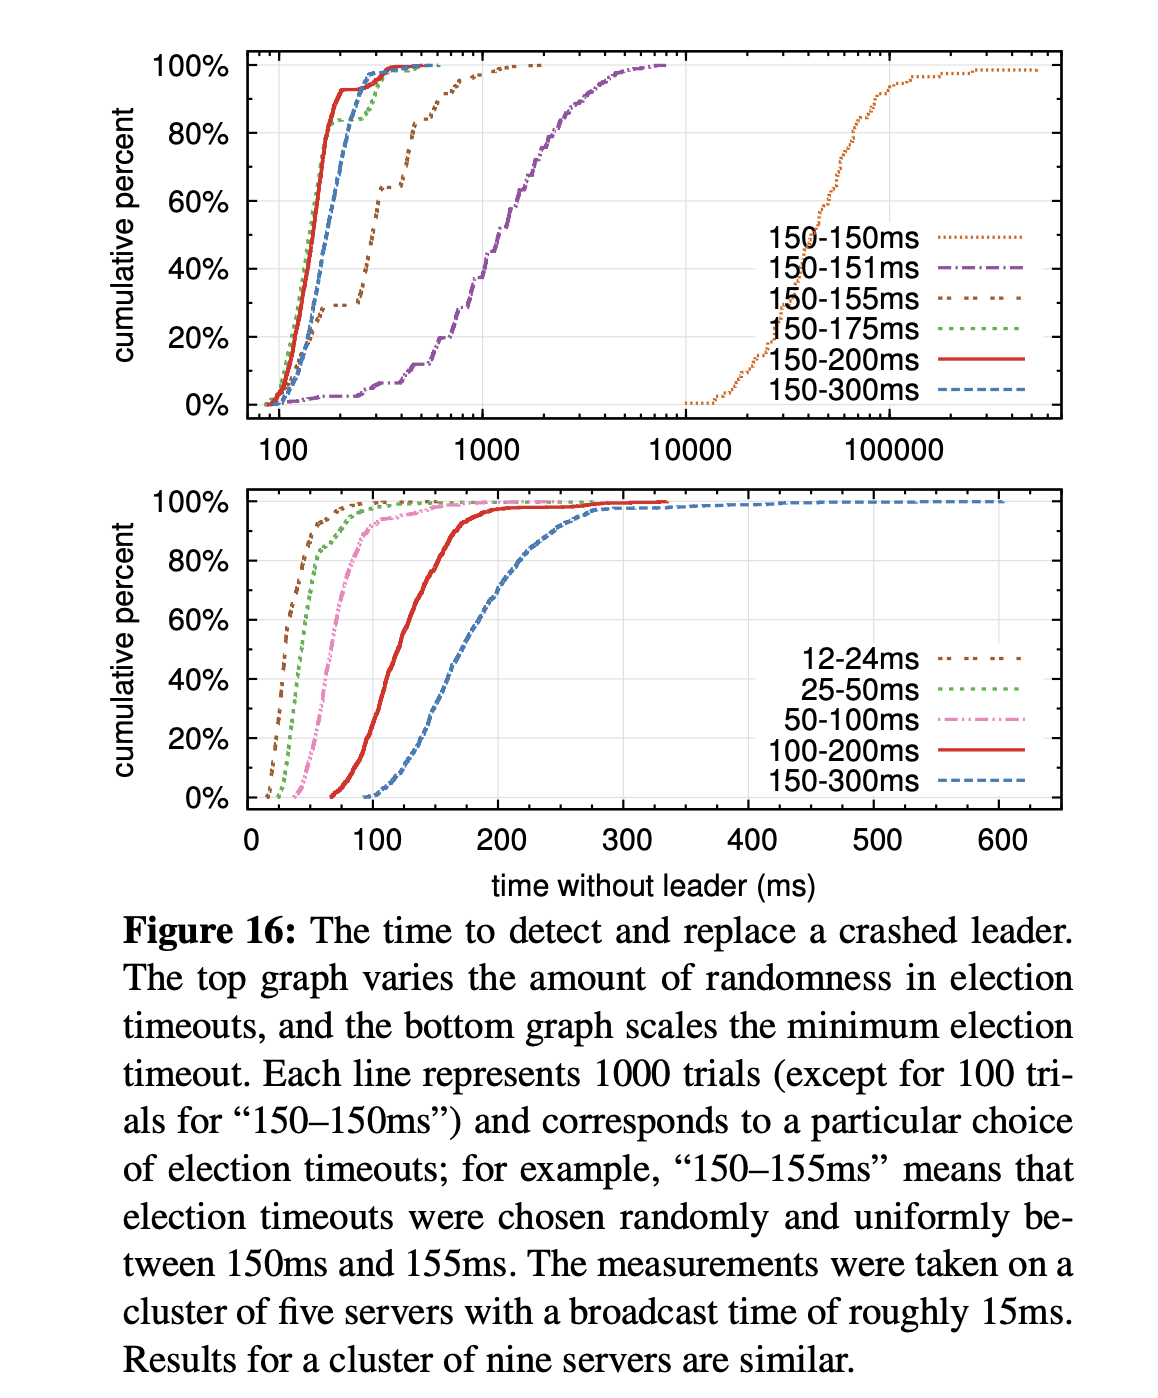
Raft 协议在选举领导者和复制日志条目等关键操作上的性能表现,以及如何通过调整参数来优化性能。
首先,Raft 协议在复制新的日志条目时的性能与 Paxos 等其他一致性算法相当。这是因为 Raft 协议使用了最少的消息数量(从领导者到集群一半的服务器只需要一个往返的消息)来完成这个操作。此外,Raft 协议还支持批处理和流水线请求,以提高吞吐量和降低延迟。
然后,通过实验测量了 Raft 协议的领导者选举算法的性能。实验的目标是回答两个问题:选举过程是否能快速收敛?在领导者崩溃后,可以达到的最小停机时间是多少?
实验结果显示,通过在选举超时时间中引入一定的随机性,可以有效地避免选举过程中的分裂投票,从而加快选举速度。在没有随机性的情况下,由于分裂投票的问题,选举过程在测试中通常需要超过 10 秒。而添加了 5ms 的随机性后,中位数的停机时间就降低到了 287ms。增加更多的随机性可以进一步改善最坏情况的表现:在添加了 50ms 的随机性后,最坏情况下的完成时间(在 1000 次试验中)是 513ms。
此外,实验还发现,通过减小选举超时时间,可以进一步减少停机时间。当选举超时时间为 12-24ms 时,选举领导者的平均时间只需要 35ms(最长的试验需要 152ms)。然而,如果进一步降低超时时间,就可能违反 Raft 协议的时间要求:领导者可能在其他服务器开始新的选举之前,无法广播心跳消息。这可能导致不必要的领导者更换,降低整个系统的可用性。因此,建议使用较为保守的选举超时时间,如 150-300ms。这样的超时时间不太可能导致不必要的领导者更换,同时仍能提供良好的可用性。
Q: 在没有随机性的情况下,为什么会导致分裂投票的问题?
A: 在 Raft 协议中,分裂投票(split vote)的问题通常发生在领导者崩溃或网络分区等情况下。当一个或多个 Follower 服务器在一段时间内没有收到领导者的心跳消息时,它们会认为领导者已经崩溃,然后开始新的选举。
如果没有随机性,那么所有的 Follower 服务器都会在相同的时间开始新的选举。这就可能导致分裂投票的问题,因为每个服务器都有可能成为候选人,并且它们都会在开始选举时给自己投票。如果集群中的服务器数量是偶数,那么投票就可能会被平分,导致没有任何一个候选人能够得到大多数的票数,从而无法选出新的领导者。这样,集群就会进入一个无领导者的状态,直到下一轮的选举开始。
为了解决这个问题,Raft 协议引入了随机性。每个 Follower 服务器在开始新的选举之前,都会等待一个随机的超时时间。这样,一些服务器会比其他服务器更早开始选举,从而有更大的机会成为新的领导者。这就大大降低了分裂投票问题的发生概率,从而提高了选举的效率和集群的稳定性。
Install v3.5
Instructions for installing etcd from pre-built binaries or from source.
Requirements
- Supported platforms
- etcd support for common architectures & operating systems
- Hardware recommendations
- etcd usually runs well with limited resources for development or testing purposes; it’s common to develop with etcd on a laptop or a cheap cloud machine. However, when running etcd clusters in production, some hardware guidelines are useful for proper administration. These suggestions are not hard rules; they serve as a good starting point for a robust production deployment. As always, deployments should be tested with simulated workloads before running in production.
CPUs >= 16 cores
Few etcd deployments require a lot of CPU capacity. Typical clusters need two to four cores to run smoothly. Heavily loaded etcd deployments, serving thousands of clients or tens of thousands of requests per second, tend to be CPU bound since etcd can serve requests from memory. Such heavy deployments usually need eight to sixteen dedicated cores.
Memory >= 64GB
etcd has a relatively small memory footprint but its performance still depends on having enough memory. An etcd server will aggressively cache key-value data and spends most of the rest of its memory tracking watchers. Typically 8GB is enough. For heavy deployments with thousands of watchers and millions of keys, allocate 16GB to 64GB memory accordingly.
Disks SSD
Fast disks are the most critical factor for etcd deployment performance and stability.
A slow disk will increase etcd request latency and potentially hurt cluster stability. Since etcd’s consensus protocol depends on persistently storing metadata to a log, a majority of etcd cluster members must write every request down to disk. Additionally, etcd will also incrementally checkpoint its state to disk so it can truncate this log. If these writes take too long, heartbeats may time out and trigger an election, undermining the stability of the cluster. In general, to tell whether a disk is fast enough for etcd, a benchmarking tool such as fio can be used. Read here for an example.
etcd is very sensitive to disk write latency. Typically 50 sequential IOPS (e.g., a 7200 RPM disk) is required. For heavily loaded clusters, 500 sequential IOPS (e.g., a typical local SSD or a high performance virtualized block device) is recommended. Note that most cloud providers publish concurrent IOPS rather than sequential IOPS; the published concurrent IOPS can be 10x greater than the sequential IOPS. To measure actual sequential IOPS, we suggest using a disk benchmarking tool such as diskbench or fio.
etcd requires only modest **disk bandwidth **but more disk bandwidth buys faster recovery times when a failed member has to catch up with the cluster. Typically 10MB/s will recover 100MB data within 15 seconds. For large clusters, 100MB/s or higher is suggested for recovering 1GB data within 15 seconds.
When possible, back etcd’s storage with a SSD. A SSD usually provides lower write latencies and with less variance than a spinning disk, thus improving the stability and reliability of etcd. If using spinning disk, get the fastest disks possible (15,000 RPM). Using RAID 0 is also an effective way to increase disk speed, for both spinning disks and SSD. With at least three cluster members, mirroring and/or parity variants of RAID are unnecessary; etcd’s consistent replication already gets high availability.
Network
Multi-member etcd deployments benefit from a fast and reliable network. In order for etcd to be both consistent and partition tolerant, an unreliable network with partitioning outages will lead to poor availability. Low latency ensures etcd members can communicate fast. High bandwidth can reduce the time to recover a failed etcd member. 1GbE is sufficient for common etcd deployments. For large etcd clusters, a 10GbE network will reduce mean time to recovery.
Deploy etcd members within a single data center when possible to avoid latency overheads and lessen the possibility of partitioning events. If a failure domain in another data center is required, choose a data center closer to the existing one. Please also read the tuning documentation for more information on cross data center deployment.
- Example hardware configurations
Here are a few example hardware setups on AWS and GCE environments. As mentioned before, but must be stressed regardless, administrators should test an etcd deployment with a simulated workload before putting it into production.
Small cluster
A small cluster serves fewer than 100 clients, fewer than 200 of requests per second, and stores no more than 100MB of data.
Example application workload: A 50-node Kubernetes cluster
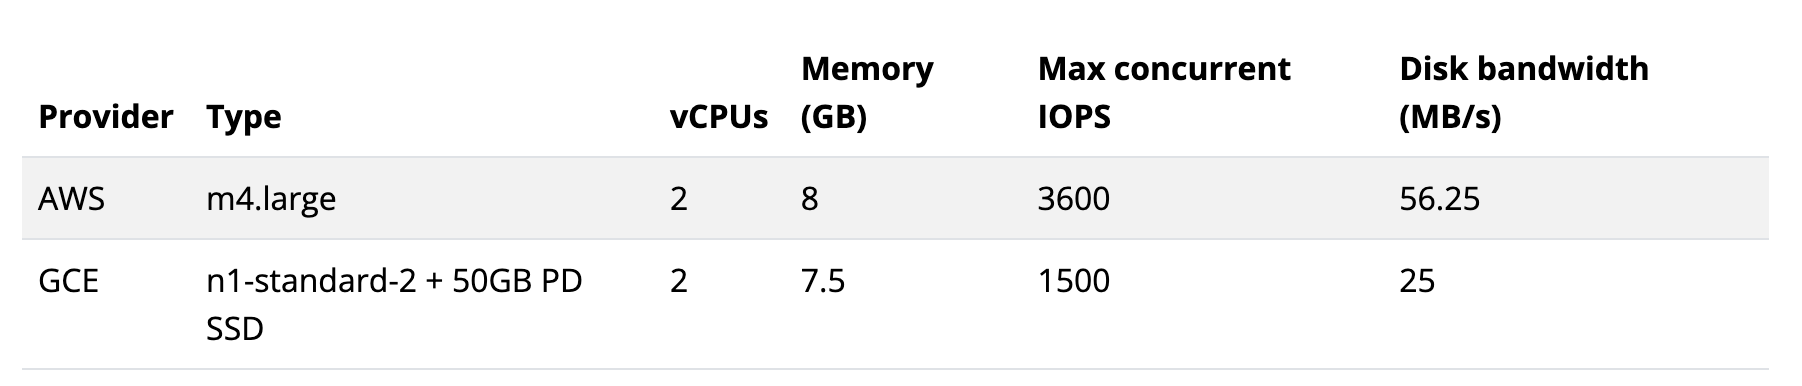
Medium cluster
A medium cluster serves fewer than 500 clients, fewer than 1,000 of requests per second, and stores no more than 500MB of data.
Example application workload: A 250-node Kubernetes cluster
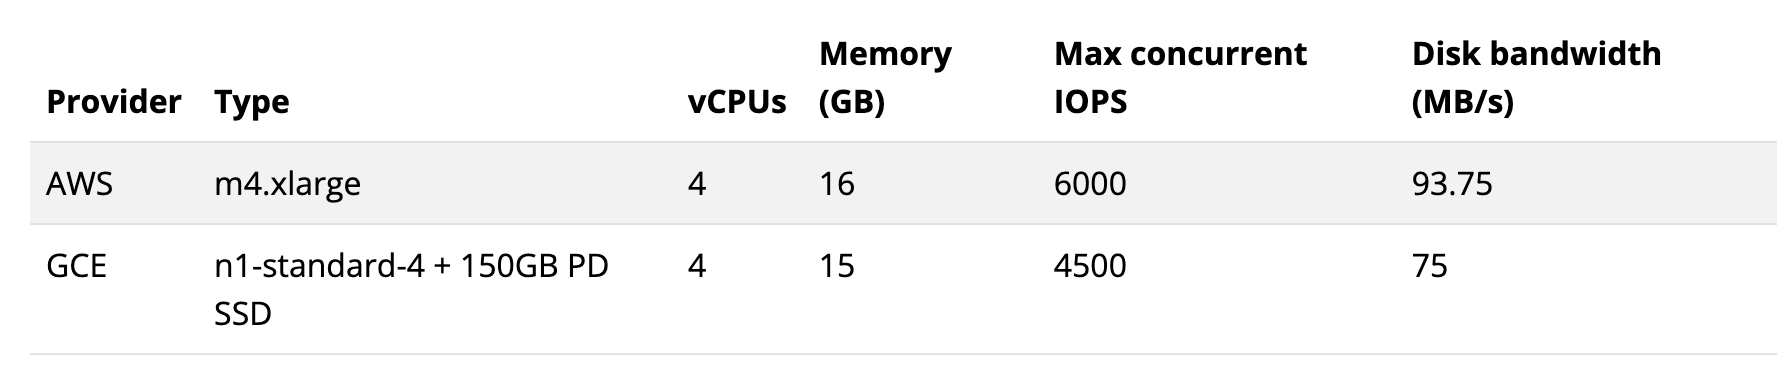
Large cluster
A large cluster serves fewer than 1,500 clients, fewer than 10,000 of requests per second, and stores no more than 1GB of data.
Example application workload: A 1,000-node Kubernetes cluster

xLarge cluster
An xLarge cluster serves more than 1,500 clients, more than 10,000 of requests per second, and stores more than 1GB data.
Example application workload: A 3,000 node Kubernetes cluster
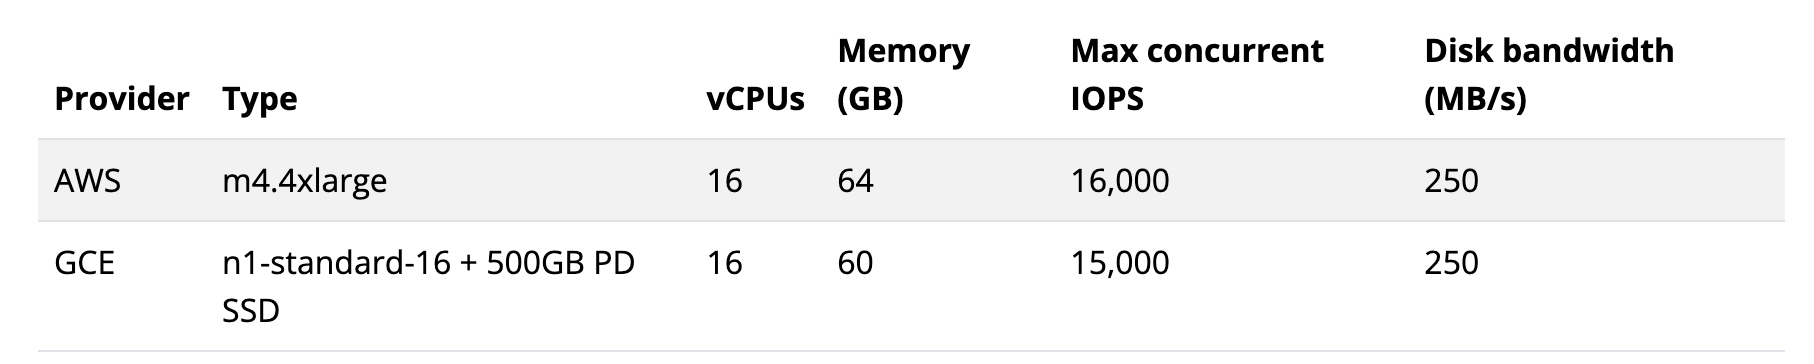
These docs cover everything from setting up and running an etcd cluster to using etcd in applications.
Follow these instructions to locally install, run, and test a single-member cluster of etcd:
Install etcd from pre-built binaries or from source. For details, see Install.
Install pre-built binaries
The easiest way to install etcd is from pre-built binaries:
- Download the compressed archive file for your platform from Releases, choosing release v3.5.17 or later.
- Unpack the archive file. This results in a directory containing the binaries.
- Add the executable binaries to your path. For example, rename and/or move the binaries to a directory in your path (like
/usr/local/bin), or add the directory created by the previous step to your path. - From a shell, test that
etcdis in your path.
$ etcd --version
etcd Version: 3.5.17
Git SHA: 507c0de
Go Version: go1.22.9
Go OS/Arch: linux/amd64
etcd 简单安装和测试功能脚本
#!/bin/bash

ETCD_VER=v3.5.17

# Check if the user has root privileges
if [ "$(id -u)" != "0" ]; then
    echo "This script must be run as root" 1>&2
        exit 1
fi

# choose either URL
GOOGLE_URL=https://storage.googleapis.com/etcd
GITHUB_URL=https://github.com/etcd-io/etcd/releases/download
DOWNLOAD_URL=${GOOGLE_URL}

echo "Preparing to download etcd version ${ETCD_VER}..."

# Clean up any previous downloads
rm -f /tmp/etcd-${ETCD_VER}-linux-amd64.tar.gz
rm -rf /tmp/etcd-download-test && mkdir -p /tmp/etcd-download-test

# Download etcd
echo "Downloading etcd from ${DOWNLOAD_URL}..."
curl -L ${DOWNLOAD_URL}/${ETCD_VER}/etcd-${ETCD_VER}-linux-amd64.tar.gz -o /tmp/etcd-${ETCD_VER}-linux-amd64.tar.gz
if [ $? -ne 0 ]; then
    echo "Download failed! Exiting."
    exit 1
fi

# Extract the tarball
echo "Extracting etcd tarball..."
tar xzvf /tmp/etcd-${ETCD_VER}-linux-amd64.tar.gz -C /tmp/etcd-download-test --strip-components=1
if [ $? -ne 0 ]; then
    echo "Extraction failed! Exiting."
    exit 1
fi

# Clean up the tarball
rm -f /tmp/etcd-${ETCD_VER}-linux-amd64.tar.gz

# Move etcd binaries to /usr/local/bin
echo "Copy etcd binaries to /usr/local/bin..."
sudo cp /tmp/etcd-download-test/etcd /usr/local/bin/
sudo cp /tmp/etcd-download-test/etcdctl /usr/local/bin/
sudo cp /tmp/etcd-download-test/etcdutl /usr/local/bin/

# Check versions
echo "Checking etcd version..."
etcd --version
etcdctl version
etcdutl version

# Start a local etcd server
echo "Starting local etcd server..."
/tmp/etcd-download-test/etcd &
ETCD_PID=$!

# Give etcd some time to start
sleep 10

# Write and read to etcd
echo "Writing and reading data to etcd..."
/tmp/etcd-download-test/etcdctl --endpoints=localhost:2379 put foo bar
/tmp/etcd-download-test/etcdctl --endpoints=localhost:2379 get foo

# Kill the etcd server
kill ${ETCD_PID}
etcd 启动脚本
#!/bin/bash

function CheckCmdExists()
{
  command -v "$1" >/dev/null 2>&1
}

##################

# etcd configuration
ETCD_NAME=${ETCD_NAME:-JLib-etcd-1}                                 # --name: The name of the etcd member
ETCD_DATA_DIR=${ETCD_DATA_DIR:-$HOME/tools/etcd/etcd-data}          # --data-dir: The directory to store etcd's data

LISTEN_CLIENT_URLS=${LISTEN_CLIENT_URLS:-http://0.0.0.0:2379}       # --listen-client-urls: List of URLs to listen on for client traffic
ADVERTISE_CLIENT_URLS=${ADVERTISE_CLIENT_URLS:-http://0.0.0.0:2379} # --advertise-client-urls: List of this member’s client URLs to advertise to the rest of the cluster

LISTEN_PEER_URLS=${LISTEN_PEER_URLS:-http://0.0.0.0:2380}           # --listen-peer-urls: List of URLs to listen on for peer traffic
INITIAL_ADVERTISE_PEER_URLS=${INITIAL_ADVERTISE_PEER_URLS:-http://0.0.0.0:2380} # --initial-advertise-peer-urls: List of this member’s peer URLs to advertise to the rest of the cluster

INITIAL_CLUSTER=${INITIAL_CLUSTER:-$ETCD_NAME=http://0.0.0.0:2380}  # --initial-cluster: Initial cluster configuration for bootstrapping
INITIAL_CLUSTER_TOKEN=${INITIAL_CLUSTER_TOKEN:-JLib-etcd-token}     # --initial-cluster-token: Initial cluster token for the etcd cluster during bootstrap
INITIAL_CLUSTER_STATE=${INITIAL_CLUSTER_STATE:-new}                 # --initial-cluster-state: Initial cluster state ("new" or "existing")

WAIT_TIME=${WAIT_TIME:-10}


# check etcd has been installed
if CheckCmdExists "etcd"; then
  echo "etcd version: $(etcd --version)"
else
  echo "etcd was not found"
  exit 1
fi

# start etcd
etcd \
  --name $ETCD_NAME \
  --data-dir $ETCD_DATA_DIR \
  --listen-client-urls $LISTEN_CLIENT_URLS \
  --advertise-client-urls $ADVERTISE_CLIENT_URLS \
  --listen-peer-urls $LISTEN_PEER_URLS \
  --initial-advertise-peer-urls $INITIAL_ADVERTISE_PEER_URLS \
  --initial-cluster $INITIAL_CLUSTER \
  --initial-cluster-token $INITIAL_CLUSTER_TOKEN \
  --initial-cluster-state $INITIAL_CLUSTER_STATE \
  > etcd.log 2>&1 &

ETCD_PID=$!

# wait for etcd to start
for i in $(seq 1 $WAIT_TIME); do
  if ps -p $ETCD_PID > /dev/null; then
    echo "etcd started successfully"
        exit 0
  fi
    echo "Waiting for etcd to start..."
    sleep 1
done

echo "etcd failed to start"
exit 1
启动参数:
etcd --name JLib-etcd-1 --data-dir /data/home/gerryyang/tools/etcd/etcd-data --listen-client-urls http://0.0.0.0:2379 --advertise-client-urls http://0.0.0.0:2379 --listen-peer-urls http://0.0.0.0:2380 --initial-advertise-peer-urls http://0.0.0.0:2380 --initial-cluster JLib-etcd-1=http://0.0.0.0:2380 --initial-cluster-token JLib-etcd-token --initial-cluster-state new
etcd 默认启动参数:
starting an etcd server","etcd-version":"3.5.17","git-sha":"507c0de","go-version":"go1.22.9","go-os":"linux","go-arch":"amd64","max-cpu-set":48,"max-cpu-available":48,"member-initialized":false,"name":"default","data-dir":"default.etcd","wal-dir":"","wal-dir-dedicated":"","member-dir":"default.etcd/member","force-new-cluster":false,"heartbeat-interval":"100ms","election-timeout":"1s","initial-election-tick-advance":true,"snapshot-count":100000,"max-wals":5,"max-snapshots":5,"snapshot-catchup-entries":5000,"initial-advertise-peer-urls":["http://localhost:2380"],"listen-peer-urls":["http://localhost:2380"],"advertise-client-urls":["http://localhost:2379"],"listen-client-urls":["http://localhost:2379"],"listen-metrics-urls":[],"cors":["*"],"host-whitelist":["*"],"initial-cluster":"default=http://localhost:2380","initial-cluster-state":"new","initial-cluster-token":"etcd-cluster","quota-backend-bytes":2147483648,"max-request-bytes":1572864,"max-concurrent-streams":4294967295,"pre-vote":true,"initial-corrupt-check":false,"corrupt-check-time-interval":"0s","compact-check-time-enabled":false,"compact-check-time-interval":"1m0s","auto-compaction-mode":"periodic","auto-compaction-retention":"0s","auto-compaction-interval":"0s","discovery-url":"","discovery-proxy":"","downgrade-check-interval":"5s"
etcd 用例测试脚本
#!/bin/bash

ENDPOINT=localhost:2379

# test write
echo "Writing data to etcd..."
etcdctl --endpoints=$ENDPOINT put foo bar

# test read
echo "Reading data from etcd..."
etcdctl --endpoints=$ENDPOINT get foo

# test list
echo "Listing all keys in etcd..."
etcdctl --endpoints=$ENDPOINT get "" --prefix=true

# test delete
echo "Deleting data from etcd..."
etcdctl --endpoints=$ENDPOINT del foo

# test list after delete
echo "Listing all keys in etcd after deletion..."
etcdctl --endpoints=$ENDPOINT get "" --prefix=true
输出:
Writing data to etcd...
OK
Reading data from etcd...
foo
bar
Listing all keys in etcd...
foo
bar
Deleting data from etcd...
1
Listing all keys in etcd after deletion...
Build from source
If you have Go version 1.2+, you can build etcd from source by following these steps:
- Download the etcd repo as a zip file and unzip it, or clone the repo using the following command.
$ git clone -b v3.5.17 https://github.com/etcd-io/etcd.git
To build from
main@HEAD, omit the-b v3.5.17flag.
- Change directory:
$ cd etcd
- Run the build script:
$ ./build.sh
The binaries are under the bin directory.
- Add the full path to the
bindirectory to your path, for example:
$ export PATH="$PATH:`pwd`/bin"
- Test that
etcdis in your path:
$ etcd --version
Installation on Kubernetes, using a statefulset or helm chart
The etcd project does not currently maintain a helm chart, however you can follow the instructions provided by Bitnami’s etcd Helm chart.
读取模型
在 etcd 中,有两种读取请求:线性一致性(linearizable)读取和可串行化(serializable)读取。这两种读取请求之间的主要区别在于它们如何确保数据的一致性和最新性。
线性一致性读取和可串行化读取在性能和数据一致性之间进行权衡。线性一致性读取提供了最新的数据,但代价是更高的延迟和开销。可串行化读取具有较低的延迟和开销,但可能会返回过时的数据。根据应用程序对一致性和性能的需求,可以选择使用适当的读取请求类型。
线性一致性读取(Linearizable read)
线性一致性读取会通过集群成员的法定人数(quorum)进行共识以获取最新的数据。这意味着,当一个线性一致性读取请求被发出时,它需要集群中的大多数成员(即法定人数)同意返回的数据是最新的。这确保了您读取的数据是最新的,但代价是更高的延迟和开销,因为需要在集群成员之间进行通信以达成共识。
可串行化读取(Serializable read)
与线性一致性读取相比,可串行化读取的成本更低,因为它们可以由单个 etcd 成员提供,而无需在集群成员之间达成共识。这意味着,当一个可串行化读取请求被发出时,它可以直接从任何一个 etcd 成员获取数据,而无需等待其他成员的同意。这可以减少延迟和开销,但可能会返回过时的数据,因为数据可能尚未在集群中完全同步。
Watch 机制 (高效获取数据变化)
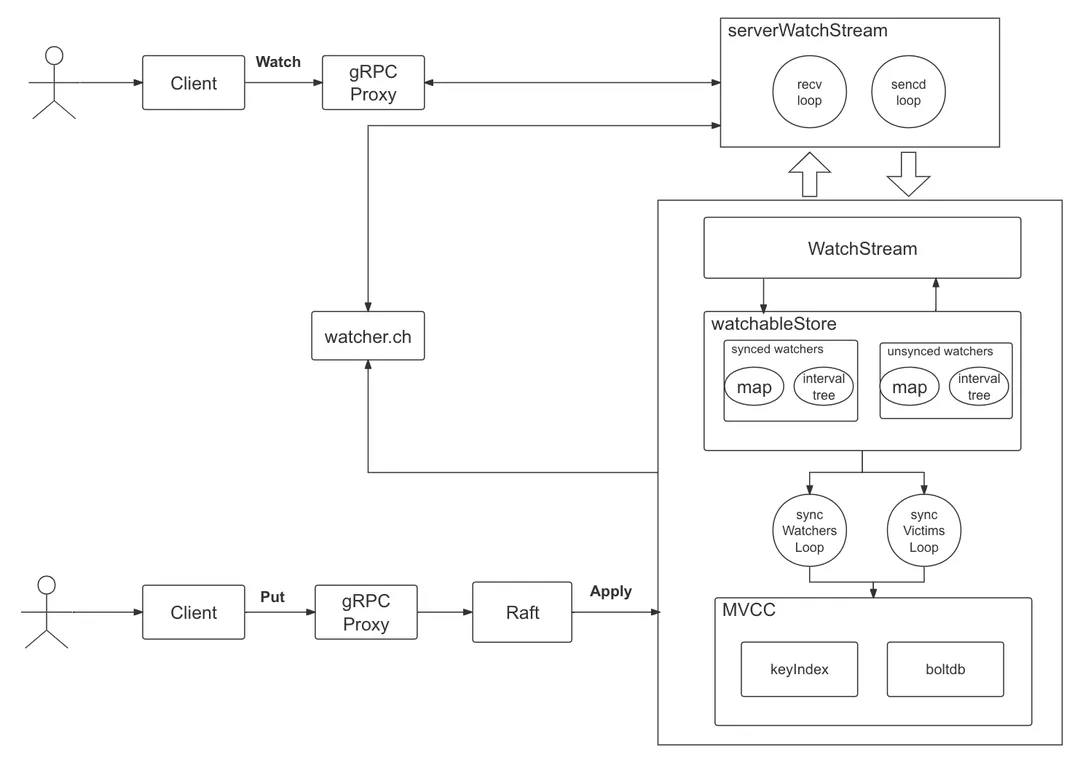
-
当通过 etcd client 发起 watch 请求的时候,首先会通过 gRPC Proxy,这一部分会将多个 watch 请求合并减少请求处理负担。
-
创建一个 serverWatchStream,当收到 watch key 请求会创建两个协程 recvLoop 和 sendLoop,recvLoop 负责接收 client create/cancel watcher 的请求,并将从管道中收到的请求转发给 sendLoop 最终发给 client。
-
serverWatchStream 收到 client 创建 watcher 的请求后会创建一个 WatchStream 并分配一个 watcherid,每个 watcher 对应唯一的 watcherid
-
一旦 watcher 创建成功就会存储在 watchableStore 的 synced watcher 中,如果监听到版本号变化,则会将 watcher 放入 unsyned watcher 中。版本号变化通过 MVCC 得知,通过 watcher.ch 管道进行信息中转。同时 synced watcher 和 unsynced watcher 底层有 map 和 interval tree 两个数据结构,分别对应单个 key 的监控和区间 key 监控。
-
etcd 启动时会创建 syncWatchersLoop 和 syncVictimsLoop 协程,进行 watcher 的同步操作。
-
用户通过 Raft 机制写入一致性数据,通过 MVCC 机制产生 Event 事件,并写入到管道中。
事务机制
事务,将应用程序的多个读写操作合并成一个逻辑操作单元,即事务中的操作要么成功提交,要么失败回滚,即使失败也可以在应用层进行重试。几乎所有的关系型数据库 (例如,Mysql) 都支持事务处理,然而当非关系型 (NoSQL) 数据库兴起后,事务逐渐开始被放弃。非关系型数据库主要通过复制、分区的方式来提升系统的可扩展性和可用性,有更灵活的数据格式,而且一般是分布式设计。一方面,实现事务意味着降低性能,如果是跨 IDC 部署,那么就得用 2PC 等方式实现分布式事务,实现难度变得很大;另一方面,很多场景下事务又是不可或缺的,比如支付转账的场景,对异常极其敏感,不使用事务实现会需要在应用层做更多的兜底逻辑。
etcd 基于 MVCC 机制实现了事务,许多使用了 MVCC 的数据库都不会暴露底层 MVCC 信息,例如 Mysql 的事务操作基于 MVCC 实现,基于 START TRANSACTION、COMMIT、ROLLBACK就可以实现事务的创建、提交、回滚操作。
一个 etcd 事务的例子:
这个事务首先检查键 “key” 的值是否等于 “value”。如果条件满足,那么它会将 “key” 的值更新为 “new_value”;否则,它会获取 “key” 的当前值。这个事务是一个原子操作,它要么全部执行成功,要么全部执行失败,不会出现部分成功部分失败的情况。
_, err := cli.Txn(ctx).
  If(clientv3.Compare(clientv3.Value("key"), "=", "value")).
  Then(clientv3.OpPut("key", "new_value")).
  Else(clientv3.OpGet("key")).
  Commit()
Performance
Understanding performance: latency & throughput
etcd provides stable, sustained high performance. Two factors define performance: latency and throughput.
Latencyis the time taken to complete an operation.Throughputis the total operations completed within some time period.
Usually average latency increases as the overall throughput increases when etcd accepts concurrent client requests.
In common cloud environments, like a standard n-4 on Google Compute Engine (GCE) or a comparable machine type on AWS, a three member etcd cluster finishes a request in less than one millisecond(毫秒) under light load, and can complete more than 30,000 requests per second under heavy load.
etcd uses the Raft consensus algorithm to replicate requests among members and reach agreement. Consensus performance, especially commit latency, is limited by two physical constraints: network IO latency and disk IO latency.
The minimum time to finish an etcd request is the network Round Trip Time (RTT) between members, plus the time fdatasync requires to commit the data to permanent storage.
The RTT within a datacenter may be as long as several hundred microseconds(几百微妙). A typical RTT within the United States is around 50ms, and can be as slow as 400ms between continents(大洲).
The typical fdatasync latency for a spinning disk is about 10ms. For SSDs, the latency is often lower than 1ms. To increase throughput, etcd batches multiple requests together and submits them to Raft. This batching policy lets etcd attain high throughput despite heavy load.
There are other sub-systems which impact(影响) the overall performance of etcd. Each serialized etcd request must run through etcd’s boltdb-backed MVCC storage engine, which usually takes tens of microseconds(几十微妙) to finish. Periodically etcd incrementally snapshots its recently applied requests, merging them back with the previous on-disk snapshot. This process may lead to a latency spike(急升). Although this is usually not a problem on SSDs, it may double the observed latency on HDD. Likewise, inflight compactions(压缩) can impact etcd’s performance. Fortunately, the impact is often insignificant since the compaction is staggered(交错) so it does not compete for resources with regular requests. The RPC system, gRPC, gives etcd a well-defined, extensible API, but it also introduces additional latency, especially for local reads.
Benchmarks
Benchmarking etcd performance can be done with the benchmark CLI tool included with etcd.
For some baseline performance numbers, we consider a three member etcd cluster with the following hardware configuration:
- Google Cloud Compute Engine
- 3 machines of 8 vCPUs + 16GB Memory + 50GB SSD
- 1 machine(client) of 16 vCPUs + 30GB Memory + 50GB SSD
- Ubuntu 17.04
- etcd 3.2.0, go 1.8.3
With this configuration, etcd can approximately write:
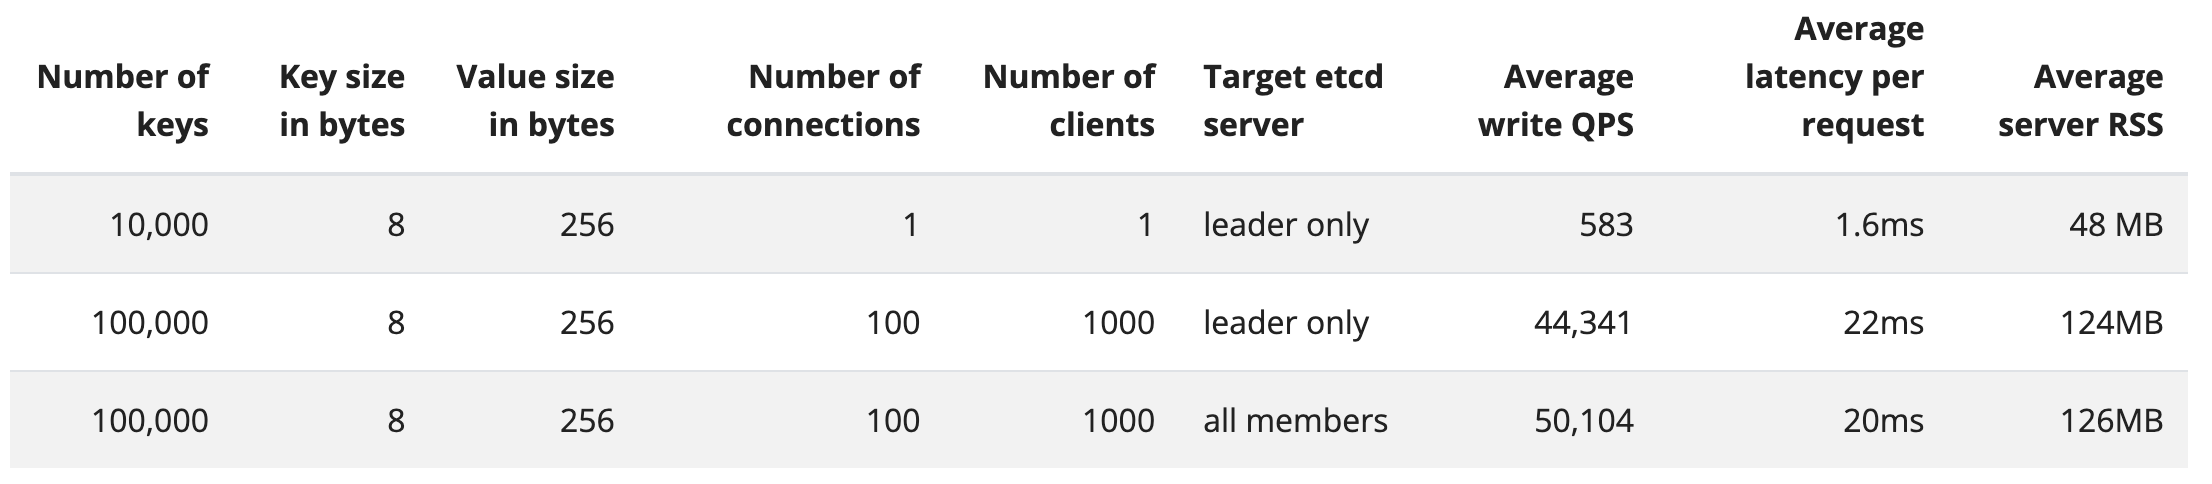
Sample commands are:
# write to leader
benchmark --endpoints=${HOST_1} --target-leader --conns=1 --clients=1 \
    put --key-size=8 --sequential-keys --total=10000 --val-size=256
benchmark --endpoints=${HOST_1} --target-leader  --conns=100 --clients=1000 \
    put --key-size=8 --sequential-keys --total=100000 --val-size=256

# write to all members
benchmark --endpoints=${HOST_1},${HOST_2},${HOST_3} --conns=100 --clients=1000 \
    put --key-size=8 --sequential-keys --total=100000 --val-size=256
Linearizable read requests (线性一致性读取) go through a quorum(法定人数) of cluster members for consensus to fetch the most recent data. Serializable read requests (可串行化读取) are cheaper than linearizable reads since they are served by any single etcd member, instead of a quorum of members, in exchange for possibly serving stale data. etcd can read:
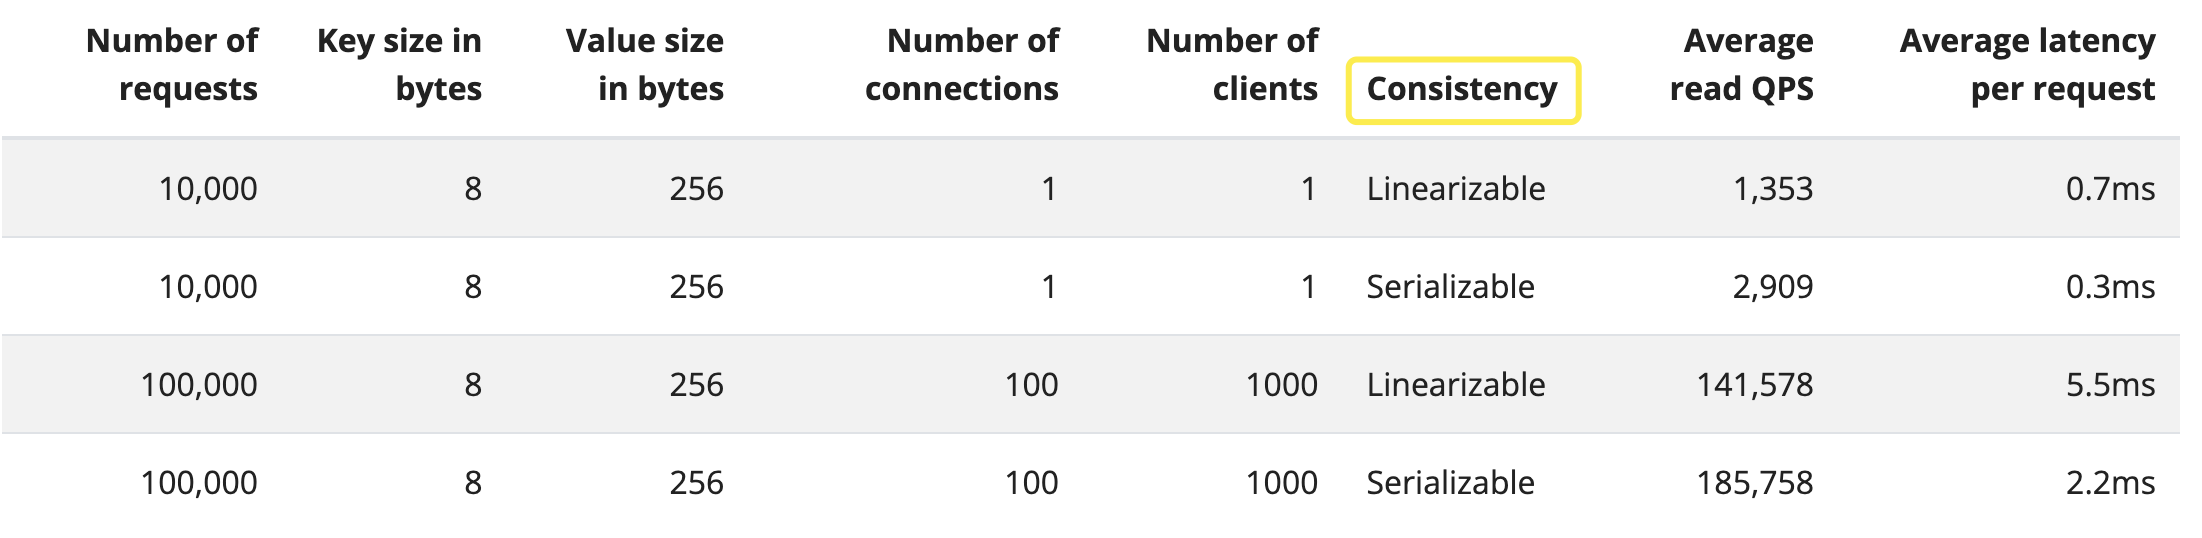
Sample commands are:
# Single connection read requests
benchmark --endpoints=${HOST_1},${HOST_2},${HOST_3} --conns=1 --clients=1 \
    range YOUR_KEY --consistency=l --total=10000
benchmark --endpoints=${HOST_1},${HOST_2},${HOST_3} --conns=1 --clients=1 \
    range YOUR_KEY --consistency=s --total=10000

# Many concurrent read requests
benchmark --endpoints=${HOST_1},${HOST_2},${HOST_3} --conns=100 --clients=1000 \
    range YOUR_KEY --consistency=l --total=100000
benchmark --endpoints=${HOST_1},${HOST_2},${HOST_3} --conns=100 --clients=1000 \
    range YOUR_KEY --consistency=s --total=100000
We encourage running the benchmark test when setting up an etcd cluster for the first time in a new environment to ensure the cluster achieves adequate performance; cluster latency and throughput can be sensitive to minor environment differences.
在新环境中首次设置 etcd 集群时,建议运行基准测试,以确保集群具有足够的性能。这是因为集群的延迟和吞吐量可能对环境差异非常敏感,即使是很小的差异也可能导致性能的显著变化。
基准测试是一种性能测试方法,用于评估系统在特定工作负载下的性能。通过运行基准测试,可以确定 etcd 集群在新环境中的实际延迟和吞吐量,并检查它们是否满足应用程序需求。
在新环境中设置 etcd 集群时运行基准测试的好处如下:
- 识别性能瓶颈:基准测试可以帮助发现可能影响集群性能的问题,例如硬件限制、网络延迟或配置问题。这使可以在投入生产环境之前解决这些问题。
- 优化配置:基准测试可以帮助确定最佳的 etcd 集群配置,以实现最佳性能。例如,可能需要调整 etcd 的各种参数,如心跳间隔、选举超时或快照阈值,以适应新环境。
- 评估环境差异的影响:由于 etcd 集群的性能可能受到环境差异的影响,因此在新环境中运行基准测试可以帮助您了解这些差异对性能的实际影响。这可以提供有关如何优化环境以提高性能的见解。
总之,当在新环境中首次设置 etcd 集群时,运行基准测试可以帮助您确保集群具有足够的性能。这将能够在投入生产环境之前发现和解决潜在的性能问题,从而确保应用程序能够正常运行。
腾讯云第三方服务 (腾讯云云原生 etcd)
参考:云原生 etcd 概述
腾讯云云原生 etcd(Cloud Service for etcd)是基于 开源 etcd 针对云原生服务场景进行优化的 etcd 托管解决方案,由腾讯云容器团队提供,完全兼容开源的 etcd 分布式存储能力,为用户提供高稳定、可观测、免运维的云原生 etcd 服务。
云原生 etcd 服务已于2022年6月8日结束内测,正式对外开放并开始商业化计费,详细资费策略请查看购买指南。
应用场景
etcd 是一个分布式、高可靠的键值存储,可以容忍集群中部分节点故障,只需存活一半以上节点即可对外提供服务。主要用于元数据存储、服务发现、分布式选举等场景。基于 etcd 提供的 Watch 机制,可以更便捷的实现发布订阅等功能。
为什么需要云原生 etcd 服务
- 用户对 etcd 了解程度不够,在使用过程中难以快速上手。
- 用户维护自建 etcd 时缺乏使用经验,在使用过程中遇到问题难以快速定位。
- 自建 etcd 往往还需要维护一套监控告警系统和备份恢复机制,增加了用户的运维负担。
- 腾讯云容器团队目前线上运维了上万套 K8S 集群,后端使用了上千套 etcd 集群作为支撑存储。团队在保障 etcd 稳定运行的同时积累了大量的实践经验,可以帮助用户降低 etcd 的运维负担,从而更专注于业务发展。
产品功能
- 一键部署 etcd 集群:支持集群高可用部署、HTTPS 访问和数据自动压缩等功能。
- 集成云原生监控能力:提供完善的监控告警机制。
- 日常运维管理:支持备份恢复、节点扩缩容和版本升级等功能。
相关服务
腾讯云 Prometheus 监控服务(Managed Service for Prometheus,TMP)是针对云原生服务场景进行优化的监控和报警解决方案,全面支持开源 Prometheus 监控能力,为用户提供轻量、稳定、高可用的云原生 Prometheus 监控服务。
How To Set Up and Secure an etcd Cluster with Ansible on Ubuntu 18.04
在基于物理机和虚拟机的部署方案中,推荐你使用 ansible、puppet 等自动运维工具,构建标准、自动化的 etcd 集群搭建、扩缩容流程。基于 ansible 部署 etcd 集群可以拆分成以下若干个任务:
- 下载及安装 etcd 二进制到指定目录
- 将 etcd 加入 systemd 等服务管理
- 为 etcd 增加配置文件,合理设置相关参数
- 为 etcd 集群各个节点生成相关证书,构建一个安全的集群
- 组建集群版(静态配置、动态配置,发现集群其他节点)
- 开启 etcd 服务,启动 etcd 集群
详细可以参考 digitalocean 这篇博客文章,它介绍了如何使用 ansible 去部署一个安全的 etcd 集群,并给出了对应的 yaml 任务文件。
The first half of this article will guide you through setting up a 3-node etcd cluster on Ubuntu 18.04 servers. The second half will focus on securing the cluster using Transport Layer Security, or TLS. To run each setup in an automated manner, we will use Ansible throughout. Ansible is a configuration management tool similar to Puppet, Chef, and SaltStack; it allows us to define each setup step in a declarative manner, inside files called playbooks.
At the end of this tutorial, you will have a secure 3-node etcd cluster running on your servers. You will also have an Ansible playbook that allows you to repeatedly and consistently recreate the same setup on a fresh set of servers.
Prerequisites
Before you begin this guide you’ll need the following:
-
Python, pip, and the pyOpenSSL package installed on your local machine. To learn how to install Python3, pip, and Python packages, refer to How To Install Python 3 and Set Up a Local Programming Environment on Ubuntu 18.04.
-
Three Ubuntu 18.04 servers on the same local network, with at least 2GB of RAM and root SSH access. You should also configure the servers to have the hostnames etcd1, etcd2, and etcd3. The steps outlined in this article would work on any generic server, not necessarily DigitalOcean Droplets. However, if you’d like to host your servers on DigitalOcean, you can follow the How to Create a Droplet from the DigitalOcean Control Panel guide to fulfil this requirement. Note that you must enable the Private Networking option when creating your Droplet. To enable private networking on existing Droplets, refer to How to Enable Private Networking on Droplets.
Warning: Since the purpose of this article is to provide an introduction to setting up an etcd cluster on a private network, the three Ubuntu 18.04 servers in this setup were not tested with a firewall and are accessed as the root user. In a production setup, any node exposed to the public internet would require a firewall and a sudo user to adhere to security best practices. For more information, check out the Initial Server Setup with Ubuntu 18.04 tutorial.
-
An SSH key pair allowing your local machine access to the etcd1, etcd2, and etcd3 servers. If you do not know what SSH is, or do not have an SSH key pair, you can learn about it by reading SSH Essentials: Working with SSH Servers, Clients, and Keys.
-
Ansible installed on your local machine. For example, if you’re running Ubuntu 18.04, you can install Ansible by following Step 1 of the How to Install and Configure Ansible on Ubuntu 18.04 article. This will make the
ansibleandansible-playbookcommands available on your machine. You may also want to keep this How to Use Ansible: A Reference Guide handy. The commands in this tutorial should work with Ansible v2.x; we have tested it on Ansible v2.9.7 running Python v3.8.2.
Step 1 — Configuring Ansible for the Control Node
Ansible is a tool used to manage servers. The servers Ansible is managing are called the managed nodes, and the machine that is running Ansible is called the control node. Ansible works by using the SSH keys on the control node to gain access to the managed nodes. Once an SSH session is established, Ansible will run a set of scripts to provision and configure the managed nodes. In this step, we will test that we are able to use Ansible to connect to the managed nodes and run the hostname command.
A typical day for a system administrator may involve managing different sets of nodes. For instance, you may use Ansible to provision some new servers, but later on use it to reconfigure another set of servers. To allow administrators to better organize the set of managed nodes, Ansible provides the concept of host inventory (or inventory for short). You can define every node that you wish to manage with Ansible inside an inventory file, and organize them into groups. Then, when running the ansible and ansible-playbook commands, you can specify which hosts or groups the command applies to.
By default, Ansible reads the inventory file from /etc/ansible/hosts; however, we can specify a different inventory file by using the --inventory flag (or -i for short).
To get started, create a new directory on your local machine (the control node) to house all the files for this tutorial:
mkdir -p $HOME/playground/etcd-ansible
Then, enter into the directory you just created:
cd $HOME/playground/etcd-ansible
Inside the directory, create and open a blank inventory file named hosts using your editor:
nano $HOME/playground/etcd-ansible/hosts
Inside the hosts file, list out each of your managed nodes in the following format, replacing the public IP addresses highlighted with the actual public IP addresses of your servers:
[etcd]
etcd1 ansible_host=etcd1_public_ip  ansible_user=root
etcd2 ansible_host=etcd2_public_ip  ansible_user=root
etcd3 ansible_host=etcd3_public_ip  ansible_user=root
The [etcd] line defines a group called etcd. Under the group definition, we list all our managed nodes. Each line begins with an alias (e.g., etcd1), which allows us to refer to each host using an easy-to-remember name instead of a long IP address. The ansible_host and ansible_user are Ansible variables. In this case, they are used to provide Ansible with the public IP addresses and SSH usernames to use when connecting via SSH.
To ensure Ansible is able to connect with our managed nodes, we can test for connectivity by using Ansible to run the hostname command on each of the hosts within the etcd group:
ansible etcd -i hosts -m command -a hostname
Let us break down this command to learn what each part means:
etcd: specifies the host pattern to use to determine which hosts from the inventory are being managed with this command. Here, we are using the group name as the host pattern.-i hosts: specifies the inventory file to use.-m command: the functionality behind Ansible is provided by modules. Thecommandmodule takes the argument passed in and executes it as a command on each of the managed nodes. This tutorial will introduce a few more Ansible modules as we progress.-a hostname: the argument to pass into the module. The number and types of arguments depend on the module.
After running the command, you will find the following output, which means Ansible is configured correctly:
Output
etcd2 | CHANGED | rc=0 >>
etcd2

etcd3 | CHANGED | rc=0 >>
etcd3

etcd1 | CHANGED | rc=0 >>
etcd1
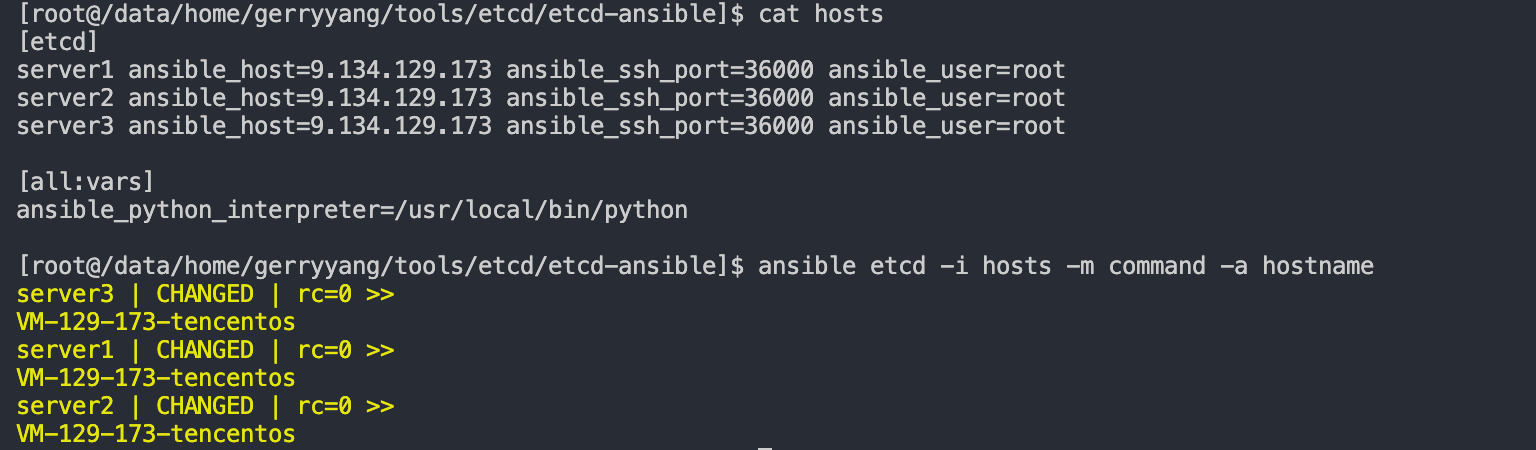
Each command that Ansible runs is called a task. Using ansible on the command line to run tasks is called running ad-hoc commands. The upside of ad-hoc commands is that they are quick and require little setup; the downside is that they run manually, and thus cannot be committed to a version control system like Git.
A slight improvement would be to write a shell script and run our commands using Ansible’s script module. This would allow us to record the configuration steps we took into version control. However, shell scripts are imperative, which means we are responsible for figuring out the commands to run (the “how”s) to configure the system to the desired state. Ansible, on the other hand, advocates for a declarative approach, where we define “what” the desired state of our server should be inside configuration files, and Ansible is responsible for getting the server to that desired state.
The declarative approach is preferred because the intent of the configuration file is immediately conveyed, meaning it’s easier to understand and maintain. It also places the onus of handling edge cases on Ansible instead of the administrator, saving us a lot of work.
Now that you have configured the Ansible control node to communicate with the managed nodes, in the next step, we will introduce you to Ansible playbooks, which allow you to specify tasks in a declarative way.
Step 2 — Getting the Hostnames of Managed Nodes with Ansible Playbooks
In this step, we will replicate what was done in Step 1—printing out the hostnames of the managed nodes—but instead of running ad-hoc tasks, we will define each task declaratively as an Ansible playbook and run it. The purpose of this step is to demonstrate how Ansible playbooks work; we will carry out much more substantial tasks with playbooks in later steps.
Inside your project directory, create a new file named playbook.yaml using your editor:
nano $HOME/playground/etcd-ansible/playbook.yaml
Inside playbook.yaml, add the following lines:
- hosts: etcd
  tasks:
    - name: "Retrieve hostname"
      command: hostname
      register: output
    - name: "Print hostname"
      debug: var=output.stdout_lines
Close and save the playbook.yaml file by pressing CTRL+X followed by Y.
The playbook contains a list of plays; each play contains a list of tasks that should be run on all hosts matching the host pattern specified by the hosts key. In this playbook, we have one play that contains two tasks. The first task runs the hostname command using the command module and registers the output to a variable named output. In the second task, we use the debug module to print out the stdout_lines property of the output variable.
We can now run this playbook using the ansible-playbook command:
ansible-playbook -i hosts playbook.yaml
You will find the following output, which means your playbook is working correctly:
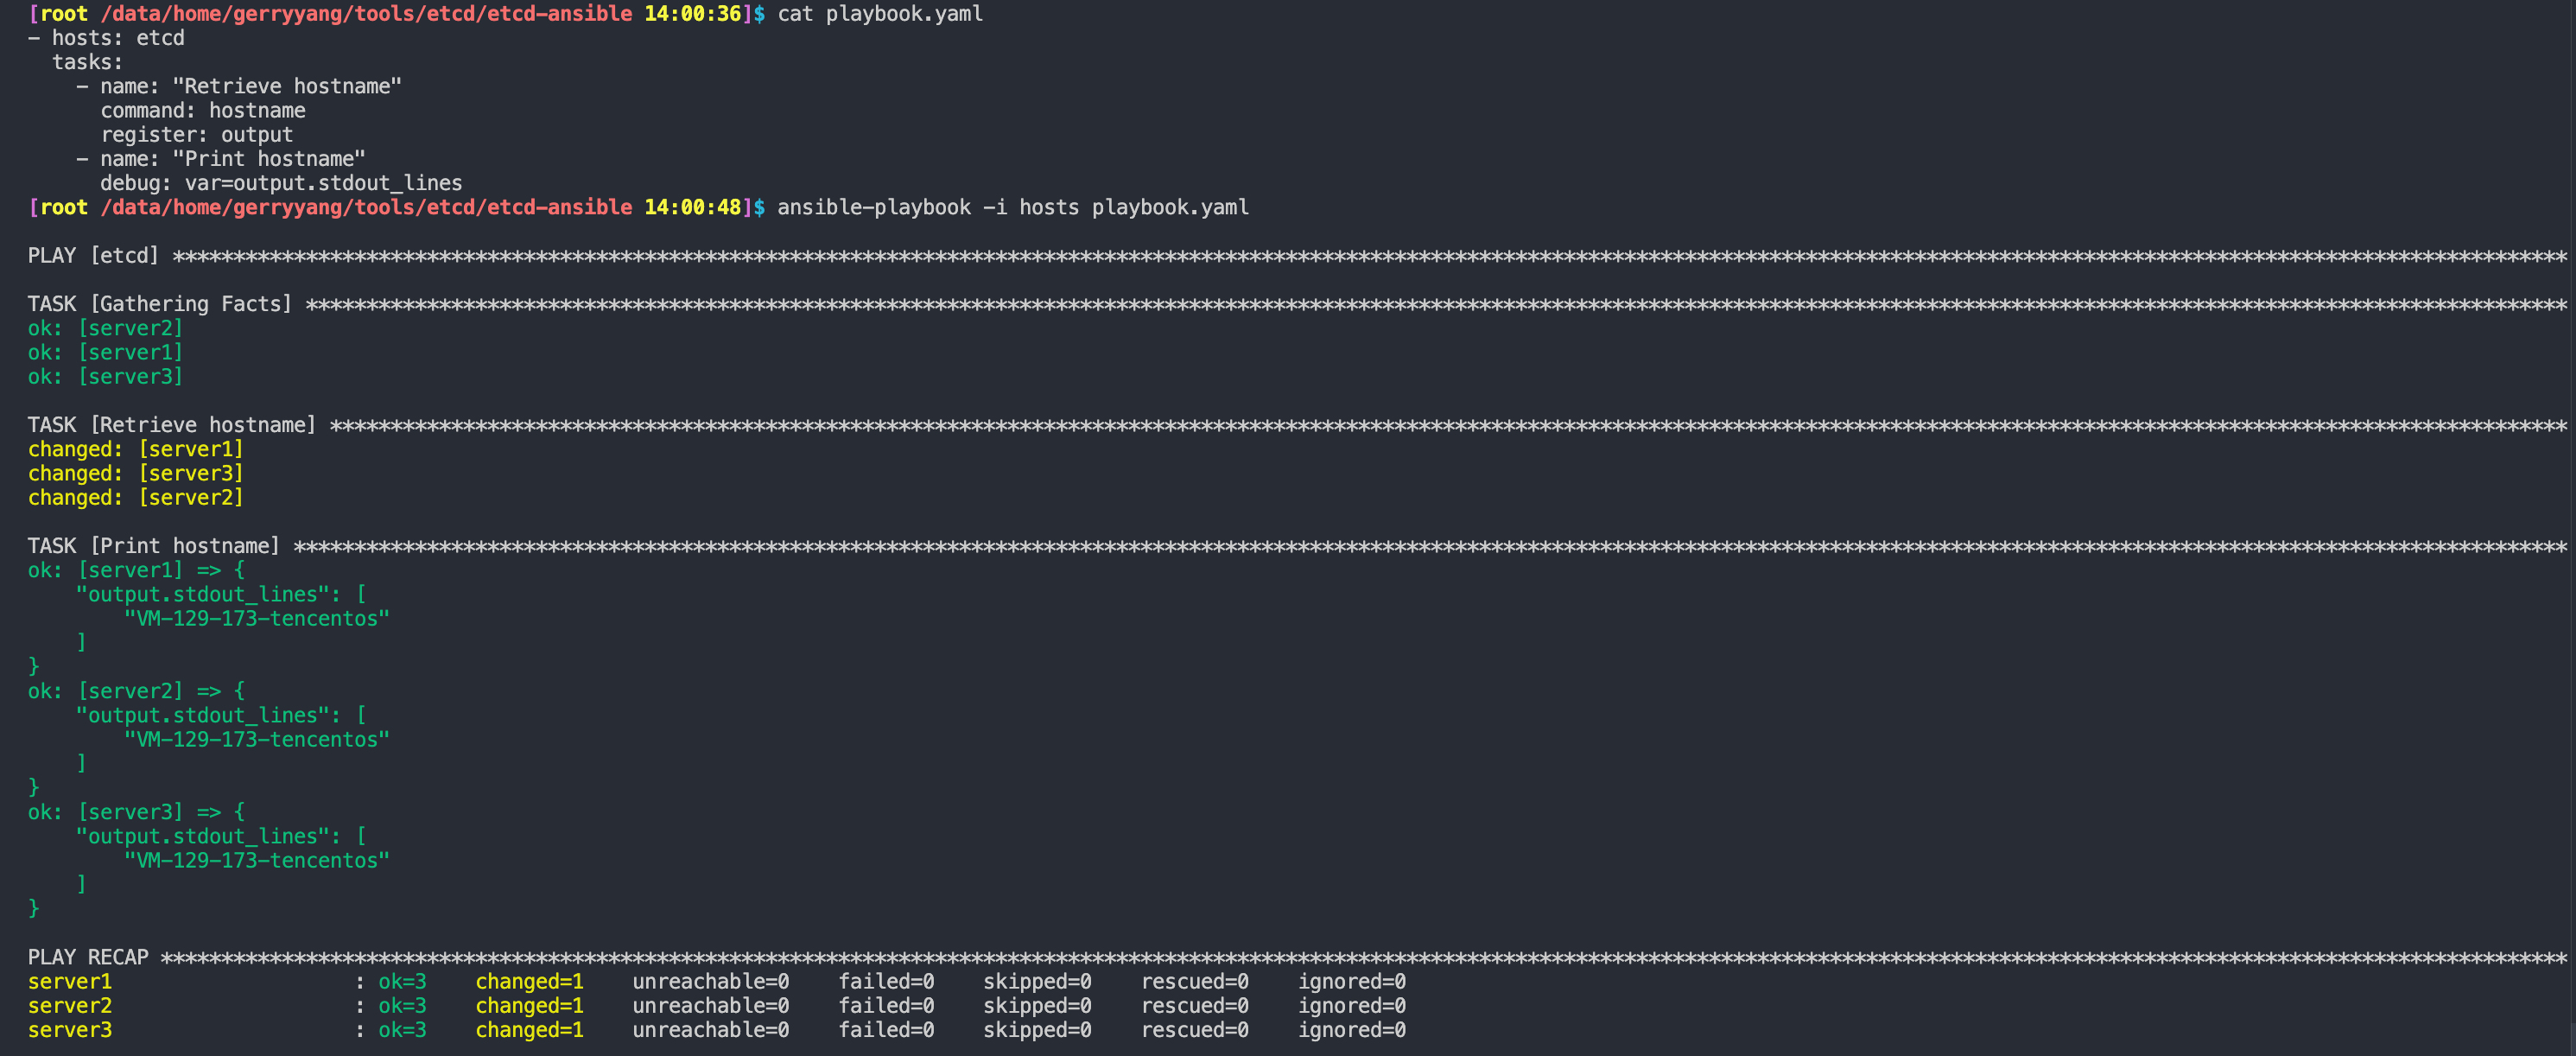
Note:
ansible-playbooksometimes usescowsayas a playful way to print the headings. If you find a lot of ASCII-art cows printed on your terminal, now you know why. To disable this feature, set the ANSIBLE_NOCOWS environment variable to 1 prior to running ansible-playbook by runningexport ANSIBLE_NOCOWS=1in your shell.
In this step, we’ve moved from running imperative ad-hoc tasks to running declarative playbooks. In the next step, we will replace these two demo tasks with tasks that will set up our etcd cluster.
Step 3 — Installing etcd on the Managed Nodes
In this step, we will show you the commands to install etcd manually and demonstrate how to translate these same commands into tasks inside our Ansible playbook.
etcd and its client etcdctl are available as binaries, which we’ll download, extract, and move to a directory that’s part of the PATH environment variable. When configured manually, these are the steps we would take on each of the managed nodes:
mkdir -p /opt/etcd/bin
cd /opt/etcd/bin
wget -qO- https://storage.googleapis.com/etcd/v3.3.13/etcd-v3.3.13-linux-amd64.tar.gz | tar --extract --gzip --strip-components=1
echo 'export PATH="$PATH:/opt/etcd/bin"' >> ~/.profile
echo 'export ETCDCTL_API=3" >> ~/.profile
The first four commands download and extract the binaries to the /opt/etcd/bin/ directory. By default, the etcdctl client will use API v2 to communicate with the etcd server. Since we are running etcd v3.x, the last command sets the ETCDCTL_API environment variable to 3.
Note: Here, we are using etcd v3.3.13 built for a machine with processors that use the AMD64 instruction set. You can find binaries for other systems and other versions on the the official GitHub Releases page.
To replicate the same steps in a standardized format, we can add tasks to our playbook. Open the playbook.yaml playbook file in your editor:
nano $HOME/playground/etcd-ansible/playbook.yaml
Replace the entirety of the playbook.yaml file with the following contents:
- hosts: etcd
  become: True
  tasks:
    - name: "Create directory for etcd binaries"
      file:
        path: /opt/etcd/bin
        state: directory
        owner: root
        group: root
        mode: 0700
    - name: "Download the tarball into the /tmp directory"
      get_url:
        url: https://storage.googleapis.com/etcd/v3.3.13/etcd-v3.3.13-linux-amd64.tar.gz
        dest: /tmp/etcd.tar.gz
        owner: root
        group: root
        mode: 0600
        force: True
    - name: "Extract the contents of the tarball"
      unarchive:
        src: /tmp/etcd.tar.gz
        dest: /opt/etcd/bin/
        owner: root
        group: root
        mode: 0600
        extra_opts:
          - --strip-components=1
        decrypt: True
        remote_src: True
    - name: "Set permissions for etcd"
      file:
        path: /opt/etcd/bin/etcd
        state: file
        owner: root
        group: root
        mode: 0700
    - name: "Set permissions for etcdctl"
      file:
        path: /opt/etcd/bin/etcdctl
        state: file
        owner: root
        group: root
        mode: 0700
    - name: "Add /opt/etcd/bin/ to the $PATH environment variable"
      lineinfile:
        path: /etc/profile
        line: export PATH="$PATH:/opt/etcd/bin"
        state: present
        create: True
        insertafter: EOF
    - name: "Set the ETCDCTL_API environment variable to 3"
      lineinfile:
        path: /etc/profile
        line: export ETCDCTL_API=3
        state: present
        create: True
        insertafter: EOF
Each task uses a module; for this set of tasks, we are making use of the following modules:
- file: to create the
/opt/etcd/bindirectory, and to later set the file permissions for theetcdandetcdctlbinaries. - get_url: to download the gzipped tarball onto the managed nodes.
- unarchive: to extract and unpack the
etcdandetcdctlbinaries from the gzipped tarball. - lineinfile: to add an entry into the
.profilefile.
To apply these changes, close and save the playbook.yaml file by pressing CTRL+X followed by Y. Then, on the terminal, run the same ansible-playbook command again:
ansible-playbook -i hosts playbook.yaml
The PLAY RECAP section of the output will show only ok and changed:
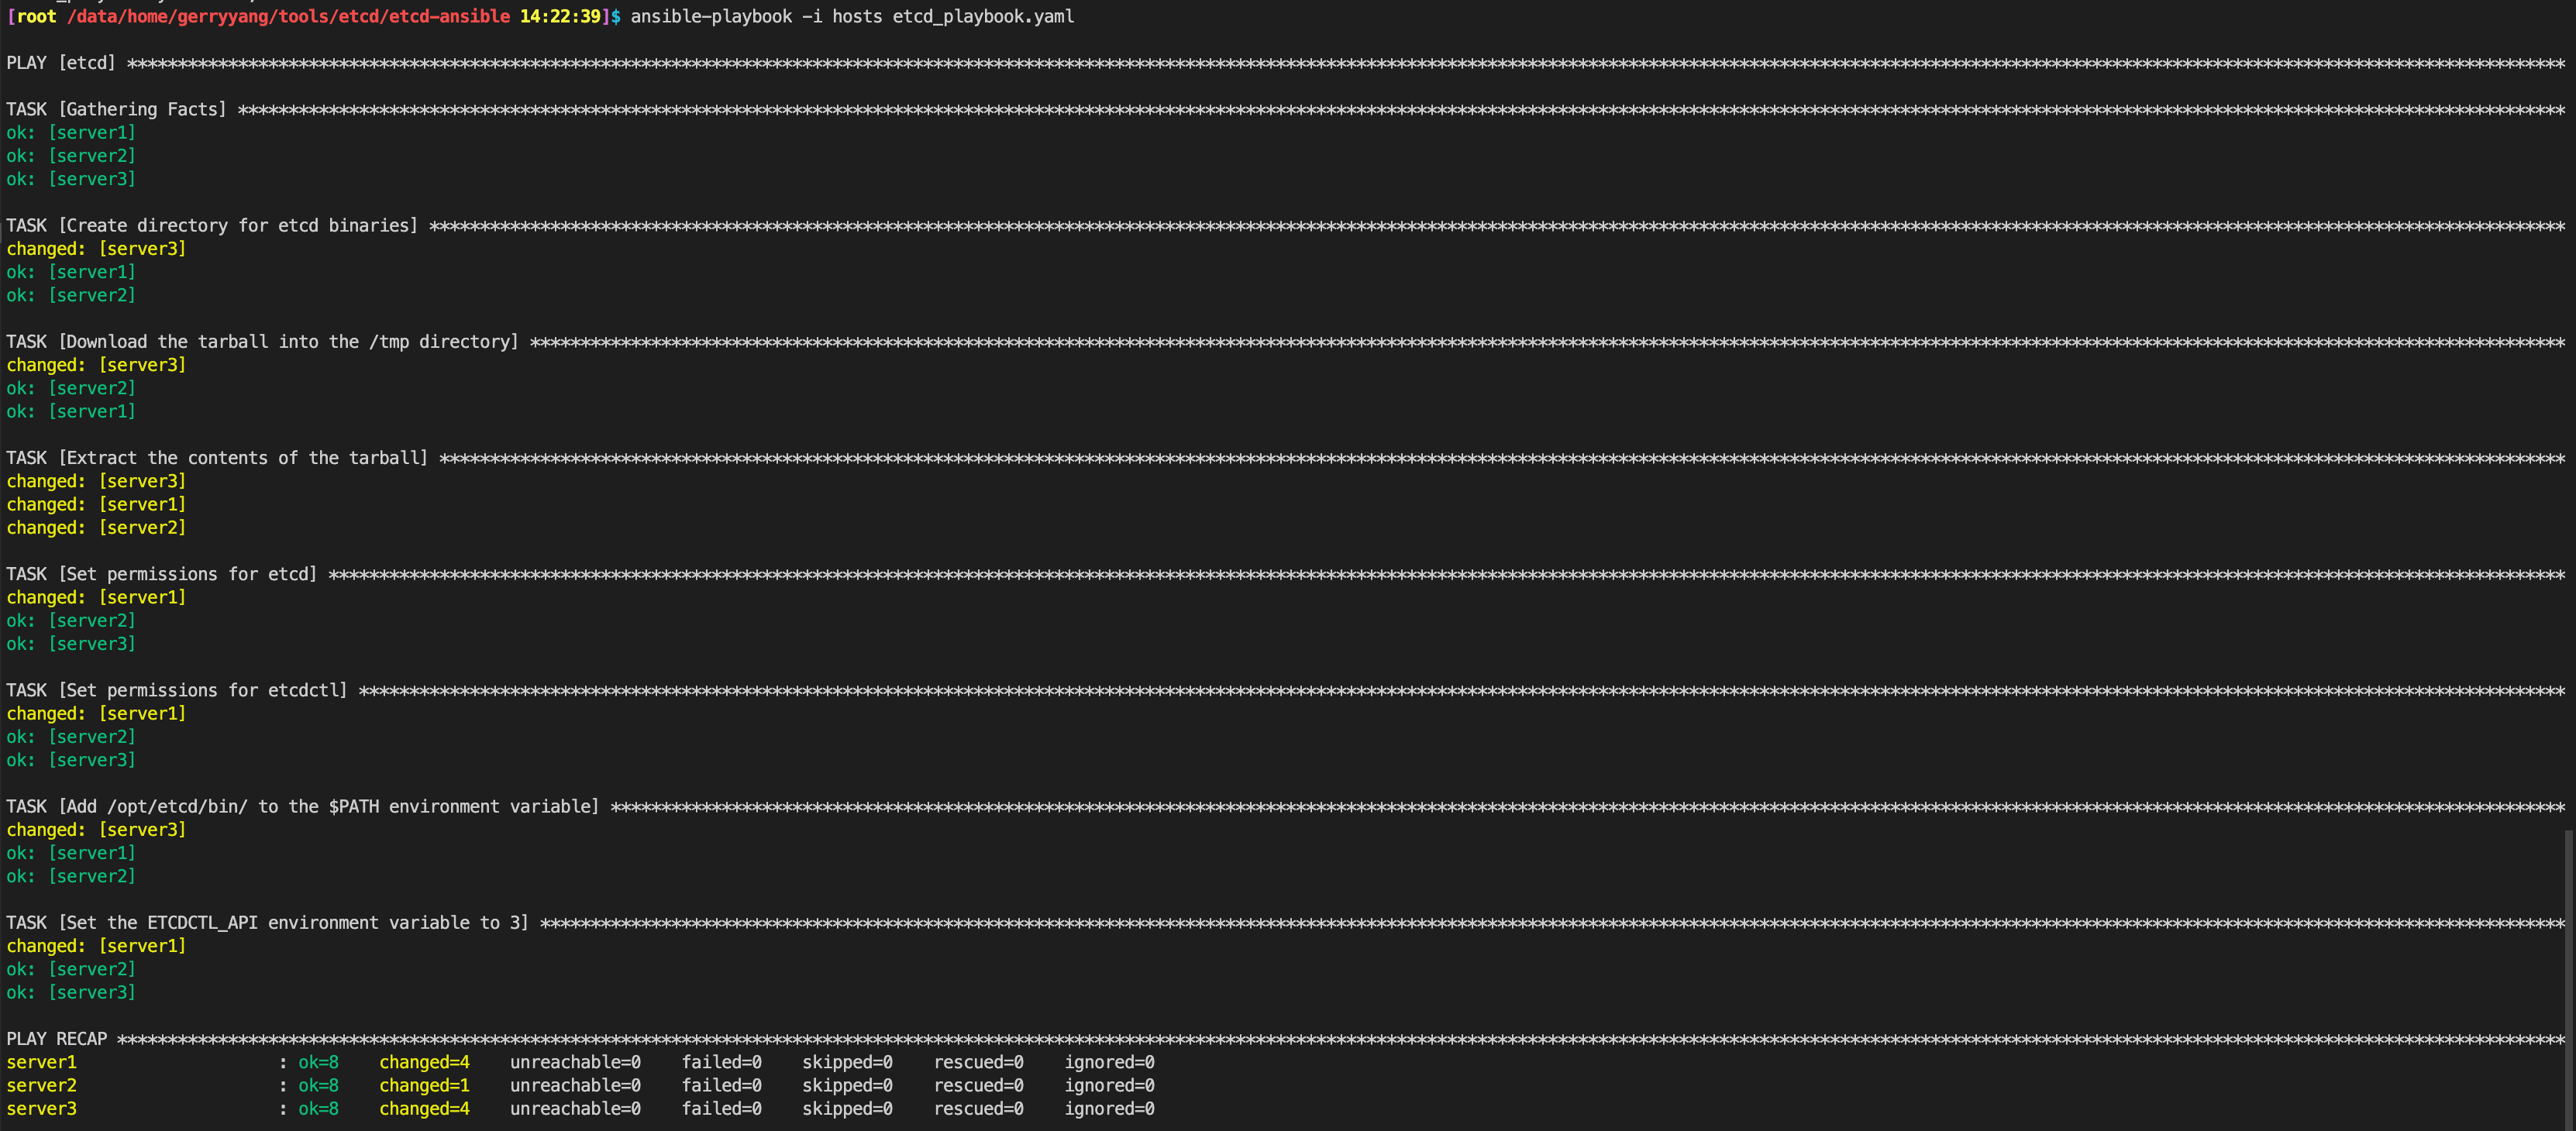
To confirm a correct installation of etcd, manually SSH into one of the managed nodes and run etcd and etcdctl:
ssh root@etcd1_public_ip
etcd1_public_ip is the public IP addresses of the server named etcd1. Once you have gained SSH access, run etcd --version to print out the version of etcd installed:
etcd --version
You will find output similar to what’s shown in the following, which means the etcd binary is successfully installed:
etcd Version: 3.3.13
Git SHA: 98d3084
Go Version: go1.10.8
Go OS/Arch: linux/amd64
To confirm etcdctl is successfully installed, run etcdctl version:
etcdctl version
You will find output similar to the following:
etcdctl version: 3.3.13
API version: 3.3
Note that the output says API version: 3.3, which also confirms that our ETCDCTL_API environment variable was set correctly.
Exit out of the etcd1 server to return to your local environment.
We have now successfully installed etcd and etcdctl on all of our managed nodes. In the next step, we will add more tasks to our play to run etcd as a background service.
Step 4 — Creating a Unit File for etcd
The quickest way to run etcd with Ansible may appear to be to use the command module to run /opt/etcd/bin/etcd. However, this will not work because it will make etcd run as a foreground process. Using the command module will cause Ansible to hang as it waits for the etcd command to return, which it never will. So in this step, we are going to update our playbook to run our etcd binary as a background service instead.
Ubuntu 18.04 uses systemd as its init system, which means we can create new services by writing unit files and placing them inside the /etc/systemd/system/ directory.
First, inside our project directory, create a new directory named files/:
mkdir files
Then, using your editor, create a new file named etcd.service within that directory:
nano files/etcd.service
Next, copy the following code block into the files/etcd.service file:
[Unit]
Description=etcd distributed reliable key-value store

[Service]
Type=notify
ExecStart=/opt/etcd/bin/etcd
Restart=always
This unit file defines a service that runs the executable at /opt/etcd/bin/etcd, notifies systemd when it has finished initializing, and always restarts if it ever exits.
Note: If you’d like to understand more about systemd and unit files, or want to tailor the unit file to your needs, read the Understanding Systemd Units and Unit Files guide.
Close and save the files/etcd.service file by pressing CTRL+X followed by Y.
Next, we need to add a task inside our playbook that will copy the files/etcd.service local file into the /etc/systemd/system/etcd.service directory for every managed node. We can do this using the copy module.
Open up your playbook:
nano $HOME/playground/etcd-ansible/playbook.yaml
Append the following highlighted task to the end of our existing tasks:
    - name: "Create a etcd service"
      copy:
        src: files/etcd.service
        remote_src: False
        dest: /etc/systemd/system/etcd.service
        owner: root
        group: root
        mode: 0644
By copying the unit file into the /etc/systemd/system/etcd.service, a service is now defined.
Save and exit the playbook.
Run the same ansible-playbook command again to apply the new changes:
ansible-playbook -i hosts playbook.yaml
To confirm the changes have been applied, first SSH into one of the managed nodes:
ssh root@etcd1_public_ip
Then, run systemctl status etcd to query systemd about the status of the etcd service:
systemctl status etcd
You will find the following output, which states that the service is loaded:

Note: The last line (
Active: inactive (dead)) of the output states that the service is inactive, which means it would not be automatically run when the system starts. This is expected and not an error.
Press q to return to the shell, and then run exit to exit out of the managed node and back to your local shell:
exit
In this step, we updated our playbook to run the etcd binary as a systemd service. In the next step, we will continue to set up etcd by providing it space to store its data.
Step 5 — Configuring the Data Directory
etcd is a key-value data store, which means we must provide it with space to store its data. In this step, we are going to update our playbook to define a dedicated data directory for etcd to use.
Open up your playbook:
nano $HOME/playground/etcd-ansible/playbook.yaml
Append the following task to the end of the list of tasks:
    - name: "Create a data directory"
      file:
        path: /var/lib/etcd/.etcd
        state: directory
        owner: root
        group: root
        mode: 0755
Here, we are using /var/lib/etcd/hostname.etcd as the data directory, where hostname is the hostname of the current managed node. inventory_hostname is a variable that represents the hostname of the current managed node; its value is populated by Ansible automatically. The curly-braces syntax (i.e., ``) is used for variable substitution, supported by the Jinja2 template engine, which is the default templating engine for Ansible.
Close the text editor and save the file.
Next, we need to instruct etcd to use this data directory. We do this by passing in the data-dir parameter to etcd. To set etcd parameters, we can use a combination of environment variables, command-line flags, and configuration files. For this tutorial, we will use a configuration file, as it is much neater to isolate all configurations into a file, rather than have configuration littered across our playbook.
In your project directory, create a new directory named templates/:
mkdir templates
Then, using your editor, create a new file named etcd.conf.yaml.j2 within the directory:
nano templates/etcd.conf.yaml.j2
Next, copy the following line and paste it into the file:
data-dir: /var/lib/etcd/.etcd
This file uses the same Jinja2 variable substitution syntax as our playbook. To substitute the variables and upload the result to each managed host, we can use the template module. It works in a similar way to copy, except it will perform variable substitution prior to upload.
Exit from etcd.conf.yaml.j2, then open up your playbook:
nano $HOME/playground/etcd-ansible/playbook.yaml
Append the following tasks to the list of tasks to create a directory and upload the templated configuration file into it:
    - name: "Create directory for etcd configuration"
      file:
        path: /etc/etcd
        state: directory
        owner: root
        group: root
        mode: 0755
    - name: "Create configuration file for etcd"
      template:
        src: templates/etcd.conf.yaml.j2
        dest: /etc/etcd/etcd.conf.yaml
        owner: root
        group: root
        mode: 0600
Save and close this file.
Because we’ve made this change, we need to update our service’s unit file to pass it the location of our configuration file (i.e., /etc/etcd/etcd.conf.yaml).
Open the etcd service file on your local machine:
nano files/etcd.service
Update the files/etcd.service file by adding the --config-file flag highlighted in the following:
[Unit]
Description=etcd distributed reliable key-value store

[Service]
Type=notify
ExecStart=/opt/etcd/bin/etcd --config-file /etc/etcd/etcd.conf.yaml
Restart=always
Save and close this file.
In this step, we used our playbook to provide a data directory for etcd to store its data. In the next step, we will add a couple more tasks to restart the etcd service and have it run on startup.
Step 6 — Enabling and Starting the etcd Service
Whenever we make changes to the unit file of a service, we need to restart the service to have it take effect. We can do this by running the systemctl restart etcd command. Furthermore, to make the etcd service start automatically on system startup, we need to run systemctl enable etcd. In this step, we will run those two commands using the playbook.
To run commands, we can use the command module:
nano $HOME/playground/etcd-ansible/playbook.yaml
Append the following tasks to the end of the task list:
    - name: "Enable the etcd service"
      command: systemctl enable etcd
    - name: "Start the etcd service"
      command: systemctl restart etcd
Save and close the file.
Run ansible-playbook -i hosts playbook.yaml once more:
ansible-playbook -i hosts playbook.yaml
To check that the etcd service is now restarted and enabled, SSH into one of the managed nodes:
ssh root@etcd1_public_ip
Then, run systemctl status etcd to check the status of the etcd service:
systemctl status etcd
You will find enabled and active (running) as highlighted in the following; this means the changes we made in our playbook have taken effect:

In this step, we used the command module to run systemctl commands that restart and enable the etcd service on our managed nodes. Now that we have set up an etcd installation, we will, in the next step, test out its functionality by carry out some basic create, read, update, and delete (CRUD) operations.
Step 7 — Testing etcd
Although we have a working etcd installation, it is insecure and not yet ready for production use. But before we secure our etcd setup in later steps, let’s first understand what etcd can do in terms of functionality. In this step, we are going to manually send requests to etcd to add, retrieve, update, and delete data from it.
By default, etcd exposes an API that listens on port 2379 for client communication. This means we can send raw API requests to etcd using an HTTP client. However, it’s quicker to use the official etcd client etcdctl, which allows you to create/update, retrieve, and delete key-value pairs using the put, get, and del subcommands, respectively.

Make sure you’re still inside the etcd1 managed node, and run the following etcdctl commands to confirm your etcd installation is working.
First, create a new entry using the put subcommand.
The put subcommand has the following syntax:
etcdctl put key value
On etcd1, run the following command:
etcdctl put foo "bar"
The command we just ran instructs etcd to write the value "bar" to the key foo in the store.
You will then find OK printed in the output, which indicates the data persisted.
We can then retrieve this entry using the get subcommand, which has the syntax etcdctl get key:
etcdctl get foo
You will find this output, which shows the key on the first line and the value you inserted earlier on the second line.
We can delete the entry using the del subcommand, which has the syntax etcdctl del key:
etcdctl del foo
You will find the following output, which indicates the number of entries deleted.
Now, let’s run the get subcommand once more in an attempt to retrieve a deleted key-value pair:
etcdctl get foo
You will not receive an output, which means etcdctl is unable to retrieve the key-value pair. This confirms that after the entry is deleted, it can no longer be retrieved.
Now that you’ve tested the basic operations of etcd and etcdctl, let’s exit out of our managed node and back to your local environment:
exit
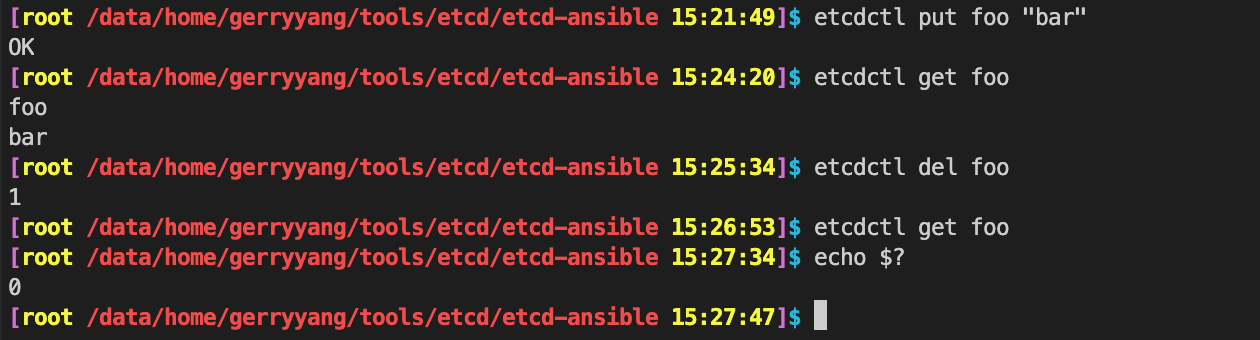
In this step, we used the etcdctl client to send requests to etcd. At this point, we are running three separate instances of etcd, each acting independently from each other. However, etcd is designed as a distributed key-value store, which means multiple etcd instances can group up to form a single cluster; each instance then becomes a member of the cluster. After forming a cluster, you would be able to retrieve a key-value pair that was inserted from a different member of the cluster. In the next step, we will use our playbook to transform our 3 single-node clusters into a single 3-node cluster.
Step 8 — Forming a Cluster Using Static Discovery
To create one 3-node cluster instead of three 1-node clusters, we must configure these etcd installations to communicate with each other. This means each one must know the IP addresses of the others. This process is called discovery. Discovery can be done using either static configuration or dynamic service discovery. In this step, we will discuss the difference between the two, as well as update our playbook to set up an etcd cluster using static discovery.
Discovery by static configuration is the method that requires the least setup; this is where the endpoints of each member are passed into the etcd command before it is executed. To use static configuration, the following conditions must be met prior to the initialization of the cluster:
- the number of members are known
- the endpoints of each member are known
- the IP addresses for all endpoints are static
If these conditions cannot be met, then you can use a dynamic discovery service. With dynamic service discovery, all instances would register with the discovery service, which allows each member to retrieve information about the location of other members.
Since we know we want a 3-node etcd cluster, and all our servers have static IP addresses, we will use static discovery. To initiate our cluster using static discovery, we must add several parameters to our configuration file. Use an editor to open up the templates/etcd.conf.yaml.j2 template file:
nano templates/etcd.conf.yaml.j2
Then, add the following highlighted lines:
data-dir: /var/lib/etcd/{{ inventory_hostname }}.etcd
name: {{ inventory_hostname }}
initial-advertise-peer-urls: http://{{ hostvars[inventory_hostname]['ansible_facts']['eth1']['ipv4']['address'] }}:2380
listen-peer-urls: http://{{ hostvars[inventory_hostname]['ansible_facts']['eth1']['ipv4']['address'] }}:2380,http://127.0.0.1:2380
advertise-client-urls: http://{{ hostvars[inventory_hostname]['ansible_facts']['eth1']['ipv4']['address'] }}:2379
listen-client-urls: http://{{ hostvars[inventory_hostname]['ansible_facts']['eth1']['ipv4']['address'] }}:2379,http://127.0.0.1:2379
initial-cluster-state: new
initial-cluster: {% for host in groups['etcd'] %}{{ hostvars[host]['ansible_facts']['hostname'] }}=http://{{ hostvars[host]['ansible_facts']['eth1']['ipv4']['address'] }}:2380{% if not loop.last %},{% endif %}{% endfor %}
Close and save the templates/etcd.conf.yaml.j2 file by pressing CTRL+X followed by Y.
Here’s a brief explanation of each parameter:
-
name - a human-readable name for the member. By default, etcd uses a unique, randomly-generated ID to identify each member; however, a human-readable name allows us to reference it more easily inside configuration files and on the command line. Here, we will use the hostnames as the member names (i.e., etcd1, etcd2, and etcd3).
-
initial-advertise-peer-urls - a list of IP address/port combinations that other members can use to communicate with this member. In addition to the API port (
2379), etcd also exposes port2380for peer communication between etcd members, which allows them to send messages to each other and exchange data. Note that these URLs must be reachable by its peers (and not be a local IP address). -
listen-peer-urls - a list of IP address/port combinations where the current member will listen for communication from other members. This must include all the URLs from the –initial-advertise-peer-urls flag, but also local URLs like
127.0.0.1:2380. The destination IP address/port of incoming peer messages must match one of the URLs listed here. -
advertise-client-urls - a list of IP address/port combinations that clients should use to communicate with this member. These URLs must be reachable by the client (and not be a local address). If the client is accessing the cluster over public internet, this must be a public IP address.
-
listen-client-urls - a list of IP address/port combinations where the current member will listen for communication from clients. This must include all the URLs from the –advertise-client-urls flag, but also local URLs like
127.0.0.1:2379. The destination IP address/port of incoming client messages must match one of the URLs listed here. -
initial-cluster - a list of endpoints for each member of the cluster. Each endpoint must match one of the corresponding member’s initial-advertise-peer-urls URLs.
-
initial-cluster-state - either
neworexisting.
To ensure consistency, etcd can only make decisions when a majority of the nodes are healthy. This is known as establishing quorum. In other words, in a three-member cluster, quorum is reached if two or more of the members are healthy.
If the initial-cluster-state parameter is set to new, etcd will know that this is a new cluster being bootstrapped, and will allow members to start in parallel, without waiting for quorum to be reached. More concretely, after the first member is started, it will not have quorum because one third (33.33%) is less than or equal to 50%. Normally, etcd will halt and refuse to commit any more actions and the cluster will never be formed. However, with initial-cluster-state set to new, it will ignore the initial lack of quorum.
If set to existing, the member will try to join an existing cluster, and expects quorum to already be established.
Note: You can find more details about all supported configuration flags in the Configuration section of etcd’s documentation.
In the updated templates/etcd.conf.yaml.j2 template file, there are a few instances of hostvars. When Ansible runs, it will collect variables from a variety of sources. We have already made use of the inventory_hostname variable before, but there are a lot more available. These variables are available under hostvars[inventory_hostname]['ansible_facts']. Here, we are extracting the private IP addresses of each node and using it to construct our parameter value.
Note: Because we enabled the Private Networking option when we created our servers, each server would have three IP addresses associated with them:
- A loopback IP address - an address that is only valid inside the same machine. It is used for the machine to refer to itself, e.g.,
127.0.0.1 - A public IP address - an address that is routable over the public internet, e.g.,
178.128.169.51 - A private IP address - an address that is routable only within the private network; in the case of DigitalOcean Droplets, there’s a private network within each datacenter, e.g.,
10.131.82.225
Each of these IP addresses are associated with a different network interface—the loopback address is associated with the lo interface, the public IP address is associated with the eth0 interface, and the private IP address with the eth1 interface. We are using the eth1 interface so that all traffic stays within the private network, without ever reaching the internet.
Understanding of network interfaces is not required for this article, but if you’d like to learn more, An Introduction to Networking Terminology, Interfaces, and Protocols is a great place to start.
The {% %} Jinja2 syntax defines the for loop structure that iterates through every node in the etcd group to build up the initial-cluster string into a format required by etcd.
To form the new three-member cluster, you must first stop the etcd service and clear the data directory before launching the cluster. To do this, use an editor to open up the playbook.yaml file on your local machine:
nano $HOME/playground/etcd-ansible/playbook.yaml
Then, before the “Create a data directory” task, add a task to stop the etcd service:
- hosts: etcd
  become: True
  tasks:
    ...
        group: root
        mode: 0644
    - name: "Stop the etcd service"
      command: systemctl stop etcd
    - name: "Create a data directory"
      file:
    ...
Next, update the “Create a data directory” task to first delete the data directory and recreate it:
- hosts: etcd
  become: True
  tasks:
    ...
    - name: "Stop the etcd service"
      command: systemctl stop etcd
    - name: "Create a data directory"
      file:
        path: /var/lib/etcd/.etcd
        state: ""
        owner: root
        group: root
        mode: 0755
      with_items:
        - absent
        - directory
    - name: "Create directory for etcd configuration"
      file:
    ...
The with_items property defines a list of strings that this task will iterate over. It is equivalent to repeating the same task twice but with different values for the state property. Here, we are iterating over the list with items absent and directory, which ensures that the data directory is deleted first and then re-created after.
Close and save the playbook.yaml file by pressing CTRL+X followed by Y. Then, run ansible-playbook again. Ansible will now create a single, 3-member etcd cluster:
ansible-playbook -i hosts playbook.yaml
You can check this by SSH-ing into any etcd member node:
ssh root@etcd1_public_ip
Then run etcdctl endpoint health --cluster:
etcdctl endpoint health --cluster
This will list out the health of each member of the cluster:
http://etcd2_private_ip:2379 is healthy: successfully committed proposal: took = 2.517267ms
http://etcd1_private_ip:2379 is healthy: successfully committed proposal: took = 2.153612ms
http://etcd3_private_ip:2379 is healthy: successfully committed proposal: took = 2.639277ms
We have now successfully created a 3-node etcd cluster. We can confirm this by adding an entry to etcd on one member node, and retrieving it on another member node. On one of the member nodes, run etcdctl put:
etcdctl put foo "bar"
Then, use a new terminal to SSH into a different member node:
ssh root@etcd2_public_ip
Next, attempt to retrieve the same entry using the key:
etcdctl get foo
You will be able to retrieve the entry, which proves that the cluster is working:
foo
bar
In this step, we provisioned a new 3-node cluster. At the moment, communication between etcd members and their peers and clients are conducted through HTTP. This means the communication is unencrypted and any party who can intercept the traffic can read the messages. This is not a big issue if the etcd cluster and clients are all deployed within a private network or virtual private network (VPN) which you fully control. However, if any of the traffic needs to travel through a shared network (private or public), then you should ensure this traffic is encrypted. Furthermore, a mechanism needs to be put in place for a client or peer to verify the authenticity of the server.
In the next step, we will look at how to secure client-to-server as well as peer communication using TLS.
Conclusion
You have now successfully provisioned a 3-node etcd cluster, secured it with TLS, and confirmed that it is working.
etcd is a tool originally created by CoreOS. To understand etcd’s usage in relation to CoreOS, you can read How To Use Etcdctl and Etcd, CoreOS’s Distributed Key-Value Store. The article also guides you through setting up a dynamic discovery model, something which was discussed but not demonstrated in this tutorial.
As mentioned at the beginning of this tutorial, etcd is an important part of the Kubernetes ecosystem. To learn more about Kubernetes and etcd’s role within it, you can read An Introduction to Kubernetes. If you are deploying etcd as part of a Kubernetes cluster, know that there are other tools available, such as kubespray and kubeadm. For more details on the latter, you can read How To Create a Kubernetes Cluster Using Kubeadm on Ubuntu 18.04.
Finally, this tutorial made use of many tools, but could not dive into each in too much detail. In the following you’ll find links that will provide a more detailed examination of each tool:
- To learn more advanced syntax of Ansible playbooks, you can read Configuration Management 101: Writing Ansible Playbooks. Ansible’s official Intro to Playbooks is also a great resource.
- To learn more about OpenSSL, you can read OpenSSL Essentials: Working with SSL Certificates, Private Keys and CSRs.
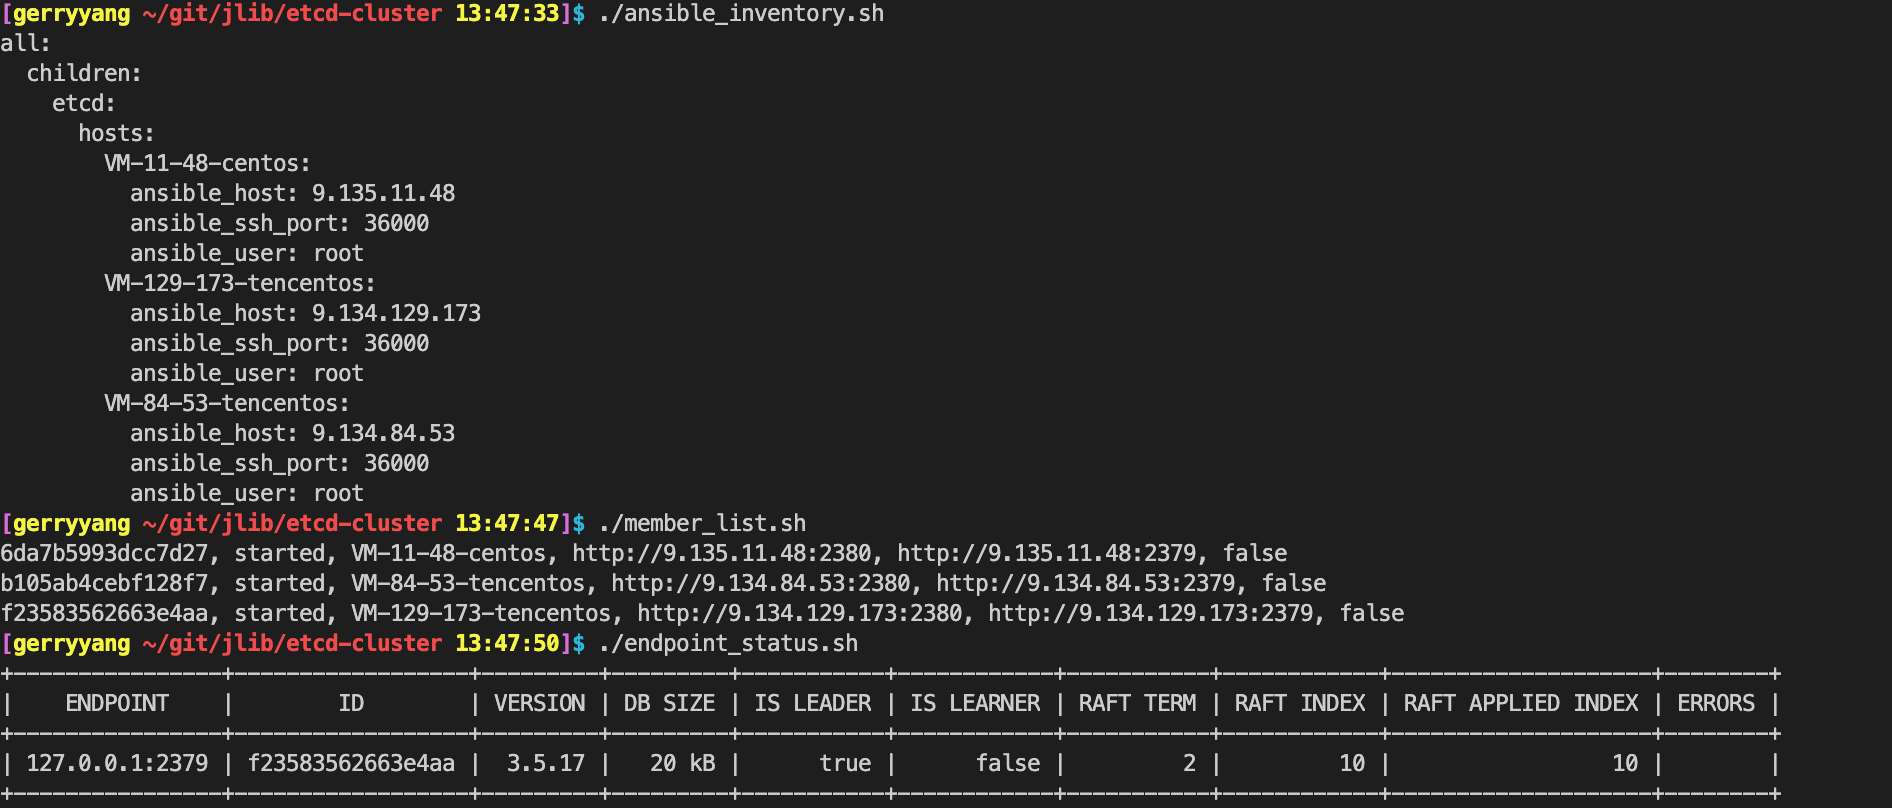
# cat /etc/etcd/etcd.conf.yaml
data-dir: /var/lib/etcd/VM-84-53-tencentos.etcd

# A cluster using static discovery
name: VM-84-53-tencentos
initial-advertise-peer-urls: http://9.134.84.53:2380
listen-peer-urls: http://9.134.84.53:2380,http://127.0.0.1:2380
advertise-client-urls: http://9.134.84.53:2379
listen-client-urls: http://9.134.84.53:2379,http://127.0.0.1:2379
initial-cluster-state: new
initial-cluster: VM-129-173-tencentos=http://9.134.129.173:2380,VM-84-53-tencentos=http://9.134.84.53:2380,VM-11-48-centos=http://9.135.11.48:2380
测试用例
etcdctl
#!/bin/bash

# enable xtrace
set -x

ENDPOINT=localhost:2379

# test write
echo "Writing data to etcd..."
etcdctl --endpoints=$ENDPOINT put foo bar

# test read
echo "Reading data from etcd..."
etcdctl --endpoints=$ENDPOINT get foo

# test list
echo "Listing all keys in etcd..."
etcdctl --endpoints=$ENDPOINT get "" --prefix=true

# test delete
echo "Deleting data from etcd..."
etcdctl --endpoints=$ENDPOINT del foo

# test list after delete
echo "Listing all keys in etcd after deletion..."
etcdctl --endpoints=$ENDPOINT get "" --prefix=true

# close xtrace
# set +x
输出:
+ ENDPOINT=localhost:2379
+ echo 'Writing data to etcd...'
Writing data to etcd...
+ etcdctl --endpoints=localhost:2379 put foo bar
OK
+ echo 'Reading data from etcd...'
Reading data from etcd...
+ etcdctl --endpoints=localhost:2379 get foo
foo
bar
+ echo 'Listing all keys in etcd...'
Listing all keys in etcd...
+ etcdctl --endpoints=localhost:2379 get '' --prefix=true
foo
bar
+ echo 'Deleting data from etcd...'
Deleting data from etcd...
+ etcdctl --endpoints=localhost:2379 del foo
1
+ echo 'Listing all keys in etcd after deletion...'
Listing all keys in etcd after deletion...
+ etcdctl --endpoints=localhost:2379 get '' --prefix=true
HTTP
etcd 提供了一个 HTTP/JSON API,可以使用 curl 命令或者其他 HTTP 客户端来访问这个 API。
- 这些命令使用了 etcd 的 v3 API,这是 etcd 的最新版本的 API。这个 API 使用 JSON 格式的请求和响应,所以可以使用 curl 命令的
-d选项来发送 JSON 数据。 - etcd 的 v3 API 使用 base64 编码的字符串来表示键和值。这就是为什么需要使用
echo -n "foo" | base64这样的命令来生成键和值的 base64 编码。(-ndo not output the trailing newline) - etcd 的 v3 API 使用 HTTP POST 方法来发送请求,所以你需要使用 curl 命令的
-X POST选项。 -L选项告诉 curl 跟随重定向,这在某些 etcd 配置中可能是必要的。- 可以使用
jq工具来解析 JSON 响应并提取 value 字段,然后使用base64命令来解码这个字段。安装 jq 工具:yum -y install jq
#!/bin/bash

# enable xtrace
# set -x

ENDPOINT=localhost:2379

# test write
echo "Writing data to etcd..."
curl -L http://$ENDPOINT/v3/kv/put -X POST -d '{"key": "'$(echo -n "foo" | base64)'", "value": "'$(echo -n "bar" | base64)'"}'
echo -e "\n"

# test read
echo "Reading data from etcd..."
response=$(curl -s -L http://$ENDPOINT/v3/kv/range -X POST -d '{"key": "'$(echo -n "foo" | base64)'"}')
echo "response: $response"
value=$(echo $response | jq -r '.kvs[0].value')
echo $value | base64 --decode
echo -e "\n"

# test delete
echo "Deleting data from etcd..."
curl -L http://$ENDPOINT/v3/kv/deleterange -X POST -d '{"key": "'$(echo -n "foo" | base64)'"}'
echo -e "\n"

# test read
echo "Reading data from etcd..."
response=$(curl -s -L http://$ENDPOINT/v3/kv/range -X POST -d '{"key": "'$(echo -n "foo" | base64)'"}')
echo "response: $response"
echo -e "\n"

# close xtrace
# set +x
输出:
Writing data to etcd...
{"header":{"cluster_id":"12297797944536498889","member_id":"17894252403103677144","revision":"29","raft_term":"5"}}

Reading data from etcd...
response: {"header":{"cluster_id":"12297797944536498889","member_id":"17894252403103677144","revision":"29","raft_term":"5"},"kvs":[{"key":"Zm9v","create_revision":"29","mod_revision":"29","version":"1","value":"YmFy"}],"count":"1"}
bar

Deleting data from etcd...
{"header":{"cluster_id":"12297797944536498889","member_id":"17894252403103677144","revision":"30","raft_term":"5"},"deleted":"1"}

Reading data from etcd...
response: {"header":{"cluster_id":"12297797944536498889","member_id":"17894252403103677144","revision":"30","raft_term":"5"}}
Tips
通过 -w fields 或 -w json 查看 key 的详细元数据
Version: Key 被修改的次数(从创建开始计数)。CreateRevision: Key 创建时的全局 revision。ModRevision: Key 最后一次修改时的全局 revision(集群级别)。
{
  "kvs": [
    {
      "key": "<your-key>",
      "value": "<value>",
      "version": "3",             // 该 key 被修改过 3 次
      "mod_revision": "789",      // 最后一次修改发生在全局 revision 789
      "create_revision": "123"    // 创建时的全局 revision
    }
  ],
  "count": 1
}
$ etcdctl get /namesvr/counter/agent --prefix --endpoints http://127.0.0.1:2379 --user root:jlib -w fields
"ClusterID" : 12297797944536498889
"MemberID" : 17894252403103677144
"Revision" : 242999
"RaftTerm" : 10
"Key" : "/namesvr/counter/agent"
"CreateRevision" : 242338
"ModRevision" : 242338
"Version" : 1
"Value" : "1"
"Lease" : 0
"More" : false
"Count" : 1
通过 -w json 也可以查看:
$ etcdctl get /namesvr/counter/agent --prefix --endpoints http://127.0.0.1:2379 --user root:jlib -w json
{"header":{"cluster_id":12297797944536498889,"member_id":17894252403103677144,"revision":242999,"raft_term":10},"kvs":[{"key":"L25hbWVzdnIvY291bnRlci9hZ2VudA==","create_revision":242338,"mod_revision":242338,"version":1,"value":"MQ=="}],"count":1}
{
	"header": {
		"cluster_id": 12297797944536498889,
		"member_id": 17894252403103677144,
		"revision": 242999,
		"raft_term": 10
	},
	"kvs": [{
		"key": "L25hbWVzdnIvY291bnRlci9hZ2VudA==",
		"create_revision": 242338,
		"mod_revision": 242338,
		"version": 1,
		"value": "MQ=="
	}],
	"count": 1
}
若知道 key 修改时的全局 revision,可查询指定 revision 的数据:
$ etcdctl get /namesvr/counter/agent --prefix --endpoints http://127.0.0.1:2379 --user root:jlib --rev=242999
/namesvr/counter/agent
1
注意:历史数据依赖配置:默认 etcd 不保留所有历史版本,需配置 –max-history 或使用 etcdutl 备份恢复。
删除 key 的版本号变化,如何查看已删除 key 的记录
在 etcd 中删除 key 时,版本号的变化机制较为特殊。以下是删除操作对版本号的影响及查看方式:
删除操作对版本号的影响
- 全局修订版本 (Global Revision)
每次删除操作都会使全局修订版本号增加 1,无论删除单个 key 还是批量删除。这是 etcd 的核心机制:所有修改操作(包括 put/del/txn)都会使全局 revision 单调递增。
- Key 的版本元数据
当 key 被删除时:
create_revision和mod_revision不再可查(通过普通get操作)- 但删除操作会在 etcd 中留下一个 “tombstone”(逻辑墓碑)记录,包含删除时的全局
revision
查看删除操作引起的版本变化
- 方法 1:通过删除命令直接获取。使用
etcdctl del时添加-w fields参数。这里的关键字段revision就是删除操作发生时的新全局版本号。
$ etcdctl del /namesvr/counter/agent --prefix --endpoints http://127.0.0.1:2379 --user root:jlib -w fields
"ClusterID" : 12297797944536498889
"MemberID" : 17894252403103677144
"Revision" : 243000         // 删除操作发生时的全局 revision
"RaftTerm" : 10
"Deleted" : 1               // 删除的 key 数量
- 方法 2:通过历史查询查看删除事件
使用 etcdctl del 时添加 -w fields 可以得到删除前的 revision 版本号。
$ etcdctl watch /namesvr/counter/agent --prefix --endpoints http://127.0.0.1:2379 --user root:jlib --rev=242999
DELETE                       // 输出删除事件
/namesvr/counter/agent
- 方法 3:通过墓碑记录查询
虽然被删除的 key 不可直接访问,但可通过特定修订版本查询其”墓碑”:查询指定 revision 的数据(删除操作发生的 revision)
$ etcdctl get /namesvr/counter/agent --prefix --endpoints http://127.0.0.1:2379 --user root:jlib --rev=242999
/namesvr/counter/agent
1
结果行为:
- 若指定的 revision 等于删除操作的 revision:返回空结果(etcd v3.4+)
- 若指定的 revision 早于删除操作的 revision:返回删除前的值
- 若指定的 revision 晚于删除操作的 revision:返回空
注意事项
- 历史数据保留
etcd 默认压缩历史数据(通过 --auto-compaction 配置)。若删除操作发生时的 revision 已被压缩,则无法查询删除事件。
- 与 key 版本的区别
- key 的
version计数器(修改次数)在删除后重置 - 重新创建同名 key 时:
- key 的
create_revision = 新全局 revision
version = 1(重新计数)
- 删除范围的影响
批量删除(如 etcdctl del --prefix)会使全局 revision 只增加 1,无论删除多少 key。
watch 查看事件变化 (通过指定 --rev 版本号可以历史事件)
首先插入两条记录:
$ etcdctl put hello world1 --endpoints http://127.0.0.1:2379 --user root:jlib
OK
$ etcdctl put hello world2 --endpoints http://127.0.0.1:2379 --user root:jlib
OK
然后执行 watch 命令,空集群启动后的版本号为 1
$ etcdctl watch hello --endpoints http://127.0.0.1:2379 --user root:jlib --rev=1 -w json
输出:两个事件记录分别对应上面的两次的修改,事件中含有 key、value、各类版本号等信息。
{
	"Header": {
		"cluster_id": 12297797944536498889,
		"member_id": 17894252403103677144,
		"revision": 243002,
		"raft_term": 10
	},
	"Events": [{
		"kv": {
			"key": "aGVsbG8=",
			"create_revision": 243001,
			"mod_revision": 243001,
			"version": 1,
			"value": "d29ybGQx"
		}
	}, {
		"kv": {
			"key": "aGVsbG8=",
			"create_revision": 243001,
			"mod_revision": 243002,
			"version": 2,
			"value": "d29ybGQy"
		}
	}],
	"CompactRevision": 0,
	"Canceled": false,
	"Created": false
}
查看 cluster leader 信息
etcdctl endpoint status --write-out=table
这将返回一个表格,其中包含每个成员的ID、名称、版本、数据库大小、是否是 leader、raft term、raft index 等信息。在 “IS LEADER” 列中,可以看到哪个实例是当前的 leader。
还可以通过查看每个成员的 “RAFT TERM” 和 “RAFT INDEX” 来推测哪个实例可能是 leader。通常,具有最高 raft term 和 raft index 的实例是 leader。


查看 cluster 的成员信息
etcdctl member list

查看 cluster 集群信息
etcdctl endpoint status --cluster -w json | python -mjson.tool
[
    {
        "Endpoint": "http://9.135.11.48:2379",
        "Status": {
            "header": {
                "cluster_id": 1001830784961041594,
                "member_id": 7901483741016259879,
                "revision": 3,
                "raft_term": 13
            },
            "version": "3.5.17",
            "dbSize": 20480,
            "leader": 17453000336978732202,
            "raftIndex": 38,
            "raftTerm": 13,
            "raftAppliedIndex": 38,
            "dbSizeInUse": 16384
        }
    },
    {
        "Endpoint": "http://9.134.84.53:2379",
        "Status": {
            "header": {
                "cluster_id": 1001830784961041594,
                "member_id": 12755789866461112567,
                "revision": 3,
                "raft_term": 13
            },
            "version": "3.5.17",
            "dbSize": 20480,
            "leader": 17453000336978732202,
            "raftIndex": 38,
            "raftTerm": 13,
            "raftAppliedIndex": 38,
            "dbSizeInUse": 16384
        }
    },
    {
        "Endpoint": "http://9.134.129.173:2379",
        "Status": {
            "header": {
                "cluster_id": 1001830784961041594,
                "member_id": 17453000336978732202,
                "revision": 3,
                "raft_term": 13
            },
            "version": "3.5.17",
            "dbSize": 20480,
            "leader": 17453000336978732202,
            "raftIndex": 38,
            "raftTerm": 13,
            "raftAppliedIndex": 38,
            "dbSizeInUse": 16384
        }
    }
]
etcd 运维脚本
#!/bin/bash

# 设置默认值
ETCD_ENDPOINTS=${ETCD_ENDPOINTS:-"localhost:2379"}
NAMESVR_PREFIX=${NAMESVR_PREFIX:-"/namesvr"}
ELECTION_PREFIX="${NAMESVR_PREFIX}/election"

# 颜色定义
RED='\033[0;31m'
GREEN='\033[0;32m'
YELLOW='\033[1;33m'
NC='\033[0m' # No Color

# 帮助信息
usage() {
    echo -e "${GREEN}NameSvr ETCD 管理工具${NC}"
    echo "Usage: $0 [command]"
    echo
    echo "Commands:"
    echo "  list         - 列出所有 NameSvr 相关的 key"
    echo "  ids          - 查看所有 NameSvr 实例 ID"
    echo "  leader       - 查看当前 leader 信息"
    echo "  routes       - 查看路由信息"
    echo "  clean        - 清理所有 NameSvr 相关的数据"
    echo "  clean-ids    - 仅清理 ID 相关数据"
    echo "  watch        - 监控 key 变化"
    echo "  status       - 查看 etcd 集群状态"
    echo "  backup       - 备份 NameSvr 相关数据"
    echo "  restore      - 从备份恢复数据"
    echo "  help         - 显示帮助信息"
    echo
    echo "Options:"
    echo "  --endpoints  - 指定 etcd 端点 (默认: localhost:2379)"
    echo "  --prefix    - 指定 namesvr 前缀 (默认: /namesvr)"
}

# 检查 etcdctl 是否可用
check_etcdctl() {
    if ! command -v etcdctl &> /dev/null; then
        echo -e "${RED}Error: etcdctl not found${NC}"
        echo "Please install etcdctl first"
        exit 1
    fi
}

# 列出所有 key
list_all() {
    echo -e "${GREEN}Listing all NameSvr related keys:${NC}"
    etcdctl --endpoints=$ETCD_ENDPOINTS get "$NAMESVR_PREFIX" --prefix=true
}

# 查看所有 NameSvr ID
list_ids() {
    echo -e "${GREEN}Current NameSvr IDs:${NC}"
    etcdctl --endpoints=$ETCD_ENDPOINTS get "${ELECTION_PREFIX}/ids" --prefix=true
}

# 查看当前 leader
show_leader() {
    echo -e "${GREEN}Current Leader:${NC}"
    etcdctl --endpoints=$ETCD_ENDPOINTS get "${ELECTION_PREFIX}/leader"
}

# 查看路由信息
show_routes() {
    echo -e "${GREEN}Current Routes:${NC}"
    etcdctl --endpoints=$ETCD_ENDPOINTS get "${ELECTION_PREFIX}/routes" --prefix=true
}

# 清理所有数据
clean_all() {
    echo -e "${YELLOW}Warning: This will delete all NameSvr related data!${NC}"
    read -p "Are you sure? [y/N] " -n 1 -r
    echo
    if [[ $REPLY =~ ^[Yy]$ ]]; then
        etcdctl --endpoints=$ETCD_ENDPOINTS del "$NAMESVR_PREFIX" --prefix=true
        echo -e "${GREEN}All NameSvr data cleaned${NC}"
    fi
}

# 清理 ID 数据
clean_ids() {
    echo -e "${YELLOW}Warning: This will delete all NameSvr ID data!${NC}"
    read -p "Are you sure? [y/N] " -n 1 -r
    echo
    if [[ $REPLY =~ ^[Yy]$ ]]; then
        etcdctl --endpoints=$ETCD_ENDPOINTS del "${ELECTION_PREFIX}/ids" --prefix=true
        echo -e "${GREEN}NameSvr ID data cleaned${NC}"
    fi
}

# 监控 key 变化
watch_keys() {
    echo -e "${GREEN}Watching NameSvr key changes (Ctrl+C to stop):${NC}"
    etcdctl --endpoints=$ETCD_ENDPOINTS watch "$NAMESVR_PREFIX" --prefix=true
}

# 查看集群状态
show_status() {
    echo -e "${GREEN}ETCD Cluster Status:${NC}"
    etcdctl --endpoints=$ETCD_ENDPOINTS endpoint status -w table
    echo -e "\n${GREEN}ETCD Cluster Health:${NC}"
    etcdctl --endpoints=$ETCD_ENDPOINTS endpoint health
}

# 备份数据
backup_data() {
    BACKUP_FILE="namesvr_backup_$(date +%Y%m%d_%H%M%S).etcd"
    echo -e "${GREEN}Backing up NameSvr data to ${BACKUP_FILE}${NC}"
    etcdctl --endpoints=$ETCD_ENDPOINTS snapshot save "$BACKUP_FILE"
    echo -e "${GREEN}Backup completed${NC}"
}

# 从备份恢复
restore_data() {
    if [ -z "$1" ]; then
        echo -e "${RED}Error: Please specify backup file${NC}"
        echo "Usage: $0 restore <backup_file>"
        return 1
    fi

    echo -e "${YELLOW}Warning: This will restore data from backup!${NC}"
    read -p "Are you sure? [y/N] " -n 1 -r
    echo
    if [[ $REPLY =~ ^[Yy]$ ]]; then
        etcdctl --endpoints=$ETCD_ENDPOINTS snapshot restore "$1"
        echo -e "${GREEN}Restore completed${NC}"
    fi
}

# 主函数
main() {
    check_etcdctl

    case "$1" in
        "list")
            list_all
            ;;
        "ids")
            list_ids
            ;;
        "leader")
            show_leader
            ;;
        "routes")
            show_routes
            ;;
        "clean")
            clean_all
            ;;
        "clean-ids")
            clean_ids
            ;;
        "watch")
            watch_keys
            ;;
        "status")
            show_status
            ;;
        "backup")
            backup_data
            ;;
        "restore")
            restore_data "$2"
            ;;
        "help"|"--help"|"-h")
            usage
            ;;
        *)
            echo -e "${RED}Unknown command: $1${NC}"
            usage
            exit 1
            ;;
    esac
}

# 处理命令行参数
while [[ $# -gt 0 ]]; do
    case $1 in
        --endpoints)
            ETCD_ENDPOINTS="$2"
            shift 2
            ;;
        --prefix)
            NAMESVR_PREFIX="$2"
            ELECTION_PREFIX="${NAMESVR_PREFIX}/election"
            shift 2
            ;;
        *)
            break
            ;;
    esac
done

# 如果没有参数,显示帮助信息
if [ $# -eq 0 ]; then
    usage
    exit 0
fi

main "$@"
安全访问
问题:etcd 服务若未授权,攻击者可以对服务器进行写操作。通过 etcdctl --endpoints=ip:port get / --prefix --limit 2 命令若能访问则说明存在安全访问问题。
修复方案:
方案1:basic 认证 (基于角色的访问控制)
# 首先创建 root 用户
etcdctl --endpoints=ip:port user add root

# 然后启用认证,启用认证后会自动为 root 账号创建一个 root 角色,该角色拥有全部 etcd 数据的读写权限。接下来访问 etcd 就必须带着账号密码访问,否则请求会被拒绝
etcdctl --endpoints=ip:port auth enable
方案2:配置为监听 localhost 访问
将下面两个参数改成只监听本地的 127.0.0.1 地址。
LISTEN_CLIENT_URLS=${LISTEN_CLIENT_URLS:-http://0.0.0.0:2379}
ADVERTISE_CLIENT_URLS=${ADVERTISE_CLIENT_URLS:-http://0.0.0.0:2379}
Q&A
Running http and grpc server on single port. This is not recommended for production
etcd 服务同时在同一个端口上运行了 HTTP 和 gRPC 服务。在生产环境中,这种配置并不推荐,因为它可能会导致性能问题或者其他潜在的问题。etcd 默认使用 gRPC 进行通信,但是它也提供了一个 HTTP API 以便于向后兼容。在生产环境中,通常建议将 HTTP 和 gRPC 服务分别运行在不同的端口上,以便于管理和监控。
The error was: ansible.errors.AnsibleUndefinedVariable: ‘dict object’ has no attribute ‘eth1’
AnsibleUndefinedVariable: ‘dict object’ has no attribute
查看所有以 ansible_eth 开头的网络接口信息:
$ ansible server2 -m setup -a 'filter=ansible_eth*' -i hosts
Libraries and tools
Note that third-party libraries and tools (not hosted on https://github.com/etcd-io) mentioned below are not tested or maintained by the etcd team. Before using them, users are recommended to read and investigate them.
Tools
- etcdctl - A command line client for etcd
- etcd-dump - Command line utility for dumping/restoring etcd.
- etcd-fs - FUSE filesystem for etcd
- etcddir - Realtime sync etcd and local directory. Work with windows and linux.
- etcd-browser - A web-based key/value editor for etcd using AngularJS
- etcd-lock - Master election & distributed r/w lock implementation using etcd - Supports v2
- etcd-console - A web-base key/value editor for etcd using PHP
- etcd-viewer - An etcd key-value store editor/viewer written in Java
- etcdtool - Export/Import/Edit etcd directory as JSON/YAML/TOML and Validate directory using JSON schema
- etcdloadtest - A command line load test client for etcd version 3.0 and above.
- lucas - A web-based key-value viewer for kubernetes etcd3.0+ cluster.
- etcd-manager - A modern, efficient, multi-platform and free etcd 3.x GUI & client tool. Available for Windows, Linux and Mac.
- etcd-backup-restore - Utility to periodically and incrementally backup and restore the etcd.
- etcd-druid - A Kubernetes operator to deploy etcd clusters and manage day-2 operations.
- etcdadm - A command-line tool for operating an etcd cluster.
- etcd-defrag - An easier to use and smarter etcd defragmentation tool.
- etcdhelper - An intellij platform plugin for etcd.
Libraries
The sections below list etcd client libraries by language.
Go
- etcd/client/v3 - the officially maintained Go client for v3
- etcd/client/v2 - the officially maintained Go client for v2
- go-etcd - the deprecated official client. May be useful for older (<2.0.0) versions of etcd.
- encWrapper - encWrapper is an encryption wrapper for the etcd client Keys API/KV.
C
- apache/celix/etcdlib - Supports v2
- jdarcy/etcd-api - Supports v2
- shafreeck/cetcd - Supports v2
C++
- edwardcapriolo/etcdcpp - Supports v2
- suryanathan/etcdcpp - Supports v2 (with waits)
- nokia/etcd-cpp-api - Supports v2
- nokia/etcd-cpp-apiv3 - Supports v3
Projects using etcd
- etcd Raft users - projects using etcd’s raft library implementation.
- go-discover - service discovery in Go
- kelseyhightower/confd - Manage local app config files using templates and data from etcd
- configdb - A REST relational abstraction on top of arbitrary database backends, aimed at storing configs and inventories.
- kubernetes/kubernetes - Container cluster manager introduced by Google.
- spf13/viper - Go configuration library, reads values from ENV, pflags, files, and etcd with optional encryption
- CoreDNS - CoreDNS is a DNS server that chains plugins, part of CNCF and Kubernetes
- Uber M3 - M3: Uber’s Open Source, Large-scale Metrics Platform for Prometheus
- Apache Pulsar - Apache Pulsar is an open-source, distributed messaging and streaming platform built for the cloud.
etcd API guarantees
etcd is a consistent and durable key value store. The key value store is exposed through gRPC Services. etcd ensures the strongest consistency and durability guarantees for a distributed system. This specification enumerates(列举) the API guarantees made by etcd.
APIs to consider
- KV APIs
- Watch APIs
- Lease APIs
- Grant
- [Revoke]
- Keep alive
KV API allows for direct reading and manipulation of key value store. Watch API allows subscribing to key value store changes. Lease API allows assigning a time to live to a key.
Both KV and Watch APIs allow access to not only the latest versions of keys, but also previous versions are accessible within a continuous history window, limited by a compaction operation. (KV API 和 Watch API 允许获取最新的数据和历史版本的数据,在不受压缩操作的影响前提下)
Calling KV API will take an immediate effect, while Watch API will return with some unbounded(不受控制的) delay. In correctly working etcd cluster you should expect to see watch events to appear with 10ms delay after them happening. However, there is no limit and events in unhealthy clusters might never arrive.
KV APIs
etcd ensures durability and strict serializability for all KV api calls. Those are the strongest isolation guarantee of distributed transactional database systems.
Durability
Any completed operations are durable. All accessible data is also durable data. A read will never return data that has not been made durable.
Strict serializability
KV Service operations are atomic and occur in a total order, consistent with real-time order of those operations. Total order is implied through revision. Read more about strict serializability.
Strict serializability implies other weaker guarantees that might be easier to understand:
Atomicity
All API requests are atomic; an operation either completes entirely or not at all. For watch requests, all events generated by one operation will be in one watch response. Watch never observes partial events for a single operation.
Linearizability
From the perspective of client, linearizability provides useful properties which make reasoning easily. This is a clean description quoted from the original paper: Linearizability provides the illusion that each operation applied by concurrent processes takes effect instantaneously at some point between its invocation and its response.
For example, consider a client completing a write at time point 1 (t1). A client issuing a read at t2 (for t2 > t1) should receive a value at least as recent as the previous write, completed at t1. However, the read might actually complete only by t3. Linearizability guarantees the read returns the most current value. Without linearizability guarantee, the returned value, current at t2 when the read began, might be “stale” by t3 because a concurrent write might happen between t2 and t3.
etcd ensures linearizability for all other operations by default. Linearizability comes with a cost, however, because linearized requests must go through the Raft consensus process. To obtain lower latencies and higher throughput for read requests, clients can configure a request’s consistency mode to serializable(串行化读), which may access stale data with respect to quorum, but removes the performance penalty of linearized accesses’ reliance on live consensus. (为了降低读延迟和提高吞吐量,etcd 提供了 Serializable 串行化读模式。它允许从 Follower 读取本地数据,牺牲了线性一致性(可能读到过期数据),换取了更好的性能;然而 etcd 默认的线性化读,为了保证线性一致性,读操作不能简单地由本地节点直接返回数据。它需要一种机制来确保它读取的是最新的、已提交的数据,且不会读到比它自身调用时间更早的状态。)
解释:
考虑一个客户端在时间点 t1 完成一个写操作。另一个客户端在 t2(t2 > t1)发出一个读操作。这个读操作应该至少收到在 t1 完成的那个写操作所写入的值。然而,这个读操作可能实际上直到 t3 才完成。线性一致性保证这个读操作返回的是最新的值。如果没有线性一致性保证,在 t2 读操作开始时返回的值(当时的最新值),到 t3 读操作完成时可能已经“过时”了,因为在 t2 和 t3 之间可能发生了一个并发的写操作。
Watch APIs
Watches make guarantees about events:
- Ordered - events are ordered by revision. An event will never appear on a watch if it precedes an event in time that has already been posted.
- Unique - an event will never appear on a watch twice.
- Reliable - a sequence of events will never drop any subsequence of events within the available history window. If there are events ordered in time as a < b < c, then if the watch receives events a and c, it is guaranteed to receive b as long b is in the available history window.
- Atomic - a list of events is guaranteed to encompass complete revisions. Updates in the same revision over multiple keys will not be split over several lists of events.
- Resumable - A broken watch can be resumed by establishing a new watch starting after the last revision received in a watch event before the break, so long as the revision is in the history window.
- Bookmarkable - Progress notification events guarantee that all events up to a revision have been already delivered.
etcd does not ensure linearizability for watch operations. Users are expected to verify the revision of watch events to ensure correct ordering with other operations.
解释:
Linearizability(线性一致性) 的含义:- 线性一致性是分布式系统中最强的一致性模型之一。
- 它要求系统表现得好像所有操作(读和写)都是原子性地发生在一个单一的、全局排序的时间线上。
- 具体来说:
- 实时性/新鲜度: 如果一个读操作在写操作完成之后开始,那么这个读操作必须看到该写操作的结果(或者一个更晚的写操作结果)。
- 顺序一致性: 所有客户端观察到的操作顺序必须与这个全局顺序一致。
- etcd 核心操作 (
Put,Get,Txn等) 的保证:- etcd 的核心读写操作是保证线性一致性的。
- 当你执行一个
Put操作并成功返回时,随后的任何Get操作(无论发往哪个健康的 etcd 节点)保证能看到这个写入的值(或一个更新的值)。 - 这个保证是 etcd 作为强一致性 KV 存储的核心价值。
Watch操作不保证线性一致性的含义:- 这句话的核心意思是:
Watch事件流本身并不能提供与实时Get请求完全等同的“实时性”保证。 - 具体体现在:
Watch事件流可能滞后于当前最新状态: 当你建立一个Watch后,事件是异步推送的。在事件生成、传输、客户端接收处理的过程中,集群的状态可能已经发生了变化(产生了更高的revision)。- 关键点:
Watch事件流内部的事件是严格按revision排序的(满足 Ordered, Reliable 等保证),但这个事件流所反映的集群状态快照,在任意给定的接收时刻,不一定是最新的,并且不能直接与同时刻发出的Get请求所读到的状态进行严格的“实时性”比较。Watch流报告的是过去某个时间点发生的变更事件(虽然通常很接近最新)。
- 这句话的核心意思是:
- 用户的责任:验证
Revision- 正因为
Watch流不保证与Get操作在“实时性”上的线性一致性,etcd 要求用户必须主动检查事件中的Revision字段。 - 如何确保正确排序:
- 理解
Revision的全局单调递增性:etcd 中的每次修改(无论涉及多少 key)都会使集群的全局 revision 计数器 +1。这个 revision 是唯一的、全序的。 - 在事件中获取
Revision: 每一个Watch事件 (Put/Delete) 都包含它发生时的集群 revision (Kv.ModRevision或Kv.Version等字段)。
- 理解
- 正因为
- 为什么这样设计?
- 性能与复杂度:保证跨 Watch 流和所有 Get 请求的严格线性一致性会极大地增加实现的复杂度和性能开销。事件推送是异步、流式的,将其与瞬时的 Get 请求在实时性上完全同步非常困难。
- 关注点分离:etcd 保证了 Watch 事件流自身强大的顺序性、可靠性和可恢复性(Ordered, Reliable, Resumable, Atomic, Bookmarkable)。它提供了高效、可靠地捕获变更历史的机制。而获取绝对最新状态则交给线性一致的 Get 请求。用户通过结合两者(Get 获取最新状态+revision, Watch 从该 revision 开始监听后续变更)来构建应用逻辑。
总结:
-
“etcd does not ensure linearizability for watch operations” 意味着:
- 一个正在接收
Watch事件的客户端,不能假设它此刻收到的某个 revision 的事件与它同时发出的一个Get请求读到的状态在“实时性”上是严格一致的(Get读到的状态可能对应更高的 revision)。 Watch事件流反映的是变更的历史事件,这些事件按 revision 严格有序可靠地传递,但不保证推送的速度能跟上集群最新的瞬时状态。
- 一个正在接收
-
“Users are expected to verify the revision of watch events to ensure correct ordering with other operations.” 意味着:
- 用户必须依赖事件中的 revision 字段。
- 通过比较和管理这些 revision,用户可以:
- 可靠地恢复中断的
Watch。 - 将
Watch事件与通过线性一致Get操作获取的状态快照关联起来。 - 确定不同操作(Put 操作、Get 操作、Watch 事件)发生的相对顺序。
- 在客户端逻辑中构建一个一致的状态视图。
- 可靠地恢复中断的
Lease APIs
etcd provides a lease mechanism. The primary use case of a lease is implementing distributed coordination mechanisms like distributed locks. The lease mechanism itself is simple: a lease can be created with the grant API, attached to a key with the put API, revoked with the revoke API, and will be expired by the wall clock time to live (TTL). However, users need to be aware about the important properties of the APIs and usage for implementing correct distributed coordination mechanisms.
etcd specific definitions
Operation completed
An etcd operation is considered complete when it is committed through consensus, and therefore “executed” – permanently stored – by the etcd storage engine. The client knows an operation is completed when it receives a response from the etcd server. Note that the client may be uncertain about the status of an operation if it times out, or there is a network disruption between the client and the etcd member. etcd may also abort operations when there is a leader election. etcd does not send abort responses to clients’ outstanding requests in this event.
操作何时被视为“完成”?
-
共识提交(Committed through Consensus):
- etcd 基于 Raft 共识算法工作。当一个客户端发起一个写操作(如
Put,Delete,Txn)时,该操作首先被发送到当前的 Leader 节点。 - Leader 将这个操作封装成一个 提案(Proposal),即一个 Raft 日志条目(Log Entry)。
- Leader 将这个日志条目复制(Replicate) 给集群中的其他节点(Follower)。
- 当多数节点(Quorum) 成功将这条日志条目持久化(Persist) 到它们的本地日志中后,Leader 就会认为这个日志条目是已提交(Committed)的。
- etcd 基于 Raft 共识算法工作。当一个客户端发起一个写操作(如
关键点: 操作在 Raft 层面 的完成点,就是当它被 提交(Committed) 的那一刻。这意味着这个操作已经被集群中的多数节点接受并记录在它们持久化的日志中,具备了持久性(Durability) 的保证(即使部分节点故障,只要多数节点还在,操作就不会丢失)。
-
存储引擎执行(Executed by Storage Engine):
- 在日志条目被提交后,Leader(以及随后同步到该日志的 Follower)会应用(Apply) 这个日志条目。
- 应用的过程就是将日志条目中包含的操作(如
Put key=value)实际执行到 etcd 的后端存储引擎(如 BoltDB)上。 - 存储引擎负责将键值对数据持久化存储到磁盘。
- 关键点:操作的 “执行” 完成点,是当它的效果被安全地写入持久化存储引擎的时候。这确保了数据即使在进程崩溃后重启也能恢复。
-
客户端响应(Client Receives Response):
- Leader 在确认操作已提交 并且 已应用到本地存储引擎之后(对于 Leader 自身而言),会向发起请求的客户端发送一个成功的响应。这个响应通常包含操作的结果(如写入的新 Revision)和集群当前的最新 Revision。
- 关键点: 从客户端的视角来看,操作只有在收到 etcd 服务器的成功响应时,才被认为是 “完成” 的。此时客户端可以确信:
- 操作已通过 Raft 共识(Committed)。
- 操作的效果已持久化在 Leader 的存储引擎中(Applied)。
- 操作的结果(如 Revision)是确定的。
因此,“etcd operation is considered complete” 意味着:
- 在 etcd 集群内部: 操作已被 Raft 提交 (Committed) 并且其效果已应用到存储引擎 (Applied),持久化在磁盘上。
- 在客户端: 客户端已收到来自 etcd 服务器的明确成功响应,确认了上述过程。
复杂性与不确定性:
然而,分布式系统的网络和节点故障引入了不确定性,特别是在客户端没有收到响应时:
-
客户端超时(Client Timeout):
- 客户端发送请求后,会设置一个等待响应的超时时间。
- 如果在这个时间内没有收到 etcd 服务器的任何响应(成功或失败),客户端就会触发超时(Timeout)。
- 关键问题: 客户端无法仅凭超时判断操作是否成功!可能的情况:
- 情况 A (操作未成功): 请求可能根本没到达 Leader(网络丢包),或者 Leader 在将提案复制出去之前就崩溃了。操作没有发生。
- 情况 B (操作可能成功): Leader 已经将提案提交并应用,但在发送响应给客户端之前,网络中断了或 Leader 崩溃了。
-
客户端的应对策略:
- 幂等性(Idempotency):这是最重要的策略。设计操作(尤其是写操作)使其可以安全地重试(Retry)。即执行一次和执行多次的效果相同。
- 状态查询 (State Querying):对于不确定的操作(例如超时后),客户端可以尝试执行一个 读取操作 来检查操作预期的效果是否已经发生。
Revision
An etcd operation that modifies the key value store is assigned a single increasing revision. A transaction operation might modify the key value store multiple times, but only one revision is assigned. The revision attribute of a key value pair that was modified by the operation has the same value as the revision of the operation. The revision can be used as a logical clock for key value store. A key value pair that has a larger revision is modified after a key value pair with a smaller revision. Two key value pairs that have the same revision are modified by an operation “concurrently”.
Revision 的本质:全局逻辑时钟
可以把 Revision 想象成 etcd 键值存储(KV Store)的一个全局的、单调递增的逻辑时钟。它记录了整个集群状态变更的全局顺序。
- 单调递增(Monotonically Increasing):
- 每次成功修改存储状态的操作(如
Put,Delete,Txn成功修改数据)都会使全局 Revision 计数器严格加 1。 - 这个计数器是集群级别的,不是 key 级别的。
- 例如:初始 Revision 是 1000。一个成功的
Put操作会使 Revision 变为 1001。下一个成功的Delete操作会使 Revision 变为 1002,依此类推。
- 每次成功修改存储状态的操作(如
- 操作绑定(Assigned per Modifying Operation):
- 每个成功修改存储的操作(无论影响多少个 key)被分配且仅分配一个唯一的 Revision。
- 原子事务(Atomic Transaction): 这是理解 Revision 的关键点。一个
Txn操作可能包含多个Put、Delete等子操作。即使这个事务修改了多个 key,整个事务只被分配一个 Revision(例如 Rev N)。这意味着:- 事务中的所有修改操作(子操作)在逻辑上是同时生效的。
- 所有被这个事务修改的 key-value 对,它们的
mod_revision属性都会被设置为这个事务的 Revision (N)。 - 外部观察者(通过
Watch或Get)要么看到这个事务的所有修改(Revision >= N),要么一个都看不到(Revision < N)。这体现了 Atomic 特性。
- Key-Value Pair 的
mod_revision属性- 存储在 etcd 中的每个键值对(Key-Value Pair)都有一个
mod_revision属性。 - 这个属性记录了最后一次成功修改该 key 的操作的 Revision。
- 重要关联:当一个操作(或包含该 key 修改的事务)成功完成并被分配 Revision R 后,所有被该操作修改的 key 的
mod_revision都会被更新为 R。
- 存储在 etcd 中的每个键值对(Key-Value Pair)都有一个
- 作为逻辑时钟(Logical Clock for KV Store):
- Revision 的核心作用就是建立键值对修改的全局先后顺序:
mod_revision越大,修改发生的时间越晚: 如果一个 Key K1 的 mod_revision = M,另一个 Key K2 的 mod_revision = N,且 M < N,那么对 K1 的最后一次修改一定发生在对 K2 的最后一次修改之前。mod_revision相同,修改是“并发”发生的: 如果两个不同的 Key K3 和 K4 的 mod_revision 都等于 P,这意味着它们是在同一个操作(通常是同一个事务)中被修改的。从外部观察者的角度看,这两个修改是原子性地同时发生的,没有先后顺序。它们属于同一个“逻辑时间点” P。
- Revision 的核心作用就是建立键值对修改的全局先后顺序:
- 并发”修改的含义
- 这里的“并发”不是指物理时间上的完全重叠,而是指在 etcd 的线性化操作序列中,它们被分配了同一个 Revision。
- 因为一个 Revision 只分配给一个修改操作(或一个原子事务),所以所有拥有相同
mod_revision的 key 的修改,都是由那唯一的一个操作/事务完成的。这些修改对外部客户端来说是不可分割的原子单元。
为什么 Revision 如此重要?
-
提供全局顺序(Ordering):这是 Revision 最基本也是最重要的功能。它给所有修改事件建立了一个清晰、单调递增的逻辑时间线。这是实现 Watch 的 Ordered、Reliable、Resumable、Bookmarkable 保证的基础。客户端可以完全依赖 Revision 的大小来判断事件的先后顺序。
-
实现原子性(Atomicity):通过将整个事务的修改绑定到同一个 Revision 上,确保了事务的原子性视图。客户端要么看到事务的所有修改(在 Revision >= T 之后),要么一个都看不到(在 Revision < T 时)。
- 支持 MVCC(Multi-Version Concurrency Control):
- etcd 是一个多版本存储系统。它不仅仅存储 key 的当前值,还会保留 key 的历史版本(在配置的压缩周期内)。
- 每个历史版本都精确地关联着修改它时对应的 Revision(即该 key 在那个历史时刻的 mod_revision)。
- 客户端可以通过指定 Revision 来读取历史快照(Get with rev parameter)。例如,读取 Revision 1005 时的整个数据库状态或某个 key 的值。
- 实现 Watch 的恢复(Resumable):
- 当 Watch 连接中断时,客户端记录它最后收到的有效事件的 Revision(比如
lastRev)。 - 要恢复监听,客户端只需要创建一个新的 Watch,告诉 etcd 从
start_revision = lastRev + 1开始发送事件。 - 只要
lastRev还在 etcd 保留的历史窗口内(未被压缩),etcd 就能精确地从lastRev+1开始,可靠地(Reliable)发送后续的所有事件,不会丢失也不会重复(Unique)。
- 当 Watch 连接中断时,客户端记录它最后收到的有效事件的 Revision(比如
- 实现乐观锁(Optimistic Locking / CAS):
- etcd 的事务 (Txn) 操作允许进行条件判断(Compare)。最常见的条件就是检查 key 的
mod_revision(或version,后者是 key 级别的修改次数计数器)。 - 例如,实现“如果 key foo 的 mod_revision 等于我上次读取到的值 prevRev(意味着自那次读取后没人修改过它),那么我就更新它;否则更新失败”。这就是 Compare-And-Swap (CAS),是分布式系统中实现并发控制的基础。
- etcd 的事务 (Txn) 操作允许进行条件判断(Compare)。最常见的条件就是检查 key 的
总结:
-
Revision 是 etcd 分配给每个成功修改存储操作的全局单调递增的唯一逻辑时间戳。
-
一个事务操作(
Txn)无论修改多少 key,都只分配一个 Revision。 -
每个被修改的 key-value 对都记录着修改它的操作的 Revision (
mod_revision)。 -
mod_revision的大小定义了 key 修改的全局顺序:大的发生在小的之后。 -
相同的
mod_revision意味着修改由同一个操作(通常是原子事务)完成,是“并发”(原子)发生的。 -
Revision 是 etcd 的核心机制,它:
- 为所有变更提供了全局有序的逻辑时间线。
- 保证了事务的原子性视图。
- 实现了多版本控制 (MVCC) 和历史快照读取。
- 使 Watch 的可靠恢复 (Resumable) 成为可能。
- 是 乐观锁 (CAS) 实现的基础。
理解 Revision 是深入掌握 etcd 工作原理和正确使用其 API(尤其是 Watch 和 Txn)的关键。它把看似离散的操作和事件,统一到了一个严格有序的逻辑时间轴上。
Next steps
Now it’s time to dig into the full etcd API and other guides.
- Read the full documentation.
- Review etcd frequently asked questions.
- Explore the full gRPC API.
- Set up a multi-machine cluster.
- Learn the config format, env variables and flags.
- Find language bindings and tools.
- Use TLS to secure an etcd cluster.
- Tune etcd.
Refer
- https://github.com/etcd-io/etcd
- The Raft Consensus Algorithm
- https://etcd.io/docs/v3.5/
- https://etcd.io/docs/v3.4/op-guide/performance/
- etcd versus other key-value stores
- 一篇文章带你搞懂 etcd 3.5 的核心特性
- How To Set Up and Secure an etcd Cluster with Ansible on Ubuntu 18.04
- https://github.com/kstone-io/kstone
- How To Use Etcdctl and Etcd, CoreOS’s Distributed Key-Value Store
- https://time.geekbang.org/column/intro/100069901